Exporting Analytic Instances
Use the Export Instance page (PTATEXPORT) to export an analytic instance.
Navigation:
This example illustrates the fields and controls on the Export Instance page.
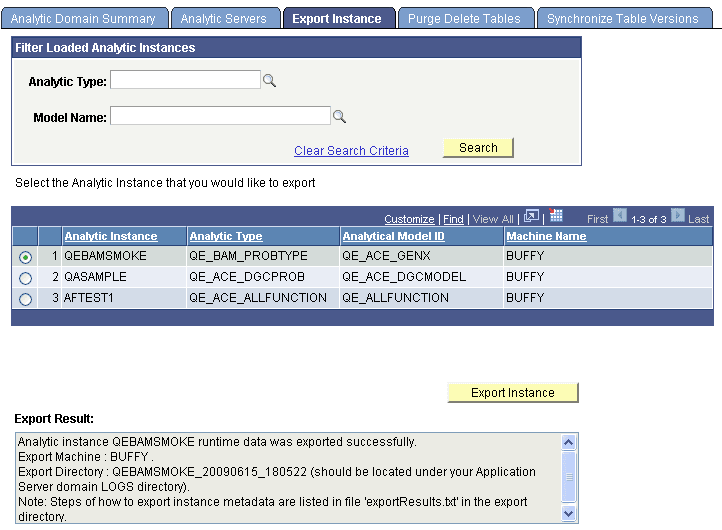
To export an analytic instance:
-
Load the analytic instance.
-
In PeopleSoft Pure Internet Architecture, select
-
Select the Export Instance tab.
-
(Optional) Select whether to filter the loaded analytic instances, either by analytic type or by model name.
-
Click the Search button to display the designated loaded analytic instances.
-
Click the option button to the left of the analytic instance that you want to export.
Although you can load multiple analytic instances, you can export only one at a time.
-
Click the Export Instance button.
The Export Result text box displays the status of the export operation. This message lists:
-
The instance name and whether it was exported successfully.
-
The export machine.
-
The export directory.
-
A message about the exportResults.txt file.
-
-
Retrieve the exportResults.txt file for specific details on how to export this analytic instance.
-
In PeopleSoft Application Designer, create a project that has the same name as the export directory that was created during the export procedure.
Remember, the export process creates a directory whose name consists of the analytic instance name followed by the date and timestamp. For example, if the analytic instance is named ACEINST, the directory might be named ACEINST_20041113_015912.
See Application Designer Developer’s Guide: Understanding Projects, Application Designer Developer’s Guide: Creating and Saving Projects.
-
Select and insert the items listed in the exportResults.txt file into the project.
-
Save the project.
-
Select
-
Select <PS_HOME>\appserv\<domain>\LOGS\<analytic instance><timestamp> as the export directory and then click the Copy button.
-
Zip the contents of <PS_HOME>\appserv\<domain>\LOGS\<analytic instance><timestamp> and send it to PeopleSoft user support.