Managing Tiles on Fluid Homepages and Dashboards
This section contains an overview and discusses:
-
Adding tiles.
-
Using the Add To Homepage feature.
-
Deleting tiles.
-
Copying or moving tiles to other fluid homepages.
Note:
You cannot copy or move tiles between fluid dashboards.
-
Dragging and dropping tiles to reposition them.
Adding Tiles
To add tiles to a fluid homepage or dashboard:
-
Navigate directly to the desired fluid homepage or dashboard.
Note:
You can personalize a fluid dashboard only after navigating directly to the dashboard; it cannot be personalized when displayed inside an activity guide, fluid navigation collection, or master/detail wrapper.
-
From the Actions menu, select Personalize Homepage (or Personalize Dashboard).
-
On the personalization page, click the Add Tile button.
Note:
The Add Tile button is not available on homepages and dashboards that are disabled for end-user personalization.
This example illustrates the Add Tile dialog box, which you use to find and add tiles to fluid homepages and dashboards.
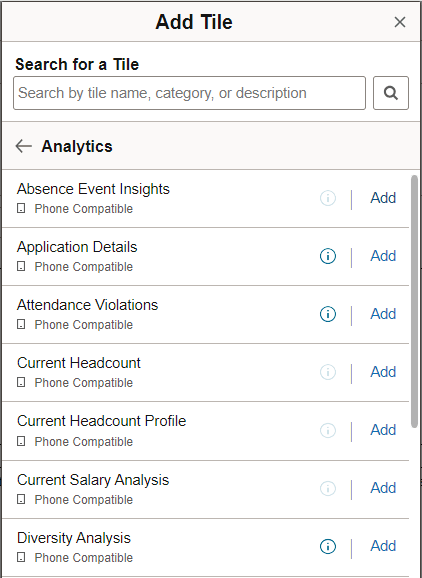
Term Definition 
Indicates that a tile is displayed on a homepage accessed from a small form factor device such as a smartphone. If this icon does not appear next to a tile, you will not be able to see the tile when accessing the homepage using a smartphone. In addition, the tile will not be available for you to add when you are personalizing the homepage using a smartphone. However, you will see the tile on other devices, such as a tablet, laptop computer, or desktop computer.
In the example above, Enter Time would not appear on the homepage if it is accessed using a smartphone and it would not appear in the Add Tile dialog box.

Selecting the Description icon opens a window with a description of the tile and indicating that it can be accessed from a small form factor device. This icon appears only if the tile is compatible with a small form factor device.
Add
Select Add to add the tile to the homepage or dashboard.
-
Find the desired tile using the Add Tile page. You have these options:
-
Enter the name or partial name of the tile in the search box, and click the Search button.
-
Browse through the folders to find the tile.
-
-
Select the tile to be added.
The tile is added to the end of the list of tiles on that fluid homepage or dashboard.
-
Optionally, move the tile to a different position on the homepage or dashboard by dragging and dropping it. See “Dragging and Dropping Tiles to Reposition Them” in a following section for more information.
-
Click Save on the personalization page.
Using the Add To Homepage Feature
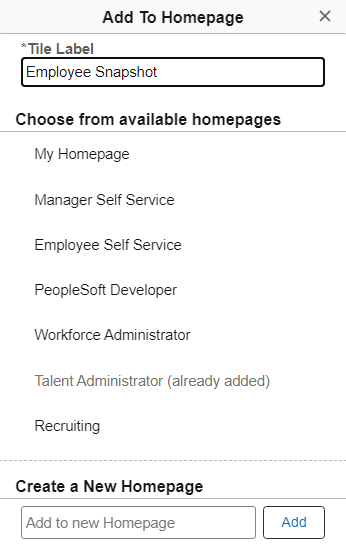
You can also add tiles to fluid homepages on an ad hoc basis using the Add To Homepage link in the Actions menu.
Note:
No actual tile definition will be created for these tiles if one does not exist already. The information is stored in the system as personalization data only.
When you add a tile to a fluid homepage on an ad hoc basis, you can edit and personalize the label for the item. For example:
Deleting Tiles from Homepages or Dashboards
To delete tiles from a fluid homepage or dashboard:
-
Navigate to the desired fluid homepage or dashboard.
-
From the Actions menu, select Personalize.
-
Locate the tile you want to delete from the homepage.
-
Click the Delete button (the trash can icon).
Note:
The Delete button is not available on tiles that are included in homepages and dashboards that are disabled for end-user personalization.
-
Click Save on the personalization page.
Copying or Moving Tiles to Other Fluid Homepages
Note:
You cannot copy or move tiles between fluid dashboards.
To copy tiles to other fluid homepages:
-
Navigate to the desired source homepage.
-
From the Actions menu, select Personalize Homepage.
-
Locate the tile you want to act on.
-
Click the action button in the bottom, right-hand corner of the tile.
-
On the Select Action prompt, select either:
-
Copy To
Note:
When you select the Copy To option on a tile, the system displays a list of possible targets where you can copy the tile. The options on this list include all the homepages where end-user personalization is enabled and where the tile is not already present.
-
Move To
Note:
The Move To option is not available on tiles that are included in homepages and dashboards that are disabled for end-user personalization.
-
-
In the prompt, select the target homepage.
-
Click Save on the Personalize Homepage page
Dragging and Dropping Tiles to Reposition Them
To drag and drop tiles to reposition them on a fluid homepage or dashboard:
-
Navigate to the desired fluid homepage or dashboard.
Note:
You can only drag and drop tiles on the homepage or dashboard if you are within the personalization page. You can no longer drag and drop directly on the homepage or dashboard presentation.
-
Click on the tile you want to reposition.
-
Drag it to the desired location—that is, the current position of another tile.
Note:
You must drop a tile onto another tile for the tile to be repositioned. Dropping the tile into empty space does not trigger the drop function.
-
Drop the tile by releasing it.
To drag and drop tiles to move them to a different fluid homepage:
-
Navigate to the desired homepage.
-
From the Actions menu, select Personalize Homepage.
-
Click on the tile you want to move to a different homepage.
-
Drag the tile and hover it over the desired homepage in the left panel, where each homepage is listed.
-
When the desired homepage is highlighted, release the tile to drop it.
-
Click Save.
Note:
Alternatively, you can use the keyboard to reposition tiles. First, highlight the tile that you want to reposition, press Ctrl + M to select the tile, use the Tab or the arrow keys to highlight the drop location, and then press Ctrl + Alt + M to drop the selected tile.