Implementing Master/Detail Components
While you can clone the delivered PT_MDSTARTPAGE_NUI component and the pages within that component, the following procedure demonstrates how you can reuse the delivered definitions to load the master list from a different component.
To load the master list from a different component:
-
Create a dynamic view record definition—for example, MY_NAVLIST_DVW. Add these fields to the dynamic view:
-
A numeric field for the hyperlink to the target content—for example, LINENUM.
-
A numeric field if a dynamic counter needs to be displayed along with the link—for example, COUNTER.
-
-
Create a derived/work record definition—for example, MY_MDLAYOUT.
Add one field to this derived/work record: GROUPBOX1, a character field.
-
Create a standard page definition—for example, MY_NAVLIST. On the Use tab, select the Fluid Page check box.
-
Add a group box that covers the entire page. On the Fluid tab, define these properties of the group box:
-
In the Style Classes field, enter psc_scroll.
-
For the Group Box Type field, select Layout Only.
-
Select the Scroll Sizing by Style check box.
-
-
Add a grid to the page.
-
Add a group box as the first column to the grid. Associate it with the MY_MDLAYOUT.GROUPBOX1 field. Define these page field properties of the group box:
-
On the Fluid tab, in the Style Classes field, enter ps_vtab.
-
On the Fluid tab, for the Group Box Type field, select Layout Only.
-
-
Define these properties of the grid:
-
On the General tab, select the Unlimited Occurs Count (rows) check box.
-
On the Label tab, click the Display Navigation Bar: Properties button; on the Row Cntr tab, select the Invisible check box. Click OK to close the dialog box.
-
On the Label tab, deselect the following three check boxes: Show Border, Show Row Headings (runtime), and Show Column Headings (runtime).
-
On the Use tab, select the following two check boxes: No Auto Select, and No Auto Update.
-
On the Use tab, for the Grid Layout field, select List Grid Layout (Unordered).
-
On the Fluid tab, in the Style Classes field, enter psc_list-linkmenu psc_wrap psc_list-has-icon psc_list-separator-dark psc_border-standard psc_border-bottomonly psc_list-icons-active.
-
On the Fluid tab, in the Custom Grid Header field, select 0 | None.
-
-
Add a push button/hyperlink as the second column in the grid. Associate it with the MY_NAVLIST_DVW.LINENUM field. Define these properties of the hyperlink:
-
On the Type tab, for the Type field, select Hyperlink.
-
On the Label tab, select the Both check box.
-
On the Fluid tab, for label rendering, select the After Control radio button.
-
-
If you wish to display a dynamic counter as part of the link to the target content, add an edit box as the third column in the grid. Associate it with the MY_NAVLIST_DVW.COUNTER field. Define these properties of the edit box:
-
On the Fluid tab, in the Style Classes field, enter psc_list_count.
-
On the Fluid tab, for the Input Type field, select text.
-
-
Insert a group box around the grid. On the Fluid tab, for the Group Box Type field, select Layout Only.
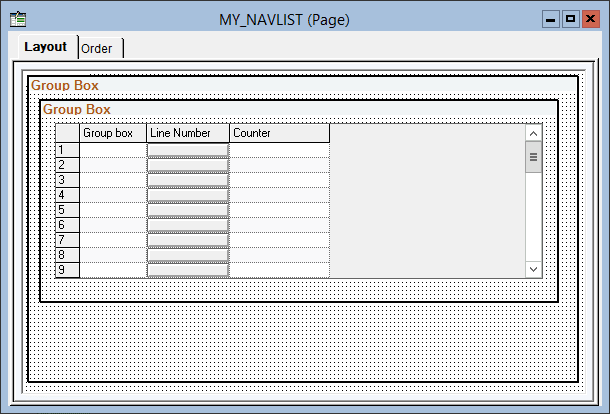
This example illustrates the appearance of the MY_NAVLIST page definition after all items have been added and defined.
-
Add a page Activate PeopleCode program to the page definition. Your PeopleCode program must:
-
Get the initial row from the URL parameters and then set the active row in the master list.
-
For each link in the master list, add a row to the rowset representing the grid on your page.
-
For each link, generate the URL to the target content. For example, use the GenerateComponentContentURL built-in function.
-
Specify this URL as the action URL of the MY_MDLAYOUT.GROUPBOX1 group box field.
-
For the MY_NAVLIST_DVW.LINENUM hyperlink field, specify the item number in the master list, the label to be displayed for this list item, and an optional image.
-
For the optional the MY_NAVLIST_DVW.COUNTER dynamic counter, retrieve and set the dynamic value.
The following example page Activate program creates four items in the master list: a fluid component, a fluid component with additional URL parameters, a classic component, and a fluid dashboard. The same optional image is reused for each list item. In addition, the counter for each item is hard-coded and not dynamically retrieved.
Local string &sNewURL, &sMenu, &sComp, &sPage;
Local number &nRow = 0;

Local Rowset &rs = GetLevel0()(1).GetRowset(Scroll.MY_NAVLIST_DVW);

If &rs <> Null Then
   /* Get the initial row number from the URL. */
   If (%Request.GetParameter("nRow") <> "") Then
      &nRow = Value(%Request.GetParameter("nRow"));
   End-If;
   /* Set the active row in the master list. */
   If (IsGroupletRequest()) Then;
      AddOnLoadScript("DoRowAction(" | &nRow | ");");
   End-If;
   /* Use SetSideTopTitle to maintain the same title in the fluid banner regardless */
   /* of what is displayed as target content. Use a Message Catalog entry.          */
   /* AddOnLoadScript("SetSideTopTitle('" | EscapeHTML("My M/D Component's Title") | "');"); */
   /* Specify the first row in the master list. */
   Local integer &n = &rs.ActiveRowCount;
   &sMenu = "MenuName.MY_MENU";
   &sComp = "Component.MY_COMP1_FL";
   &sPage = "Page.MY_PAGE1";
   &sNewURL = GenerateComponentContentURL(%Portal, %Node, @&sMenu, %Market, @&sComp, @&sPage, "U");
   &rs(&n).MY_MDLAYOUT.GROUPBOX1.SetGroupletActionUrl(&sNewURL);
   &rs(&n).MY_MDLAYOUT.GROUPBOX1.SetGroupletDisplayIn(%GroupletActionMDTargetFluid);
   &rs(&n).MY_MDLAYOUT.GROUPBOX1.IsGroupletLabelOnly = True;
   &rs(&n).MY_MDLAYOUT.GROUPBOX1.Visible = False;
   &rs(&n).MY_NAVLIST_DVW.LINENUM.Value = &n;
   &rs(&n).MY_NAVLIST_DVW.LINENUM.Label = "Fluid Component 1";
   &rs(&n).MY_NAVLIST_DVW.LINENUM.HoverText = "Fluid Component 1";
   &rs(&n).MY_NAVLIST_DVW.LINENUM.LabelImage = @("Image.CHECKLIST_64");
   &rs(&n).MY_NAVLIST_DVW.COUNTER.Value = 5;
   /* Insert another row in the master list. */
   &rs.InsertRow(&n);
   &n = &rs.ActiveRowCount;
   &sMenu = "MenuName.MY_MENU";
   &sComp = "Component.MY_COMP1_FL";
   &sPage = "Page.MY_PAGE2";
   /* Includes additional URL parameters. */
   &sNewURL = EncodeURL(GenerateComponentContentURL(%Portal, %Node, @&sMenu, %Market, @&sComp, @&sPage, "U") | "&CONNGATEWAYID=LOCAL");
   &rs(&n).MY_MDLAYOUT.GROUPBOX1.SetGroupletActionUrl(&sNewURL);
   &rs(&n).MY_MDLAYOUT.GROUPBOX1.SetGroupletDisplayIn(%GroupletActionMDTargetFluid);
   &rs(&n).MY_MDLAYOUT.GROUPBOX1.IsGroupletLabelOnly = True;
   &rs(&n).MY_MDLAYOUT.GROUPBOX1.Visible = False;
   &rs(&n).MY_NAVLIST_DVW.LINENUM.Value = &n;
   &rs(&n).MY_NAVLIST_DVW.LINENUM.Label = "Fluid Component 2";
   &rs(&n).MY_NAVLIST_DVW.LINENUM.HoverText = "Fluid Component 2";
   &rs(&n).MY_NAVLIST_DVW.LINENUM.LabelImage = @("Image.CHECKLIST_64");
   &rs(&n).MY_NAVLIST_DVW.COUNTER.Value = 12;
   /* Insert the third row in the master list. */
   &rs.InsertRow(&n);
   &n = &rs.ActiveRowCount;
   &sMenu = "MenuName.MY_OTHER_MENU";
   &sComp = "Component.MY_CLASSIC_COMP";
   &sPage = "Page.MY_PAGE3";
   &sNewURL = GenerateComponentContentURL(%Portal, %Node, @&sMenu, %Market, @&sComp, @&sPage, "U");
   &rs(&n).MY_MDLAYOUT.GROUPBOX1.SetGroupletActionUrl(&sNewURL);
   /* Classic components require a different value. */
   &rs(&n).MY_MDLAYOUT.GROUPBOX1.SetGroupletDisplayIn(%GroupletActionMDTargetClassic);
   &rs(&n).MY_MDLAYOUT.GROUPBOX1.IsGroupletLabelOnly = True;
   &rs(&n).MY_MDLAYOUT.GROUPBOX1.Visible = False;
   &rs(&n).MY_NAVLIST_DVW.LINENUM.Value = &n;
   &rs(&n).MY_NAVLIST_DVW.LINENUM.Label = "Classic Component 1";
   &rs(&n).MY_NAVLIST_DVW.LINENUM.HoverText = "Classic Component 1";
   &rs(&n).MY_NAVLIST_DVW.LINENUM.LabelImage = @("Image.CHECKLIST_64");
   &rs(&n).MY_NAVLIST_DVW.COUNTER.Value = 1;
   /* Insert the fourth row in the master list. */
   &rs.InsertRow(&n);
   &n = &rs.ActiveRowCount;
   &sMenu = "MenuName.PT_FLDASHBOARD";
   &sComp = "Component.PT_FLDASHBOARD";
   &sPage = "Page.PT_LANDINGPAGE";
   /* Specify which fluid dashboard as a URL parameter. */
   &sNewURL = EncodeURL(GenerateComponentContentURL(%Portal, %Node, @&sMenu, %Market, @&sComp, @&sPage, "U") | "&DB=QE_CHART_DB");
   &rs(&n).MY_MDLAYOUT.GROUPBOX1.SetGroupletActionUrl(&sNewURL);
   &rs(&n).MY_MDLAYOUT.GROUPBOX1.SetGroupletDisplayIn(%GroupletActionMDTargetFluid);
   &rs(&n).MY_MDLAYOUT.GROUPBOX1.IsGroupletLabelOnly = True;
   &rs(&n).MY_MDLAYOUT.GROUPBOX1.Visible = False;
   &rs(&n).MY_NAVLIST_DVW.LINENUM.Value = &n;
   &rs(&n).MY_NAVLIST_DVW.LINENUM.Label = "Chart Dashboard";
   &rs(&n).MY_NAVLIST_DVW.LINENUM.HoverText = "Chart Dashboard";
   &rs(&n).MY_NAVLIST_DVW.LINENUM.LabelImage = @("Image.CHECKLIST_64");
   &rs(&n).MY_NAVLIST_DVW.COUNTER.Value = 0;
End-If;
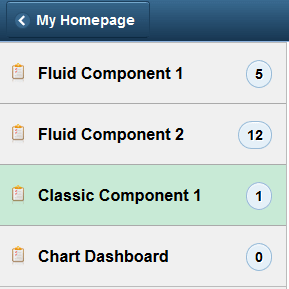
This example illustrates the rendering of the master list based on the preceding PeopleCode example. The initial list item (nRow=2) is selected by default when the master/detail application is opened.
-
-
If you want the master/detail component to maintain the same title in the fluid banner regardless of which page is displayed as target content, then remove the comment and use the SetSideTopTitle JavaScript function to set the title.
-
Create a fluid component definition—for example, MY_NAVLIST:
-
On the Use tab, select INSTALLATION as the search record.
-
Insert the MY_NAVLIST page into the component.
-
-
Use the component Registration Wizard to add the component to a menu and permission list.
Important:
Do not register the component in the portal registry.
-
Manually, create a content reference definition to launch your master/detail application:
-
In the browser, select .
-
Create the content reference definition in the menu folder where you want the menu item to appear.
Note:
To make your master/detail application available as a tile only and not as a menu item in the menu structure, create the content reference definition in the tile repository. See Portal Technology: Understanding Tile Definitions and the Tile Repository.
-
In the content reference definition, specify the delivered PT_MDSTARTPAGE_NUI component in the URL information as follows:
Field or Control Description Node Name
LOCAL_NODE
URL Type
PeopleSoft Component
Menu Name
NUI_FRAMEWORK
Market
GBL
Component
PT_MDSTARTPAGE_NUI
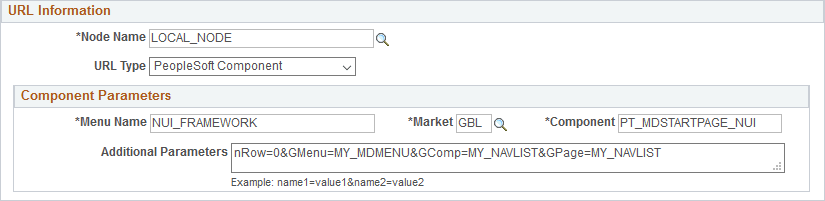
This example illustrates the fields in the URL Information group box for a master/detail application based on the delivered PT_MDSTARTPAGE_NUI.
-
Add four additional parameters to the URL definition to identify the component you created to define your master list:
Field or Control Description nRow
Specify the list item to be displayed when the master/detail is initially opened. A value of 0 represents row 1 in the list.
GMenu
(Required) Specify the menu name you used to register your component.
GComp
(Required) Specify the name of the component containing the master list.
GPage
Specify the name of the page containing the master list.
-
Specify any additional URL parameters required for correct rendering and operation of your master/detail application—for example, whether AJAX transfers are allowed or whether to use the slide-out left panel. See Working with Two-Panel Implementations for more information.
-
When to Clone the Delivered PT_MDSTARTPAGE_NUI Definitions
In some circumstances, to implement a master/detail application, you may want to clone the PT_MDSTARTPAGE_NUI component and the page definitions it includes. These situations include:
-
You need to execute additional initialization PeopleCode for the master/detail component that is not in the PeopleTools-supplied component.
-
You need to use more than one grouplet for the navigation list in the left panel.