Creating Template Secondary Domains
This section discusses how to:
-
Import domain configurations from application domains.
-
Import domain configurations from files.
-
View template secondary domains.
-
Add and delete dispatcher queues from template secondary domains.
-
Restore dispatcher queue lists.
Understanding Template Secondary Domains
Template secondary enable you to dynamically add secondary domains without performing any configuration changes in PSADMIN.
When you create a template secondary domain you import a domain configuration and save it as a template for the secondary domain. This process creates a static secondary domain that uses all of the pub/sub processes and queue lists configured for the domain that you import. If dedicated servers are configured for the domain that you import, they are imported and available on the secondary domain. After you import a domain configuration and save it as a secondary domain, you can add or remove dispatcher queues from the secondary domain as needed.
All template secondary domains must be based on the same primary domain configuration.
Template Secondary Domain Types
There are two options for importing a domain as a template:
| Field or Control | Description |
|---|---|
|
IB Secondary Basic |
When the configuration is imported, all the Pub/Sub processes are configured identically to the domain on which the secondary template is based, including the PSWATCHSRV and PSMONITOR server processes. Other process, such as PSAPPSRV, PSSAMSRV, and so on, are not included in the template secondary domain. However, you can modify the template secondary domain configuration file to include these processes if needed |
|
IB Sync Secondary |
As in the IB Secondary Basic template, when the configuration is imported, all the Pub/Sub processes are configured identically to the domain on which the secondary template is based, including the PSWATCHSRV and PSMONITOR server processes. However, unlike the IB Secondary Basic template, this option imports the PSAPPSRV, JSL, and JREPSVR processes from the domain on which the template is based. In addition you have the option to change the default Jolt port (Jolt port taken from the primary configuration file). |
Understanding Importing Domain Configurations
To import the domain configuration on which the template secondary domain is based, you use the Import Domain Configuration command in PSADMIN. You can import a domain that is already configured in PSADMIN or you can import a domain configuration from a file.
To import a domain configuration from an application domain you specify the location of <PS_CFG_HOME> for the domain that you want to import. For example, the location might be c:\documents and settings\admin\psft\ps\<PS_CFG_HOME>.
To import a PeopleTools 8.49 or earlier application domain you must specify the <PS_HOME> location for <PS_CFG_HOME>. For example, the location might be c:\documents and settings\<PS_HOME>\<PS_CFG_HOME>.
Prerequisites for Importing Domain Configurations
If you are importing a domain that is already configured in PSADMIN, you must first set the PS_FILEDIR environment variable equal to the PS_HOME location of the domain you importing.
If importing a domain configuration from a file, you must first set the PS_FILEDIR environment variable to the location where you are importing the file.
Importing Domain Configurations from Files
To import a domain configuration from a file:
-
Open PSADMIN.
The PeopleSoft Server Administration menu appears.
-
Enter 1 for Application Server and press the ENTER key.
The PeopleSoft Application Server Administration menu appears.
-
Enter 4 for Import Domain Configuration and press the ENTER key.
The PeopleSoft Import Application Server Configuration menu appears.
-
Enter 2 for Import IB Primary Configuration and press the ENTER key.
A Configuration Templates prompt appears.
-
Select one of the following options:
-
Enter 1 to import the domain as an IB Secondary Basic template and press the ENTER key.
-
Enter 2 to import the domain as an IB Sync Secondary template and press the ENTER key.
The PeopleSoft Import Application Server Configuration menu appears.
-
-
Enter 1 for Import from file and press theENTER key.
A prompt displays to enter the full path to the domain configuration file to import.
-
Enter the full path to the domain configuration file to import and press the ENTER key.
A prompt displays to enter a name for the new domain.
-
Enter a name for the new domain and press the ENTER key.
The system merges the domain configuration with the new template secondary domain and creates the new configuration and loads it on the application server. Upon completion, the PeopleSoft Domain Administration menu appears, where you may boot the template secondary domain, configure the template secondary domain or perform other administrative tasks.
Importing Domain Configurations from Application Domains
To import a domain configuration from an application domain:
-
Open PSADMIN.
The PeopleSoft Server Administration menu appears.
-
Enter 1 for Application Server and press the ENTER key.
The PeopleSoft Application Server Administration menu appears.
-
Enter 4 for Import Domain Configuration and press the ENTER key.
The PeopleSoft Import Application Server Configuration menu appears.
-
Enter 2 for Import IB Primary Configuration and press the ENTER key.
A Configuration Templates prompt appears.
-
Select one of the following options:
-
Enter 1 to import the domain as an IB Secondary Basic template and press the ENTER key.
-
Enter 2 to import the domain as an IB Sync Secondary template and press the ENTER key.
The PeopleSoft Import Application Server Configuration menu appears.
-
-
Enter 2 to for Import from application domain and press theENTER key.
A prompt displays to enter the location of <PS_CFG_HOME>.
-
Enter the location of <PS_CFG_HOME> and press theENTER key.
The Tuxedo Domain List appears that lists the application domains that you can import.
-
Enter the number that corresponds to the application domain to import.
A prompt displays to enter a name for the new domain.
-
Enter a name for the new domain and press the ENTER key.
The system merges the domain configuration with the new template secondary domain and creates the new configuration and loads it on the application server. Upon completion, the PeopleSoft Domain Administration menu appears, where you may boot the template secondary domain, configure the template secondary domain or perform other administrative tasks.
Adding and Removing Dispatcher Queues from Template Secondary Domains
This section applies only to asynchronous secondary templates.
Template secondary domains contain all of the dispatcher queues that exist on the domain on which it is based. However, you can add and remove queues to configure the template secondary domain to suit your requirements.
Note:
Before you can add or remove queues from a template secondary, you must inactivate all domains.
The Secondary Templates page (IB_DOMAIN2_SEC) lists the dispatcher queues assigned to each dispatcher process of the template secondary.
This example illustrates the Secondary Templates page. Use this page to view the queues assigned to each dispatcher process of a template secondary.
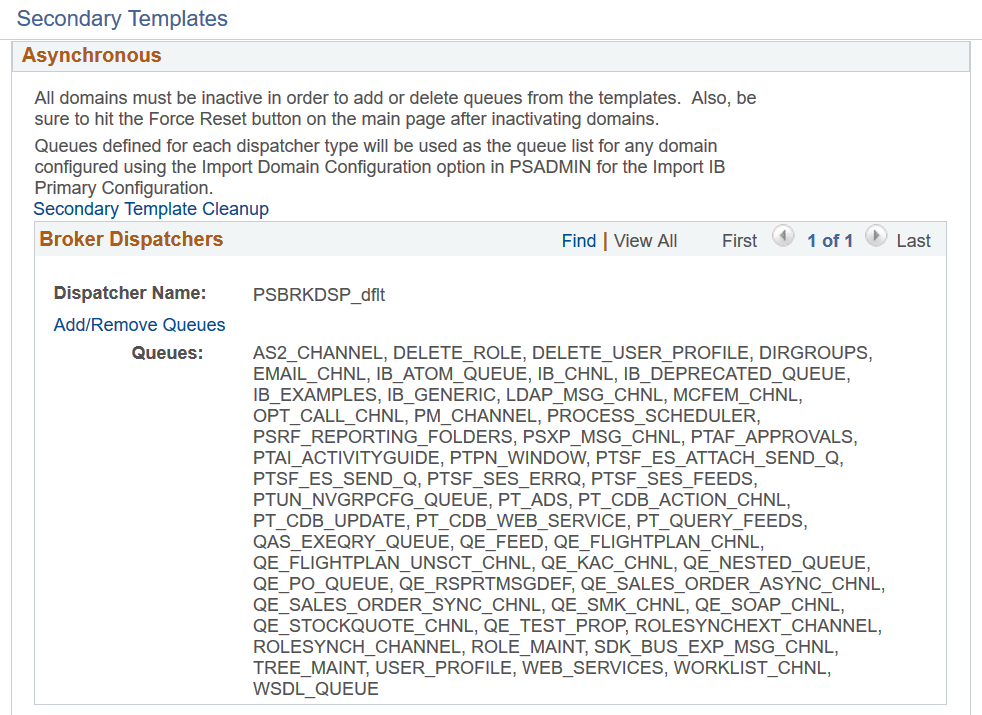
From the Secondary Templates page, you can use the Add/Remove Queues link located under each dispatcher process name to access the Add/Remove Queues page to add or remove queues assigned to the dispatcher.
This example illustrates the Add/Remove Queues page. Use this page to add or remove queues for a dispatcher process of a template secondary.
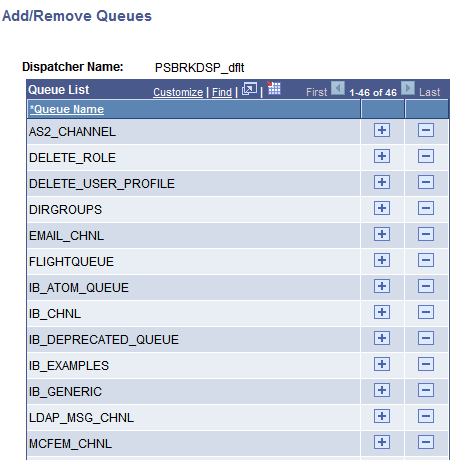
Note that this example shows a partial queue list for the domain.
On the Add/Remove Queues page you can use the plus (+) button to add a queue to the queue list. Use the minus (-) button to remove a queue from the list.
To add or remove dispatcher queues for template secondary:
-
Access the Domain Status page ().
-
Check the All Domains Inactive box and click the Update button.
The Force Reset button appears.
-
Click the Force Reset button to reset any contacts that are in a Started or Working state.
-
Click the Secondary Templates link.
The Secondary Templates page appears.
-
Click the Add/Remove Queues link for a queue dispatcher.
The Add/Remove Queues page appears and displays the queue list for the dispatcher.
-
To add a queue:
-
Click the plus (+) button to insert a new row into the list.
-
Click the Lookup button to search for a queue to add.
-
Click the OK button at the bottom of the Add/Remove Queues page.
The Secondary Templates page appears.
-
Click the Update button.
The Domain Status page appears.
-
-
To delete a queue:
-
Click the minus (-) button next to the queue to delete.
-
Click the OK button in the dialog box to confirm the delete action.
-
Click the OK button at the bottom of the Add/Remove Queues page.
The Secondary Templates page appears.
-
Click the Update button.
The Domain Status page appears.
-
-
Activate the domains in the messaging system.
Check the All Domains Active box and click the Update button to activate the domains.
Restoring Template Secondary Dispatcher Queue Lists
Restoring a queue list deletes any changes you have made to a template secondary dispatcher queue list, and restores it to the queue list that you originally imported from the primary domain.
To restore a template secondary queue list, use the Secondary Template Cleanup page (IB_DOMAIN3_SEC).
This example illustrates the Secondary Template Cleanup page. Use this page to restore dispatcher queue lists to the default settings from the primary domain.
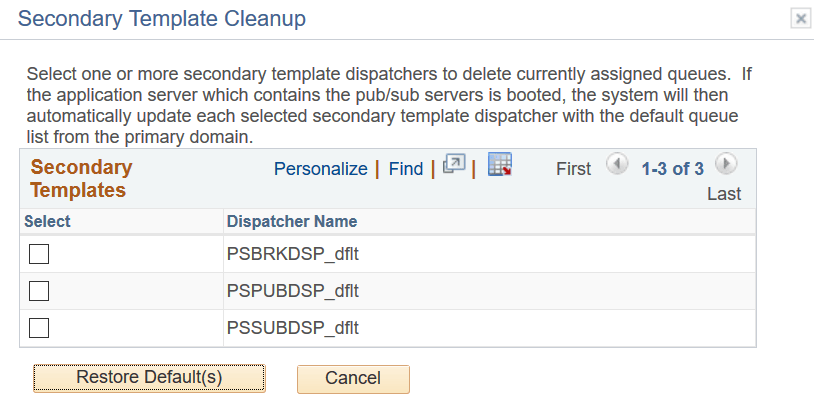
In the previous example, PSBRKDSP_dflt appears in the Dispatcher Name field, meaning that additions or deletions have been made to the queue. In this example, you could use the page to restore the default template secondary dispatcher list for PSBRKDSP_dflt.
To restore a template secondary dispatcher queue list, you must first inactivate all domains on the system.
To restore a template secondary dispatcher queue list:
-
Inactivate the domains on the messaging system:
-
Access the Domain Status page ().
-
Check the All Domains Inactive box and click the Update button.
The Force Reset button appears.
-
Click the Force Reset button to reset any contacts that are in a Started or Working state.
-
-
Access the Secondary Template Cleanup page:
-
From the Domain Status page, click the Secondary Templates link.
The Secondary Templates page appears.
-
On the Secondary Templates page, click the Secondary Template Cleanup link.
The Secondary Template Cleanup page appears.
-
-
Check the box next to each dispatcher process name for which you want to restore the default queue list.
-
Click the Restore Default(s) button.
The Domain Status page appears.
-
Activate the domains in the messaging system.
Check the All Domains Active box and click the Update button to activate the domains.