Setting Up the Integration Network Monitor
Use the Network Monitor Setup page (IB_INTNET_MONSETUP) to set up Integration Network Monitor and Transactional Tracker options, such as the number of rows to display in the monitor, date/time ranges for query results, and more.
To access the page, select and click the Network Monitor Setup link.
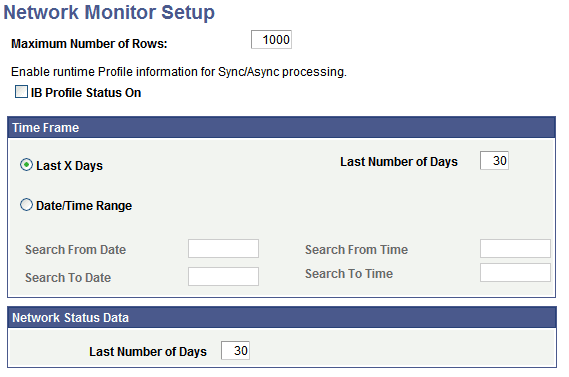
This example illustrates the fields and controls on the Network Monitor Setup page.
Specifying the Number of Rows to Return
Use the Maximum Number of Rows field on the Network Monitor Setup page to specify the number of rows to return as search results. The default value is 1000 rows.
There is no minimum or maximum value that you can set for this parameter. Consider integration volume when setting this value.
Enabling Integration Broker Performance Statistics
Check the IB Profile Status On field on the Network Monitor Setup page to enable the collection and display of runtime Integration Broker performance statistics.
Defining Date and Time Ranges for Query Results
Use the Time Frame section on the Network Monitor Setup page to define the date and time range in which query results should fall.
By default, the system returns search results for activity that has taken place in the past 30 days. However, you change the day range, or set parameters based on date and time ranges.
To define a date range in which query results are to fall:
-
Select the Last X Days radio button.
-
In the Last Number of Days field, enter a value.
By default the value is 30, and the system returns query results for the last 30 days of activity.
To define a date and time range in which query results are to fall:
-
Select the Date/Time Range radio button.
-
Select the date range.
-
In the Search from Date field, enter the start date of the date range.
Alternatively, click the calendar icon to select a date.
-
In the Search to Date field, enter the end date of the date range.
Alternatively, click the calendar icon to select a date.
-
-
Select the time range.
-
In the Search from Time field, enter the start time of the time range.
-
In the Search to Time field, enter the end time of the time range.
Time field format is HH:MI:SS.999999, where HH represents hours, MI represents minutes, SS represents seconds, and 999999 represents microseconds.
-
Defining the Date Range of Network Status Query Results
In the Network Status Data section, select the number of days for which to return results of network status information for the Network Status page.
The default value is 30 days.