Using Automated Integration Processing Verification
This section discussed how to:
-
View the status of automated network integration processing verification.
-
Enable and set up automated network integration processing verification.
-
Propagate integration processing verification to network nodes.
-
View results of automated network integration processing verification.
Viewing the Status of Automated Integration Processing Verification
The Auto Network Sync section of the Network Status Setup page provides a read-only Enabled/Disabled toggle field that indicates if automated integration processing verification is enabled.
To access the Network Status Setup page, select The Network Status page appears. Click the Network Status Setup link.
This example illustrates the fields and controls in the Auto Network Sync section of the Network Status Setup page.
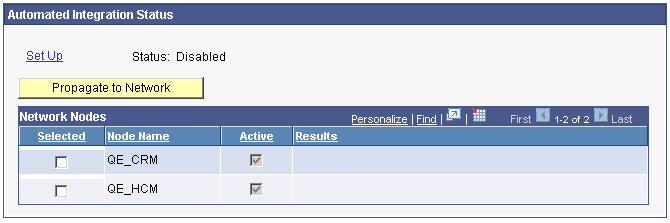
In the previous example, the term Disabled appears in the Auto Network Sync section of the page, indicating that automated integration processing verification is not enabled.
Enabling and Setting Up Automated Integration Processing Verification
Use the Automated Integration Status page (IB_INTNET_STAT_SEC) to enable and set up automated integration processing verification. To access the page, from the Network Status Setup page click the Set Up link in the Auto Network Sync section of the page.
This example illustrates the fields and controls on the Automated Integration Status page. You can find definitions for the fields and controls later on this page.
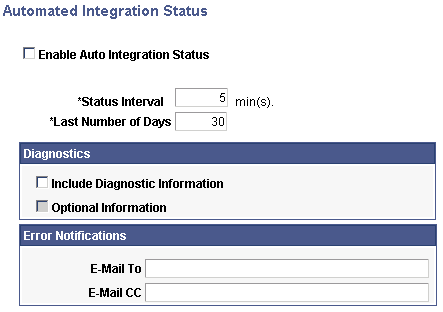
The page features the following fields and controls:
| Field or Control | Description |
|---|---|
|
Enable Auto Integration Status |
Select the box to enable automated integration processing verification. |
|
Status Interval |
Enter the frequency in minutes that the system performs integration processing verification. The default value is 5 minutes. |
|
Last Number of Days |
Indicates the time range the system uses for reporting integration processing verification. The default value is 30 days. |
|
Include Diagnostic Information |
(Optional.) Select the box to generate system diagnostic information, such as dispatcher name, number of active handlers, and so on, should an error occur. |
|
Optional Information |
(Optional.) Select the box to generate information such as the number of transactions in retry status, memory available, and so on, in addition to system diagnostic information. This control is enabled only after the Include Diagnostic Information box is selected. |
|
E-Mail To |
Enter the email address to notify in the event of an error. Separate multiple addresses with a semicolon. |
|
E-Mail CC |
(Optional.) Enter the email address to copy on a notification if an error occurs. Separate multiple address with a semicolon. |
To enable and set up automated integration processing verification:
-
Access the Automated Integration Status page ( The Network Status page appears. Click the Network Status Setup link. The Network Status Setup page appears. Click the Set Up link. The Auto Network Sync page appears.
-
Select the Enable Auto Integration Status box.
-
In the Status Interval field enter interval between checks, in minutes, for verifying processing.
-
In the Last Number of Days field enter the number of days for which to verify processing.
-
(Optional.) Select the Include Diagnostic Information box for the system to return diagnostics if the system determines integrations are not being processed.
-
(Optional.) Select the Optional Information box for the system to return additional diagnostics information if the system determines integrations are not being processed.
-
In the E-Mail To field, enter one or more email addresses to notify if the system detects errors in integration processing.
-
In the E-Mail CC field, enter one or more email addresses to copy on notifications of errors in integration processing.
-
Click the OK button.
Propagating Network Integration Processing Verification to Network Nodes
After you enable and select automated integration processing verification options, use the Network Status Setup page to select the nodes with which to perform network integration processing verification and to propagate the verification options to those nodes.
The propagate to network feature enables you to enable automated network integration processing verification on selected network nodes and push verification options to those nodes, without the need to manually set the options on each system.
To propagate network integration processing verification to network nodes:
-
Access the Network Status Setup page ( The Network Status page appears. Click the Network Status Setup link. The Network Status Setup page appears).
-
In the Network Nodes grid in the Automated Integration Status section of the page, check the box next to each node to include in integration processing verification.
-
Click the Propagate to Network button.
Results of the action appear in the Network Node Status Results grid.
Viewing Results of Automated Network Integration Processing Verification
When automated network integration processing verification is enabled and the system detects processing errors, it sends a notification to the email address(es) defined in the Auto Network Sync page. If during set up you selected the diagnostics option, diagnostic information is included in the notification.
Upon receipt of a notification, troubleshoot any errors by using pages and tools provided in the Integration Network, including:
-
Manual network processing verification described previously in this topic.
-
Integration Network Monitor. See Using the Integration Network Monitor
-
Transactional Tracker. See Using the Integration Network Transactional Tracker