Configuring REN Servers and SSL-Enabled REN Servers
Specify REN server configuration parameters based on your network topology and server arrangement.
Define the parameters for REN server configuration in three locations:
-
Authentication token domain, set during PeopleSoft Pure Internet Architecture installation or in web profile configuration.
-
REN server configuration parameters, specified in an application server domain using PSADMIN.
-
REN server parameters, including cluster and browser URLs, set in the PeopleTools REN Server and REN Cluster components.
Configuration parameters that are set in the REN Server and REN Cluster components override any defaults in PSADMIN.
Authentication Domain
The authentication domain tells PeopleSoft Pure Internet Architecture the internet domain name that browser clients use when accessing PeopleSoft applications across the internet. The token is required to comply with the same-origin security policy that is enforced by most browsers. The domain name that is specified in the REN Server Configuration page must be identical to the domain name that is specified as the authentication token domain during PeopleSoft Pure Internet Architecture installation.
If authentication domain is not set during PeopleSoft Pure Internet Architecture installation, define the authentication domain in web profile configuration to match the REN server configuration.
Note:
You must specify the authentication token domain if you access the REN server and the PeopleSoft Pure Internet Architecture web server using different DNS names from the browser client (for example, if they are on different machines).
Configuring a REN Server and SSL-Enabled REN Server with PSADMIN
If necessary, you can specify parameters in the PSRENSRV section of the PSADMIN application server domain configuration, as illustrated in the following example:
This example illustrates the parameters in the PSRENSRV section of the PSADMIN application server domain configuration.
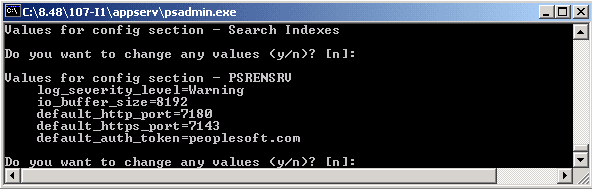
Specify parameters as described in the following table:
| Parameter | Default | Description |
|---|---|---|
|
log_severity_level |
Warning |
This is the logging level for the REN server. Select from one of the following log severity levels, from less to more logged data: Error, Warning, Notice, Debug. Note: Do not use Debug in a production environment. |
|
io_buffer_size |
8192 |
This is the TCP buffer size in bytes that is used for serving content. Do not exceed a value of 65536. If the REN server is running on Microsoft Windows, change io_buffer_size to a minimum value of 56000. |
|
default_http_port |
7180 |
This is the REN server's HTTP port. The default value is 7180. The default_http_port parameter takes effect only when a REN server starts up for the first time and the database does not already contain configuration information for the REN server. Note: After the HTTP port number that is assigned to the REN server has been established in the database, the only way to change it is on the REN Server Definition page. Editing the port number in the psappsrv.cfg file does not overwrite the value that is stored in the database. |
|
default_https_port |
7143 |
This is the REN server's HTTPS port for SSL-enabled REN server. The default value is 7143. Note: The https port is used only when the REN server is SSL-enabled. The default_https_port parameter is configured in psappsrv.cfg and is used when a SSL-enabled REN server starts up for the first time. Note: To change the default https port, use the REN Server Definition page. Changing the SSL Port requires the reboot of the REN server. |
|
default_auth_token |
example.com |
This is the fully qualified domain name of the application server. This value should match the value of the web server's authentication domain. The default_auth_token parameter takes effect only when a REN server starts up for the first time and the database does not already contain configuration information for the REN server. When configuring the REN server parameters through PSADMIN, do not place a period or dot (.) before the default_auth_token value. For example, the parameter should read default_auth_token=example.com |
Access logging is no longer enabled by
default. In order to enable access logging, remove the leading #(hash) from this line in the
“Modules to load” section of the psrenconfig.txt file.#ns_param nslog ${bindir}/${prefix}rennslog${ext}
The configuration for REN server and for any REN clients must be updated to restrict REN server communication to TLS version 1.3.
To update the REN server configuration, set the following parameters in the psrenconfig.txt file:
-
ns_param ServerProtocols tlsv1_3
-
ns_param SockServerProtocols tlsv1_3
-
ns_param SockClientProtocols tlsv1_3
After specifying REN server configuration parameters, be sure to specify Y (Yes) when asked if you want event notification configured and MCF server configured. Boot this domain from the Domain Administration menu.
Note:
Use PeopleSoft Pure Internet Architecture REN server definition and configuration pages to modify configuration parameters whenever possible. REN server configuration parameters that you make using PSADMIN are written to the psappsrv.cfg file in the application server directory. REN server configuration values that are found in the database override any values that are found in psappsrv.cfg.
Use static IP addresses for your web servers. If you use dynamic IP addresses (DHCP), ensure that the domain name server (DNS) can map fully qualified domain names to the dynamic IP addresses.
Socket Binding
The REN server listens
on the port that is defined in the REN Server Definition page, which
is by default 7180. However, the host name to which the REN server
binds is determined by information in the psrenconfig.txt file for
each application server domain. If the host machine contains multiple
network interface cards (NICs), then the REN server binds by default
to only one NIC, which is given by uname() on Unix,
or GetComputerName() on Microsoft Windows.
To bind a REN server to a specific NIC, manually edit psrenconfig.txt for the appropriate application server domain, changing both set address and set hostname to the IP address and locally-known host name of the NIC. For example:
set address			192.0.2.10
set hostname		myserver.example.com
Note:
If you enter an invalid IP address in the psreconfig.txt file, the REN server may not start correctly. Check the REN server log for error messages that identify the issue.
Note:
To configure a REN server with a virtual machine name, manually enable the #ns_param javascript_kn_server parameter in the psrenconfig.txt by removing # (hash) from the parameter.
Configuring TCP_NODELAY
The parameter, TCP_NODELAY in psrenconfig.txt controls whether to disable the TCP Nagle algorithm on the TCP packets sent by the REN server. Two instances of TCP_NODELAY are available in psrenconfig.txt. TCP_NODELAY in the nssock section is used by non-SSL REN servers, and the instance in the nsopenssl section is used by SSL-enabled REN servers. The TCP Nagle algorithm is generally enabled by default and inserts a short delay before sending small TCP packets. This helps prevent network overload.
If TCP_NODELAY is set to 0, the TCP algorithm acts normally. This is the recommended configuration for most applications. However, for certain CTI applications, this parameter must be set to 1 to improve performance. If TCP_NODELAY is set to 1, the TCP Nagle algorithm is disabled on operating system platforms that support disabling this feature.
Configuring SSL Receive Parameters
In the REN server, the SSLReceiveTimeout and SSLReceiveWaitTime parameters are used to control the time to wait when there is a delay in receiving a TCP packet. To optimize the performance of REN server while receiving data, set the following values for these parameters in the nsopenssl section of the psrenconfig.txt file:
-
ns_param SSLReceiveTimeout 300
-
ns_param SSLReceiveWaitTime 10