Configuring Remote Content
Configuring remote content creates access to the menu structure of the remote system within the main menu of the portal system. When a remote folder or content reference is added to the main menu of the portal system, it can be added under a unique local parent folder. Alternatively, multiple remote folders or content references can be added under a single local parent folder.
To add remote folders and content references to the main menu of the portal system:
-
Access the Configure Unified Navigation navigation collection. (See Configure Unified Navigation Fluid Navigation Collection.)
-
In the Configure Unified Navigation navigation collection, expand the Unified Navigation Setup section and click the Select Remote Content link to open the Configure Drop Down Menu page in the target area.
This example illustrates the fields and controls on the Configure Drop Down Menu page. You can find definitions for the fields and controls later on this page.
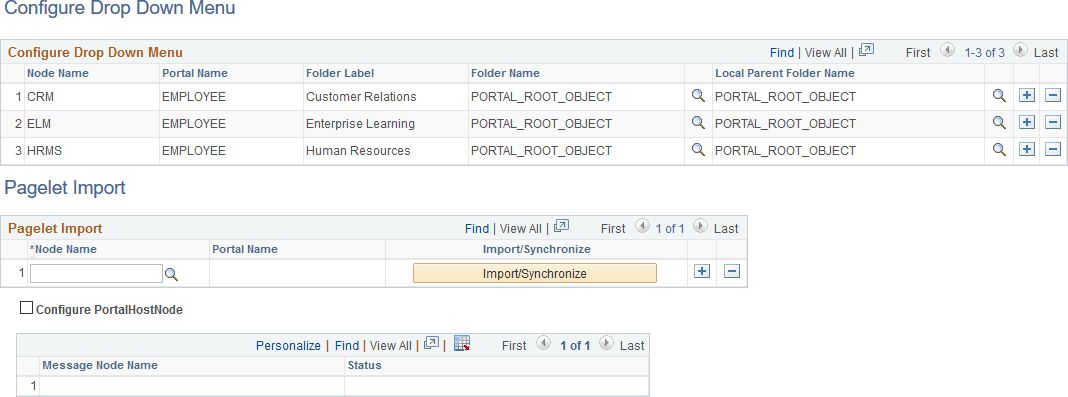
| Field or Control | Description |
|---|---|
|
Node Name |
Select a portal host node from the list of defined content provider nodes. Note: While default local nodes are also listed, use the portal host node for the content provider. |
|
Portal Name |
The current portal name is automatically filled in after you select the remote folder or local parent folder. |
|
Folder Label |
Enter the label for the new folder as it will appear in the designated portal system's main menu. Note: Do not use the following special characters in the labels for a remote folder: { } #. |
|
Folder Name |
Click the lookup button, navigate the tree of folders, and select the remote folder from the content provider node. Note: The selected remote folder and all menu items and subfolders contained within it will be available in the main menu on the designated portal system. |
|
Local Parent Folder Name |
Click the lookup button, navigate the tree of folders, and select the parent folder on the designated portal system. |
|
Pagelet Import |
The Pagelet Import grid is discussed in a different topic. See Importing Pagelets from Content Provider Systems. |
|
Configure PortalHostNode |
Important: Whenever you add a remote folder to the unified navigation configuration, you must always select the Configure PortalHostNode check box before saving the configuration. In a unified navigation configuration, the Configure PortalHostNode field ensures that the Home, Notifications, Logout options on the portal system’s header point to the portal system. |
Configuring Multiple Remote Folders in the Same Local Parent Folder
Two or more remote folders can be configured under the same local parent folder. To configure multiple remote folders:
-
In the Configure Drop Down Menu grid, click the Add row button to add a new row.
-
In the Node Name field, enter or select a portal host node from the list of defined content provider nodes.
-
In the Folder Label field, enter the label for the new folder as it will appear in the portal system's main menu.
Important:
Do not use the following special characters in the labels for a remote folder: { } #.
-
In the Folder Name field, click the lookup button, navigate the tree of folders, and select the remote folder from remote content provider node.
-
If the next remote folder is on the same remote node, skip to the next step. Otherwise, in the Node Name field, enter or select a different portal host node from the list of defined content provider nodes.
-
In the Folder Name field, click the lookup button, navigate the tree of folders, and select the remote folder from remote content provider node.
-
Repeat steps 5 and 6 for each remote folder to be added under the local parent folder.
-
In the Local Parent Folder Name field, click the lookup button, navigate the tree of folders, and select the local root folder on the portal system.
-
Click Save to save the configuration.
In the following example, the local folder labelled Self Service includes two remote folders from different content providers: CRM:CO_EMPLOYEE_SELF_SERVICE and HRMS:CO_EMPLOYEE_SELF_SERVICE.
