Securing and Sharing Report Requests in Windows Clients
In Windows Client of PeopleSoft nVision, you have the flexibility of making report request either public or private. By default, all nVision report requests created in Windows clients are public.
All users who create and view reports must have the required privileges to use the Business Unit from which the reports are generated. If the report creators define the report as secured, other users can use the secured reports only if the report creators have transferred the reports to them. For example, if user A creates a report request and shares it with user B, then only user B will have access to that report request. However, in the same client session, if the Open PeopleSoft nVision Report Request dialog box or the PeopleSoft nVision Report Request dialog box still retains the shared report request information, user A will have a temporary access to the shared report request. When these dialog boxes are refreshed with other report requests information or the client session is closed, then user A will no longer have the access to the shared report request.
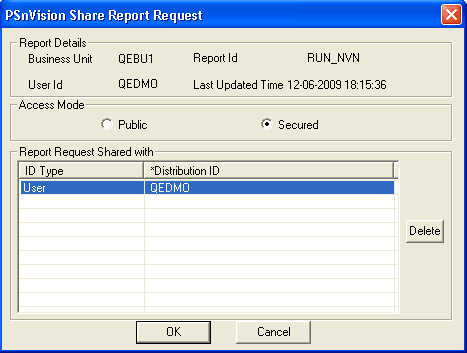
Report creators can use the nVision Share Report Request dialog box to change the access mode of reports from public to private, and vice versa.
This example illustrates the fields and controls on the nVision Share Report Request dialog box.
Securing Report Requests in PS/nVision Windows Clients
To secure report requests in PS/nVision Windows clients:
-
Select from the nVision toolbar.
The PeopleSoft nVision Report Request dialog box appears.
-
Enter the required values for the new report request, and click the Save button.
-
Click the Run button to generate the report instance.
-
Select from the nVision menu.
The Share Report Request dialog box appears.
-
Accept the default settings of Secured.
-
Double-click the ID Type field.
A list of contain values for ID type appears.
-
Select an user to share this report instance with.
Alternatively, select a roles to share this report instance to users with certain roles.
-
After selecting ID type or role, double-click the Distribution ID field or the Distribution List field.
If the ID type cell is User, a list of users appears. If the ID type cell is Roles, a list of roles appears.
-
Optionally, repeat step 6 to 8 for adding other users and roles.
-
Click the OK button to make the report instance secured.
Sharing Report Requests in PS/nVision Windows Clients
To share report requests in PS/nVision Windows clients:
-
Select from the nVision toolbar.
The PeopleSoft nVision Report Request dialog box appears.
-
Enter the required values for the new report request, and click the Save button.
-
Click the Run button to generate the report instance.
-
Select from the nVision menu.
The Share Report Request dialog box appears.
-
Select the Public option to make the report instance public.
A message appears for confirmation of this report instance to be available to all users.
-
Click the OK button to make the report instance public.
Alternatively, click the Cancel button to keep the report instance secured and viewed only by the shared users.
Removing User or Role From the Secured Distribution List
To remove an user or a role from the secured distribution list:
-
Select from the nVision toolbar.
The PeopleSoft nVision Report Request dialog box appears.
-
Enter the required values for the new report request, and click the Save button.
-
Click the Run button to generate the report instance.
-
Select from the nVision menu.
The Share Report Request dialog box appears.
-
Select the required user to be removed, and click the Delete button.
Alternatively, select the required role to be removed, and click the Delete button.
-
Click the OK button to confirm that the selected user or role will be deleted.
-
Optionally, repeat step 5 and 6 for removing other users and roles.
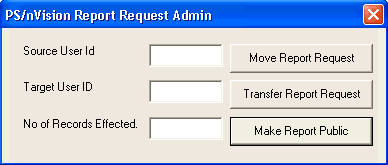
Setting Report Request Admin
Report creators can also use the PS/nVision Report Request Admin dialog box to transfer the private reports to other users for use.
To access the PS/nVision Report Request Admin dialog box:
-
Open nVision client by selecting
-
Create a new nVision report, or open an exiting one.
-
Select from the menu.
The PS/nVision Report Request Admin dialog box appears.
This example illustrates the fields and controls on the nVision Report Request Admin dialog box, which enables report creators to move reports from one user to another user.