Step 1: Enter Connected Query Name and Descriptive Information
Use the Connected Query Quick Start - Step 1 (CQ_WZ_INFO) to enter a connected query name and descriptive information, and define ownership of the connected query.
Navigation:
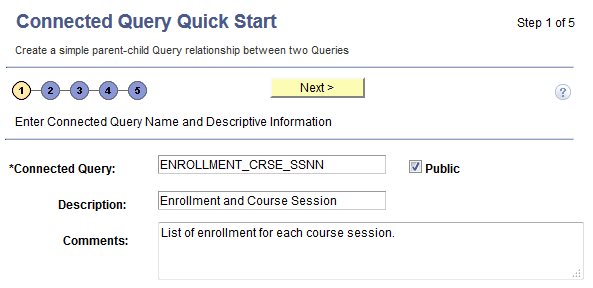
This example illustrates the fields and controls on the Connected Query Quick Start - Step 1. Definitions for the fields and controls appear following the example.
| Field or Control | Description |
|---|---|
|
Connected Query |
This is a required field. Enter a name for the connected query. Note: The name of the connected query cannot be changed after you enter the name into the Select a Child Query page of a Connected Query Quick Start. Because Connected Query uses query name as an XML node, query names used in a Connected Query must follow these naming rules:
If a query name starts with an alpha or underscore [ _ ] character, the query node name in an XML file will be the same as the query name. Otherwise, the query node name will be the query name with the prefix PS_. For example:
|
|
Public |
Indicate the query ownership. If the Public check box is selected, this connected query will be public. If the Public check box is not selected, this connected query will be private. Note: The ownership of the connected query cannot be changed after you enter data into the Select a Child Query page of a Connected Query Quick Start. |
|
Description |
(Optional) Enter a description for the connected query. |
|
Comments |
(Optional) Enter comments for the connected query. |
|
Next |
Note: The Next button is available after you enter the name of the connected query in the Connected Query field and move to any other field. Click to advance the wizard to the next page. |