Setting Page Permissions
Access the Permission Lists - Pages page (select and click the Pages tab).
This example illustrates the fields and controls on the Permission Lists - Pages page.
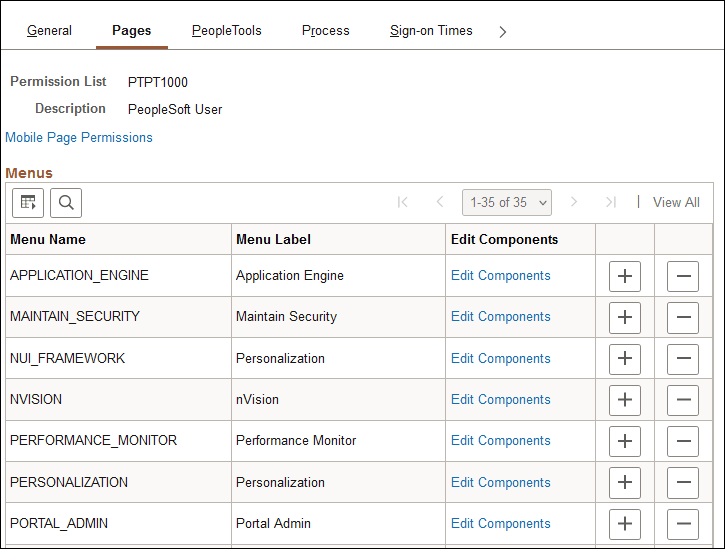
This table describes the fields on the Pages page.
| Field or Control | Description |
|---|---|
|
Mobile Page Permissions |
Click to grant access to mobile application pages. Important: PeopleSoft Mobile Agent is a desupported product. These features exist for backward compatibility only. |
|
Menu Name |
Displays all menu names in the database. Add new rows to add more menu names. The name reflects the definition name in PeopleSoft Application Designer. |
|
Menu Label |
Displays the menu label associated with the PeopleSoft Application Designer menu name. |
|
Edit Components |
Click to grant access to specific pages. |
Page permissions refer to the pages to which a user has access. Pages are contained within components, which are ultimately contained within a menu name. To grant access to a particular page, determine the component it is in and the menu name the component falls under. This enables you to drill down to the appropriate page.
When you click the Edit Components link, the Component Permissions page appears:
This example illustrates the fields and controls on the Component Permissions page.
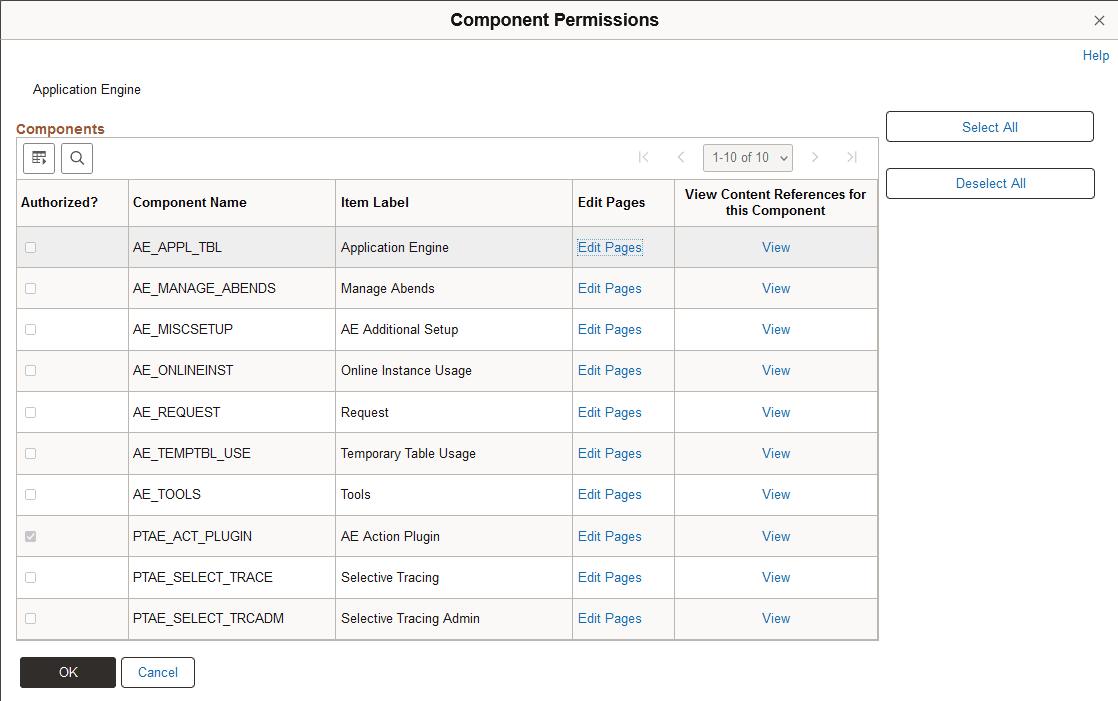
This table describes the fields on the Component Permissions page:
| Field or Control | Description |
|---|---|
|
Authorized |
This field indicates whether at least one page in the component is authorized for current the permission list. This field is display-only. |
|
Component Name |
This field indicates the component where the pages reside. This field is display-only. |
|
Item Label |
This field indicates the item label on the menu definition where the component resides. This field is display-only. |
|
Edit Pages |
Click this link to grant access to individual pages and the appropriate actions. |
|
View Content References for this Component |
Click this link to access the content reference. |
When you click the Edit Pages link, the Page Permissions page appears:
This example illustrates the fields and controls on the Page Permissions page.
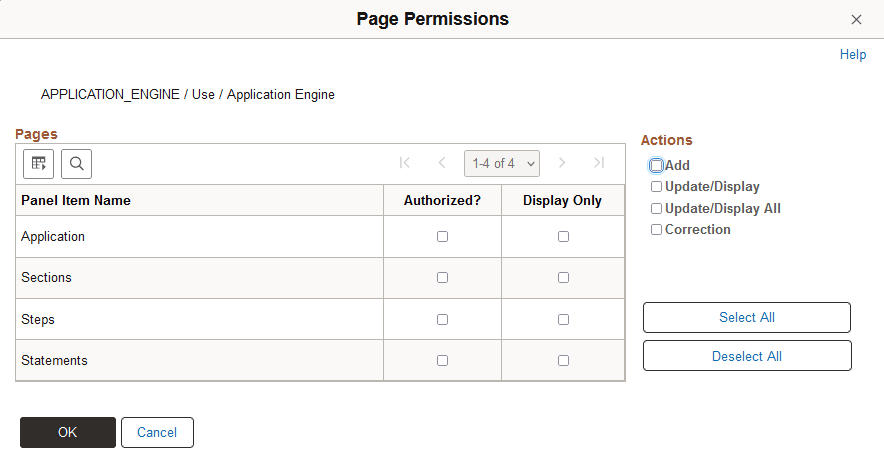
This table describes the fields on the Page Permissions page:
| Field or Control | Description |
|---|---|
|
Panel Item Name |
This is the name of the panel item as entered in the component in Application Designer. This field is display-only. |
|
Authorized? |
Select this check box to authorize user access to the page. |
|
Display Only |
Select this check box to authorize view only user access to the page. No fields are active when this check box is selected. |
|
Actions |
Select from the following check boxes: Add: The user can create new high-level key information through the search page. Update/Display: The user can view the current row. The user can view, insert, and update future rows. Update/Display All: The user can view the history and current rows. The user can view, insert, and update future rows. Correction: The user can view, insert, and update history, current, and future rows. Note: Only actions that are selected in the component definition in Application Designer are enabled. |
Note:
To find the name of a menu, component, or page, you can press Ctrl+J or Ctrl+Alt+J while accessing the page with the browser (the keyboard shortcut differs depending on the browser you use), or use the Find Definition References feature in PeopleSoft Application Designer.
Granting access to PeopleTools and PeopleSoft applications requires serious consideration. For each role, carefully consider what the members of that role must access to complete their jobs and to what degree they need access. Then make the appropriate permission lists.
After you add a menu name, you grant access to its components and pages on an item-by-item basis. In PeopleSoft applications, menu items represent components. If a component consists of more than one page, then selecting the menu item opens another layer with more items—individual pages. For example, if you added the UTILITIES menu name to a permission list, you could then grant access to the Utilities, Use menu items but not to the Utilities, Process menu items. Alternatively, you could grant access to only a few of the Use menu items or make some items display only.
You grant access permission to two categories of components:
-
All PeopleSoft applications.
-
Page-driven PeopleTools.
Note:
With PeopleTools programs, the process of editing menu items varies. With page-based PeopleTools, such as PeopleSoft Process Scheduler, you can grant access to menu items just as you can for PeopleSoft applications. However, the other PeopleTools programs do not allow you to grant item-by-item access; you can either access all the menus and menu items or you cannot. PeopleSoft Application Designer is an exception; you can restrict access to it at the definition level.
Granting Access to Components and Pages
The following procedure describes how to set access permissions to your PeopleSoft applications and your page-driven PeopleTools. You begin at the component level and drill down to the page level, making the appropriate selections as you go.
Note:
The same procedure applies to both PeopleSoft applications and page-driven PeopleTools.
To add access to PeopleSoft components and pages:
-
Locate the menu name of the component to which you want to add access.
-
Click Edit Components.
The Components page appears.
-
Locate the component to which you want to grant access.
By default, when adding a new permission list, no components are authorized.
-
Click the Edit Pages button associated with each component to which you want to grant access.
The Page Permissions page appears. You specify the actions that a user can complete on this page. You can select from these options for each page that appears in the Page column:
-
Authorized?
Select to enable a user to access the page. Decide the degree to which a user is authorized on a page by selecting Display Only or one or more of the available options in the Actions group.
-
Display Only.
Select to enable the user to view the information provided by the page but not to alter any data.
-
Actions.
Specify how users can alter information on a page, such as Add, Update/Display, and Correction. The available options depend upon the options selected when the page was initially developed in PeopleSoft Application Designer.
To grant access to all pages and all actions for each page, click Select All.
-
-
When you have finished making the appropriate selections, click OK on the Page Permissions page, and then again on the Component Permissions page.
Repeat each step for each menu name.
Note:
After you delete access to a component or iScript, you must clear the browser cache or wait for 20 minutes (default time) for the deletion to appear in the menu.
Granting Access to Mobile Pages
To add access to mobile pages:
Important:
PeopleSoft Mobile Agent is a desupported product. These features exist for backward compatibility only.
-
Select , and select the Pages page.
-
Click the Mobile Page Permissions link.
The Mobile Page Permissions page appears.
-
To add a new mobile page to the permission list, click the plus sign.
-
For the Mobile Page Name edit box, click the search button.
-
Search for and select the mobile page for which you need to grant access.
-
Click OK.
-
Save the permission list.