Working with the Single Signon Page
Access the Single Signon page (select ).
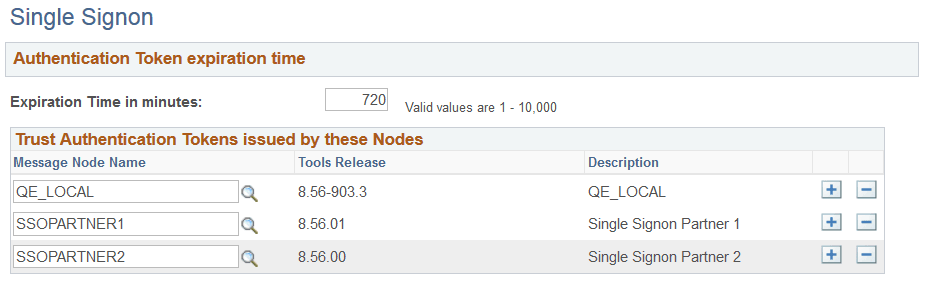
This example illustrates the fields and controls on the Single Signon page. You can find definitions for the fields and controls later on this page.
| Field or Control | Description |
|---|---|
|
Expiration time in minutes |
You need to set an expiration time for tokens this system accepts for authentication. Otherwise, once the user is authenticated, the user could be authenticated and signed on to the system with the token for as long as it stays up and running. You can set the authentication interval to be minutes, hours, or days depending on your signon strategy. The value is in minutes. For example, 480 minutes is 8 hours. This is global setting for all users of your PeopleSoft system that get issued the cookie. A short expiration period is more secure, but less convenient because users need to enter their passwords more frequently. The system accepting the token controls the expiration time, not the issuing system. For example, Node HCM_WEST, which has an expiration time of 100 minutes, issues a token to a user. The user attempts to use that token to sign in to Node FIN_EAST, which has an expiration time set to 60 minutes. If a period greater than 60 minutes has transpired, Node FIN_EAST rejects the token. When a node rejects a single signon token, the system prompts the user to enter a user ID and password on the standard signon screen. Note: This expiration time is separate from the timeouts you specify in the Permission Lists and the web server configuration files. |
|
Message Node name |
Shows the name of the Message Node. In order to share authentication tokens between nodes, the nodes need to trust each other. By adding a node to this grid, you indicate that a particular node is known to the system and trusted. When a node is trusted, the local node accepts tokens issued by it. By default, no nodes appear in the trusted nodes list. If you want to implement single signon, you need to explicitly configure your system to support it by adding trusted nodes. First, you need to add the local node to the grid as a node must be able to trust its own tokens. When you sign in to the portal, the system authenticates users with a single signon token issued by the local system. The portal won't be able to sign in unless the local node is trusted. Then you add the names of other nodes in the system that should be trusted. Note: You define nodes in Portal, Portal Node Definitions. |
|
Tools Release |
Displays the PeopleTools release of the node, as defined on the Nodes - Portal page. |
|
Description |
Displays the node name description, as defined on the Nodes - Node Definitions page. |
Note:
After you update the list of trusted nodes, the system automatically recognizes the new list. Rebooting the application server is not required.