Specifying Field Mappings
Specify field mappings in the Field Map dialog box.
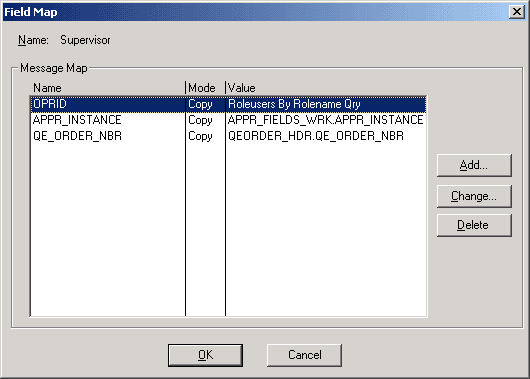
This example illustrates the fields and controls on the Field Map dialog box.
To specify field mappings:
-
Click the Field Mapping button.
If the Field Mapping button is unavailable, then you did not properly link the routing to the event that triggers it.
The Field Map dialog box appears. Use this dialog box to tell the system where to find the data to create a worklist entry. The Message Map group box lists the fields involved.
Field or Control Description Name
Displays the user ID (OPERID) of the person who receives the worklist routing. It may also display the fields in the worklist record, which includes key data for the page where the user performs the necessary work and the descriptive data that appears in the user’s worklist—normally the WORKLIST_URL and WORKLIST_DESCR fields.
Mode
Specify the map mode value from Copy, Xlat-S, or Xlat-L (use one of these two values if the field has a translate table value).
Value
Indicates where the system finds the data to enter into those fields.
-
Select the field to which you want to map a value.
-
Click the Change button or, to add a new field to the map, click the Add button.
This example illustrates the fields and controls on the Map Field dialog box.
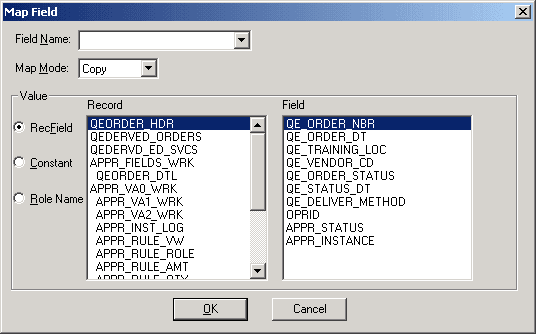
The Map Field dialog box appears. Use this dialog box to provide a value for each field in the worklist record:
-
Select the field into which you want to place routing data.
If you select the field from the message map, its name appears in the Field list box. If the correct name does not appear, you can select a field from the list box or enter a new name.
-
Identify the value for the selected field.
There are three ways to put data into a field: from a database field, a specific constant value, or a role name.
Field or Control Description Record Field Value
To enter the value from a database field into the worklist field, select the RecField option. The Record box lists the record definitions that should be available when the event triggers this routing (according to the page and record definition associated with the event). Select the record name. The fields in that record appear in the Fields list box. Select the field whose value you want. When the event is triggered, the system completes the worklist field with the value of the field in the current record.
Constant
To assign a specific constant value to the field, select this option and enter the value in the text box to the right. Every worklist entry will have this value in the selected field.
Role Name
To assign a role name to the field, select this option and select a role from the drop-down list box that appears next to it. When the event is triggered, the system completes the field with a list of users who fill this role. If you select a user list role, each user who is assigned to that role receives a copy of the work item. If you select a query role, each user that the query returns receives a copy.
-
If you map the field to a role name, provide values for any bind variables.
If you map the user ID field to a query role that includes bind variables, the Specify Query Bind Variables button appears next to the Role Name option. When you click this button, a dialog box appears, enabling you to specify the value that each bind variable in the query should take for each work item.
The Query Bind Variable column displays the bind variables for the role query. (If nothing appears in this column, you defined the query without specifying any bind variables.) The Record column lists the record definitions associated with the component that triggers this routing. The Field column displays the fields in the selected record definition.
You can bind each variable with the value from a record field or with a constant:
-
To bind a variable with the value from a record field, select the Field option, select the bind variable for which you want to provide a value, and select the record field to contain the value.
-
To bind a variable with a constant, select the Constant option, and enter the value into the text box.
-
-
When you have mapped bind values for all of the variables, click OK to close the dialog box.
Note:
If you are using route controls with Virtual Approver, the role that you assign to the OPRID field is one of the predefined route control query roles.
-
If you map the field to a record field, specify whether the system copies the assigned value directly into the worklist field or replaces the assigned value with a value from the translate table.
Select the appropriate option from the Map Mode list box. This list box is available only if the selected field has associated translate table values. In most cases, leave the default value (Copy).
For example, suppose the worklist record definition includes an Employment Status field, and you associate the field with the record field PERSONAL_DATA.STATUS. If the PERSONAL_DATA.STATUS field holds an abbreviation that translates to a value in the translate table, you can tell the system to populate the worklist field with the abbreviation (Copy) or with the corresponding translate table value (Xlat-S for the short form or Xlat-L for the long form).
-
Click OK to add the field and its value to the routing dialog box.
-
Repeat Steps 5 through 10 for each field that you want to add to the worklist routing.
You must provide values for all of the key fields in the worklist record definition.
-
Close all of the dialog boxes by clicking OK in each one.