4 Set Up the Migration Tools

If you are planning to migrate your infrastructure resources from Oracle Cloud Infrastructure Compute Classic to Oracle Cloud Infrastructure, you can use Oracle-provided migration tools to make the process quicker and easier.
To access the Oracle-provided migration tools, create a migration controller instance in your Oracle Cloud Infrastructure Compute Classic account using the Oracle Cloud Infrastructure Classic Migration Tools image. Look for the most recent migration tools image in the list of Oracle-provided images. When your migration controller instance is ready, you can configure the instance and then start using the preinstalled tools to do the following:
  • Get a list of resources in your source environment.
  • Create networking objects in your target environment.
  • Migrate your instances and block volumes.
  • Migrate storage volume backups.
  • Migrate a single instance database using RMAN.

About Required Services and Roles

To use the migration tools to migrate your resources, you'll need the following services and roles:

  • Oracle Cloud Infrastructure Compute Classic: You'll need the Compute_Operations role to create the migration controller instance and to create snapshots of the boot and block volumes.

  • Oracle Cloud Infrastructure: Ensure that you have policies in place that allow you to read the required OCIDs from the Web Console. You'll also need to create an API user, who must belong to a group that has policies in place to create the required resources.

Complete the Prerequisites

Before you create the migration controller instance, Control-S, complete the following prerequisites.

  • Verify that you have sufficient quota to launch the instance. For the migration controller instance to be created in your Oracle Cloud Infrastructure Compute Classic account, you'll need the capacity to create one instance with a sufficient number of OCPUs for your migration.
  • Generate an SSH key to connect to Control-S.
  • Generate an API signing PEM key for Oracle Cloud Infrastructure.
  • Ensure that you have an API user set up in your Oracle Cloud Infrastructure environment:
    1. Create an API user in Oracle Cloud Infrastructure.
    2. Upload the API signing key for this user.
    3. Ensure that this user is added to the required groups and has the required policies in place to create VMs and storage volumes in the required compartment.
    4. Keep a copy of the API access PEM key. You'll need to make this key available on Control-S later.
  • Verify that your API access to Oracle Cloud Infrastructure is set up correctly. Use the CLI to run a few commands to ensure that you can connect to the Oracle Cloud Infrastructure account and have the required permissions.

Launch the Migration Controller Instance (Control-S) in the Source Environment

In your Oracle Cloud Infrastructure Compute Classic account, create the source controller (Control-S) instance with the following configuration.

  1. The Control-S instance must be created in the same identity domain and site as the resources that you want to migrate. You can use the web console or any other interface to create an instance with the following specifications:
    • Image: OL_7.5_UEKR4_x86_64_MIGRATION. This image is available under Oracle Images in the console.
    • Shape: General Purpose oc5 (4 OCPUs, 30 GB RAM) or any other shape with a sufficient number of OCPUs.
    • SSH Key: Associate an SSH public key with the Control-S instance. You'll use the corresponding private key to connect to the Control-S instance. Note that this key isn't the same as the SSH key pair used to access Linux source instances from Control-S when you migrate instances and block storage.
    • Network: Ensure that you select the shared network with a persistent public IP address.
      • Select the default security list that allows SSH inbound.
      • Ensure that security rules are in place to allow SSH outbound, SMB inbound, and HTTPS outbound traffic.
      • If you want to migrate instances that have interfaces on one or more IP networks only, then configure interfaces of the Control-S instance on the relevant IP networks as well, so that the Control-S instance can access the source instances that you want to migrate.
    • Storage: Use the default bootable storage volume.
  2. The Control-S instance and associated storage volumes created for migration are by default billed at the applicable rates for your account. However, you can rename these resources so that the multipart name includes /oraclemigration as a container. Resources created in this /oraclemigration container aren't billed to your account.
    If you create the Control-S instance using the API, CLI, or a Terraform configuration, you can specify multipart resource names as /Compute-example/user@example.com/oraclemigration/resource-name when you create the resources.

    If you create the Control-S instance and storage volumes using the web console, then after the instance is created, modify the orchestration to move the instance and storage volumes to the /oraclemigration container.

    To move the Control-S instance and storage volumes into the /oraclemigration container:

    1. Log in to the Oracle Cloud Infrastructure Compute Classic web console and go to the Instances page.
    2. When the Control-S instance is created with status Running, click the Orchestrations tab.
    3. To move the Control-S instance to the /oraclemigration container, you can suspend the orchestration. Go to the relevant orchestration and from the menu icon menu, select Suspend.
    4. After the orchestration status changes to Suspended, from the menu icon menu, select Update.
    5. On the update page, in the Instance section, click the menu icon menu and select Edit JSON.
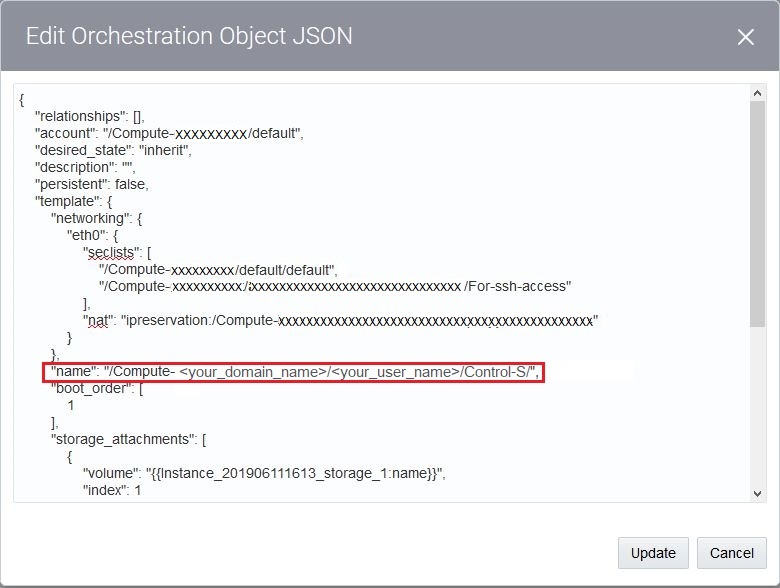
    6. In the Edit Orchestration Object JSON window, look for the instance name. This is usually displayed within the template section, after networking.
       "name": "/Compute-example/user@example.com/instance-name",

      Modify the instance name to include the /oraclemigration container:

       "name": "/Compute-example/user@example.com/oraclemigration/instance-name",

      Click Update.


      Edit Orchestration Object JSON for instance

    7. To move storage volumes to the /oraclemigration container, you must terminate the orchestration. This step destroys all persistent and nonpersistent objects created by the orchestration. Do this only if you haven't made any changes to your instance or storage volumes that you want to preserve. On the Orchestrations page, go to the relevant orchestration and from the menu icon menu, select Terminate.
    8. After the orchestration status changes to Stopped, from the menu icon menu, select Update.
    9. On the update page, in the Storage Volume section, go to the relevant storage volume, click the menu icon menu and select Edit JSON.
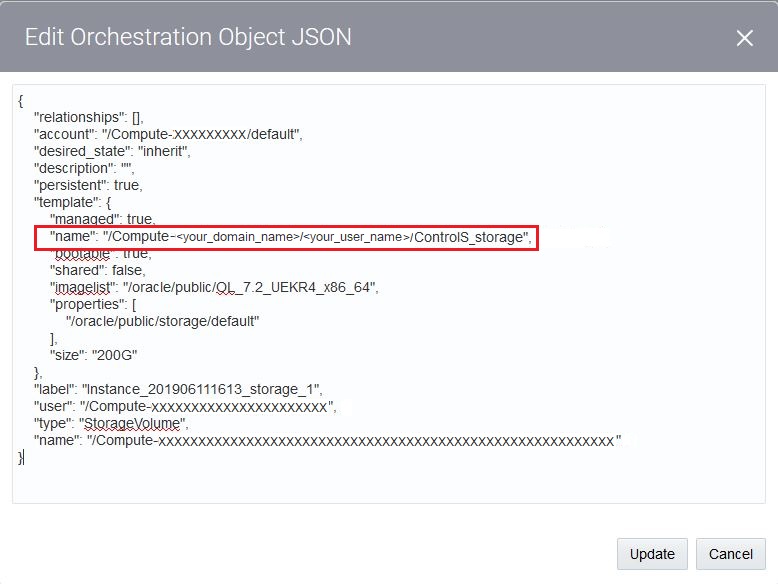
    10. In the Edit Orchestration Object JSON window, look for the storage volume name in the template section:
       "name": "/Compute-example/user@example.com/storage-volume-name",

      Modify the instance name to include the /oraclemigration container:

       "name": "/Compute-example/user@example.com/oraclemigration/storage-volume-name",

      Click Update.


      Edit Orchestration Object JSON for storage volume

    11. Repeat these steps for any other storage volume in this orchestration that you want to move to the /oraclemigration container.
    12. When you've updated all the relevant resources, start the orchestration. On the Orchestrations page, go to the relevant orchestration and from the menu icon menu, select Start.

Note:

When your instance and other resources are created in the /oraclemigration container, they are listed in the web console with this container name prefixed to the user-specified name. So if you had named your Control-S instance Control-S it will now appear with the name oraclemigration/Control-S.
When the instance status is displayed as Running, you can log in to the instance as the opc user from your local system, using your SSH private key.

Install Terraform

You can use Oracle Cloud Infrastructure Classic Discovery and Translation Tool to generate Terraform configurations for various resources. You can then apply the Terraform configuration to create the specified resources in your Oracle Cloud Infrastructure tenancy.

To use Terraform, download the appropriate package from the Terraform web site and install it on your Control-S instance.

Note:

Recent versions of the Oracle Cloud Infrastructure Classic Migration Tools image have Terraform preinstalled. However, if you created your Control-S instance prior to May 2019, Terraform might not be preinstalled on the instance.
  1. Use SSH to log in to your Control-S instance as the opc user.
  2. Use yum to install Terraform along with the required providers.
    sudo yum-config-manager --enable ol7_developer
    
    sudo yum install -y terraform.x86_64 terraform-provider-oci.x86_64 terraform-provider-baremetal.x86_64
  3. To verify your installation and check the version, run the following command:
    terraform -v
    The Terraform version is displayed in the output, as shown in this example:
    Terraform v0.11.10

Get Started with the Migration Tools

You can now start using the migration tools available on the Control-S instance. Each of the migration tools requires you to provide information about the source and target environment including user credentials, service details, access points, and so on. Provide the required information in the appropriate format.

For Oracle Cloud Infrastructure Compute Classic, this information is generally provided in the /home/opc/.opc/profiles/default file and for Oracle Cloud Infrastructure, this information is generally provided in the /home/opc/.oci/config file. See the relevant sections of this document for more information on setting up these files.

The following tools are preinstalled on this instance:

  • Oracle Cloud Infrastructure Classic Discovery and Translation Tool: You can access this tool using the opcmigrate commands. This tool helps you to discover resources in your source environment and generate Terraform configuration files that you can use to create the corresponding resources in your target environment. See Identify and Translate Resources in Your Source Environment.
  • Oracle Cloud Infrastructure Classic VM and Block Storage Migration Tool: You can access this tool by using the opcmigrate migrate instance commands. This tool helps you to migrate instances and block volumes. See Migrate Virtual Machines and Block Storage to Oracle Cloud Infrastructure.
  • Oracle Cloud Infrastructure Classic Block Volume Backup and Restore Tool: You can access this tool using the opcmigrate migrate rsm commands. This tool helps you to migrate storage backups created using remote snapshots or scheduled backups. See Migrate Remote Snapshots and Scheduled Backups.
  • Oracle Cloud Infrastructure Classic Database Backup Migration Tool: You can access this tool using the opcmigrate migrate database commands. This tool helps you to migrate single instance deployments of Oracle Database Classic Cloud Service using RMAN. See Migrate Databases Using the Migration Tools.
  • Oracle Cloud Infrastructure Classic Java Migration Tool: You can access this tool using the opcmigrate migrate jcs commands. This tool helps you to migrate an Oracle Java Cloud Service instance. See Learn About Migrating to Oracle Cloud Infrastructure in Migrating Oracle Java Cloud Service Instances to Oracle Cloud Infrastructure Using Migration Tools.