Specify Workbook Canvas Navigation
When you configure the presentation settings for a workbook, you can choose between navigation options to best fit how you want the consumer to move between the workbook's canvases.
You can choose to always display the workbook's canvas navigation bar, or to display it only when the consumer hovers over the bottom of the workbook. You can also choose a navigation control corresponding to how you want to represent the canvases on the workbook's navigation bar.
The navigation control options are:
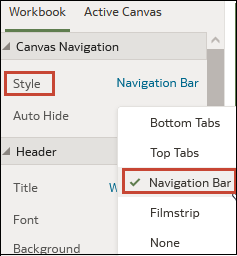
- Bottom Tabs: Displays each canvas as a tab including the canvas' title at the bottom of the workbook. The consumer clicks the tabs to navigate between canvases.
- Top Tabs: Displays each canvas as a tab including the canvas' title at the top of the workbook. The consumer clicks the tabs to navigate between canvases.
- Navigation Bar: Displays each canvas as a circle at the bottom of the workbook. The consumer clicks the circles to navigate between canvases.
- Filmstrip: Displays each canvas as a thumbnail at the bottom of the workbook. The consumer clicks the thumbnails to navigate between canvases.
- None: Removes the navigation control from the workbook.
- On your home page, hover over a workbook, click Actions, and select Open.
- From the Preview menu
 , select Configure Presentation.
 - In the presentation settings panel, click the Workbook tab.
- In the Canvas Navigation section, click the Style field and select how to you want the consumer to move between workbook canvases.
- Optional: Click the Auto Hide field and select On if you want to display the navigation panel when the consumer hovers over the bottom of the workbook.
- Click Save.