2 Prepare to Migrate Oracle Data Visualization Cloud Service Instances

Before you migrate Oracle Data Visualization Cloud Service instances to Oracle Cloud Infrastructure, plan and prepare for migration.

Task Description More Information
Plan your new service Plan your Oracle Analytics Cloud deployment on Oracle Cloud Infrastructure. Think about what you want before you start.

Plan Your Service on Oracle Cloud Infrastructure

Complete your order and sign in to your Oracle Cloud account

You must have a subscription for Oracle Analytics Cloud (or Oracle Analytics Cloud Subscription) to create services on Oracle Cloud Infrastructure.

As Cloud Account Administrator, you can complete all setup tasks.

Signing in for the First Time

Create a service on Oracle Cloud Infrastructure Create an Oracle Analytics Cloud instance with the required size and shape on Oracle Cloud Infrastructure.

If you subscribe through Universal Credits, create the service with Oracle Analytics Cloud.

If you have a non-metered subscription, create the service with Oracle Analytics Cloud Subscription.

Create a Service with Oracle Analytics Cloud

Create a Service with Oracle Analytics Cloud Subscription

Verify your service Verify that your service is up and running and that you can sign in. Verify Your Service and Sign In
Migrate users and roles Migrate users and roles from your traditional Oracle Data Visualization Cloud Service account.

Migrate Users and Roles from Oracle Data Visualization Cloud Service

Add the IP address of your service to allowlists If you registered the IP of your Oracle Data Visualization Cloud Service instance in any data source allowlists, you must perform this task again for the new Oracle Analytics Cloud instance on Oracle Cloud Infrastructure. Find the IP or Host Name of Your Oracle Analytics Cloud Instance

About Downtime Requirements

The migration process doesn't affect the availability of your existing Oracle Data Visualization Cloud Service. Users can continue to sign in and use the service.

Note:

If you do allow users to access and make changes after you've taken the final snapshot for migration, you need to take another snapshot and repeat the migration if you want to include any changes that they make.

After the Oracle Data Visualization Cloud Service instance is migrated successfully, you can reroute users to the new Oracle Analytics Cloud instance on Oracle Cloud Infrastructure.

Plan Your Service on Oracle Cloud Infrastructure

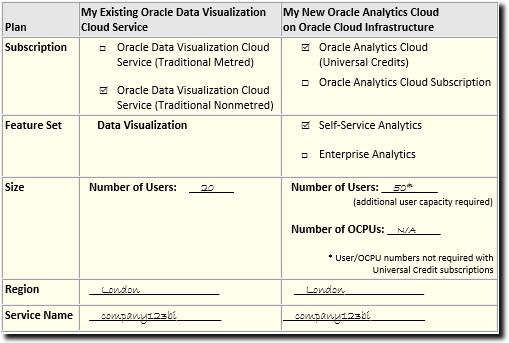
Take some time to plan your service on Oracle Cloud Infrastructure before you create it. Consider the size, shape, and location of your current deployment and decide what you want your Oracle Cloud Infrastructure to look like, before you start. If it helps, use a checklist similar to the one shown here.

Planning checklist - an example

Use a checklist similar to this one to help you decide.

Description of checklist_migdvcs.jpg follows
Description of the illustration checklist_migdvcs.jpg

Which type of subscription do you need?

If you subscribe through Universal Credits, you create Oracle Analytics Cloud services on Oracle Cloud Infrastructure (Gen 2) . If you have a non-metered subscription, you use Oracle Analytics Cloud Subscription to create services on Oracle Cloud Infrastructure.

  • Oracle Analytics Cloud (Universal Credits): Oracle Cloud Infrastructure (Gen 2)

  • Oracle Analytics Cloud Subscription: Oracle Cloud Infrastructure (Gen 1)

Which feature set do you need?

In most cases, you need Oracle Analytics Cloud - Self-Service Analytics.

Feature sets available on Oracle Cloud Infrastructure:

  • Self-Service Analytics: Suitable if you want to offer only data visualization and migrate only data visualization artifacts (Professional Edition).
  • Enterprise Analytics: Suitable if you want to offer data visualization, plus enterprise modeling and reporting features (Enterprise Edition).
  • Essbase: Not applicable when you migrate from Oracle Data Visualization Cloud Service.

What sizing options are available to you?

When you create an Oracle Analytics Cloud service, you either specify the number of Oracle Compute Units (OCPUs) you want to deploy or the number of people you expect to use the service.

Size Options Oracle Analytics Cloud (Universal Credits) Oracle Analytics Cloud Subscription
Number of OCPUs

Yes

Yes

Number of Users

Yes

Yes

How many OCPUs do you think you’ll need?

Oracle Cloud Infrastructure offers a range of compute sizes (OCPUs) to suit different scenarios. The larger the compute size, the greater the processing power. If you're not sure which compute shape best suits your needs, discuss your requirements with your Oracle representative.

For more guidance, read How many OCPUs do you think you’ll need?

How many users will use the service?

Alternatively, you can specify how many people you expect to use the service. Verify how many people are using your Oracle Data Visualization Cloud Service and consider whether or not this number of users is likely to increase.

For more guidance, read How many people do you expect to use the service?

Where do you want to deploy your service?

Verify the region where you deploy Oracle Data Visualization Cloud Service.

Oracle Cloud Infrastructure is hosted in geographic areas, also called regions. If multiple regions are available to you, decide where you want to deploy your service. For example, Phoenix, Ashburn, Frankfurt, London. To find out which regions are available, see www.oracle.com/cloud/data-regions.html.

What name do you want for your service?

Think about a suitable name for your service. The name that you specify is displayed in Oracle Cloud Infrastructure Console and in the URL for your service.

Naming conventions on Oracle Cloud Infrastructure:

  • Must contain between 1 and 25 characters.

  • Must start with an ASCII letter: a to z or A to Z.

  • Must contain only ASCII letters or numbers.

  • Mustn't contain any other special characters.

  • Must be unique within the identity domain.

Create Your Service on Oracle Cloud Infrastructure

As Cloud Account Administrator, you can create services on Oracle Cloud Infrastructure. If you subscribe through Universal Credits, create the service with Oracle Analytics Cloud. If you have a non-metered subscription, create the service with Oracle Analytics Cloud Subscription.

Create a Service using the Console

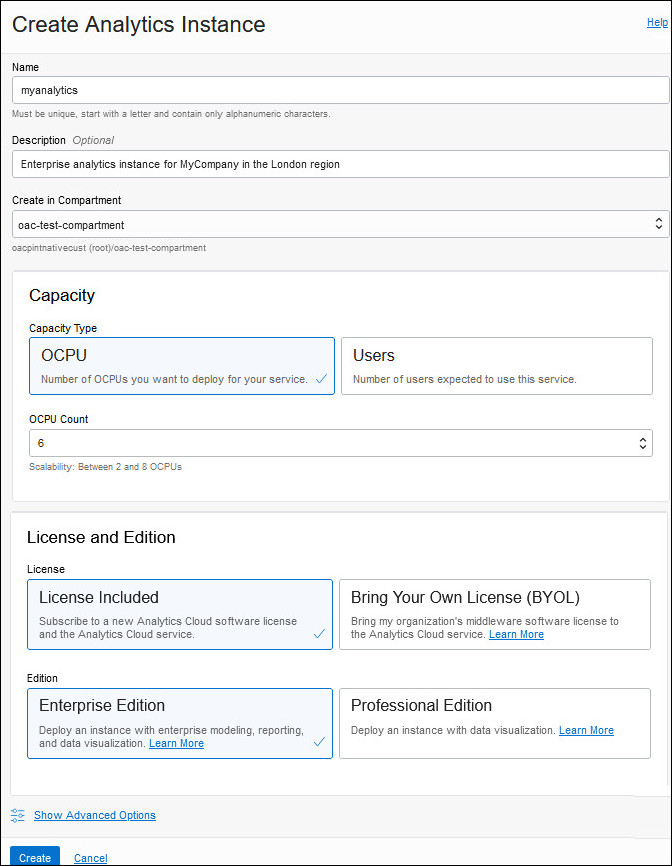
You can use Oracle Cloud Infrastructure Console to set up a service instance with Oracle Analytics Cloud.

You must belong to an OCI group that is granted the required policies to create an Analytics instance. See Give Users Permissions to Manage Analytics Cloud Instances.

  1. Sign in to your Oracle Cloud account.

    The way you sign in depends whether your cloud account uses identity domains or federates with Oracle Identity Cloud Service. See Signing In to the Oracle Cloud Infrastructure Console.

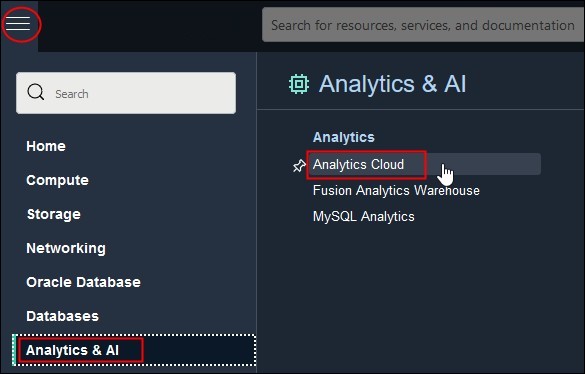
  2. In Console, click Navigation menu in the top left corner.
  3. Click Analytics & AI. Under Analytics, click Analytics Cloud.
  4. From the Compartment list, select the compartment in which you want to create the service.
  5. Click Create Instance.
  6. Enter a Name and a brief description.
    The name must start with a letter and can contain only letters and numbers.
  7. For Capacity, select the size of your deployment.
    • OCPU: Select the number of OCPUs you want to deploy.
      • Production environment: Select between 2 and 52 OCPUs.
      • Non-production environment: Select 1 OCPU if you want to create an instance for test purposes.

      See What's the Difference Between Production and Non-Production Environments.

      You must select the OCPU option if you plan to use your Oracle Middleware on-premise license with Oracle Analytics Cloud (BYOL).

  8. For License, select License Included to subscribe to an Oracle Cloud license for Oracle Analytics Cloud or Bring Your Own License (BYOL) to use your Oracle Middleware on-premise license with Oracle Analytics Cloud and be charged the Bring Your Own License (BYOL) rate.

    The Bring Your Own License (BYOL) option is available when you select OCPU for Capacity.

  9. Select the Edition that matches your subscription.
    • Enterprise Edition: Deploys an instance with enterprise modeling, reporting, and data visualization.
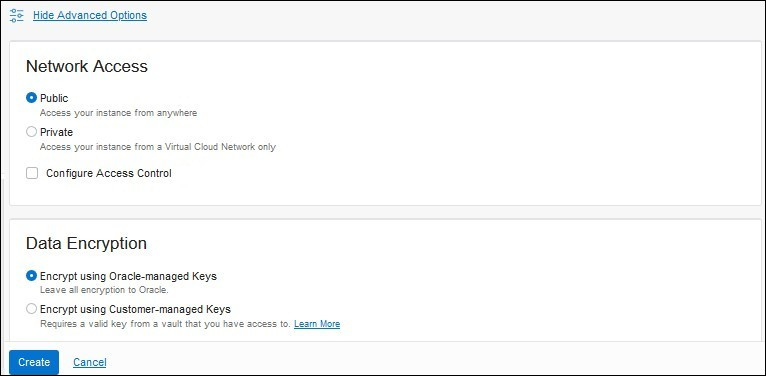
  10. Optional: Click Show Advanced Options to configure network or encryption options.
  11. In Network Access, configure how you want users to access Oracle Analytics Cloud: over the public internet or through a private network.
    • Public: Enable access over the public internet.

      The Public option deploys Oracle Analytics Cloud with a public internet accessible endpoint. If required, you can configure access control rules to restrict access by public IP address, public CIDR block range, VCN, and Oracle services. See Restrict Access to Oracle Analytics Cloud Deployed with a Public Endpoint.

    • Private: Enable private access from an on-premise network or hosts on a virtual cloud network (VCN). Private access means that traffic doesn't go over the internet.

      The Private option deploys Oracle Analytics Cloud with a private endpoint. Before you configure this option, you must set up the Oracle Cloud Infrastructure VCN that you plan to use with a subnet for Oracle Analytics Cloud. If required, you can restrict access to private endpoints through network security groups. If your network security groups aren't set up yet, you can save this task for later. See Deploy Oracle Analytics Cloud with a Private Endpoint.

    You can configure access control rules for a public endpoint or change the VCN, subnet, and network security group access for a private endpoint, later on as required. However, you can't change your network access selection from public to private (or private to public).

  12. Optional: In Data Encryption, customize how Oracle Analytics Cloud encrypts customer data.
    • Encrypt using Oracle-managed Keys: Leave all data encryption to Oracle.

    • Encrypt using Customer-managed Keys: Specify the custom encryption key you want to use.

    You can configure data encryption now or later. If you haven’t created a master encryption key yet, leave this task for later. See Encrypt Sensitive Information.

    Your Oracle Analytics Cloud instance must be deployed with Enterprise Edition. Custom encryption isn't available on Oracle Analytics Cloud instances deployed with Professional Edition.

  13. Verify that the details are correct, and click Create.
It takes about 20 minutes to create the service. Display the Instance page to check the current status.

Create a Service with Oracle Analytics Cloud Subscription

You use Oracle Cloud Infrastructure Console to set up a service with Oracle Analytics Cloud Subscription. Follow these steps if you have a non-metered subscription.
  1. Sign in to Oracle Cloud as the Cloud Account Administrator.
    If you're signing in for the first time, you can find your account name and login information in your welcome email.
  2. In Oracle Cloud Infrastructure Console, click Profile icon in the top right corner.
  3. Click Service User Console, and then click Oracle Analytics Cloud Subscription.
    If you don't immediately see Oracle Analytics Cloud Subscription, enter Analytics Cloud Subscription in the search box.
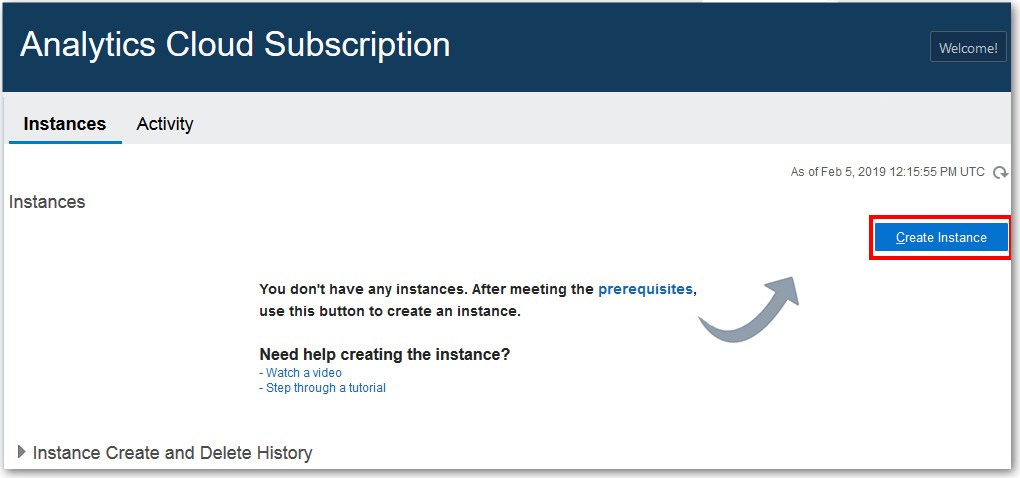
  4. Click Create Instance.
  5. For Instance Name, enter a name for your service instance.
    The name must start with a letter and can contain only letters and numbers.
  6. For Notification Email, enter the email address of the person you want to notify when this service is ready to use and receive other status updates about this service in the future.
    This person is usually you, the Cloud Account Administrator who’s setting up the service.
  7. If multiple identity domains are available to you, select the Identity Domain that you want this service to use and then enter the name of an existing user in this identity domain that you want to assign as the Service Administrator.
    You don't see these options if only one identity domain is available.
  8. If several geographical regions are available to you, select the Region where you want to deploy Oracle Analytics Cloud. For example, uk-london–1.
  9. If several edition options are available to you, select the Edition that matches the type of service you want to create.
    • Professional

    • Essbase *

    • Enterprise

    * Oracle Analytics Cloud -Essbase Edition isn't available in Oracle Cloud accounts created after 12th December 2019.

  10. Determine the size of your service.
    • To size your service based on how many users you're entitled to as part of your subscription, set Subscription Type to Number of Users, and then enter the number of users (between 10 and 3000).
    • To size your service based on how many Oracle Compute Units (OCPUs) you're entitled to as part of your subscription, set Subscription Type to Number of OCPUs, and then select the number of OCPUs you want.
  11. Click Next.
  12. Verify that the details are correct, and click Create.
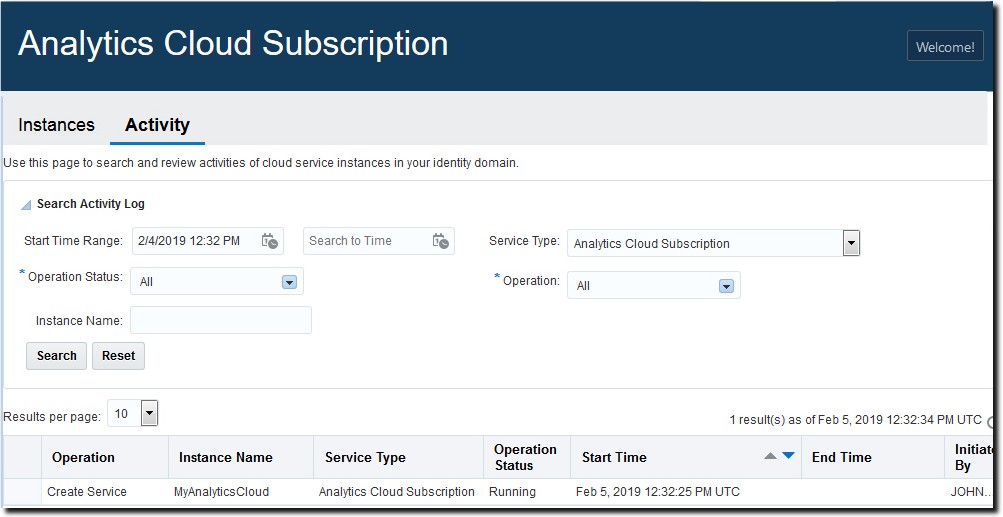
It takes about 20 minutes to create the service. Oracle sends an email to the designated email address when your service is ready. Display the Activity page to check the current status.
Description of activity-page_sub.jpg follows
Description of the illustration activity-page_sub.jpg

Migrate Users and Roles from Oracle Data Visualization Cloud Service

Before you migrate your Oracle Data Visualization Cloud Service content to Oracle Cloud Infrastructure, you must migrate users and roles from your traditional Oracle Data Visualization Cloud Service account to the identity management system available with your Cloud account: Oracle Cloud Infrastructure Identity and Access Management (IAM) Identity Domains or Oracle Identity Cloud Service (IDCS).

  1. Navigate to the users and roles you want to export from Oracle Data Visualization Cloud Service.
    1. Sign in to your traditional Oracle Cloud account.
    2. Click Users.
  2. Migrate users (Users tab).
    Export user information to a CSV file (users.csv) and import the users on your target identity management system.
    1. On the Users tab, click Export.
    2. Open users.csv to verify it contains the users you want to migrate.
    3. Change the User Login column heading to User ID and the Email column heading to Work Email.

      At a minimum, the file must have these exact column headings: User ID, Last Name, First Name,Work Email. See

      Import User Accounts in Administering Oracle Identity Cloud Service. You can download a sample file from this topic to verify the required format.

    4. Add a Password column heading with dummy passwords, if required.
    5. Save your changes to the CSV file.
    6. In Oracle Cloud Infrastructure Console, navigate to the Users tab and click Import.
      For details, refer to the documentation for your identity management system:
    7. Click Browse to locate and select the CSV file that contains the users you want to import (users.csv).
  3. Migrate roles (Roles tab and Custom Roles) and import them as groups on your target identity management system.
    You can't export roles from your traditional account. You must manually create a CSV file that includes any roles in Oracle Data Visualization Cloud Service that you want to migrate, together with their current user assignments. The CSV file you create can include roles and custom roles.
    In Oracle Cloud Infrastructure Console, you import these roles and custom roles as groups. The format of the CSV file must match the format required to import groups. At a minimum, the file must have these exact column headings: Display Name, Description, User Members.
    In Oracle Analytics Cloud, you see these groups on the Roles tab and then you assign them to the same application role that they had in Oracle Data Visualization Cloud Service.
    1. Create a CSV file named Groups.csv.
    2. On the Roles tab, locate the predefined roles associated with the Oracle Data Visualization Cloud Service instance you want to migrate, and then copy Display Name, Description, and User Members information to the CSV file.

      Include:

      • <DVCServicename>.BICloudServiceAdministrators
      • <DVCServicename>.BICloudServiceAdvancedContentAuthors
      • <DVCServicename>.BICloudServiceConsumers

      Exclude:

      • TenantAdminGroup (Identity Domain Administrator), db_administrator, db_developer, db_user, and other service roles.

    3. On the Custom Roles tab, identify any other roles used by the Oracle Data Visualization Cloud Service instance you want to migrate, and then copy Display Name, Description, User Members information to the CSV file.

      For example, your Groups.csv file might contain information that looks something like this:

      Display Name Description User Assignments
      mycompany.BICloudServiceAdministrators Users authorized to administer the service and delegate privileges to others CBrown
      mycompany.BICloudServiceAdvancedContentAuthors Users authorized to create and share content AGold;BJones;DMarks
      mycompany.BICloudServiceConsumers Users authorized to view and explore content JSmith;Swasher;TYoung
      SalesManagers Managers in the Sales organization AGold;BJones;
      SalesTeam Members of the Sales organization AGold;BJones;JSmith;SWasher
    4. In Oracle Cloud Infrastructure Console, use the information you collected in Groups.csv to create the required groups in Oracle Cloud Infrastructure Identity and Access Management (IAM) Identity Domains or Oracle Identity Cloud Service (IDCS).

      Navigate to the Groups tab. Create groups with exactly the same names, descriptions, and user assignments as the roles you recorded in Groups.csv. The names are case-sensitive.

    For details, refer to the documentation for your identity management system:
  4. Verify that the users and groups you migrated are available in Oracle Analytics Cloud.
    1. Sign-in to Oracle Analytics Cloud and navigate to Console.
    2. Click Users and Roles.
    3. On the Users tab, verify the list of users and check whether users have the correct role (group).
    4. On the Roles tab, verify the list of roles (groups) and check whether the correct users are assigned to each role.
  5. Grant Oracle Analytics Cloud application roles to your users and groups.
    1. Click the Application Roles tab.
    2. Grant appropriate Oracle Analytics Cloud application roles to the roles that you migrated from Oracle Data Visualization Cloud Service. Refer to the table.
      Grant Application Role in Oracle Analytics Cloud... To Each Role You Migrated to Oracle Cloud Infrastructure...
      BI Service Administrator <DVCServicename>.BICloudServiceAdministrators
      DV Content Author <DVCServicename>.BICloudServiceAdvancedContentAuthors
      DV Consumer <DVCServicename>.BICloudServiceConsumers

Verify Your Service and Sign In

Oracle sends an email to the designated email address when your Oracle Analytics Cloud service is ready. Navigate to your service in Oracle Cloud Infrastructure Console, obtain the service URL, and then sign in to verify your Oracle Analytics Cloud service is up and running.
  1. Sign in to your Oracle Cloud account.
  2. In Oracle Cloud Infrastructure Console, click Navigation menu icon in the top left corner.
  3. Do one of the following:
    • Oracle Analytics Cloud (Universal Credits) - Click Analytics & AI. Under Analytics, click Analytics Cloud.

      Select the compartment in which you created the service, the name of the new service, and then click Analytics Home Page. See Verify Your Service.

    • Oracle Analytics Cloud Subscription - Click Profile icon in the top right corner, click Service User Console, and then click Oracle Analytics Cloud Subscription

      Click Manage this instance for your service, and then click Oracle Analytics Cloud URL. See Verify Your Service.

  4. Sign in with your administrator credentials.