Create and Configure a Custom Endpoint

You can map a custom endpoint to a Visual Builder instance and use it to access the instance instead of the original URL generated in the OCI Console.

Let's say you want to open your Visual Builder instance from a custom URL like https://my-custom-endpoint.example.com/ic/builder instead of the original URL generated by Oracle (which can look something like https://<instance-display-name>-<tenancy-name>-<region-code>...oraclecloud.com). To do this, you create a hostname for your chosen custom domain (for example, my-custom-endpoint.example.org), and then create a custom endpoint in your Visual Builder instance that is associated with the hostname. Creating a custom endpoint doesn't affect the original instance URL of your Visual Builder instance. You'll be able to access your instance using the custom endpoint URL as well as the original instance URL.

Note:

If you are creating a custom endpoint for a private endpoint-enabled VB instance, and you want to make the custom endpoint public, you will need to use a public load balancer in your tenancy, and create a hostname, listener, and a backend that points to the private endpoint's IP address. This isn't needed if you don't intend to make the endpoint public.

After you have configured a custom endpoint, you can map an app in your instance to the endpoint by selecting the endpoint as the vanity URL in the settings of the visual application containing the app. After setting the app's vanity URL, users can and should open the app directly by entering the vanity URL root (https://my-custom-endpoint.example.com) in their browser. For more about using a vanity URL for an app, see Configure Support for a Custom Domain.

These instructions assume you have direct access to a Visual Builder instance and to the OCI Console.

To create and configure a custom endpoint for your Visual Builder instance:
  1. Choose a custom hostname for your instance and register it at a DNS provider.
  2. Obtain an SSL certificate from a certificate authority (CA) for your hostname.
  3. Configure the hostname for your custom endpoint.

    To create and configure a hostname, do one of the following:

    The difference between these two options is whether the certificate is managed by you or by Oracle. Oracle recommends that you use the Oracle Web Application Firewall service, as this allows you to map your DNS name and upload your associated certificate and private key yourself instead of configuring the VB instance to manage them.

    Note:

    The options above for creating and configuring a hostname are applicable only for your first (primary) custom endpoint. If your instance already has a custom endpoint and you want to add another, you need to use the command line. Similarly, if your instance already has multiple custom endpoints and you want to edit any of them, you need to do this using the command line. For details on how to do this, see Create and Update Alternate Endpoints.
  4. On the Visual Builder Instances page, find the instance you want to work with and open its details page. If you need help finding the Instances page or the instance, see View and Manage the Visual Builder Instance.
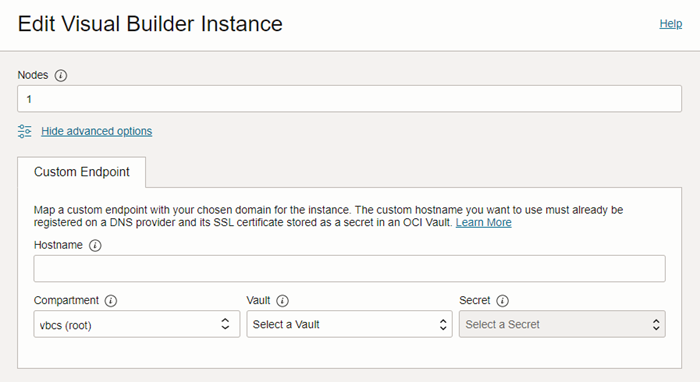
  5. Select Edit to open the Edit visual builder instance panel.

    If you don't have an instance, see Create the Visual Builder Instance.

  6. Supply the custom endpoint details in the Custom endpoint pane.


    Note:

    If you configured the hostname for the custom endpoint using WAF, you only need to provide the hostname. You do not need to supply the Compartment, Vault, or Secret.

    Field Description
    Hostname Required.

    Enter the custom hostname chosen for the instance.

    The custom hostname you want to map to the instance must already be registered on a DNS provider,

    If the hostname is configured using an OCI vault, its SSL certificate should be stored as a secret in the vault.

    Certificate Required when the hostname is configured using an OCI vault.

    Provide the location of the hostname's certificate in your OCI tenancy.

    • Compartment: Select the OCI compartment that contains your certificate vault.
    • Vault: Select the vault that contains the hostname’s certificate.
    • Secret: Select the secret corresponding to the hostname’s certificate.

    Note:

    You can also update or replace a custom endpoint that was previously associated with the instance. You can modify the hostname as well as the certificate details. However, to update the certificate details, you must have access permissions to the vault containing the required certificate. For details, see Update a Secret in a Vault.
  7. Finally, update the custom endpoint DNS record to the original instance hostname. As a best practice, update the CNAME with the hostname, or update the A record using the public IP address if you want the endpoint to be public. (You can obtain the IP address by using dig on the hostname.)