Prerequisites for Creating a Connection
You must satisfy the following prerequisites to create a connection with the Oracle CPQ Adapter.
Register with the Oracle CPQ Site
After registration, you then receive an email with information that you use to create a connection on the Connections page. See Configure Connection Properties and Configure Connection Security.
Obtain the SOAP WSDL from the Oracle CPQ Site
-
Note the following details:
-
The WSDL must be generated by the Oracle CPQ site to integrate with Oracle Integration.
-
Web Services 2.0 must be used to generate the URL needed to generate the WSDL.
-
The Commerce SOAP server URL endpoint must be used to generate the URL needed to generate the WSDL.
-
The commerce process to integrate with Oracle Integration must be used to generate the URL needed to generate the WSDL.
Oracle Integration uses the Oracle CPQ transaction WSDL to understand the valid data and operations provided by Oracle CPQ.
To access the Oracle CPQ transaction WSDL:-
Log in to the Oracle CPQ site that you want integrate with Oracle Integration.
-
To open the Admin home page, click Admin.
The Admin home page appears.
-
Under Integration Platform, click Web Services.
-
For the Web Service Version, select 2.0.
-
Ensure that the Commerce tab is the current tab.
-
From the Process Name list, select the name of the commerce process to integrate with Oracle Integration.
-
In the SOAP Server URL field, append
?WSDLto the end of the value.For example:
https://site_URL/v2_0/receiver/commerce/processVarName?WSDL.where:
-
site_URLis the base URL of the Oracle CPQ site. -
processVarNameis the variable name of the selected commerce process. -
Optional: To confirm that the URL is correct, open it in a web browser. A page of WSDL should appear.
Use the URL you created as needed in Oracle Integration to reference the Oracle CPQ transaction WSDL.
-
-
Obtain the REST Catalog URL
http(s)://site_URL/rest/v3/metadata-catalogwhere site_URL is the base URL of the Oracle CPQ site.
-
Use the latest REST catalog version available at your Oracle CPQ site for the invoke connection.
-
You must be on Oracle CPQ release 2016R2 or above to use the REST catalog in the Oracle CPQ Adapter.
OAuth using JWT User Assertion Security Policy Prerequisites
This section describes the steps to make inbound REST API calls to Oracle CPQ with Oracle Cloud Infrastructure Identity and Access Management-provided OAuth tokens.
- Register Oracle CPQ as a Resource in Oracle Cloud Infrastructure Identity and Access Management
- Register External Application Client in Oracle Cloud Infrastructure Identity and Access Management
- Set Up the User In Oracle Cloud Infrastructure Identity and Access Management
- Create an OAuth Provider Integration In Oracle CPQ
- Link Oracle CPQ and the Oracle Cloud Infrastructure Identity and Access Management User
- Prepare User and Client Assertions
- Obtain the OAuth Token From Oracle Cloud Infrastructure Identity and Access Management
- In the navigation pane, click Identity & Security.
- Click Domains.
- Select your compartment.
- Select the identity domain.
- In the menu bar, click Integrated
applications.
This is the location at which you create the client application for your grant type.

- Click Add application.
- Select Confidential Application, then click Launch workflow.
- Enter a name.
- Click Submit.
- Click the OAuth configuration tab, then the Edit OAuth configuration subtab.
- In the Resource server configuration panel, select Configure this application as a resource server now.
- In the Primary audience field, enter the Oracle CPQ site URL.
- Click the Add scopes toggle, then click Add.
- In the Scope field, enter
/api. - Optionally enter a display name and description, then click Add.
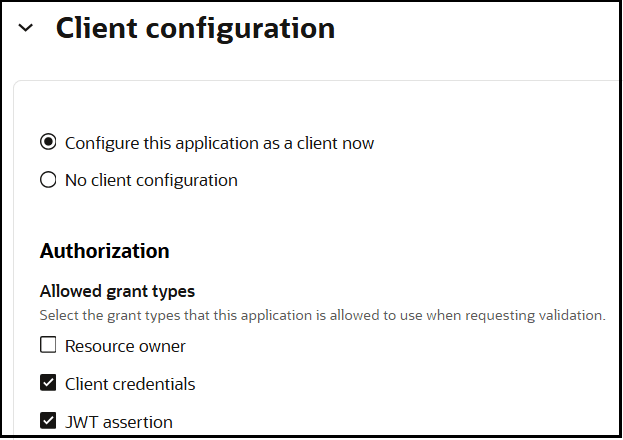
- In the Client configuration section, select Configure this application as a client now.
- In the Authorization section, select
Client credentials and JWT
assertion for the Allowed grant types.

- In the Client type section, select Trusted.
- In the Certificate section,
click Import certificate to import the CPQ client
certificate.
This certificate can be downloaded from the OAuth Provider integration in the Integration Center.
- In the Alias field, enter a meaningful name.
- Drag and drop the certificate file or select to browse for it by clicking in the field. This is the file downloaded in Step 19.
- Click Import.
- At the bottom of the wizard, click
Submit.
The details page for the client application is displayed.
- Click Activate, and then
Activate application to activate the client
application for use.
The application is now active.
- In the menu bar, click the OAuth configuration tab.
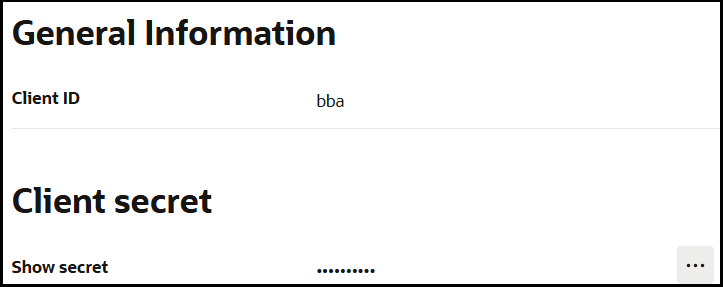
- In the General Information section, note
the client ID and client secret values. These values are required when
creating the OAuth Provider integration CPQ in the JWKS
Authorized Client ID and JWKS Authorized Client
Secret fields, respectively.

- In the navigation pane, click Identity & Security.
- Click Domains.
- Select your compartment.
- Select the identity domain.
- In the menu bar, click Integrated
applications.
This is the location at which you create the client application for your grant type.

- Click Add application.
- Select Confidential Application, then click Launch workflow.
- Enter a name.
- Click Submit.
- Click the OAuth configuration tab, then the Edit OAuth configuration subtab.
- In the Client configuration panel, select Configure this application as a client now.
- In the Authorization section, select
Client credentials and JWT
assertions in the Allowed grant types section.

- For Client type, ensure that Trusted is selected.
- In the Certificate section, click
Import Certificate.
This certificate is not available in Oracle CPQ. The external entity that wants to call the Oracle CPQ REST API must provide this certificate.
Note:
The private key corresponding to the client certificate is used to obtain the token from Oracle Cloud Infrastructure Identity and Access Management. Keep it ready for use. - In the Alias field, enter a meaningful name. This name is used later to prepare the assertions.
- Drag and drop the certificate file or select to browse for it by clicking in the field.
- Click Import.
- Click the Add Resources toggle.
- Click Add scope.
- Search for and expand the Oracle CPQ resource application that you created in Step 8.
- Select the scopes, then click Add.
- At the bottom of the wizard, click
Submit.
The details page for the client application is displayed.
- Click Activate, and then
Activate application to activate the client
application for use.
The application is now active.
- In the menu bar, click the OAuth configuration tab.
- In the General Information section, note the client ID value.
- Create users in Oracle Cloud Infrastructure Identity and Access Management. See Managing Users.
- Set up the integration between Oracle Cloud Infrastructure Identity and Access Management and Oracle CPQ. See OAuth Provider Integration.
- Link Oracle CPQ and the Oracle Cloud Infrastructure Identity and Access Management user. See Register a User Login for External OAuth in the Administration section.
- Prepare user and client assertions to get the token from Oracle Cloud Infrastructure Identity
and Access Management. User and client assertions are JWT assertions that
contains header and claims. See Client/User JWT
Assertion.
To learn more about JWT, see Introduction to JSON Web Tokens.
Some of the claims and their corresponding values are listed below. See the above documentation for details about claims not provided here.Table 2-1 Client/User Assertion Headers
Claim Value kid Alias value obtained from Step 15 Table 2-2 Client Assertion Body/Claims
Claim Value sub Client ID obtained in Step 25 iss Client ID obtained in Step 25 aud https://identity.oraclecloud.com/Table 2-3 User Assertion Body/Claims
Claim Value sub Oracle Cloud Infrastructure Identity and Access Management user name iss Client ID obtained in Step 25 aud https://identity.oraclecloud.com/Sample User AssertioneyJ4NXQjUzI1NiI6Imh6TW1yWkhEWXBQdFFGTElqLXdiUjBvWlVLQ0lOcjIza0g3VVNKQVpiazAiLCJ4 NXQiOiJnanI2TnhuV2RST1ZyN0o5MXdDUVZEeXk2Sk0iLCJraWQiOiJrZXk0b2F1dGgiLCJhbGciOiJSUzI1NiJ9. eyJzdWIiOiJqb2huLmRvZUBleGFtcGxlLmNvbSIsImF1ZCI6Imh0dHBzOlwvXC9pZGVudGl0eS5vcmFjbGVjbG91ZC5 jb21cLyIsImlzcyI6IjhjNjgyZDVmZTZhNzQ3NDdhYWU3YzE2YjFlMTIyYTkxIiwiZXhwIjoxNzI5Mjg4MzY5LCJpY XQiOjE3Mjg5MjgzNjksImp0aSI6ImMxMTNkNGIzLTIwM2EtNDMxNi05YjAyLWVlOTU1OWMxZDgzZSJ9. akqAQJyhi1LSI8Ei3TCnUPebUtlbUo6d5G9ML_kw0MJnsoX0bX1u4jcyh1u42bU9XS7U_W4CMerS4VixtX2_- _46yBiv4qfmFuWc8ZtuvlDeo7rDlEvHqGVvDT1rndHorAvi7UmwGA5BpR0qMN-i79gS5yEQ7v8m4HP-H8uvrGgfZca y4q42JY9zZHmHX5GuqbqxxAaGmb30PB825OJPncq2UXkp6zlDZv3i5sPy66i9BA_0bpwmtFgFYPENRYEFgsYCXfMaJa 5M4hjPpcTKm3D6O22UvpDZUMtSiBaWZhEH4CY64TO665Ikw6y3_4dZz1vDpzmkZrAodabBXbEgSample Client AssertionUVZEeXk2Sk0iLCJraWQiOiJrZXk0b2F1dGgiLCJhbGciOiJSUzI1NiJ9.eyJzdWIiOiI4YzY4MmQ1Z mU2YTc0NzQ3YWFlN2MxNmIxZTEyMmE5MSIsImF1ZCI6Imh0dHBzOlwvXC9pZGVudGl0eS5vcmFjbGVjbG91ZC5 jb21cLyIsImlzcyI6IjhjNjgyZDVmZTZhNzQ3NDdhYWU3YzE2YjFlMTIyYTkxIiwiZXhwIjoxNzI5Mjg4NDE0LC JpYXQiOjE3Mjg5Mjg0MTQsImp0aSI6IjAzZjI5YzMxLWI5ODctNDVmZi1iY2E3LWM5YzBjYWNjOWMzZCJ9.MTXq n1mG-bLFP29UDC5ZYwfFubzO9OvGC47EzUnFzIbFOAzrClv_baHMC3HXeFOHaijCApMKRvRiQavhejCySMgSw9z wo6fEQiN4b-7AHhbHmwVWGaqs8W0kMEiaOTUm6wNo1e4R4Wcb2tUDw7QwJ0iSiMeny5Ud_ECgQTmGoNzsgb7Ri5 54eQvwO7DoieNDWpDkSVogz0WdtppOFzLVF9bT4jlxc3LEuL2WPGnyWU6b5QEWZ1XALU7XhrGY_5gcZE6Js12X8 HBtrbVGXGYKSj_LzgerTv-CZT6IA8uQ--ThEtPTLIiedG6ZiTEM4acZIAQtej7NcJ6eUEIpmWA
- See Assertion Grant Type
to obtain the OAuth token from Oracle Cloud Infrastructure Identity
and Access Management by using client and
user assertions.
The scope value to pass in the token API call is a combination of the Oracle CPQ site URL and the
/apistring. For example, if your Oracle CPQ site URL is the following:
The scope value should be:https://jondoe.bigmachines.comhttps://jondoe.bigmachines.com/api