Add the REST Adapter (Trigger) and the Oracle E-Business Suite Adapter (Invoke) to the Integration
After creating an integration with "Application" pattern, you need to orchestrate desired activities for the integration.
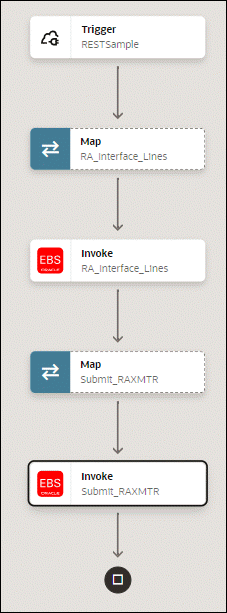
In this example, the "EBS OIT Demo" orchestration flow diagram created for this integration includes the following activities:
-
The REST Adapter as a trigger connection "REST"
This activity provides the invoice line information as an input payload for invocation of the RA_INTERFACE_LINES_ALL REST service through the Oracle E-Business Suite Adapter.
-
Mapping defined for "RA_Interface_Lines"
This activity allows you to map and pass the invoice related parameters to the "RA_Interface_Lines" activity to invoke the RA_INTERFACE_LINES_ALL REST service contained in the "AR Autoinvoice" (RAXMTR) open interface.
See: Create Mappings.
-
The Oracle E-Business Suite Adapter as an invoke connection (called RA_Interface_Lines) for inserting invoice line data
This activity invokes the RA_INTERFACE_LINES_ALL REST service when adding the Oracle E-Business Suite Adapter as an invoke connection. This activity will insert multiple invoice line records into the RA_INTERFACE_LINES_ALL open interface table in Oracle Receivables when the service is invoked successfully.
See: Add the Oracle E-Business Suite Adapter as an Invoke Connection for Inserting Records.
-
The first logger called "Interface"
This activity allows you to log message about the "Success Count" information after the successful invocation of the RA_INTERFACE_LINES_ALL REST service.
-
Mapping defined for "Submit_RAXMTR"
This activity provides the parameter values to the "Submit_RAXMTR" activity in order for the concurrent program to run successfully.
See: Create Mappings.
-
The Oracle E-Business Suite Adapter as an invoke connection (called "Submit_RAXMTR") for submitting associated concurrent program
This activity invokes the "SUBMIT_CP_RAXMTR" REST service to submit the RAXMTR (Autoinvoice Master Program) concurrent program. When the request of running the concurrent program is processed or executed, validation is performed on the corresponding open interface.
See: Add the Oracle E-Business Suite Adapter as an Invoke Connection for Submitting a Concurrent Program.
-
The second logger called "CPSubmitResponse"
Once the concurrent request is successfully processed, use this activity to log message about the concurrent request ID. You can view the associated report through the concurrent request ID for validation.
See: Add the Loggers.
Add the REST Adapter as a Trigger Connection
The REST Adapter is used in this example to provide invoice information as an input to the RA_INTERFACE_LINES_ALL REST service invocation through the Oracle E-Business Suite Adapter.
Perform the following steps to add the REST Adapter as a trigger (source) connection:
-
In the "EBS OIT Demo" integration canvas, click the + sign in the integration canvas or click Triggers
 on the side of the canvas. A list of trigger connections appears.
-
Search the Oracle E-Business Suite connection called "RESTSample" from the list of selection. The REST Adapter Endpoint Configuration Wizard appears.
-
Enter the following information:
-
What do you want to call your endpoint? - Enter the name of this endpoint, such as "REST".
-
What does this endpoint do? - Enter the usage of this endpoint, such as "Provide REST endpoint with input payload".
-
What is the endpoint's relative resource URI? - Enter
/RA_INTERFACE_LINES_ALL/. -
What action does the endpoint perform? - Select "POST" from the drop-down list.
Ensure that you select the following checkbox for this trigger (source) connection:
-
Configure a request payload for this endpoint
Click Continue.
-
-
In the Configure Request page, perform the following tasks:
-
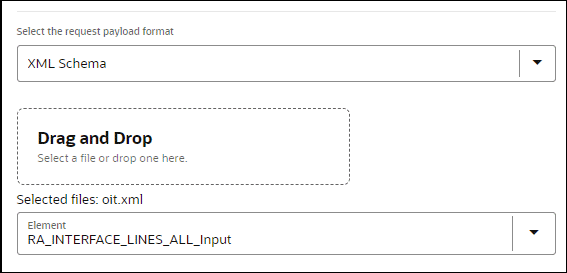
In the "Select the request payload file" section, select the XML schema button.
Please note that the request payload file type can be either XML schema or JSON format.
-
Click Browse to select a desired request payload file, such as "input.xsd". Click Open to attach the selected file. System will parse the schema and display the root element (
RA_INTERFACE_LINES_ALL_input) in the Element field.
For the sample request payload, see Sample XSD for the Oracle E-Business Suite Adapter as an Invoke Example for an Open Interface REST Service.
-
In the "Select the type of payload with which you want the endpoint to receive" section, select the XML button as the payload type.
Click Continue.
-
-
This displays the Summary page with the following REST service information that you specified earlier:
-
REST Service URI:
/RA_INTERFACE_LINES_ALL/ -
Method: POST
-
Request Media Type: application/xml
Click Finish.
Click Save to save your work.
The "REST" endpoint now appears as a trigger in the integration flow.
-
Add the Oracle E-Business Suite Adapter as an Invoke Connection for Inserting Records
After adding the REST Adapter as a trigger connection, you can add the Oracle E-Business Suite connection that you created earlier as an invoke (target) connection in your integration. This allows you to invoke an open interface table REST service to insert invoice line data into the open interface table RA_INTERFACE_LINES_ALL in Oracle Receivables.
Perform the following steps to add the Oracle E-Business Suite Adapter in the orchestration flow:
-
In the "EBS OIT Demo" integration canvas, drag and drop the "EBSDemo" connection from the Invokes toolbar on the right to the integration, right after the "REST" activity you created earlier.
The Configure Oracle E-Business Suite Adapter Endpoint wizard appears.
-
In the Configure Basic Info page, enter the following information for your endpoint:
-
What do you want to call your endpoint? - Enter "RA_Interface_Lines".
-
What does this endpoint do? - Enter "Insert invoice data in Oracle Receivables".
Click Continue.
-
-
In the Configure Web Services page, specify the following information for your target connection:
-
Product Family: Select "Financial Receivables Suite" from the drop-down list.
-
Product: Select "Receivables".
-
Interface Type: Select "Open Interface" from the list.
-
API: Select "AR Autoinvoice" for this example.
The corresponding API internal name (RAXMTR) and description are automatically populated.

Click Continue.
-
-
In the Configure Operations page, select a desired method name contained in the selected API (RAXMTR) for this invoke (target) connection.
For example, select "RA_INTERFACE_LINES_ALL".
In the CRUD Operation field, select "Create" from the drop-down list.

Click Continue.
-
The Summary page displays all the selected interface details. This information includes the selected "RA_INTERFACE_LINES_ALL" operation (with CRUD "Create" operation) contained in the "RAXMTR" web service from the Financial Receivables Suite product family and Receivables product. This page also displays the default interaction pattern "Synchronize" for the selected service.
The Oracle E-Business Suite Adapter Target Endpoint configuration is successfully created.
Click Finish.
-
Click Save to save your work.
The connection for Oracle E-Business Suite called "RA_Interface_lines" now appears as part of the orchestration flow.
Add the Oracle E-Business Suite Adapter as an Invoke Connection for Submitting a Concurrent Program
After adding the Oracle E-Business Suite Adapter as an invoke connection (RA_Interface_lines) to invoke the RA_INTERFACE_LINES_ALL REST service, you can add the second invoke connection in the flow to invoke the SUBMIT_CP_RAXMTR REST service to submit the RAXMTR (Autoinvoice Master Program) concurrent program.

Perform the following steps to add the Oracle E-Business Suite Adapter as an invoke (target) connection for concurrent program submission:
-
In the "EBS OIT Demo" integration canvas, hover your cursor over the lines right after the "RA_Interface_lines" activity you just created earlier. Click the + sign to display a list of invoke connections.
Search and select the "EBSDemo" connection from the list to display the Oracle E-Business Suite Adapter Endpoint Configuration Wizard.
-
In the Configure Basic Info page, enter the following information for your endpoint:
-
What do you want to call your endpoint? - Enter "Submit_RAXMTR".
-
What does this endpoint do? - Enter "Submit the concurrent program for RAXMTR".
Click Continue.
-
-
In the Configure Web Services page, specify the following information for your target connection:
-
Product Family: Select "Financial Receivables Suite" from the drop-down list.
-
Product: Select "Receivables".
-
Interface Type: Select "Open Interface" from the list.
-
API: Select "AR Autoinvoice".
The corresponding API internal name (RAXMTR) and description are automatically populated.
Click Continue.
-
-
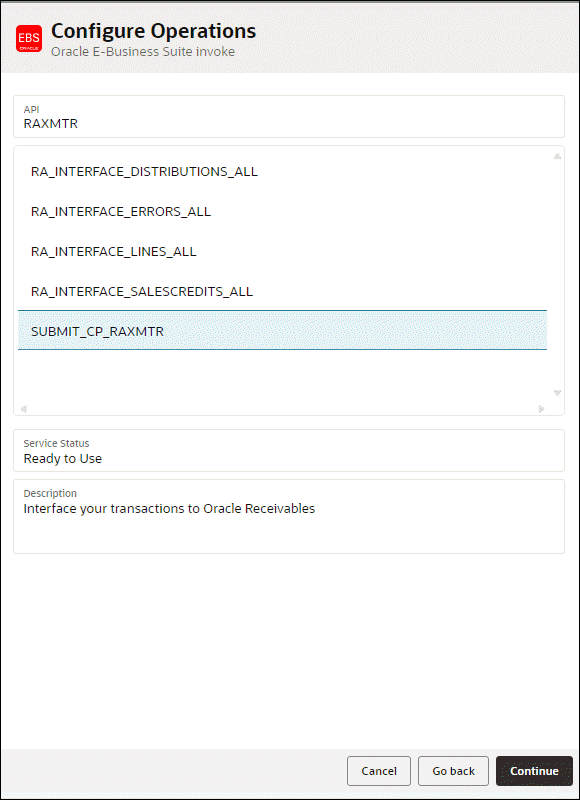
In the Configure Operations page, select a desired method name contained in the API (RAXMTR) for this invoke (target) connection. In this example, select "SUBMIT_CP_RAXMTR".

Click Continue.
-
The Summary page displays all the selected interface details. This information includes the selected "SUBMIT_CP_RAXMTR" operation contained in the "RAXMTR" REST service from the Financial Receivables Suite product family and Receivables product. This page also displays the default interaction pattern "Synchronize" for the selected service.
The Oracle E-Business Suite Adapter Target Endpoint configuration is successfully created.
Click Finish.
-
Click Save to save your work.
Add the Loggers
After adding both the trigger and invoke connections in the canvas, you can add the logger to log messages. In this example, you need to add the following two loggers in the orchestration flow:
-
Add the first logger after "RA_Interface_Lines"
This activity is to log message about the "Success Count" information after the successful invocation of the RA_INTERFACE_LINES_ALL REST service.
-
Add the second logger after "Submit_RAXMTR"
Once the concurrent program is successfully processed, use this activity to log message about the concurrent request ID. You can then view the associated report through the concurrent request ID for validation.
Perform the following steps to add loggers:
-
Add the First Logger "Interface" for Success Count
In the "EBS OIT Demo" integration page, click Actions
 and drag and drop the Logger action to the integration after "RA_Interface_Lines" and before "Submit_RAXMTR". The Configure Logger panel appears.
The Create Action page appears.
-
Click Edit
 under Configure Logger to enter "Interface" as the name.
-
Perform the following tasks to create a message:
-
In the Log field, select the Always button.
-
In the Source tree, expand the RA_INTERFACE_LINES_ALLResponse node, then the OutputParameters node, and then the Summary node.
Drag and drop the SuccessCount element to the right in the Logger Message field.
-
In the Functions section, expand Functions, then String, and then concat. Drag and drop concat to the Logger Message field to add the function as expression to display Success Count.
Click Save to add this action to the integration.
-
-
Add the Second Logger "CPSubmitResponse" for Concurrent Program Submit ID
In the "EBS OIT Demo" integration page, click Actions
 and drag the drop the Logger action to the integration, right after "Submit_RAXMTR". The Configure Logger panel appears.
-
Click Edit
 under Configure Logger to enter "PSubmitResponse" as the name.
-
Perform the following tasks to create a message:
-
In the Log field, select the Always button.
-
In the Source tree, expand the Submit_RAXMTR node, then the RAXMTRResponse node, and then the OutputParameters node.
Drag and drop the CP_Submit element to the right in the Logger Message field.
-
In the Functions section, expand Functions, then String, and then concat. Drag and drop concat to the Logger Message field to add the function as expression to display CP Submit ID.
Click Save to add the second Logger to the integration.
-