Add Standalone Integrations to a Project
You can move or copy one or multiple standalone integrations that currently exist outside of projects to a newly-created or existing project.
Capabilities
This feature provides the following benefits.
- Enables you to move or copy integrations to an existing project or to a new project. Moving or copying integrations does not change the execution behavior of standalone integrations. Active, standalone integrations continue to run. This behavior only changes after you activate integrations in the project.
- For integrations that you move, you can also select to retain the global endpoint URL. When you activate an integration for the first time in a project that is currently active in a standalone environment, the standalone integration is first deactivated. The new project integration is then activated. If you selected to retain the global endpoint URL, client applications continue to use the same global endpoint URL when connecting to Oracle Integration. A new project endpoint URL is also created after activation. enabling you to gradually transition away from the global endpoint URL to the project endpoint URL.
- For integrations that you copy, a new project endpoint URL is created after activating the integration in a project. You cannot use the global endpoint URL for active, project integrations and your Oracle Integration clients must update their endpoint URLs. Integrations copied to a project act like a new integration in a project. Their activation or deactivation has no impact on the standalone integration.
- Enables you to move or copy all supported types of integrations: application, schedule, and event.
- Enables you to move or copy a maximum of 100 integrations per request.
- Enables you to select a single version of an integration with multiple versions to copy or move to a project and have the remaining versions automatically selected. For example, selecting version 1.0.1 automatically causes versions 1.0.2 and 1.0 to be selected.
- TestAIActions (1.0.1)
- TestAIActions (1.0.2)
- TestAIActions (1.0)
The capability also applies when deselecting an integration with multiple versions.
- Enables you to move your integrations to a project, then export and import that project from a development to a production environment, and maintain the global endpoint URLs.
- Eliminates the need to navigate to the details page of a project to move or copy an integration to a project. You perform this task from the standalone Integrations page.
- Helps you to more easily adopt your design-time and runtime experiences to projects and enjoy the benefits of better manageability and easier observability.
- Enables you to create a new minor version of an integration that you moved to a project and have it inherit the settings of the major integration. For example, if the major version of the integration (for example, 1.0) is configured to maintain use of the global endpoint URL, the minor version of the integration (for example, 1.0.1) also inherits these capabilities, even though the minor version never existed in the standalone environment.
- Enables you to create a project deployment that includes integrations moved from a standalone environment and have those integrations retain both the global (if selected to be retained) and project endpoint URLs.
Restrictions
- Child integrations won't be copied if not explicitly selected.
- Connections are not automatically configured when you copy integrations to a project. Connections configurations are retained when you move integrations to a project.
- You can only move a standalone integration once to a project. After that, the standalone integration cannot be moved to another project.
Move Standalone Integrations to a Project
- In the navigation pane, click Design, then Integrations.
- In the upper right corner of the page, click Add to project.
- Click Move to project.
- Select the project to which to move integrations:
- Create: Prompts you to first create a new project to which to move integrations.
- Select a project: Select an existing project to which to move integrations.
After making your selection, a message is displayed with the following details:
- The number of integrations you can move to this project based on the number of integrations currently in the project. A maximum of 200 integrations are allowed per project. For example, if there are already 12 integrations in the selected project, the message indicates that an additional 188 are allowed.
- Only fully configured or activated integrations are displayed for moving to the project. You cannot move integrations that are locked or in a draft state.
- Select the integrations to copy to the new or existing project, then click Next.
The Summary page is displayed.
- If you want to retain use of your current global endpoint URL after integration activation, ensure that the Keep Current URL check box is selected. It's enabled by default.
If The Check Box Is ... Then ... Selected After integration activation in a project, the global endpoint URL remains active by default even though your integrations have been moved to the project context. Retaining the global endpoint URL means that your Oracle Integration clients do not need to update their endpoint URLs.
The new project endpoint URL is also generated, allowing you to transition gradually to the project endpoint URL. The endpoint URLs are constructed differently. For example, for theTESTALLACTIONSintegration:- New project endpoint URL:
/ic/api/integration/v1/flows/rest/project/TESTALLACTIONS/1.0/ - Existing global endpoint URL:
/ic/api/integration/v1/flows/rest/TESTALLACTIONS/1.0/
After testing your integrations in a project and notifying all your clients to update their applications to use the new project endpoint URL, you can disable the global endpoint URL. See Disable the Global Endpoint URL.
Not Selected After integration activation in a project, you must use the new project endpoint URL and your clients must also update their applications to use the new project endpoint URL.
- New project endpoint URL:
- Click Submit.
When moving completes, the following message is displayed:
Integrations moved to projectIf you click the Notifications icon at the top of the page, the same message is shown.
- In the navigation pane, click Projects.
- Open your project and note that the moved integrations and artifacts (connections, lookups, and other artifacts) appear in a configured state in the project.
Your integrations now reside in both the project and standalone environments. No integrations or artifacts are deleted. This scenario gives you time to verify that your integrations work correctly in the project.
- Activate the integrations that you moved to the project. For details about what occurs with integrations during activation, see Capabilities.
If you have multiple versions of the same integration (for example, 1.0, 1.0.1, and 1.0.2), activate the integration that was active in the standalone environment.
If an integration version that you moved to the project is active in the standalone environment, a message appears saying that the version in the standalone environment will be automatically deactivated. The integration in the project is then activated. If none of the integrations that you moved to the project are currently active, this message does not appear.
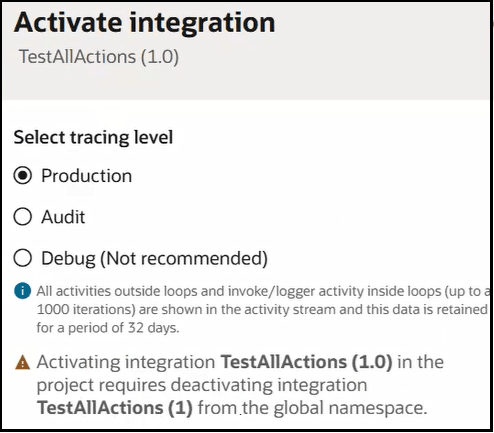
- After activation successfully completes, select the Actions
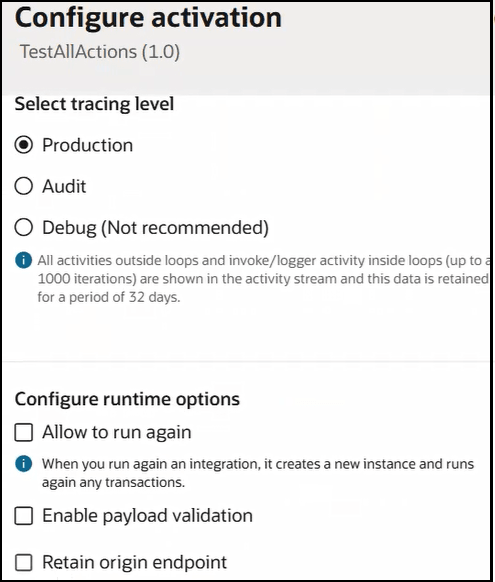
 menu for this integration, then select Configure activation.
- Select Retain origin endpoint to continue using the global endpoint URL, then click Save.
Disable the Global Endpoint URL
- Go to the integration in the project.
- Select the Actions menu, then select Configure activation.
- Deselect Retain origin endpoint, then click Save.
If you later want to resume use of the global endpoint URL, then re-select Retain origin endpoint.
Copy Standalone Integrations to a Project
- In the navigation pane, click Design, then Integrations.
- In the upper right corner of the page, click Add to project.
- Click Copy to project.
- Select the project to which to copy integrations:
- Create: Prompts you to first create a new project to which to copy integrations.
- Select a project: Select an existing project to which to copy integrations.
- Select the integrations to copy to the new or existing project, then click Submit.
- When copying completes, the following message is displayed:
Integrations copied to project
- When copying completes, the following message is displayed:
- In the navigation pane, click Projects.
- Open your project and note that the copied integrations appear in the project.
Your integrations now reside in both the project and standalone environments.
- Reconfigure the connections in your integrations.
- Activate the integrations. For details about what occurs during activation, see Capabilities.