Send Notification Emails During Stages of the Integration with a Notification Action

You can send a notification email to relevant users at specific points in the processing of an integration. You can set the to, from, and subject parts of an email. You can create the body part of an email using parameters defined in the Expression Builder. You can also add attachments to the email if your integration includes them. The total size limit on a notification email is 1 MB for Oracle Integration and 2 MB for Oracle Integration Generation 2. Both the email body and attachment are considered in calculating the total size.

  1. Add a notification action to an integration in either of the following ways:
    • On the side of the canvas, click Actions Integration actions icon and drag the Notification action to the appropriate location.
    • Click Add icon at the location where you want to add the notification action, then select Notification.
  2. Click Edit Edit icon under Configure Notification to enter a name and optional description for the notification action.
  3. Click the To field.
    This opens the Sources tree for defining an expression and a second To field for editing immediately after the first field.
  4. Manually enter an email address, select from the drop-down list, or drag an element from the Sources tree to the To field:


    Sources tree shows a value of email that has been dragged to the To field. The To field includes clear and switch to developer view icons.

  5. Click the From field.
    This opens a second From field for editing immediately after the first field.


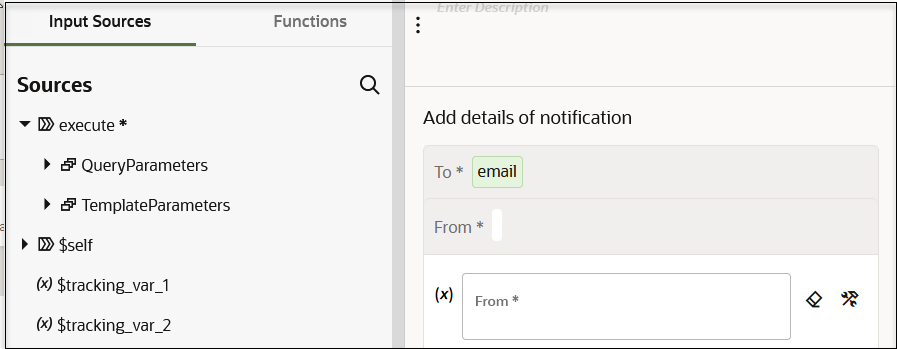
    The Input Sources tab is selected. The Functions tab is to the right. The Sources section is after this. On the right is the Add details of notification section. The To and From fields are after. The From field is selected for editing. Two icons appear to the right of this field.

  6. Manually enter an email address, select from the drop-down list, or drag an element from the Sources tree. For this example, an email element is dragged from the Sources tree.
    You can provide an email address in the From field that is approved as the sender for service failure alerts, system status reports, and integration error reports. You configure the approval email address to use in the From field on the Notifications page that is accessible by selecting Settings, and then Notifications.

    Note:

    If you send emails with the notification action and the From address is not one of the approved senders configured on the Notifications page, the From address defaults to the approved sender address of no-reply@mail.integration.region.ocp.oraclecloud.com. For example, if your region is Ashburn, the address is no-reply@mail.integration.us-ashburn-1.ocp.oraclecloud.com. See Configure Notification Emails.

    See Send System Status Reports with Notification Emails.

  7. Click the Subject field.
    This opens a second Subject field for editing immediately after the first field.
  8. Manually enter a subject in plain text, select from the drop-down list, or build an expression from the Source or Functions tree. To drag a function, ensure that you first select Switch to Developer View Switch view icon.

    For this example, a concat function is selected for use from the Functions section.

    concat ( 'Hello', name )
  9. Click the Body field.
    This opens a second Body field for editing immediately after the first field.
  10. Enter a message using plain text and plain HTML formatting that you create in a separate HTML editing tool and paste into this field or parameters that you create in the table immediately after this field. After creating parameters, enter them inside { } brackets.
    <html>
    <body>
    <p>Hello <strong><span style="color: #2925BF;">{name},</span></strong></p>
    <p><span style="color: #298022;"><strong>Welcome to Oracle Integration!</strong></span></p>
    </body>
    </html>
  11. Click + to add parameters.
  12. Enter a parameter name and description or build an expression.
  13. Click + to add attachments.
  14. Select the attachments to add.
  15. In the Attachments section, click + to open a page to select an attachment file.
    You can edit or delete attachments once added. Examples of attachments may include file reference attachments that are available for selection:
    • An attachment from a REST Adapter connection
    • A file reference from a stage file write operation
    • A file reference from an FTP Adapter download operation
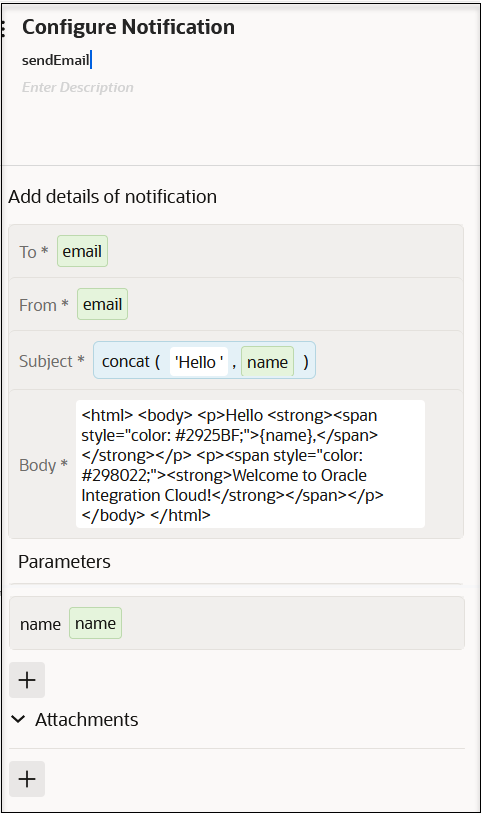
  16. When complete, the Configure Notification panel looks as follows for this example:

    The Configure notifications panel shows name and description fields at the top. After this is the Add details of notification section. The To, From, Subject, and Body fields are after. After this is the Parameters section, with a value of name. After this is the Attachments section.

  17. Click Save.

When the email notification is received during integration runtime, the parameter name is replaced with a dynamic value.

Note:

  • Deleting the notification action does not impact downstream activities because a notification does not have any output. Changes in the upstream activities impact the notification when they are used either in the From, To, or Subject fields or in the body parameters. For example, if the name example used in this section is modified, the parameter assignment become invalid.

  • Notification actions are treated as asynchronous actions with no failure. For example, assume you include a notification action in an integration and disable the sendmail service on your host, which prevents you from receiving an email notification. The integration instance appears as completed on the Instances page and there is no error message in the instance. This is the expected behavior. You can only see an issue with the instance if you open the integration instance and view the notification action.