Import Transactional Data Using the Bulk Data Import Operation

This use case describes how to import transactional records in chunks from an application (for example, Salesforce) into the PostgreSQL database. In this use case, the Salesforce application is used. Similarly, you can import data files from other applications into the PostgreSQL database using the PostgreSQL Adapter.

To perform this operation, you create the Salesforce Adapter and PostgreSQL Adapter connections in Oracle Integration. The PostgreSQL Adapter first validates an input file header with the target table header (columns), and then inserts data into the target table if the data is in the expected format.

  1. Create an app-driven orchestrated integration.
  2. Drag a REST Adapter into the integration as a trigger connection.
    1. On the Basic Info page, provide a name.
    2. On the Resource Configuration page, select the GET action and the Configure this endpoint to receive the response check box.
    3. On the Response page, select JSON Sample in the Select the response payload format field.
    4. Select JSON in the What is the media-type of Response Body? (Accept Header) field.
    5. Review your selections on the Summary page.
  3. Drag a Salesforce Adapter into the integration canvas.
  4. Configure the Salesforce Adapter endpoint:
    1. On the Basic Info page, provide a name.
    2. On the Action page, select Query Information.
    3. On the Operations page, select Query as an operation and the Exclude option for the deleted and achieved records.
    4. Enter a valid SOQL query statement and select the Use Default Header check box.
    5. Review your selections on the Summary page.
  5. Drag a stage file action into the integration canvas after the Salesforce Adapter and configure it to write (insert) transactional records in a file.
    1. On the Basic Info page, provide a name.
    2. On the Configure Operation page, select Write File from the Choose Stage File Operation field.
    3. Specify the X Path expression for the file name in the Specify the File Name field.
    4. Enter the file name with an extension (for example, Accountant).
    5. Specify the directory name in the Specify the Output Directory field.
    6. On the Scheme Options page, select Yes in the Do you want to specify the structure for the contents of the file field.
    7. Select Sample delimited document (e.g. CSV) in the Which one of the following choices would be used to describe the structure of the file contents field.
    8. On the Format Definition page, click Drag and Drop and upload the sample CSV file in the Select a New Delimited Data File field.
    9. Review your selections on the Summary page.
  6. In the mapper, map headers as an input for the write_header (stage) file.

    The

  7. Drag a second stage file action into the integration canvas. The stage file action helps to add the header to a file and then append the data to the same file.
    1. On the Basic Info page, provide a name.
    2. On the Configure Operation page, select Write File from the Choose Stage File Operation field.
    3. Specify the X Path expression for the file name in the Specify the File Name field.
    4. Enter the same file name and extension that you provided for the headwaiter (stage).
    5. Specify the directory name in the Specify the Output Directory field.
    6. Enter the same output directory that you provided for the headwaiter (stage).
    7. Under Append to Existing File, select the Append check box.
    8. On the Scheme Options page, select Yes in the Do you want to specify the structure for the contents of the file field.
    9. Select Sample delimited document (e.g. CSV) in the Which one of the following choices would be used to describe the structure of the file contents field.
    10. On the Format Definition page, click Drag and Drop and upload a sample CSV file in the Select a New Delimited Data File field.
    11. Review your selections on the Summary page.
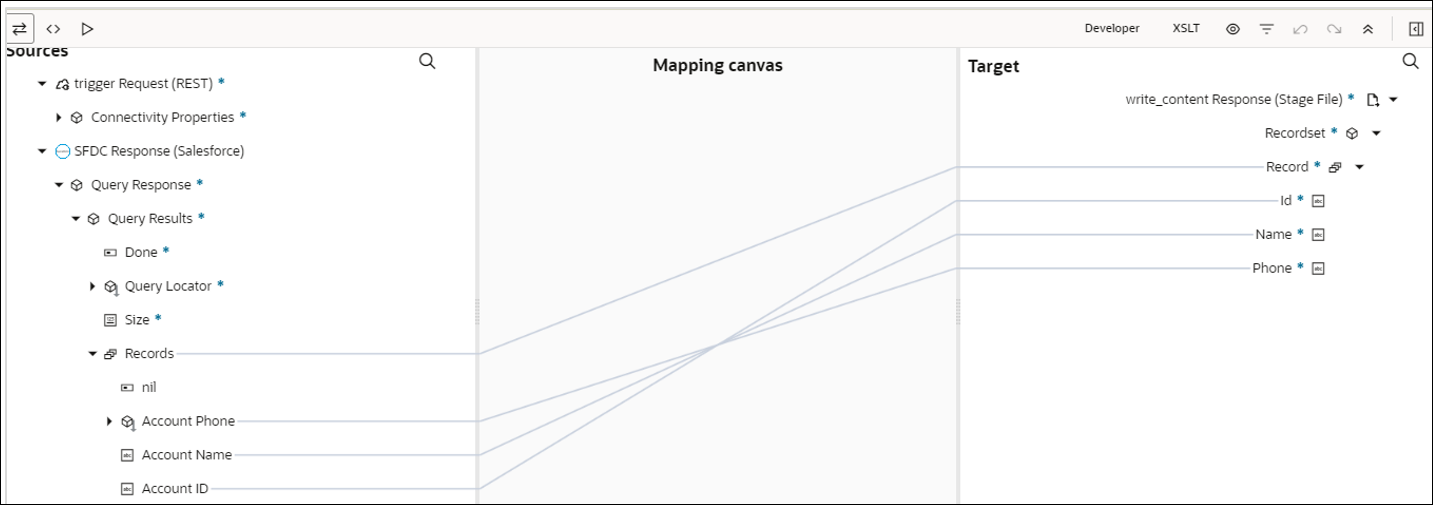
  8. In the mapper, map the Salesforce response to the write_content (stage) request.

    The

  9. Drag a PostgreSQL Adapter into the integration canvas.
  10. Configure the PostgreSQL Adapter endpoint:
    1. On the Basic info page, provide an endpoint name, and select Perform Bulk Data Import Operation.
    2. On the Bulk load from File to Table page, select the delimiter (for example, comma), schema, table, and table columns.
    3. On the Summary page, review your selections.
  11. In the mapper, map the file reference from the ICS file response to pass the data to the target table.

    The

  12. Click Validate.
    The completed integration looks as follows.


    The

  13. When complete, save and activate the integration. As a result, the PostgreSQL Adapter inserts data into the target table if the data is in the expected format.