Process Large Data Sets Asynchronously with Different Bulk Data Operations (CRUD)

The Salesforce REST Bulk API version 2.0 enables you to handle huge data sets asynchronously with different bulk operations. For every bulk operation, the Salesforce application creates a job that is processed in batches. A job contains one or more batches in which each batch is processed independently.

This use case describes how to configure the Salesforce REST Adapter to create many account records in Salesforce Cloud.

To perform this operation, you can create FTP Adapter and Salesforce REST Adapter connections in Oracle Integration.

In this use case, a CSV file is used as input. However, you can also use other format files. The Salesforce REST Adapter transforms the file contents into a Salesforce REST recognizable format. Follow these steps to recreate this use case in your Oracle Integration instance.
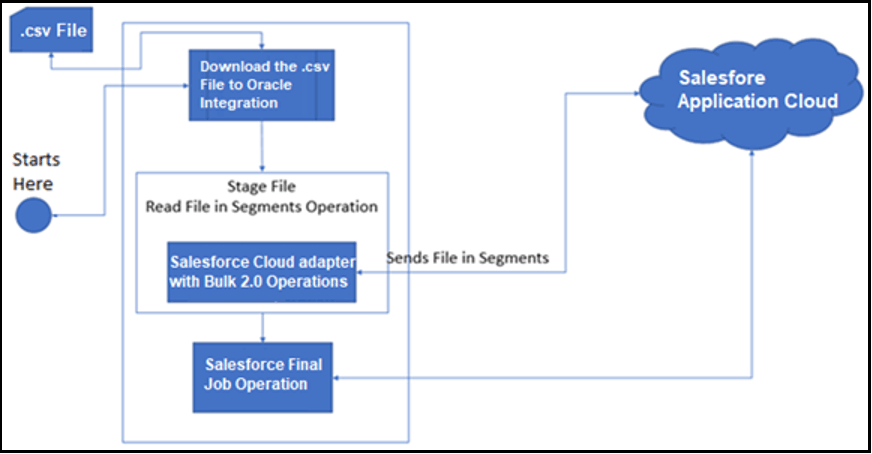

A box labeled .csv File appear in the upper left. Below this is the Starts Here circle. Both the box and circle point with arrows to a box labeled Download the .csv File to Oracle Integration. This box points down with an arrow to a box labeled Stage File Read File in Segments Operation. Within this box is a smaller box labeled Salesforce Cloud adapter with Bulk 2.0 Operations. The smaller box points to a cloud labeled Salesforce Application Cloud. This smaller box also points to a box labeled Salesforce Final Job Operation, which also points to the cloud labeled Salesforce Application Cloud.

  1. Create a schedule integration.
  2. Drag an FTP Adapter into the integration canvas.
  3. Configure the FTP Adapter as follows:
    1. On the Basic Info page, provide a name.
    2. On the Operations page, select Download File from the Select Operation list.
    3. Select Binary from the Select a Transfer Mode list.
    4. Provide the input directory, file name, and download directory.
    5. On the Summary page, review your selections.
  4. Drag a stage file action into the integration canvas below the FTP Adapter. The stage file action helps the Salesforce REST Adapter fetch data in the form of segments (a single segment contains 200 to 2000 records).
    1. On the Basic Info page, provide a name.
    2. On the Configure Operations page, select Read Files in Segments from the Choose Stage File Operation field.
    3. Specify the XPath expression for the file name in the Specify the File Name field.
    4. Specify the directory name in the Specify the Directory to read from field (downloaded to Oracle Integration using FTP).
    5. On the Scheme Options page, Select Yes in the Do you want to specify the structure for the contents of the file field and select Sample delimited document (e.g. CSV) in the Which one of the following choices would be used to describe the structure of the file contents field.
    6. On the Format Definition page, click Choose File and upload the sample CSV file in the Select a New Delimited Data File field.
    7. Enter the record name and record set name.
    8. On the Summary page, review your selections.
  5. Drag a Salesforce REST Adapter inside the stage file action and configure it with the required bulk operation.
    1. On the Basic Info page, provide a name.
    2. On the Action page, select Perform Bulk Data Operations (Create, Upsert, Update, Delete).
    3. On the Operations page, select Bulk, then select the required operation (for this example, Create) in the Select an operation field.
    4. Select the required business objects (for this example, Account) in the Select Business Objects field.
    5. On the Summary page, review your selections.
  6. In the mapper, map the source stage file action elements to the target Salesforce REST input payload elements.

    The Sources, Mapping canvas, and Target sections are shown. The source Bulk Record Set subelements are mapped to the target Account subelements.

  7. Drag a Salesforce REST Adapter below the stage file action and configure it with the Final Job operation.
    1. On the Basic Info page, provide a name.
    2. On the Action page, select Perform Bulk Data Operations.
    3. On the Operations page, select Bulk, then select Final Job in the Select an operation field.
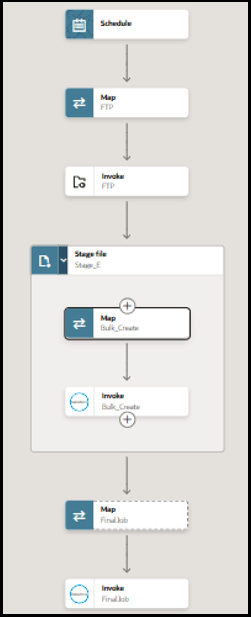
    When complete, the integration looks as follows.


    The integration shows a schedule, map, invoke, stage file (which includes a map and invoke), map, and invoke.

  8. Specify the tracking variable.
    1. Click Business Identifiers Business identifiers icon.
    2. Drag the required variable to use for the tracking reference (for this example, startTime is selected).
  9. Activate the integration.
    After successful activation, you can submit the integration and monitor the runtime in Oracle Integration.