Use OAuth 2.0 Grants in Identity Domain Environments
To use an OAuth 2.0 grant type with this adapter in an identity domain environment of Oracle Integration, you must perform the following prerequisites.
Access the Identity Domain
- Log in to the Oracle Cloud Console
with your identity domain administrator credentials.
- In the navigation pane, click Identity & Security.
- Click Domains.
- Select your compartment.
- Select the identity domain.
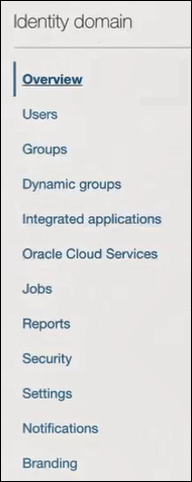
- In the menu bar, click Integrated
applications.
This is the location at which you create the client application for your grant type.
Prerequisites for JWT User Assertion
- Generate the key
- Configure the client application
- Add a certificate as a trusted partner
- Generate the JWT user assertion
- Validate the client application
Generate the key
You must first generate the key to import when you configure the client application for the JWT user assertion.
- Generate the self-signed key pair.
keytool -genkey -keyalg RSA -alias <your_alias> -keystore <keystore_file> -storepass <password> -validity 365 -keysize 2048 ##example keytool -genkey -keyalg RSA -alias assert -keystore sampleKeystore.jks -storepass samplePasswd -validity 365 -keysize 2048 - Export the public key for signing the JWT
assertion.
keytool -exportcert -alias <your_alias> -file <filename> -keystore <keystore_file> -storepass <password> ##example keytool -exportcert -alias assert -file assert.cer -keystore sampleKeystore.jks -storepass samplePasswd ## This should show a success message e.g. Certificate stored in file <assert.cer> - Convert the keystore to P12
format.
keytool -importkeystore -srckeystore <filename> -srcstorepass <password> -srckeypass <password> -srcalias <your_alias> -destalias <your_alias> -destkeystore <destFileName> -deststoretype PKCS12 -deststorepass <password> -destkeypass <password> ##example keytool -importkeystore -srckeystore sampleKeystore.jks -srcstorepass samplePasswd -srckeypass samplePasswd -srcalias assert -destalias assert -destkeystore assert.p12 -deststoretype PKCS12 -deststorepass samplePasswd -destkeypass samplePasswd ## This should show a success message e.g. Importing keystore sampleKeystore.jks to assert.p12... - Export the private key from the P12
keystore.
openssl pkcs12 -in <destFileName> -nodes -nocerts -out <pem_file>

##example
openssl pkcs12 -in assert.p12 -nodes -nocerts -out private_key.pem

## This should show a success message: MAC verified OK
Configure the client application
To trigger the integration with OAuth, a client application is required.
- Click Add application.
- Select Confidential Application, then click Launch workflow.
- Enter a name. The remaining fields on this page are optional and can be ignored.
- Click Submit.
- Click the OAuth configuration tab, then the Edit OAuth configuration subtab.
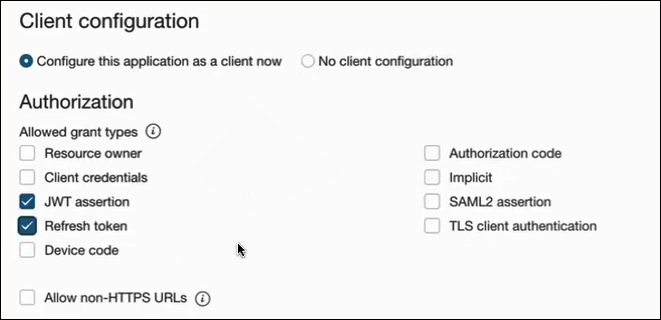
- In the Client configuration panel, select Configure this application as a client now.
- For JWT user assertions, select JWT
assertion and Refresh token in the
Allowed grant types section.
- Complete the following steps for the grant type:
- Leave the Redirect URL, Post-logout redirect URL, and Logout URL fields blank.
- In the Client type section, select Trusted for the client to generate self-signed user assertions and import your signing certificate.
- In the Certificate section, import the certificate created in section Generate the key. This action adds the certificate as a trusted partner.
- Bypass several fields and scroll down to the Token issuance policy section.
- Select Confidential in the Authorized resources section.
- Click the Add Resources toggle.
- Click Add scope.
- Find and expand the Oracle Integration application for your instance.
- Select the two scopes appended with the following
details:
- urn:opc:resource:consumer::all
- ic/api/

- Click Add.
The scopes are displayed in the Resources section.
- Ignore the Add app roles check box. This selection is not required.
- Click Submit.
The details page for the client application is displayed.
- Click Activate, and then Activate application to activate the client application for use.
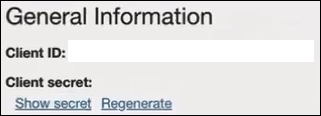
- In the General Information section,
note the client ID and client secret values. These values are required
for the third-party application that is communicating with the identity
domain.
- In the menu bar, click Oracle cloud
services.

- Click the specific application corresponding to the Oracle Integration instance.
- In the navigation pane, click Application roles.
- Expand ServiceInvoker, then click
Actions
 next to Assigned applications.
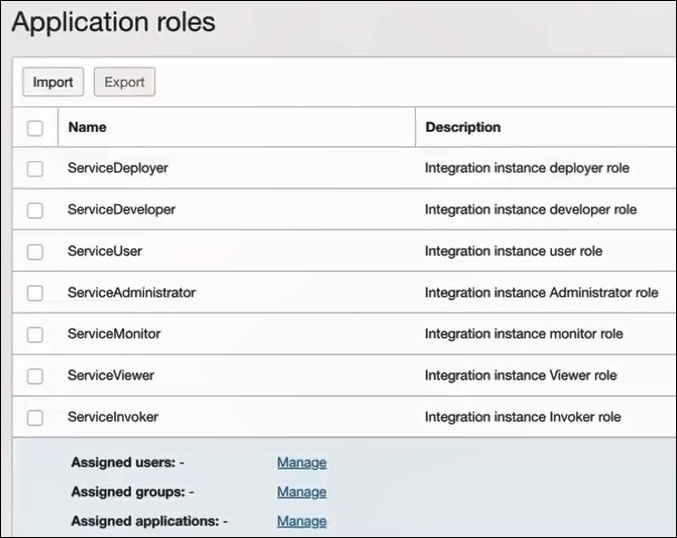
- Select ServiceInvoker, then click Manage users or Manage groups.
- Based on your selection, click Assign users or Assign groups to select the users or groups, then click Assign.
Add a certificate as a trusted partner
- In the menu bar, click
Security.

- Scroll down to the Trusted partner certificates section.
- Click Import certificate to upload the certificate created in section Generate the key.
Generate the JWT user assertion
- Generate the JWT user assertion using the generated private key and
simple Java code.
Note:
You can use the https://github.com/jwtk/jjwt library to generate the user assertion. There are many libraries listed at https://jwt.io/ for multiple technologies.Sample: header: { "alg": "RS256", "typ": "JWT", "kid": "assert" } payload: { "sub": "ssaInstanceAdmin", "jti": "8c7df446-bfae-40be-be09-0ab55c655436", "iat": 1589889699, "exp": 1589909699, "iss": "d702f5b31ee645ecbc49d05983aaee54", "aud": "https://identity.oraclecloud.com/" }Where:subspecifies the user name for whom user assertion is generated.jtiis a unique identifieriatis issued (epoch seconds).expis the token expiry (epoch seconds).issis the client ID.audmust include the identity domain audiencehttps://identity.oracle.com/. The signing algorithm must be RS256.kidspecifies the key to use to verify the signature. Therefore, it must match with the uploaded certificate alias.
Validate the client application
- Once you generate the JWT user assertion, generate the access token
as
follows.
##Syntax curl -i -H 'Authorization: Basic <base64Encoded clientid:secret>' -H 'Content-Type: application/x-www-form-urlencoded;charset=UTF-8' --request POST https://<Identity_Domain_Service_Instance>.identity.oraclecloud.com/oauth2/v1/token -d 'grant_type=urn%3Aietf%3Aparams%3Aoauth%3Agrant-type%3Ajwt-bearer&assertion=<user assertion>&scope=<app_scope>' ###where #### grant type - urn:ietf:params:oauth:grant-type:jwt-bearer #### <base64-clientid-secret> - Base 64 encode clientId:ClientSecret #### <user assertion> - User assertion generated #### <app scope> - Scope added while creating application in client configuration section (Ends with urn:opc:resource:consumer::all) - Capture the
access_tokenfrom the response.{ "access_token": "eyJ4NXQjG...dfsdfsFgets2ed", "token_type": "Bearer", "expires_in": 3600 } - Use an
access_tokenin the authorization header to invoke the Oracle Integration trigger endpoint.curl --location --request GET 'https://OIC host/OIC endpoint' \ --header 'Authorization: Bearer eyJ4NXQjG...dfsdfsFgets2ed'
Prerequisites for Client Credentials and Resource Owner Password Credentials
To trigger the integration with OAuth, a client application is required. The prerequisites for the client credentials and resource owner password credentials grant types are very similar.
Configure the client application
- Click Add application.
- Select Confidential Application, then click Launch workflow.
- Enter a name. The remaining fields on this page are optional and can be ignored.
- Click Submit.
- Click the OAuth configuration tab, then the Edit OAuth configuration subtab.
- In the Client configuration panel, select Configure this application as a client now.
- Select the grant type to use:
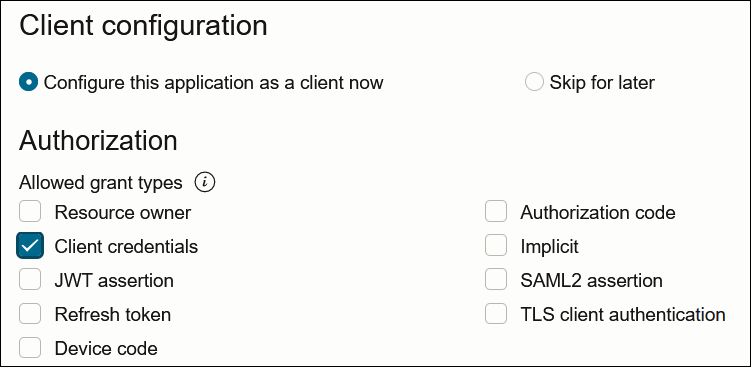
- For client credentials, select Client
credentials in the Allowed grant
types section.
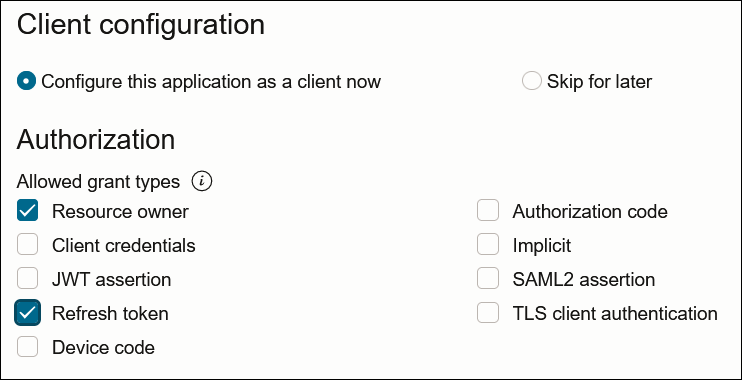
- For resource owner password credentials, select
Resource owner and Refresh
token in the Allowed grant types
section.
- For client credentials, select Client
credentials in the Allowed grant
types section.
- Complete the following steps for either grant type:
- Leave the Redirect URL, Post-logout redirect URL, and Logout URL fields blank.
- For Client type, ensure that Confidential is selected.
- Bypass several fields and scroll down to the Token issuance policy section.
- Select Confidential in the Authorized resources section.
- Click the Add Resources toggle.
- Click Add scope.
- Find and expand the Oracle Integration application for your instance.
- Select the two scopes appended with the following
details:
- urn:opc:resource:consumer::all
- ic/api/

- Click Add.
The scopes are displayed in the Resources section.
- Ignore the Add app roles check box. This selection is not required.
- Click Submit.
The details page for the client application is displayed.
- From the Actions menu at the top, select Activate, and then Activate application to activate the client application for use.
- In the General Information section, note the
client ID and client secret values. These values are required for the
third-party application that is communicating with the identity domain.

Add roles to the client application
- In the menu bar, click Oracle cloud
services.

- Click the specific application corresponding to the Oracle Integration instance.
- In the menu bar, click Application roles.
- If configuring the client credentials grant type, select the
following:
- Expand ServiceInvoker, then click
Actions
 next to Assigned applications.

- Select to assign users, groups, and applications to the instance application.
- Expand ServiceInvoker, then click
Actions
- If configuring the resource owner password credentials grant type,
select the following:
- Select ServiceInvoker, then click Manage users or Manage groups.
- Based on your selection, click Assign users or Assign groups to assign users or groups to the instance application, then click Assign.
- Validate the client application for the grant type you are using.
- For the client credentials grant type:
- Fetch the access client to make an access token
request with the client
credentials.
##Syntax
curl -i -H 'Authorization: Basic <base64Encoded clientid:secret>' -H 'Content-Type: application/x-www-form-urlencoded;charset=UTF-8' --request POST https://<Identity_Domain_Service_Instance>.identity.oraclecloud.com/oauth2/v1/token -d 'grant_type=client_credentials&scope=<app scope>'
###where
#### <base64-clientid-secret> - Base 64 encode clientId:ClientSecret
#### <app scope> - Scope added while creating application in client configuration section (Ends with urn:opc:resource:consumer::all)

##Example
curl -i -H 'Authorization: Basic OGQyM...ZDA0Mjcz' -H 'Content-Type: application/x-www-form-urlencoded;charset=UTF-8' --request POST https://<identity_domain_host>/oauth2/v1/token -d 'grant_type=client_credentials&scope=https://<Resource APP Audience>urn:opc:resource:consumer::all'
Where
Identity_Domain_Service_Instanceis the value in the Domain URL field of the Details tab of the instance application.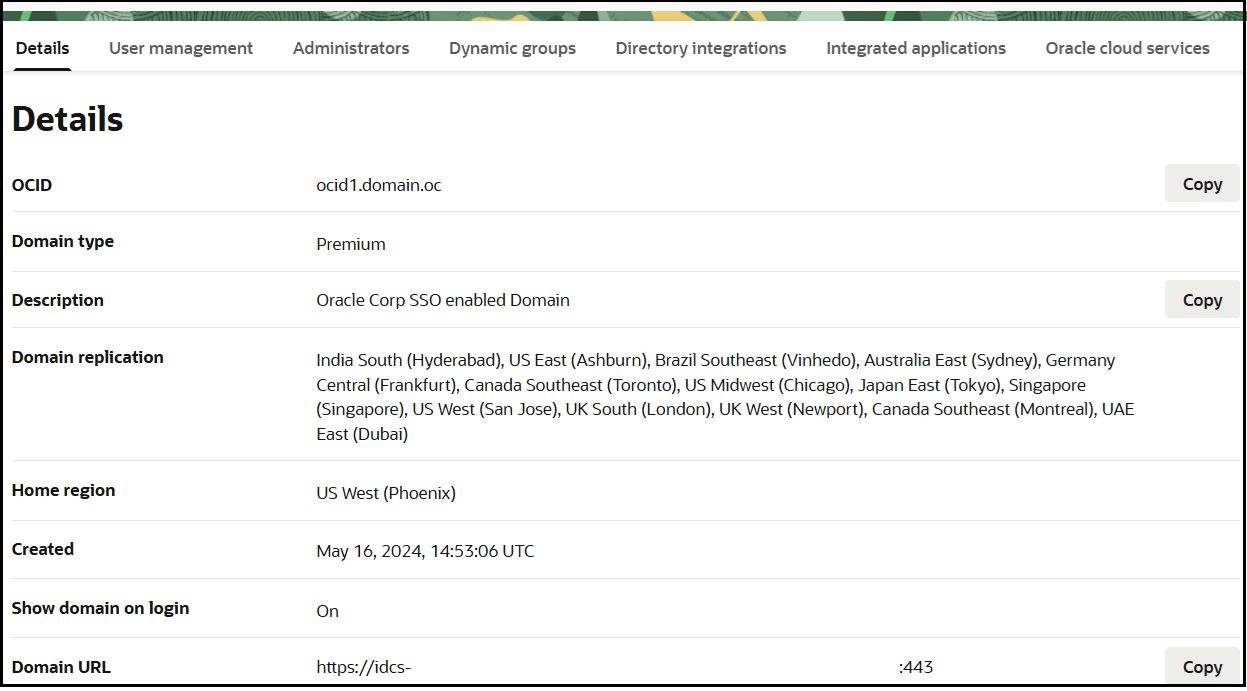
- Capture the
access_tokenfrom the response.{ "access_token": "eyJ4NXQjG...dfsdfsFgets2ed", "token_type": "Bearer", "expires_in": 3600 } - Use the
access_tokenin the authorization header to invoke the trigger endpoint.curl --location --request GET 'https://OIC host/OIC endpoint' \ --header 'Authorization: Bearer eyJ4NXQjG...dfsdfsFgets2ed'
- Fetch the access client to make an access token
request with the client
credentials.
- For the resource owner password credentials grant type:
- To fetch the access client, make a request with the
user name and password in the
payload.
##Syntax curl -i -H 'Authorization: Basic <base64Encoded_clientid:secret>' -H 'Content-Type: application/x-www-form-urlencoded;charset=UTF-8' --request POST https://<Identity_Domain_Service_Instance>.identity.oraclecloud.com/oauth2/v1/token -d 'grant_type=password&username=<user-name>&password=<password>&scope=<App_Scope>%20offline_access' ###where #### <base64-clientid-secret> - Base 64 encode clientId:ClientSecret #### <username> - user for token needs to be issued (must be in serviceinvoker role). #### <password> - password for above user #### <app_scope> - Scope added while creating application in client configuration section (Ends with urn:opc:resource:consumer::all) ##Example curl -i -H 'Authorization: Basic OGQyM...ZDA0Mjcz' -H 'Content-Type: application/x-www-form-urlencoded;charset=UTF-8' --request POST https://<identity_domain_host>/oauth2/v1/token -d 'grant_type=password&username=sampleUser&password=SamplePassword&scope=https://<Resource_APP_Audience>urn:opc:resource:consumer::all%20offline_access' - Capture the
access_tokenandrefresh_tokenfrom the response.{ "access_token": "eyJ4NXQjG...dfsdfsFgets2ed", "token_type": "Bearer", "expires_in": 3600, "refresh_token": "AQAgY2MzNjVlOTVhOTRh...vM5S0MkrFSpzc=" } - Use the
access_tokenin the authorization header to invoke the Oracle Integration trigger endpoint.curl --location --request GET 'https://OIC host/OIC endpoint' \ --header 'Authorization: Bearer eyJ4NXQjG...dfsdfsFgets2ed' - To update the access token, use the refresh token and make a request.
- Capture the
access_tokenandrefresh_tokenfrom the response for further use.curl -i -H 'Authorization: Basic <base64-clientid-secret>' -H 'Content-Type: application/x-www-form-urlencoded;charset=UTF-8' --request POST https://<Identity_Domain_Service_Instance>.identity.oraclecloud.com/oauth2/v1/token -d 'grant_type=refresh_token&refresh_token=<refresh_token>' ##Example curl -i -H 'Authorization: Basic OGQyM...ZDA0Mjcz' -H 'Content-Type: application/x-www-form-urlencoded;charset=UTF-8' --request POST https://<Identity_Domain_Service_Instance>.identity.oraclecloud.com/oauth2/v1/token -d 'grant_type=refresh_token&refresh_token=AQAgY2MzNjVlOTVhOTRh...vM5S0MkrFSpzc='
- To fetch the access client, make a request with the
user name and password in the
payload.
- For the client credentials grant type:
Prerequisites for Authorization Code
- Configure the client application
- Validate the Oracle Integration application and user roles
- Validate the client application
Configure the client application
To trigger the integration with OAuth, a client application is required.
- Click Add application.
- Select Confidential Application. then click Launch workflow.
- Enter a name. The remaining fields on this page are optional and can be ignored.
- Click Submit.
- In the Client configuration box, select Configure this application as a client now.
- Select the grant type to use:
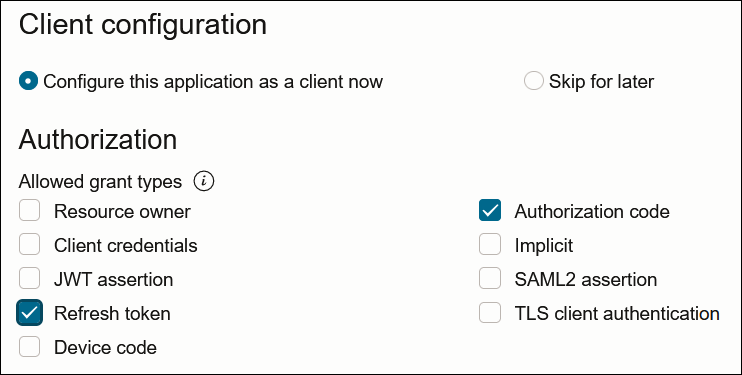
- For authorization code, select Refresh
token and Authorization code in
the Allowed grant types section.
- In the Redirect URL field, enter the
redirect URL of the client application. After user login, this URL is
redirected to with the authorization code. You can specify multiple
redirect URLs. This is useful for development environments in which you
have multiple instances, but only one client application due to
licensing issues.
Note:
If you don't know the following information, check with your administrator:
- If your instance is new or upgraded from Oracle Integration Generation 2 to Oracle Integration 3.
- The complete instance URL with the region included (required for new instances).
For Connections… Include the Region as Part of the Redirect URL? Example of Redirect URL to Specify… Created on new Oracle Integration 3 instances Yes. https://OIC_instance_URL.region.ocp.oraclecloud.com/icsapis/agent/oauth/callbackCreated on instances upgraded from Oracle Integration Generation 2 to Oracle Integration 3
No. This applies to both:
- New connections created after the upgrade
- Existing connections that were part of the upgrade
https://OIC_instance_URL.ocp.oraclecloud.com/icsapis/agent/oauth/callback - In the Client type section, click Confidential.
- Bypass several fields and scroll down to the Token issuance policy section.
- Select Confidential in the Authorized resources section.
- Click the Add Resources check box.
- Click Add scope.
- Find and expand the Oracle Integration application for your instance.
- Select the two scopes appended with the following
details:
- urn:opc:resource:consumer::all
- ic/api/

- Click Add.
The scopes are displayed in the Resources section.
- Ignore the Add app roles check box. This selection is not required.
- Click Submit.
The details page for the client application is displayed.
- Click Activate, and then Activate application to activate the client application for use.
- In the General Information section,
note the client ID and client secret values. These values are required
for the third-party application that is communicating with the identity
domain.

- For authorization code, select Refresh
token and Authorization code in
the Allowed grant types section.
Validate the Oracle Integration application and user roles
- In the menu bar, click Oracle cloud
services.

- Click the specific application corresponding to the Oracle Integration instance.
- In the navigation pane, click Application roles.
- Expand ServiceInvoker, then click
Actions
 next to Assigned applications.

- Select to manage users, groups, and applications for the instance application.
- Based on your selection, click Assign users or Assign groups to select the users or groups, then click Assign.
Validate the client application
- To fetch the authorization code, make the following request from the
browser.
##Syntax GET https://<Identity_Domain_Service_Instance>.identity.oraclecloud.com/oauth2/v1/authorize?client_id=<client-id>&response_type=code&redirect_uri=<client-redirect-uri>&scope=<app_scope>%20offline_access&nonce=<nonce-value>&state=<unique_value> ###where #### <client-id> - ID of Client application generated. #### <client-redirect-uri> - Redirect URI, in client application. #### <app_scope> - scope added while creating application in client configuration. (Ends with urn:opc:resource:consumer::all) #### nonce - Optional, unique value to mitigate replay attacks #### state - Recommended, Opaque to IDCS. Value used to maintain state between the request and the callback ##Example GET https://<identity_domain_host>/oauth2/v1/authorize?client_id=<clientID>&response_type=code&redirect_uri=https://app.getpostman.com/oauth2/callback&scope=https://<Resource_APP_Audience>urn:opc:resource:consumer::all%20offline_access&nonce=121&state=12345544 - If the user is not already logged in, you are challenged to
authenticate your user credentials. (For authentication, the user assigned the
ServiceInvoker role must be used.)
After authentication is successful, the client URL is redirected to with the authorization code and state added to the URL.
##Response URL https://<redirect_URL>?code=<code_value>=&state=<state_value> ###Client should validate state received is same as one sent in request. - Capture the code value from the above response and make the
following request to get the access
token.
##Syntax curl -i -H 'Authorization: Basic <base64-clientid-secret>' -H 'Content-Type: application/x-www-form-urlencoded;charset=UTF-8' --request POST https://<Identity_Domain_Service_Instance>.identity.oraclecloud.com/oauth2/v1/token -d 'grant_type=authorization_code&code=<authz-code>&redirect_uri=<client-redirect-uri> ###where #### <base64-clientid-secret> - BAse 64 encode clientId:ClientSecret #### <authz-code> - code value received as response on redirect. #### <client-redirect-uri> - Redirect URI, in client application. ##Example curl -i -H 'Authorization: Basic MDMx..NGY1' -H 'Content-Type: application/x-www-form-urlencoded;charset=UTF-8' --request POST https://<identity_domain_host>/oauth2/v1/token -d 'grant_type=authorization_code&code=AQAg...3jKM4Gc=&redirect_uri=https://app.getpostman.com/oauth2/callback - Capture the
access_tokenandrefresh_tokenfrom the response.{ "access_token": "eyJ4NXQjG...dfsdfsFgets2ed", "token_type": "Bearer", "expires_in": 3600, "refresh_token": "AQAgY2MzNjVlOTVhOTRh...vM5S0MkrFSpzc=" } - Use the
access_tokenin the authorization header to invoke the Oracle Integration trigger endpoint.curl --location --request GET 'https://OIC host/OIC endpoint' \ --header 'Authorization: Bearer eyJ4NXQjG...dfsdfsFgets2ed' - To update the access token, use the refresh token and make the request.
- Capture the
access_tokenandrefresh_tokenfrom a response for further use.curl -i -H 'Authorization: Basic <base64-clientid-secret>' -H 'Content-Type: application/x-www-form-urlencoded;charset=UTF-8' --request POST https://<Identity_Domain_Service_Instance>.identity.oraclecloud.com/oauth2/v1/token -d 'grant_type=refresh_token&refresh_token=<refresh_token>' ##Example curl -i -H 'Authorization: Basic OGQyM...ZDA0Mjcz' -H 'Content-Type: application/x-www-form-urlencoded;charset=UTF-8' --request POST https://<Identity_Domain_Service_Instance>.identity.oraclecloud.com/oauth2/v1/token -d 'grant_type=refresh_token&refresh_token=AQAgY2MzNjVlOTVhOTRh...vM5S0MkrFSpzc='