Create an Editable Table

You can create an editable table that allows users to edit multiple existing rows before they submit all their changes in one transaction to the backend service.

This implementation of an editable table uses the Buffering Data Provider with a Service Data Provider (SDP). The Buffering Data Provider is a wrapper that provides buffering for an underlying data provider, so that edits can be committed to the data source later on. The underlying data provider (Service Data Provider, in this case) is responsible for fetching data, and the Buffering Data Provider merges any buffered edits with the underlying data so they appear as a unified set of data.

Here's how you can create a table that displays editable rows of employees. All changes are stored in a buffer until the user clicks a Save button, at which time a REST call posts the changes to the backend service. The example used here follows the Batch Editable Table (BDP) recipe in the Visual Builder Cookbook, which demonstrates additional functionality, such as how to implement validation and create new rows.

  1. Add a table to your page and connect it to data using the Add Data quick start. The quick start creates a variable that is automatically bound to the table component. Because this variable is based on the Service Data Provider type, you need to create a variable based on the Buffering Data Provider type and set up your table to reference the new variable.
    1. Drag and drop a table component to your page, then add data to it using the Add Data quick start.
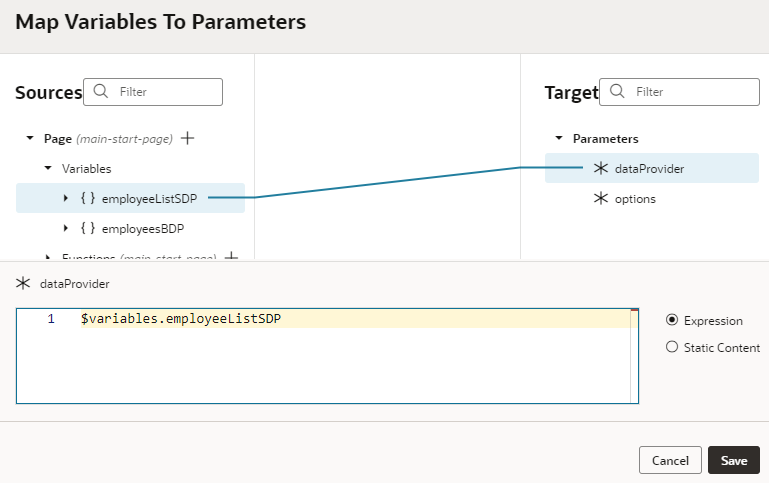
    2. Create a variable (for example, employeesBDP) based on the Buffering Data Provider type. In the newly created variable's Properties pane, map the dataProvider Constructor Parameter to the employeeListSDP:

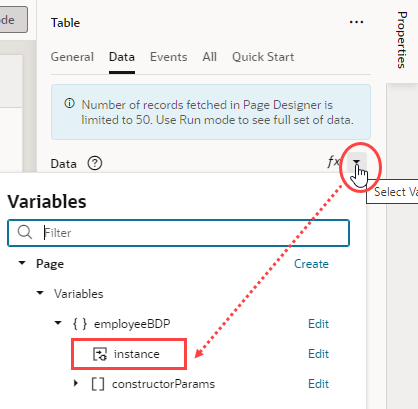
    3. In the table's Data tab, change the data property to point to [[ $variables.employeesBDP.instance ]], instead of employeesListSDP.

  2. Create event listeners and action chains to handle the table's edit events and make the table editable.
    1. Create a custom type from your endpoint (for example, the EmployeeType type based on the GET /Employee/{Employee_Id} endpoint), then create a page variable named currentRowBuffer that is assigned to the custom type.
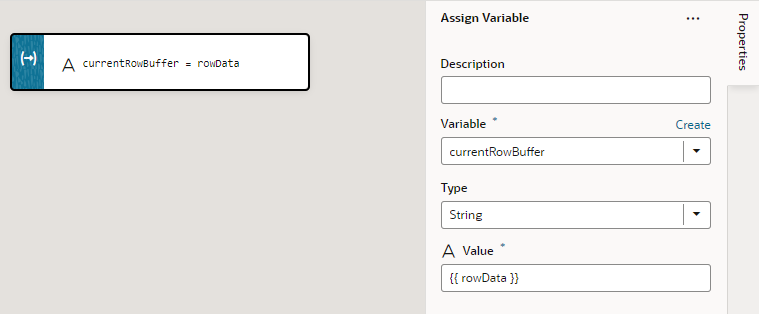
    2. Now add an ojBeforeRowEdit event listener to the table, then in the TableBeforeRowEditChain, add an Assign Variable action with the current row data (rowData) assigned to the currentRowBuffer page variable.

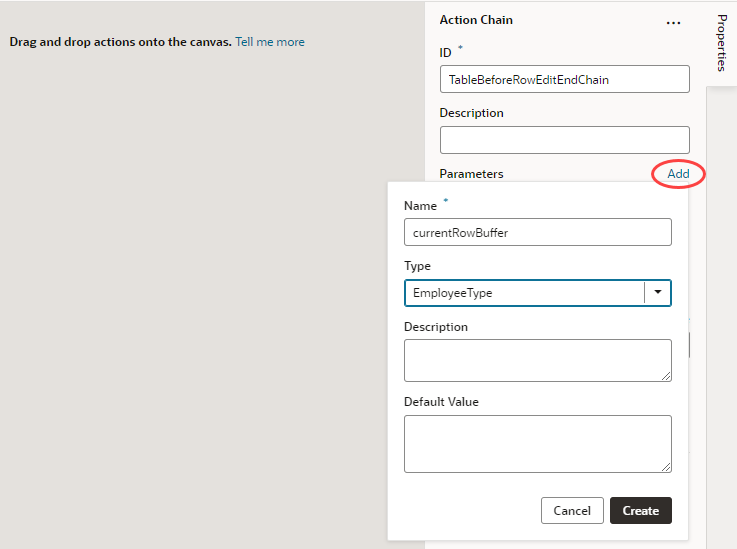
    3. Add an ojBeforeRowEditEnd event listener to the table, then in the TableBeforeRowEditEnd action chain, add two new Parameters as input parameters:
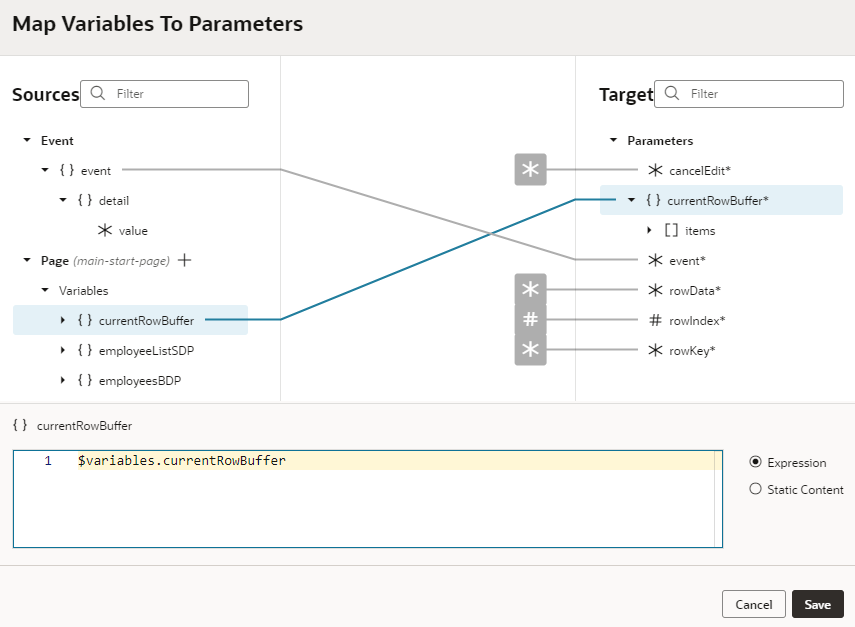
    4. To map these two new parameters, open the Event Listeners tab, select the TableBeforeRowEditEnd action chain under the tableBeforeRowEditEnd event. In the action chain's Properties pane, map the new parameters to $variables.currentRowBuffer and $event, respectively.

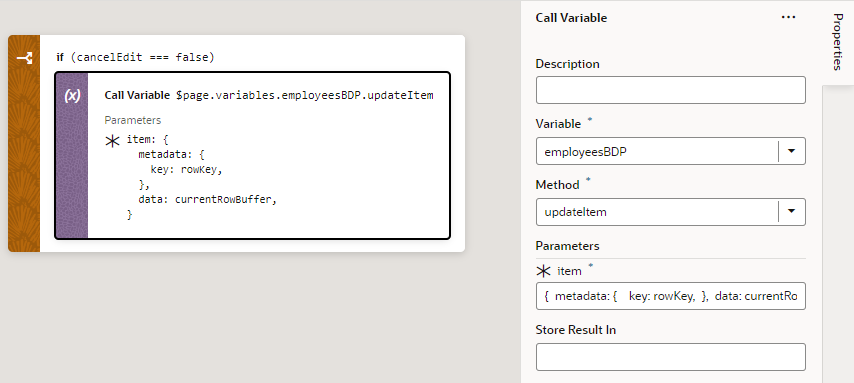
    5. In the TableBeforeRowEditEnd action chain, add an If action and test if the cancelEdit parameter is false. If false, changes need to be stored into the employeesBDP.
      Storing changes is implemented using a Call Variable action for variable employeesBDP and function updateItem with parameters:
      { metadata: { key: rowKey}, data: currentRowBuffer}


    6. Both the ojBeforeRowEdit and ojBeforeRowEditEnd events must have asynchronous behaviour enabled for editable table functionality to work. To do this, switch to the page's JSON view, locate tableBeforeRowEdit and tableBeforeRowEditEnd under eventListeners, and add "asyncBehavior": "enabled" for both events:
        "eventListeners": {
          "tableBeforeRowEdit": {
            "asyncBehavior": "enabled",
            "chains": [{ ... }]
          },
          "tableBeforeRowEditEnd": {
            "asyncBehavior": "enabled",
            "chains": [{ ... }]
          }     
    7. In the table's properties, set Edit Mode to Row Edit (if the option isn't already selected).
    8. Enhance table cells to make them editable:
      1. Drag and drop a Text component onto the first table column which needs to be editable. This generates a cell template for the column.
      2. In the Structure view, right-click the Bind Text node and select Surround and If to generate a condition for when to render the text component. Set the Bind If condition to [[$current.mode === 'navigation']]. When the table row is in read-only mode navigation, the text component will render the column value.
      3. Drop an Input Text (or any other component) into the same cell template as the Bind Text node and wrap it again in an If condition, but this time set the condition to [[$current.mode === 'edit']] to show an editable input text component when the table row is in edit mode.
      4. Remove the Input Text component's Label Hint and ReadOnly properties. Bind the Value property in the Data tab to the corresponding property from currentRowBuffer. For example, {{ $variables.currentRowBuffer.firstName }}.

      Use similar steps to make the other table columns editable.

  3. Track and save changes to the table. Saving changes involves collecting them from the Buffering Data Provider instance, marking changes as being submitted, creating a single batch REST Call payload to store all changes in one transaction, and finally marking changed items in the Buffering Data Provider as submitted.
    1. Drag a button and drop it above the table on the page. Change the Label to Save in the button's properties.
    2. In the button's Events tab, add an event listener for the On 'ojAction' event and rename the corresponding action chain as SubmitChanges.
    3. In the SubmitChanges action chain, add supporting JavaScript functions:
      • The createBatchPayload function to generate the payload with all changes. All changes stored in the Buffering Data Provider are accessed using the API call getSubmittableItems.
      • The setStatusTo function to set Buffering Data Provider items to submitting, submitted, or unsubmitted states. The Buffering Data Provider requires an edit item's status to be set, via the setItemStatus API call, before the change is committed to the data source.
      See the batch editable table recipe in the cookbook for sample code.
    4. Using these functions, you can build your action chain to change state, save data, and handle error states. See the batch editable table recipe in the cookbook for sample code.