5 About Oracle Machine Learning Notebooks
A notebook can contain many paragraphs. A paragraph is a notebook component where you can write and run SQL statements, PL/SQL scripts, R and Python code, and conda instructions. You can run paragraphs individually or, run all the paragraphs in a notebook using a single button.
A paragraph has an input section and an output section. In the input section, specify the interpreter to run along with the code or text. This information is sent to the interpreter to be run. In the output section, the results of the interpreter are provided.
The Notebooks page lists all the notebooks associated with the selected project. You can create, edit, and run your notebooks here.
You can perform the following tasks in the Notebooks page:

-
Go to OML Notebook EA: Click Go to OML Notebook EA to go to the Oracle Machine Learning Notebooks Early Adopter page.
Note:
EA stands for Early Adopter. -
Create: Click Create to create a new notebook.
-
Edit: Click on a notebook row to select it and click Edit. You can edit the notebook name, and add comments in the Edit Notebook dialog box.
-
Delete: Click on a notebook row to select it and click Delete.
-
Duplicate: Click on a notebook row to select it , and click Duplicate. This creates a copy of a notebook, and the duplicate copy of the is listed on the Notebooks page with the suffix
_1in the notebook name. - Move: Select a notebook and click Move to move the notebook to a different project, either in the same or in a different workspace. You must have either the
AdministratororDeveloperprivilege to move notebooks across projects and workspaces. You can move notebooks that are running from jobs because when you run notebooks from jobs, it runs a copy of the notebook.Note:
A notebook cannot be moved if it is in RUNNING state, or if a notebook already exists in the target project by the same name. - Copy: Select a notebook and click Copy to copy the notebook to another project, either in the same or different workspace. You must have either the
Administratoror theDeveloperprivilege to copy notebooks in different projects and workspaces. -
Save as Template: To save a notebook as a template, select the notebook and click Save as Template. In the Save as Template dialog, you can define the location of the template to save it in Personal or Shared under Templates.
-
Import: To import a notebook as
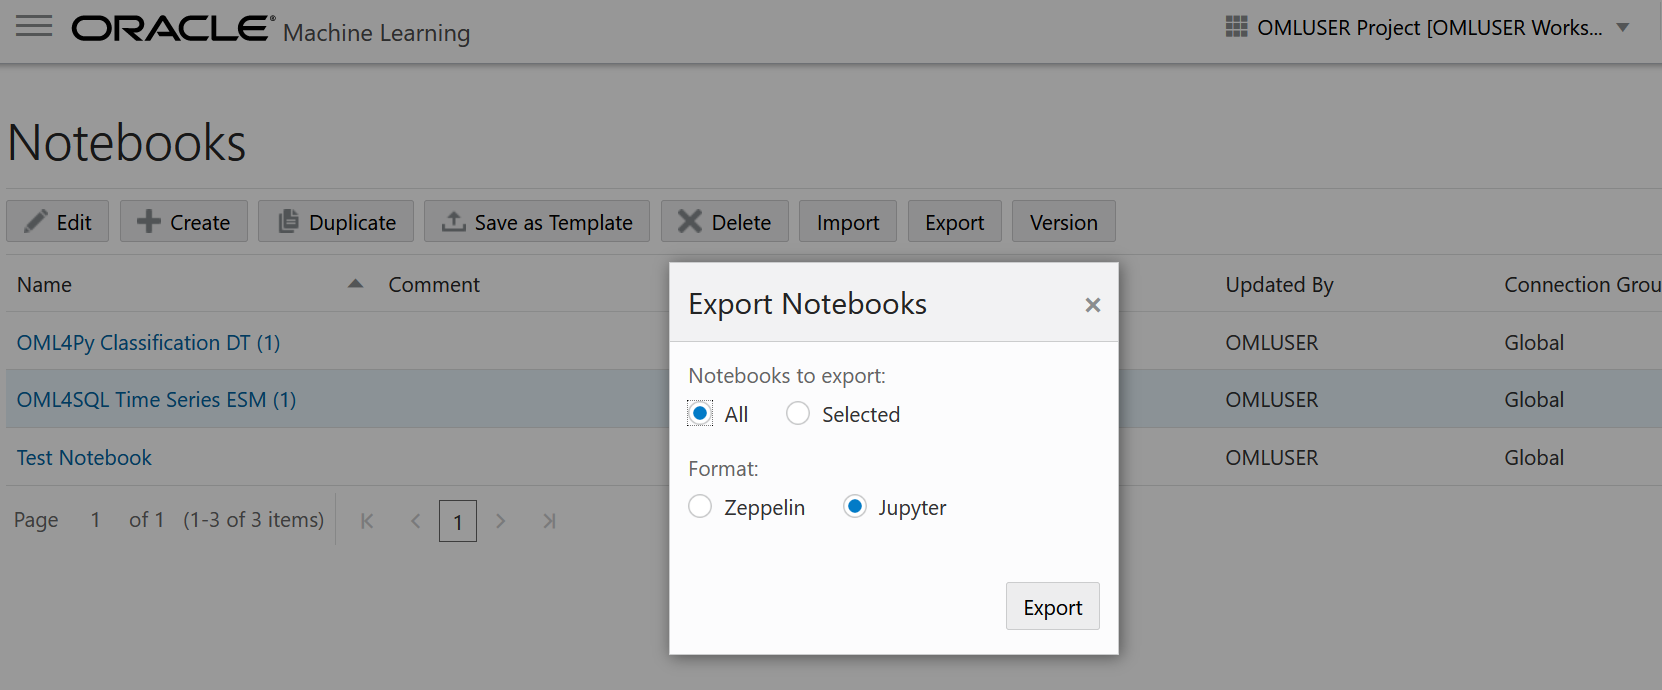
.jsonfiles, click Import. Select the project and workspace in which to import the notebook. - Export: To export a notebook, click Export. You can export notebooks in Zeppelin format ( .json ) file and in Jupyter format ( .ipynb ), and later import them in to the same or a different environment.
-
Version: To create versions of a notebook, select it and click Version. You can experiment with your notebook by creating versions of it, and revert to an older version by clicking Revert Version.
Note:
You can also version a notebook by opening it, and then clicking on the Versioning option . Using this option, you can create new versions, view version history, restore older versions, and delete any older versions of the notebook that you have opened.
- Copy to OML Notebook EA: To copy the selected notebook(s) to the early adopter interface using the original name with the suffix _ea.
_ea. You can now access this notebook by clicking on Notebooks EA in the left navigation menu, or by clicking on Go to OML Notebooks EA on the top right corner of this page. -
To open a notebook and run it, click the notebook. Notebook opens in the edit mode.
- Create a Notebook
A notebook is a web-based interface for data analysis, data discovery, data visualization and collaboration. - Edit Your Notebook
Upon creating a notebook, it opens automatically, presenting you with a single paragraph using the default%sqlinterpreter. You can change the interpreter by explicitly specifying one of%script, %python,%sql,%r,%mdor%conda. - Version a Notebook
You can version or create a backup a notebook, experiment on it, and revert to the original notebook, if required. - Save Notebooks as Templates
You can save an existing notebook as a template in Personal or in Shared. - Use the SQL Interpreter in a Notebook Paragraph
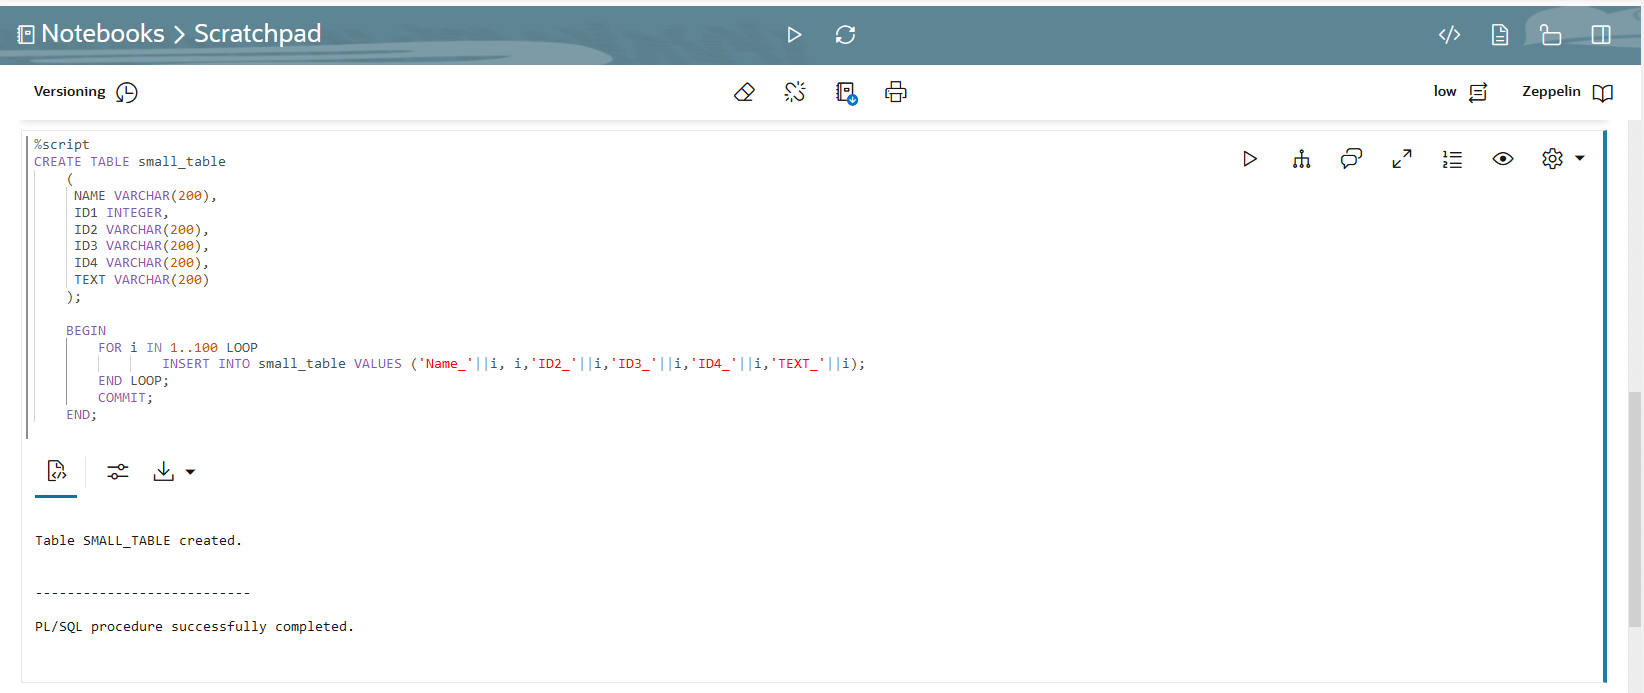
An Oracle Machine Learning notebook supports multiple languages. Each paragraph is associated with a specific interpreter. For example, to run SQL statements use the SQL interpreter. To run PL/SQL statements, use thescriptinterpreter. - Use the Python Interpreter in a Notebook Paragraph
An Oracle Machine Learning notebook supports multiple languages. Each paragraph is associated with a specific interpreter. To run Python commands in a notebook, you must first connect to the Python interpreter. To use OML4Py, you must import theomlmodule. - Use the R Interpreter in a Notebook Paragraph
An Oracle Machine Learning notebook supports multiple languages. Each paragraph is associated with a specific interpreter. To run R functions in an Oracle Machine Learning notebook, you must first connect to the R interpreter. - Use the Conda Interpreter in a Notebook Paragraph
Oracle Machine Learning Notebooks provides a Conda interpreter to enable administrators to create conda environments with custom third-party Python and R libraries. Once created, you can download and activate Conda environments inside a notebook session also using the Conda interpreter. - Call the Markdown Interpreter and Generate Static html from Markdown Plain Text
Use the Markdown interpreter and generate static html from Markdown plain text. - About Interpreter Bindings and Notebooks
An interpreter is a plug-in that allows you to use a specific data processing language backend. - Use the Scratchpad
The Scratchpad provides you convenient one-click access to a notebook for running SQL statements, PL/SQL, R, and Python scripts that can be renamed. The Scratchpad is available on the Oracle Machine Learning User Interface (UI) home page. - Collaborate in Oracle Machine Learning
Two or more users can collaborate and share Oracle Machine Learning User Interface (UI) notebooks with other users.
Related Topics
5.1 Create a Notebook
A notebook is a web-based interface for data analysis, data discovery, data visualization and collaboration.
%sql— To call the SQL interpreter and run SQL statements%script— To call PL/SQL interpreter and run PL/SQL scripts%md— To call the Markdown interpreter and generate static html from Markdown plain text%python— To call the Python interpreter and run Python scripts%r— To call the R interpreter and run R scripts.%conda— To connect to the Conda interpreter, and install third-party Python and R libraries inside a notebook session.
Parent topic: About Oracle Machine Learning Notebooks
5.2 Edit Your Notebook
Upon creating a notebook, it opens automatically, presenting you with a single paragraph using the default %sql interpreter. You can change the interpreter by explicitly specifying one of %script, %python, %sql , %r , %md or %conda.
- Export a Notebook
You can export a notebook in Zeppelin format (.json) file and in Jupyter format (.ipynb), and later import them in to the same or a different environment. - Import a Notebook
You can import notebooks across Pluggable Databases (PDBs) into your workspace. You can also import Jupyter notebooks into Oracle Machine Learning UI. - Create Check Box Forms in Notebooks
The Check Box Form supports multiple selection of inputs in a paragraph. The inputs are available as check box options in the notebook. - Create Select Forms in Notebooks
The Select Form allows you to select input values from a list of values, and dynamically retrieve the selected values as defined in the paragraph. - Create Text Input Forms in Notebooks
The Text Input form allows you to dynamically retrieve values as defined in the notebook.
Parent topic: About Oracle Machine Learning Notebooks
5.2.1 Export a Notebook
You can export a notebook in Zeppelin format ( .json ) file and in Jupyter format ( .ipynb ), and later import them in to the same or a different environment.
Related Topics
Parent topic: Edit Your Notebook
5.2.2 Import a Notebook
You can import notebooks across Pluggable Databases (PDBs) into your workspace. You can also import Jupyter notebooks into Oracle Machine Learning UI.
Note:
Starting in Oracle Database 20c,"database" refers specifically to the data files of a multitenant container database (CDB), pluggable database (PDB), or application container.Related Topics
Parent topic: Edit Your Notebook
5.2.3 Create Check Box Forms in Notebooks
The Check Box Form supports multiple selection of inputs in a paragraph. The inputs are available as check box options in the notebook.
Parent topic: Edit Your Notebook
5.2.4 Create Select Forms in Notebooks
The Select Form allows you to select input values from a list of values, and dynamically retrieve the selected values as defined in the paragraph.
Parent topic: Edit Your Notebook
5.2.5 Create Text Input Forms in Notebooks
The Text Input form allows you to dynamically retrieve values as defined in the notebook.
Parent topic: Edit Your Notebook
5.3 Version a Notebook
You can version or create a backup a notebook, experiment on it, and revert to the original notebook, if required.
Parent topic: About Oracle Machine Learning Notebooks
5.4 Save Notebooks as Templates
You can save an existing notebook as a template in Personal or in Shared.
Parent topic: About Oracle Machine Learning Notebooks
5.5 Use the SQL Interpreter in a Notebook Paragraph
An Oracle Machine Learning notebook supports multiple languages. Each paragraph is associated with a specific interpreter. For example, to run SQL statements use the SQL interpreter. To run PL/SQL statements, use the script interpreter.
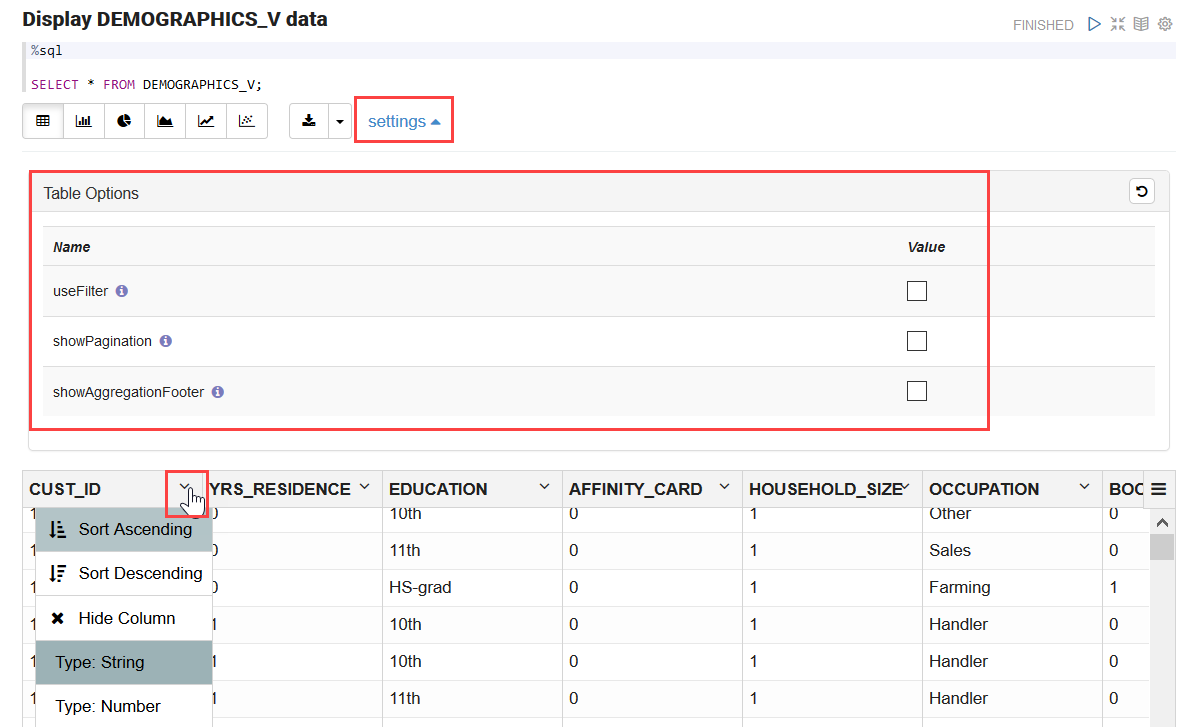
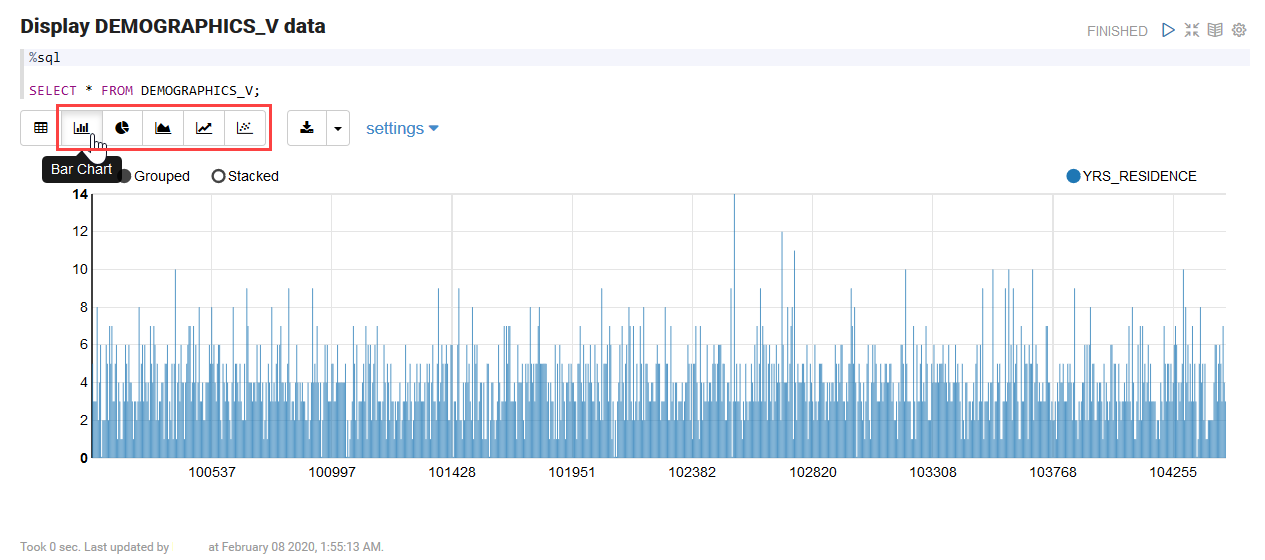
In an Oracle Machine Learning UI notebook, you can add multiple paragraphs, and each paragraph can be connected to different interpreters such as SQL or Python. You identify which interpreter to use by specifying % followed by the interpreter to use: sql, script, r, python, conda, markdown.
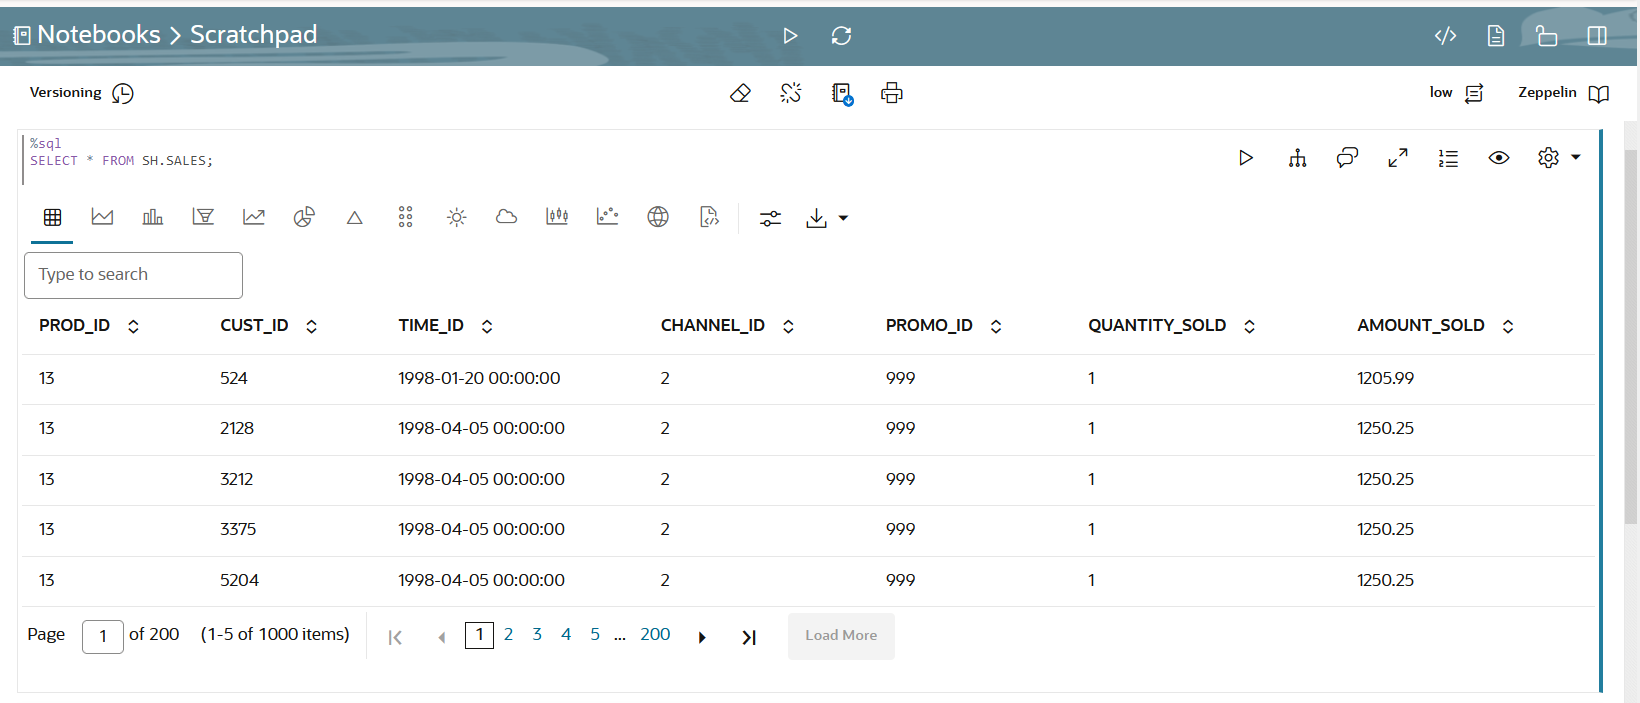
%sql— Supports standard SQL statements. In%sqlthe results of aSELECTstatement are directly displayed in a table viewer, with access to other visualization options. Use the options in the chart settings to perform groupings, summation, and other operations.%script— Supports both SQL statements and PL/SQL. In%script, the results of aSELECTstatement are provided as text string output.%conda— Supports the Conda environment. Type%condaat the beginning of the paragraph to connect to the Conda environment and work with third-party libraries for Python.%r— Supports R scripts. Type%rat the beginning of the paragraph to connect to the R interpreter.%python— Supports Python scripts. Type%pythonat the beginning of the paragraph to connect to the Python interpreter.%md— Supports Markdown markup language.
Note:
To run a Group By on all your data, then it is recommended to use SQL scripts to do the grouping in the database, and return the summary information for charting in the notebook. Grouping at the notebook level works well for small sets of data. If you pull too much data to the notebook, you may encounter issues due to insufficient memory. You can set the row limit for your notebook by using the option Render Row Limit on the Connections Group page.- About Oracle Machine Learning for SQL
Oracle Machine Learning for SQL (OML4SQL) provides a powerful, state-of-the-art machine learning capability within Oracle Database. You can use Oracle Machine Learning for SQL to build and deploy predictive and descriptive machine learning models, add intelligent capabilities to existing and new applications. - Set Output Format in Notebooks
Oracle Machine Learning Notebooks allow you to preformat query output in notebooks. - Output Formats Supported by SET SQLFORMAT Command
By using theSET SQLFORMATcommand, you can generate the query output in a variety for formats.
Related Topics
Parent topic: About Oracle Machine Learning Notebooks
5.5.1 About Oracle Machine Learning for SQL
Oracle Machine Learning for SQL (OML4SQL) provides a powerful, state-of-the-art machine learning capability within Oracle Database. You can use Oracle Machine Learning for SQL to build and deploy predictive and descriptive machine learning models, add intelligent capabilities to existing and new applications.
Oracle Machine Learning for SQL offers an extensive set of in-database algorithms for performing a variety of machine learning tasks, such as classification, regression, anomaly detection, feature extraction, clustering, and market basket analysis, among others. The programmatic interfaces to OML4SQL are PL/SQL for building and maintaining models and a family of SQL functions for scoring.
%sql) and PL/SQL scripts (%script) respectively. Use Oracle Machine Learning for SQL to:
- Perform data exploration and data analysis
- Build, evaluate and deploy machine learning models, and
- Score data using those models
Parent topic: Use the SQL Interpreter in a Notebook Paragraph
5.5.2 Set Output Format in Notebooks
Oracle Machine Learning Notebooks allow you to preformat query output in notebooks.
SET SQLFORMAT as follows:
Parent topic: Use the SQL Interpreter in a Notebook Paragraph
5.5.3 Output Formats Supported by SET SQLFORMAT Command
By using the SET SQLFORMAT command, you can generate the query output in a variety for formats.
Note:
These output formats are available for the Script interpreter. Therefore, you must include the prefix%script.
-
CSV — The CSV format produces standard comma-separated variable output, with string values enclosed in double quotes. The syntax is:
%scriptSET SQLFORMAT CSV -
HTML — The HTML format produces the HTML for a responsive table. The content of the table changes dynamically to match the search string entered in the text field. The syntax is:
%scriptSET SQLFORMAT HTML -
XML — The XML format produces a tag based XML document. All data is presented as
CDATAtags. The syntax is:%scriptSET SQLFORMAT XML -
JSON — The JSON format produces a JSON document containing the definitions of the columns along with the data that it contains. The syntax is:
%scriptSET SQLFORMAT JSON -
ANSICONSOLE — The ANSICONSOLE format resizes the columns to the width of the data to save space. It also underlines the columns, instead of separate line of output. The syntax is:
%scriptSET SQLFORMAT ANSICONSOLE -
INSERT — The INSERT format produces the INSERT statements that could be used to recreate the rows in a table. The syntax is:
%scriptSET SQLFORMAT INSERT -
LOADER — The LOADER format produces pipe delimited output with string values enclosed in double quotes. The column names are not included in the output. The syntax is:
%scriptSET SQLFORMAT LOADER -
FIXED — The FIXED format produces fixed width columns with all data enclosed in double-quotes. The syntax is:
%scriptSET SQLFORMAT FIXED -
DEFAULT — The DEFAULT option clears all previous
SQLFORMATsettings, and returns to the default output. The syntax is:%scriptSET SQLFORMAT DEFAULTNote:
You can also run this command without the format nameDEFAULTby simply typingSET SQLFORMAT. -
DELIMITED — The DELIMITED format allows you to manually define the delimiter string, and the characters that are enclosed in the string values. The syntax is:
%scriptSQLFORMAT DELIMITED delimiter left_enclosure right_enclosureFor example,
%scriptSET SQLFORMAT DELIMITED ~del~ " "SELECT * FROM emp WHERE deptno = 20;Output:
"EMPNO"~del~"ENAME"~del~"JOB"~del~"MGR"~del~"HIREDATE"~del~"SAL"~del~"COMM"~del~"DEPTNO"In this example, the delimiter string is
~del~and string values such asEMPNO, ENAME, JOBand so on, are enclosed in double quotes.
Parent topic: Use the SQL Interpreter in a Notebook Paragraph
5.6 Use the Python Interpreter in a Notebook Paragraph
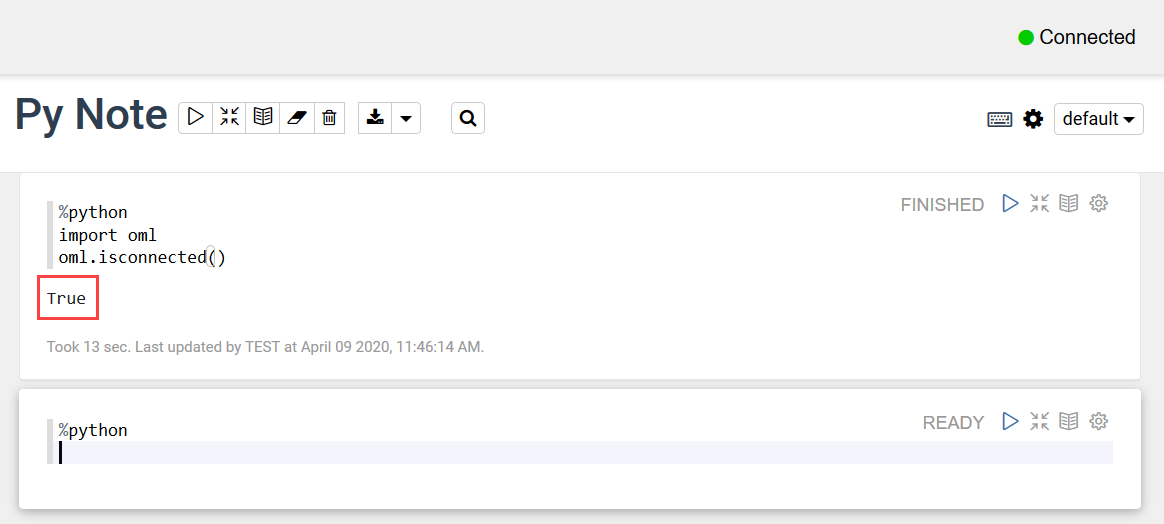
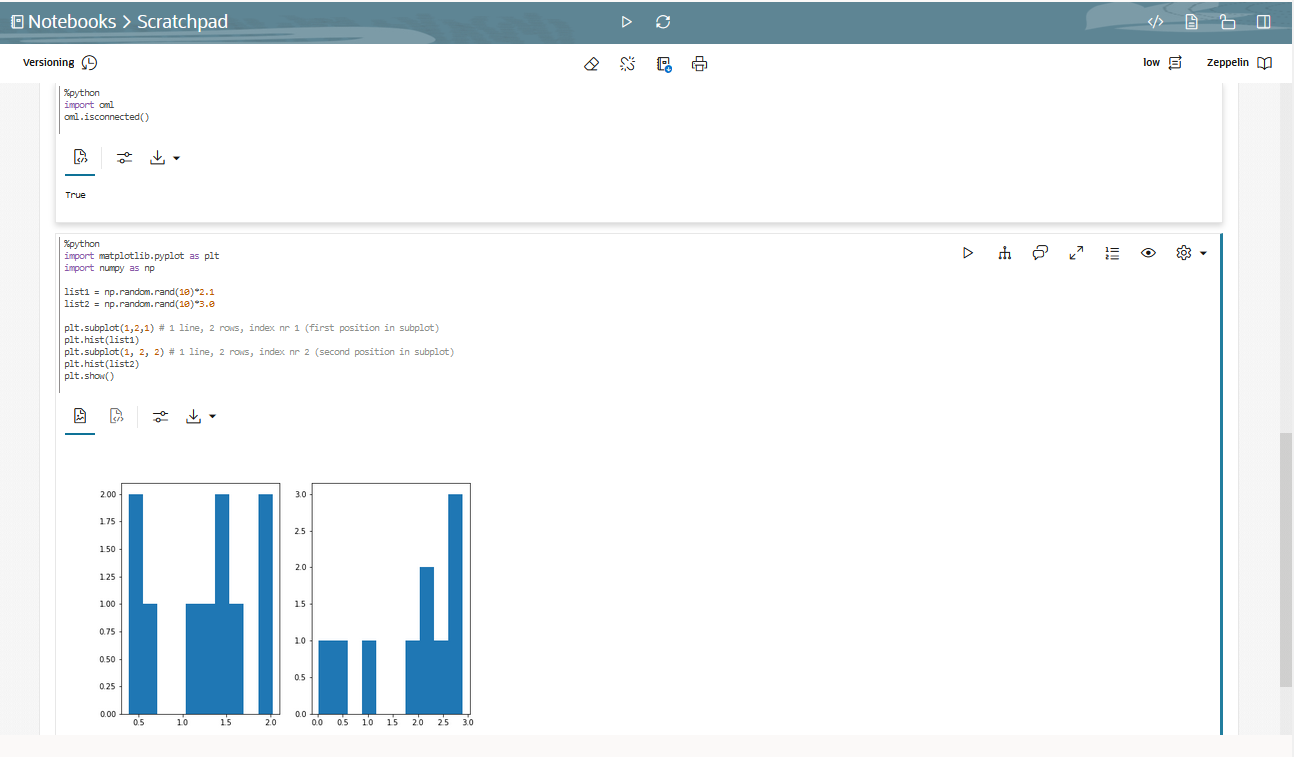
An Oracle Machine Learning notebook supports multiple languages. Each paragraph is associated with a specific interpreter. To run Python commands in a notebook, you must first connect to the Python interpreter. To use OML4Py, you must import the oml module.
In an Oracle Machine Learning UI notebook, you can add multiple paragraphs, and each paragraph can be connected to different interpreters such as SQL or Python. You identify which interpreter to use by specifying % followed by the interpreter to use: sql, script, r, python, conda, markdown.
- Connect to a Python interpreter to run Python commands in a notebook
- Import the Python modules -
oml,matplotlib, andnumpy - Check if the
omlmodule is connected to the Oracle Database
Note:
z is a reserved keyword and must not be used as a variable in %python paragraphs in Oracle Machine Learning UI notebooks.
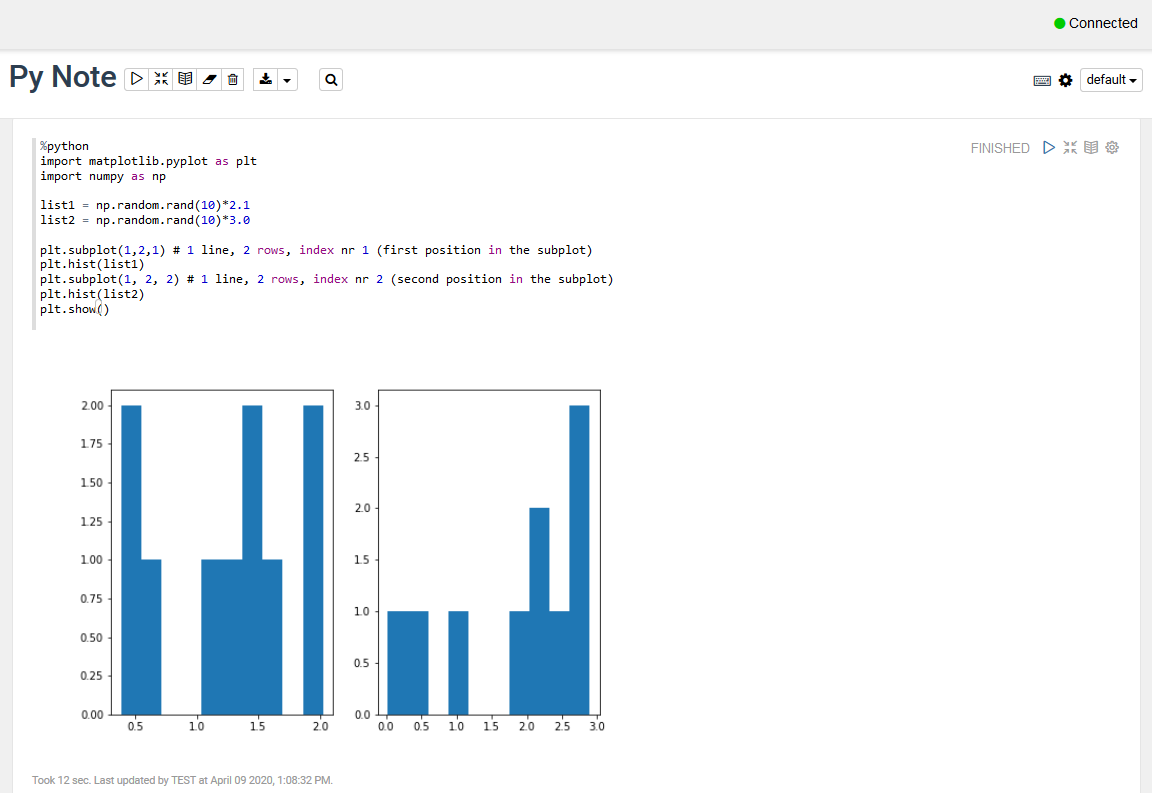
Example to demonstrate the use of the Python modules - matplotlib and numpy , and use random data to plot two histograms.
- About Oracle Machine Learning for Python
Oracle Machine Learning for Python (OML4Py) is a component of Oracle Autonomous Database, which includes Oracle Autonomous Data Warehouse (ADW), Oracle Autonomous Transaction Processing (ATP), and Oracle Autonomous JSON Database (AJD). By using Oracle Machine Learning UI notebooks, you can run Python functions on data for data exploration and preparation while leveraging Oracle Database as a high-performance computing environment. Oracle Machine Learning User Interface (UI) is available through Autonomous Data Warehouse (ADW) , Autonomous Transaction Processing (ATP) and Autonomous JSON Database (AJD) services.
Parent topic: About Oracle Machine Learning Notebooks
5.6.1 About Oracle Machine Learning for Python
Oracle Machine Learning for Python (OML4Py) is a component of Oracle Autonomous Database, which includes Oracle Autonomous Data Warehouse (ADW), Oracle Autonomous Transaction Processing (ATP), and Oracle Autonomous JSON Database (AJD). By using Oracle Machine Learning UI notebooks, you can run Python functions on data for data exploration and preparation while leveraging Oracle Database as a high-performance computing environment. Oracle Machine Learning User Interface (UI) is available through Autonomous Data Warehouse (ADW) , Autonomous Transaction Processing (ATP) and Autonomous JSON Database (AJD) services.
Oracle Machine Learning for Python (OML4Py) makes the open source Python scripting language and environment ready for the enterprise and big data. Designed for problems involving both large and small volumes of data, Oracle Machine Learning for Python integrates Python with Oracle Autonomous Database, including its powerful in-database machine learning algorithms, and enables deployment of Python code.
- Perform data exploration, data analysis, and machine learning using Python leveraging Oracle Database as a high performance compute engine
- Build and evaluate machine learning models and score data using those models from an integrated Python API using in-database algorithms
- Deploy user-defined Python functions through a REST interface with data-parallel and task-parallel processing
The Python interpreter uses Python 3.8.5 to process Python scripts in Oracle Machine Learning UI notebooks. To use the interpreter, specify the %python directive at the beginning of the paragraph. The Python interpreter supports the following Python modules:
cx_Oracle 7.3.0cycler 0.10.0joblib 0.14.0kiwisolver 1.1.0matplotlib 3.1.2numpy 1.18.1pandas 0.25.3pyparsing 2.4.0python-dateutil 2.8.1pytz 2019.3scikit_learn 0.22.1scipy 1.4.1six 1.13.0
Related Topics
Parent topic: Use the Python Interpreter in a Notebook Paragraph
5.7 Use the R Interpreter in a Notebook Paragraph
An Oracle Machine Learning notebook supports multiple languages. Each paragraph is associated with a specific interpreter. To run R functions in an Oracle Machine Learning notebook, you must first connect to the R interpreter.
In an Oracle Machine Learning UI notebook, you can add multiple paragraphs, and each paragraph can be connected to different interpreters such as R or SQL or Python. You identify which interpreter to use by specifying % followed by the interpreter to use: sql, script, r, python, conda, markdown.
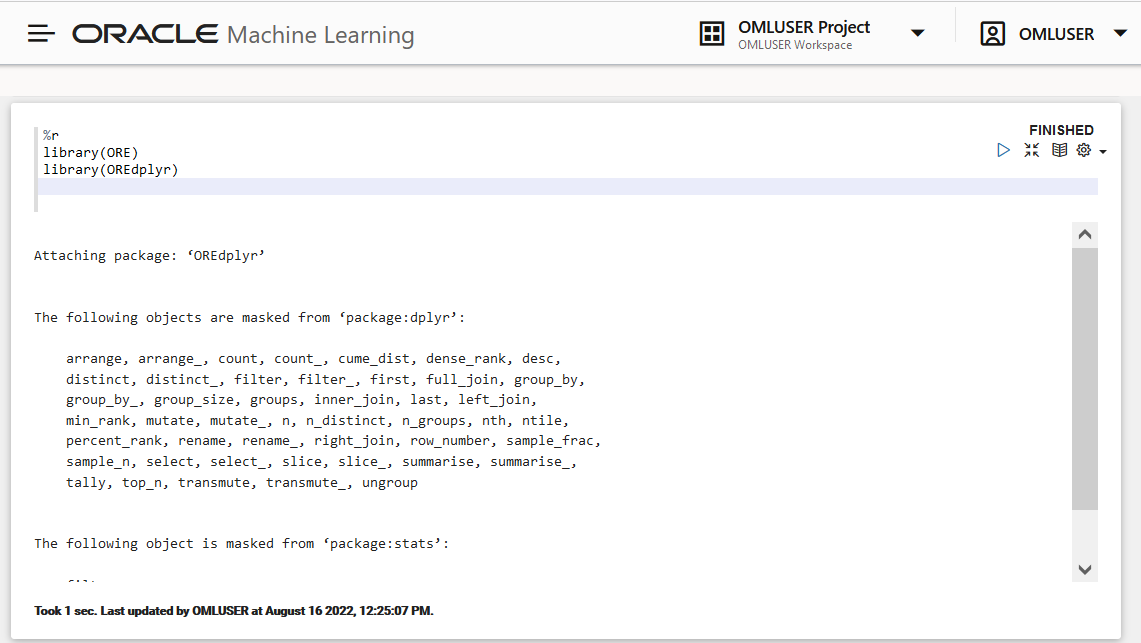
- Connect to the R interpreter to run R commands in a notebook.
- Verify the connection to Oracle Autonomous Database, and
- Load the ORE libraries
- About Oracle Machine Learning for R
Oracle Machine Learning for R (OML4R) is a component of the Oracle Machine Learning family of products, which integrates R with Oracle Autonomous Database.
Parent topic: About Oracle Machine Learning Notebooks
5.7.1 About Oracle Machine Learning for R
Oracle Machine Learning for R (OML4R) is a component of the Oracle Machine Learning family of products, which integrates R with Oracle Autonomous Database.
Oracle Machine Learning for R makes the open source R scripting language and environment ready for enterprise and big data. It is designed for problems involving for both large and small data volumes. OML4R allows users to run R commands and scripts for statistical, machine learning, and perform visualization analyses on database tables and views using R syntax.
Oracle Machine Learning for R is available in Oracle Machine Learning UI, currently available through Oracle Autonomous Database, including Autonomous Data Warehouse, Autonomous Transaction Processing, and Autonomous JSON Database. Oracle Machine Learning for R Embedded R Execution functionality can be deployed through SQL and REST APIs on Autonomous Database.
Use Oracle Machine Learning for R to:
- Perform data exploration and data preparation while seamlessly leveraging Oracle Database as a high-performance computing environment.
- Run user-defined R functions on database spawned and controlled R engines, with system-supported data-parallel and task-parallel capabilities.
- Access and use powerful in-database machine learning algorithms from R language.
To use the R interpreter, specify the %r directive at the beginning of the paragraph. The following R packages are installed to support Oracle Machine Learning for R.
Supported Oracle Machine Learning for R Proprietary R Packages
The supported Oracle Machine Learning for R proprietary R packages are:
ORE_1.5.1OREbase_1.5.1OREcommon_1.5.1OREdm_1.5.1OREdplyr_1.5.1OREeda_1.5.1OREembed_1.5.1OREgraphics_1.5.1OREmodels_1.5.1OREpredict_1.5.1OREstats_1.5.1ORExml_1.5.1
Supported Open Source R Modules
The following open source R packages are supported by Oracle Machine Learning for R:
-
R-4.0.5 Cairo_1.5-15ROracle_1.4-1: DBI_1.1-2arules_1.7-3png_0.1-7randomForest_4.6-14statmod_1.4-36dplyr_1.0-9:R6_2.5.1assertthat_0.2.1cli_3.3.0crayon_1.5.1ellipsis_0.3.2fansi_1.0.3generics_0.1.2glue_1.6.2lazyeval_0.2.2lifecycle_1.0.1magrittr_2.0.3pillar_1.7.0pkgconfig_2.0.3purrr_0.3.4rlang_1.0.2tibble_3.1.7tidyselect_1.1.2utf8_1.2.2vctrs_0.4.1
Oracle Machine Learning for R Interpreter Requirements
Rkernel 1.3:base64enc 0.1-3cli 3.3.0crayon 1.5.1digest 0.6.29ellipsis 0.3.2evaluate 0.15fansi 1.0.3fastmap 1.1.0glue 1.6.2htmltools 0.5.2IRdisplay 1.1jsonlite 1.8.0lifecycle 1.0.1pbdZMQ 0.3-7pillar 1.7.0repr 1.1.4rlang 1.0.2utf8 1.2.2uuid 1.1-0vctrs 0.4.1
knitr 1.39:evaluate_0.15glue_1.6.2highr_0.9magrittr_2.0.3stringi_1.7.6stringr_1.4.0xfun_0.31yaml_2.3.5
Parent topic: Use the R Interpreter in a Notebook Paragraph
5.8 Use the Conda Interpreter in a Notebook Paragraph
Oracle Machine Learning Notebooks provides a Conda interpreter to enable administrators to create conda environments with custom third-party Python and R libraries. Once created, you can download and activate Conda environments inside a notebook session also using the Conda interpreter.
An Oracle Machine Learning notebook supports multiple languages. For this, you must create a notebook with some paragraphs to run SQL queries, and other paragraphs to run PL/SQL scripts. To run a notebook in different scripting languages, you must first connect the notebook paragraphs with the respective interpreters such as SQL, PL/SQL, R, Python, or Conda.
- Connect to the Conda interpreter
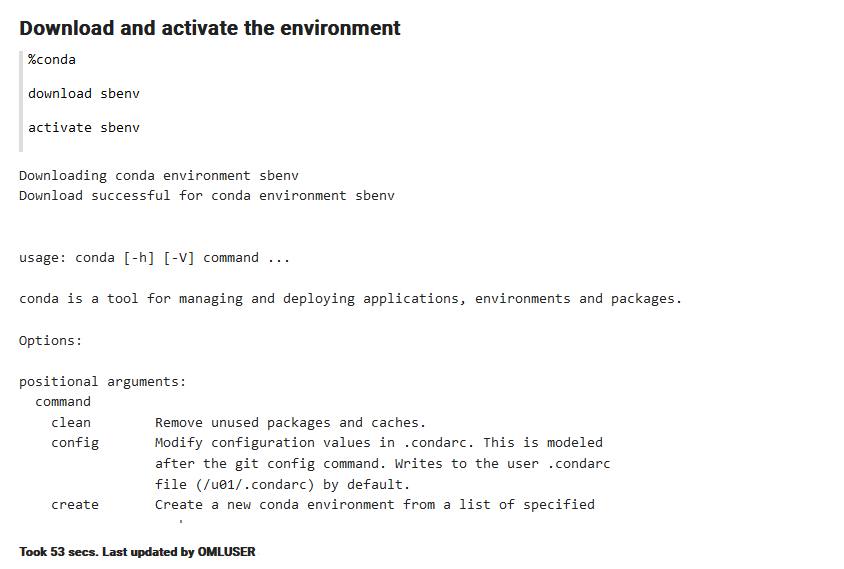
- Download and activate the Conda environment
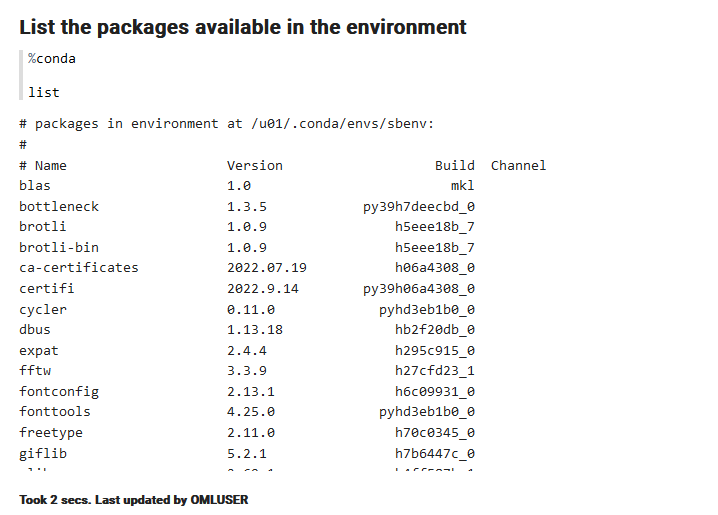
- View the list of packages in the Conda environment
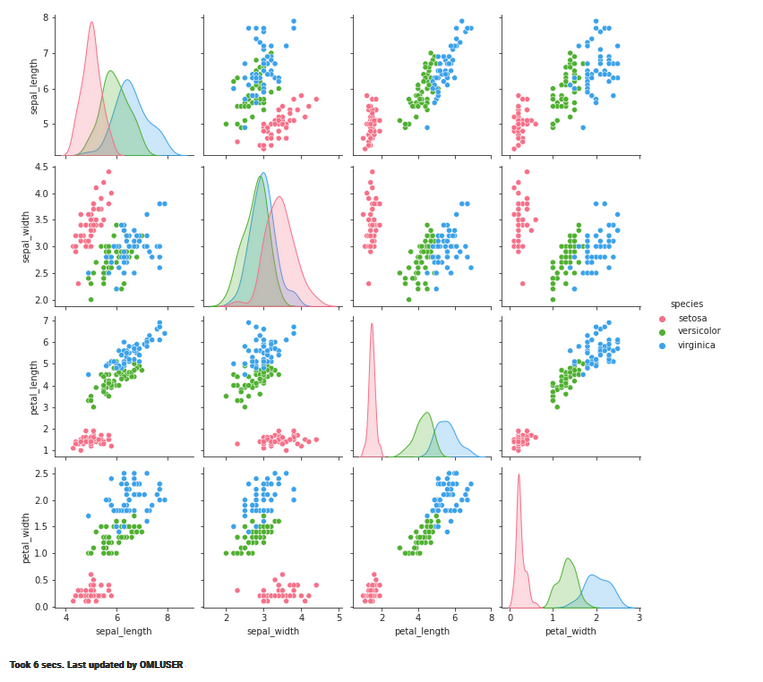
- Run a Python function to import the Iris dataset, and use the seaborn package for visualization
- About the Conda Environment and Conda Interpreter
Conda is an open-source package and environment management system that allows the use of environments containing third-party Python and R libraries. Oracle Machine Learning User Interface (UI) provide the conda interpreter to install third-party Python and R libraries inside a notebook session. - Conda Interpreter Commands
This table lists the commands for the Conda interpreter.
Parent topic: About Oracle Machine Learning Notebooks
5.8.1 About the Conda Environment and Conda Interpreter
Conda is an open-source package and environment management system that allows the use of environments containing third-party Python and R libraries. Oracle Machine Learning User Interface (UI) provide the conda interpreter to install third-party Python and R libraries inside a notebook session.
- Standard Python
- Standard R
- Oracle Machine Learning for Python embedded Python execution from the Python, SQL and REST APIs
- Oracle Machine Learning for R embedded R execution from the R, SQL, and REST APIs
To start working in the Conda environment:
- Ensure that a Conda environment is saved to Object Storage, or update an existing package by installing a new version.
Note:
The Conda environment is created by the ADMIN user withOML_SYS_ADMINrole. The administrator manages the lifecycle of an environment, including adding or deleting packages from it, and removing environments. The Conda environments are stored in an Object Storage bucket associated with the Autonomous Database. - Sign into Oracle Machine Learning UI and download the Conda environment. To download the Conda environment, type:
%condadownload myenv - Activate the Conda environment. To activate the Conda environment, type:
activate myenvNote:
There is only one active Conda environment at a given point in time. - Create a notebook, use the Conda interpreter to use third-party libraries in the Object Storage. To use the Conda interpreter, type
%condaat the beginning of the paragraph to connect to the Conda environment, and work with third-party libraries for Python. You can switch between the preinstalled Conda environments. For example, you can have an environment for working with Graph analysis, and another environment for Oracle Machine Learning analysis. - Deactivate the Conda environment. As a best practice, deactivate the Conda environment after you have finished working on your machine learning analysis. To deactivate the environment, type:
deactivate
Parent topic: Use the Conda Interpreter in a Notebook Paragraph
5.8.2 Conda Interpreter Commands
This table lists the commands for the Conda interpreter.
Conda Interpreter Commands
Table 5-1 Conda Interpreter Commands
| Tasks | Commands | Role |
|---|---|---|
| Create a Conda environment. | create -n <env_name> <python_version> |
|
Remove a list of packages from a specified conda environment. It is also an alias for conda uninstall.
|
remove -n <env_name> --allNote: The Conda environment is deleted from the user session. |
|
| List user-created local environment. | env list |
|
| Remove user-created local environment. | env remove -n <env_name> |
|
| List all packages and versions installed in active environment. | list |
|
| Activate a user-created local environment. | activate -n <env_name> |
|
| Deactivate the current environment. | deactivate |
|
| Install an external package from a public Conda channel. | install -n <env_name> <package_name> |
|
Uninstall a specific package from a Conda environment. It is also an alias for remove.
|
uninstall -n <env_name> <package_name> |
|
| Display information about current conda install. | info |
|
| View the command line help. | COMMANDNAME --help |
|
| Upload a Conda environment to object storage.
Note: This is an Autonomous Database specific command. |
upload --overwrite <env_name> --description 'some description' -t <name> <value>Note: You can provide many tags. For example:-t <name1> <value1> -t <name2> <value2> .. |
|
| Download and unpack a specific Conda environment from the object storage.
Note: This is an Autonomous Database specific command. |
download --overwrite <env_name> |
|
| List local environments available to the user. | list-local-envs |
|
| List all Conda environments in the object storage.
Note: This is an Autonomous Database specific command. |
list-saved-envs --installed-packages -e <env_name> |
|
| Delete a Conda environment.
Note: This is an Autonomous Database specific command. |
delete <env_name>Note: The Conda environment is deleted from the Object Storage. |
|
| Update conda packages to the latest compatible version. | update |
|
Upgrade the current conda package. It is also an alias for conda update.
|
upgrade |
|
Search for packages and display associated information. The input is a MatchSpec, a query language for conda packages.
|
search |
|
Parent topic: Use the Conda Interpreter in a Notebook Paragraph
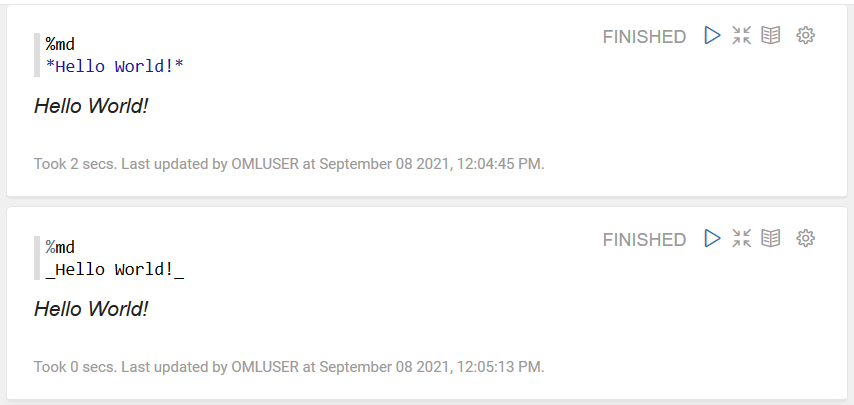
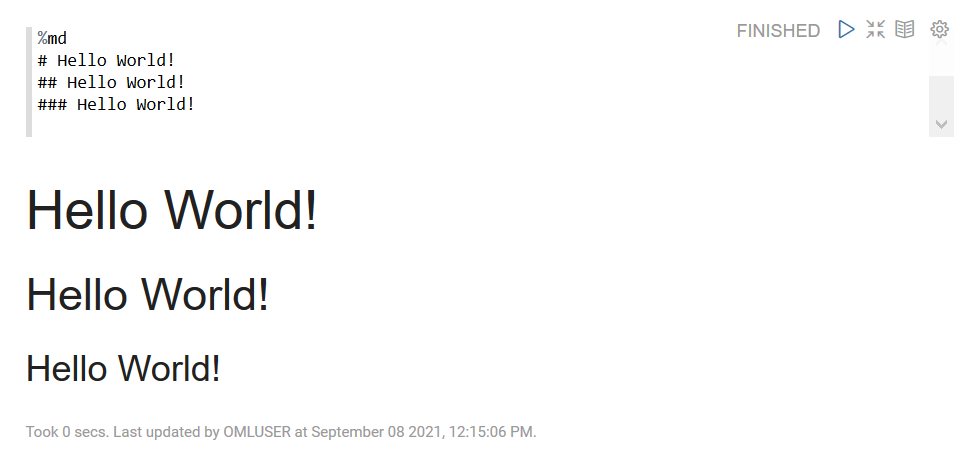
5.9 Call the Markdown Interpreter and Generate Static html from Markdown Plain Text
Use the Markdown interpreter and generate static html from Markdown plain text.
Parent topic: About Oracle Machine Learning Notebooks
5.10 Use the Scratchpad
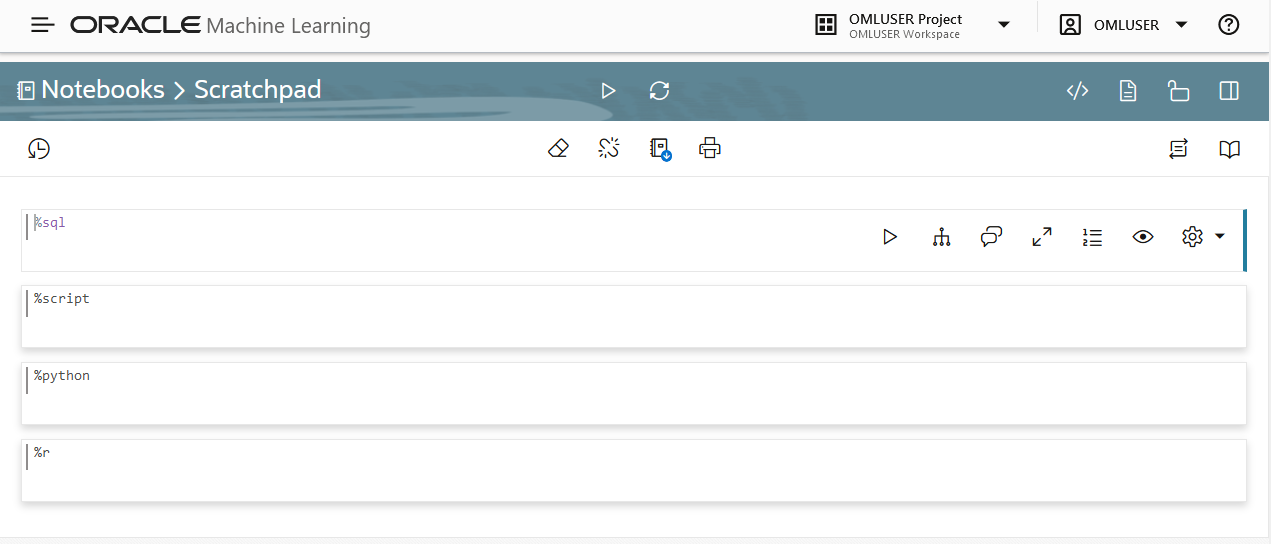
The Scratchpad provides you convenient one-click access to a notebook for running SQL statements, PL/SQL, R, and Python scripts that can be renamed. The Scratchpad is available on the Oracle Machine Learning User Interface (UI) home page.
Note:
The Scratchpad is a regular notebook that is prepopulated with four paragraphs - %sql, %script, , %python and %r.
Parent topic: About Oracle Machine Learning Notebooks
5.11 Collaborate in Oracle Machine Learning
Two or more users can collaborate and share Oracle Machine Learning User Interface (UI) notebooks with other users.
You can collaborate by:
- Granting Access to Workspace of Another User
- Using the Export Option
- Using Oracle Machine Learning UI notebooks templates
Parent topic: About Oracle Machine Learning Notebooks
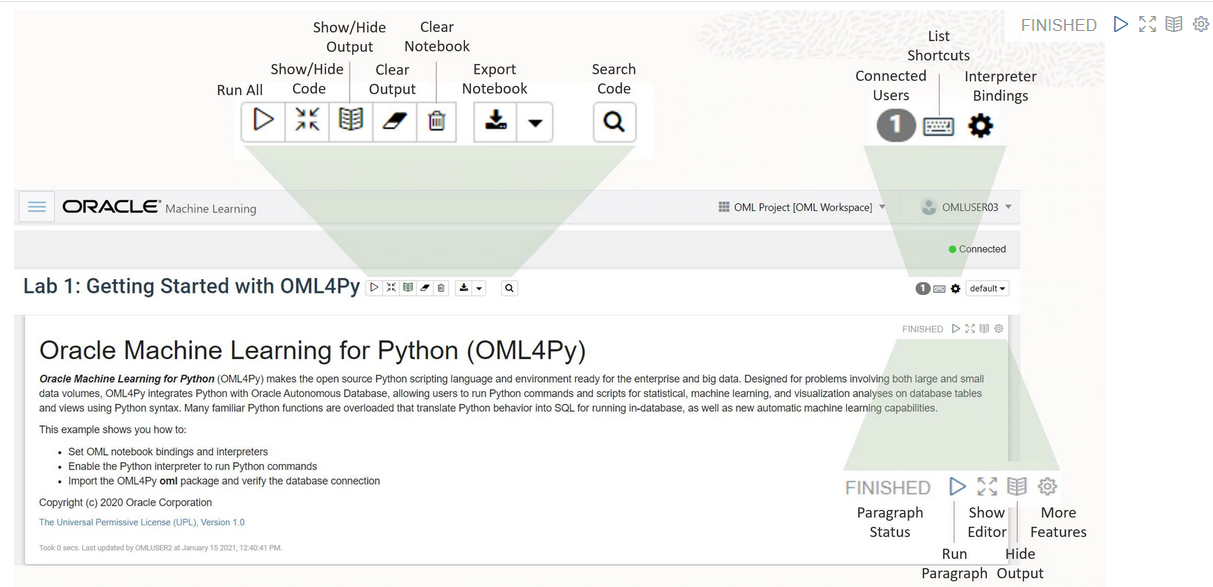
 to run one or all paragraphs in the notebook.
 to hide all codes from all the paragraphs in the notebook. Click it again to display the codes.
 to hide all outputs from all the paragraphs in the notebook. Click it again to view the outputs.
 to remove all outputs from all the paragraphs in the notebook. To view the output, click the run icon again.
 to delete all the paragraphs in the notebook.
 to export the notebook.
 to search any information in the codes present in the notebook.
 to view the list of keyboard shortcuts.
 to set the order for interpreter bindings for the notebook.
 to select one of the three notebook display options.
 to access paragraph specific edit options such as clear output, remove paragraph, adjust width, font size, run all paragraphs above or below the selected paragraph and so on.


 . Alternatively, press Shift+Enter keys to run the notebook.