Consume Share
Once the providers share the objects, there are a few steps the recipients need to follow to consume the share.
- Consume Share Overview:
To consume data shares, you need to subscribe to them and create views of tables included in the live share.
- Consume Versioned Share:
As a recipient, you will need to download your share profile, subscribe to the data share provider, register the shares and create external tables on top of your shares. The Data Share tool authorizes the access using the JSON profile sent to the recipient using the activation mail. After the access is granted, the Data Share tool links the shared objects with the Data link tool where the consumer can run the data link job and access the objects shared by the provider.
- Consume Live Share:
This lets you as a recipient to consume live data from the database.
- View Share Provider Entity Details:
Use the Actions icon at the right of the live share or delta share provider entity entry to view details about the live share or delta share provider entity you create.
- Consume Share Overview
The Consume Share provides an overview on the list of share providers, search for share providers and add a share provider. - Consume Versioned Share
You must follow these steps to make shared versioned data available to you within Oracle Autonomous Database. Data shared with you through Delta Sharing is not automatically available and discoverable in your Autonomous Database. - Consume Live Share
Live data shared with you through data sharing is not automatically available for consumption. - View Share Provider Entity Details
To view details about the Share Provider entity, click the Actions icon at the right of the Share Provider entity entry, then click View Details.
Parent topic: The Data Share Tool
Consume Share Overview
The Consume Share provides an overview on the list of share providers, search for share providers and add a share provider.
- On the Data Studio menu, select Consume Share under the Data Share menu.
- On the Data Share page, click the Consume Share widget present in the Provider and Consumer section.
The Consume Share page contains: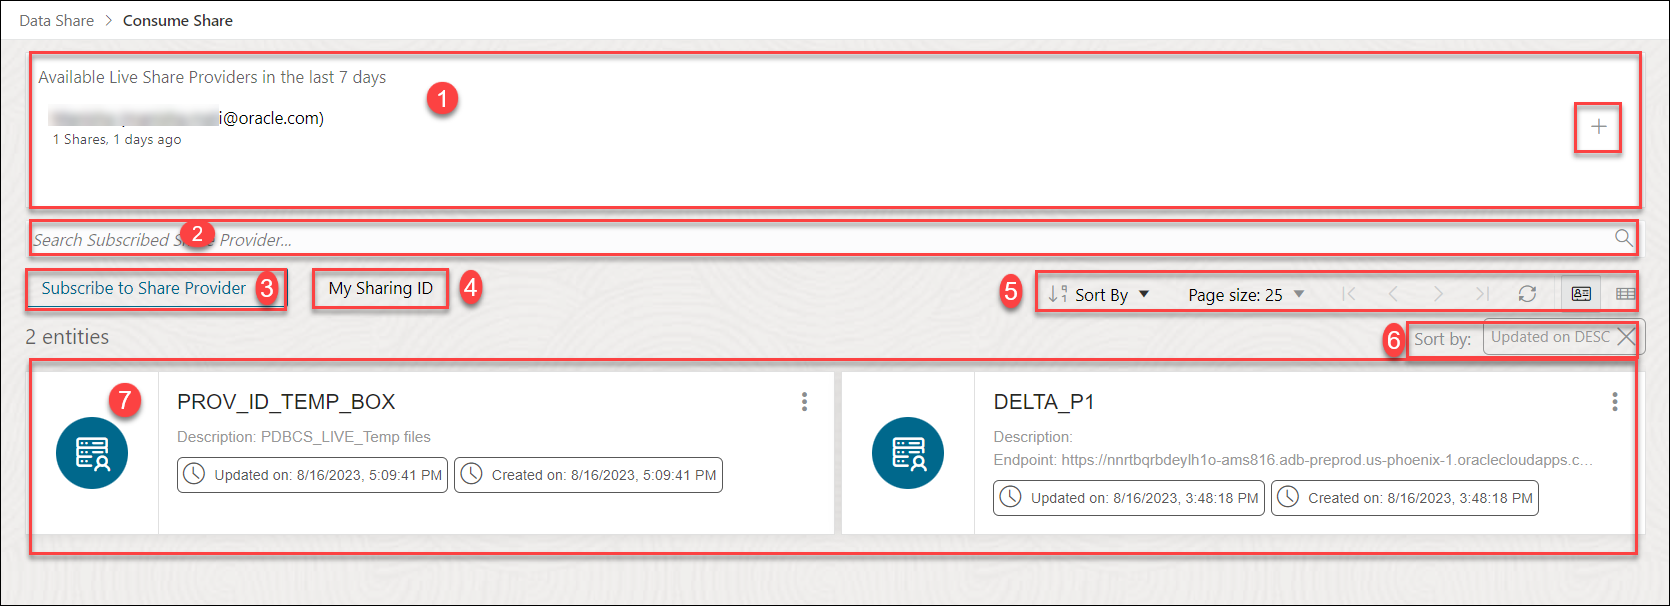
Description of the illustration consume-share-new.png
- Available Live Share Providers in the last 7 Days
This area displays the list of available Live Share Providers you create in the last 7 days. You can update any of the fields as per your wish. You can also subscribe to Live Share using the + sign to the right of Shares listed in Available shares in the last 7 days.
-
Search Subscribed Share Provider field
You can search for the Share Recipient you create by entering the name of the Subscribed Share Provider. Enter the name of the Subscribed Share Provider, for example, REVIEW_PROVIDER and click the magnifer icon to complete the search. The Share tool displays the search results in the display area.
- Select + Subscribe to Share Provider to subscribe to a new Share Provider. See Subscribe to Share Provider for exploring this icon.
- My Sharing ID
A Sharing ID is a unique provider for your Autonomous Database. Copy this ID to the clipboard and paste it in the Sharing ID field of the Create Share Recipient wizard. This enables a Live Share to be shared with a share provider.
- Toolbar
The toolbar consists of the sort by, page size, refresh and entity view options.
- Sort by settings
When you set sorting values by using the Sort By control in the toolbar, the settings are displayed in small boxes beneath the toolbar. You can delete a setting by clicking the X icon in the box. Or you can change the settings by returning to the Sort By control in the toolbar.
-
Display area
The area beneath the Search Consumer Share Providers field displays the entities returned by a search and that match the filter criteria set in the Filters panel. You can sort the entities by clicking the Sort By button and then setting sort values.
Parent topic: Consume Share
Consume Versioned Share
You must follow these steps to make shared versioned data available to you within Oracle Autonomous Database. Data shared with you through Delta Sharing is not automatically available and discoverable in your Autonomous Database.
- Download the JSON profile.
- Subscribe to the data share provider.
- Register shares made available to you.
- Create external tables on top of your shares.
About JSON Profile
Profile files are JSON files containing a user's credentials to access a Delta Sharing Server. This enables you to authenticate yourself with the delta sharing server and to discover the data shares you are eligible to access. Download the profile using the URL included in the invitation email sent by the data share provider.
Once the Share tool creates a share object, the recipient receives an activation mail with subject titled Oracle Autonomous Database Data Share.
To access the share, you need to register the shared objects using personal authorization JSON profile.
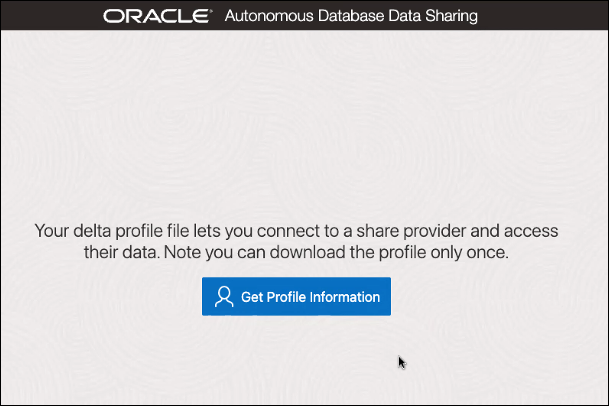
You can click on the profile link to download the JSON profile. Clicking the profile link takes you to a new screen in the browser with a Get Profile Information button as shown below:
Description of the illustration json-profile.png
Note:
You can click on the Get Profile Information button only once. The share tool does not allow you to select Get Profile Information twice. Clicking on it twice brings up a screen which displays the list of causes of the failure to download the profile.{ "
shareCredentialsVersion ": 1,
"endpoint": "https://myhost.us.example.com/ords/prov/_delta_sharing/",
"tokenEndpoint": "http://myhost.us.example.com:1234/ords/pdbdba/oauth/token",
"bearerToken": "-xxxxxxxxxxxxxxxxxxxxx",
"expirationTime": "2023-01-13T07:53:11.073Z",
"clientID": "xxxxxxxxxxxxxxxxxxxxxx..",
"clientSecret": "xxxxxxxxxxxxxxxxxxxx.."}- shareCredentialsVersion: The version of the share you publish.
- endpoint: Specifies the share endpoint.
- tokenEndpoint: Specifies the token endpoint. The Share tool client use the token endpoint to refresh the timeout on your bearer token if you are consuming the share using Oracle.
- bearerToken: This is a cryptic string which the authentication server generates in response to a login request.
- expirationTime: This is the time taken for the authentication to expire.
- ClientID: Specifies the public identifier the authentication server generates when you register the instance for authentication.
- clientSecret: Specifies a secret identifier the authentication server generates for authorization.
Note:
Ensure you copy the full JSON content profile, including the left brace and the right brace.Security enhancements
As a share recipient, you must set up an access control list (ACL) to the share provider’s machine by using the APPEND_HOST_ACE procedure as an ADMIN user, or another privileged user. This allows you to access the share via the Internet.
Note:
This must be done before using the Add Share Provider Wizard to add an access control entry (ACE) to the access control list (ACL) of the host (i.e. Share provider). You can find the host name from the JSON profile you downloaded in the previous step.
For example, if you wish to allow a database user, A_SHARE_USER to access the endpoints on a host (Share provider) named, here is a sample of PL/SQL procedure you will need to run in the SQL worksheet editor as an admin. As a prerequisite, extract the host name from the endpoint property in the delta sharing JSON profile, as provided in the example above. The hostname from the example is myhost.us.example.com.
BEGIN
        dbms_network_acl_admin.append_host_ace(
        host =>'myhost.us.example.com',
        lower_port=>443,
        upper_port=>443,
        ace => xs$ace_type(
        privilege_list => xs$name_list('http', 'http_proxy'),
        principal_name =>'A_SHARE_USER',
        principal_type => xs_acl.ptype_db));
        COMMIT;
        END;
        /
Following are the parameters with their description:
- host- Specifies the name or the IP address of the host. The host or domain name is not case-sensitive.
- lower port- Specifies the lower port of an optional TCP port range.
- upper port- Specifies the upper port of an optional TCP port range.
- ace – The Access Control Entry.
- privilege list- Specifies the list of network privileges to be granted or denied.
- principal_name- It is the principal (database user or role) to whom the privilege is granted or denied. It is case-sensitive.
- principal_type- Specifies the type of principal you use.
Refer to the PL/SQL Packages and Types Reference document for more details on the DBMS_NETWORK_ACL_ADMIN package subprograms.
PRIV_ORDS_ACL CONSTANT PLS_INTEGER := 8;In this process you will load the provider’s JSON profile for configuration and credentials to enable access to the recipients.
- Open the Consume Share page and click + Subscribe to Share Provider to select Subscribe to Delta Share Provider from the drop-down. This opens the Subscribe to Share Provider dialog box.
- On the Provider Settings pane of the Register Share Provider dialog box, specify the following details:
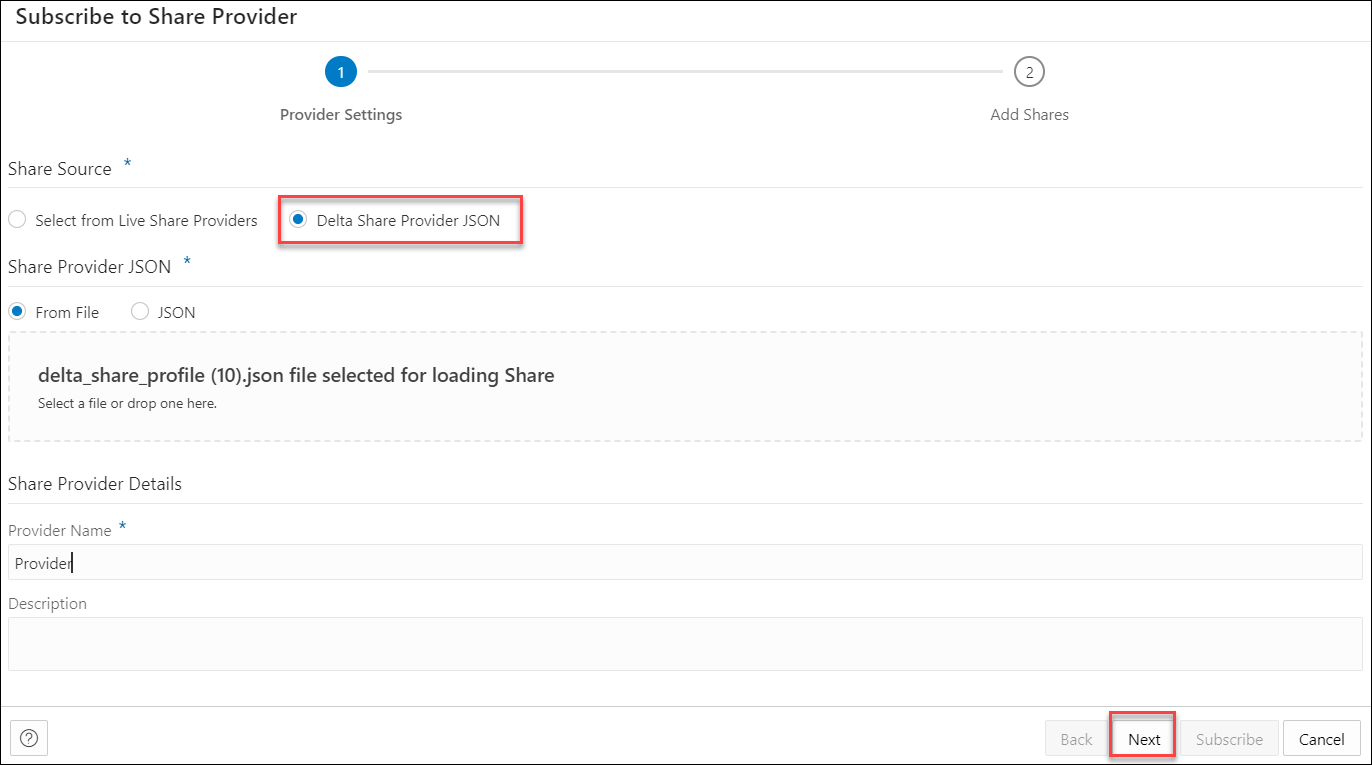
Description of the illustration subscribe-share-provider-version-providersettings.png- Provider Name: Provider.
- Description: Add a description. This field is optional.
Under Share Source section, choose Delta Share Provider JSON.
Under Share Provider JSON field, you can share the JSON profile in the following ways:- From File: Select this option and click on the drop area titled "Delta Share Profile JSON". Clicking on the area opens your local repository where you can select the JSON profile you had downloaded.
- JSON: You can select this option and paste the JSON content of the profile you copy into the notepad.
Upload the JSON profile file and create a share provider subscription.
Click Next to progress to the Add Shares tab. - On the Add Shares tab of the dialog, you will view the list of available shares. Click the share you wish to consume from the Available Shares and select any of the available options:
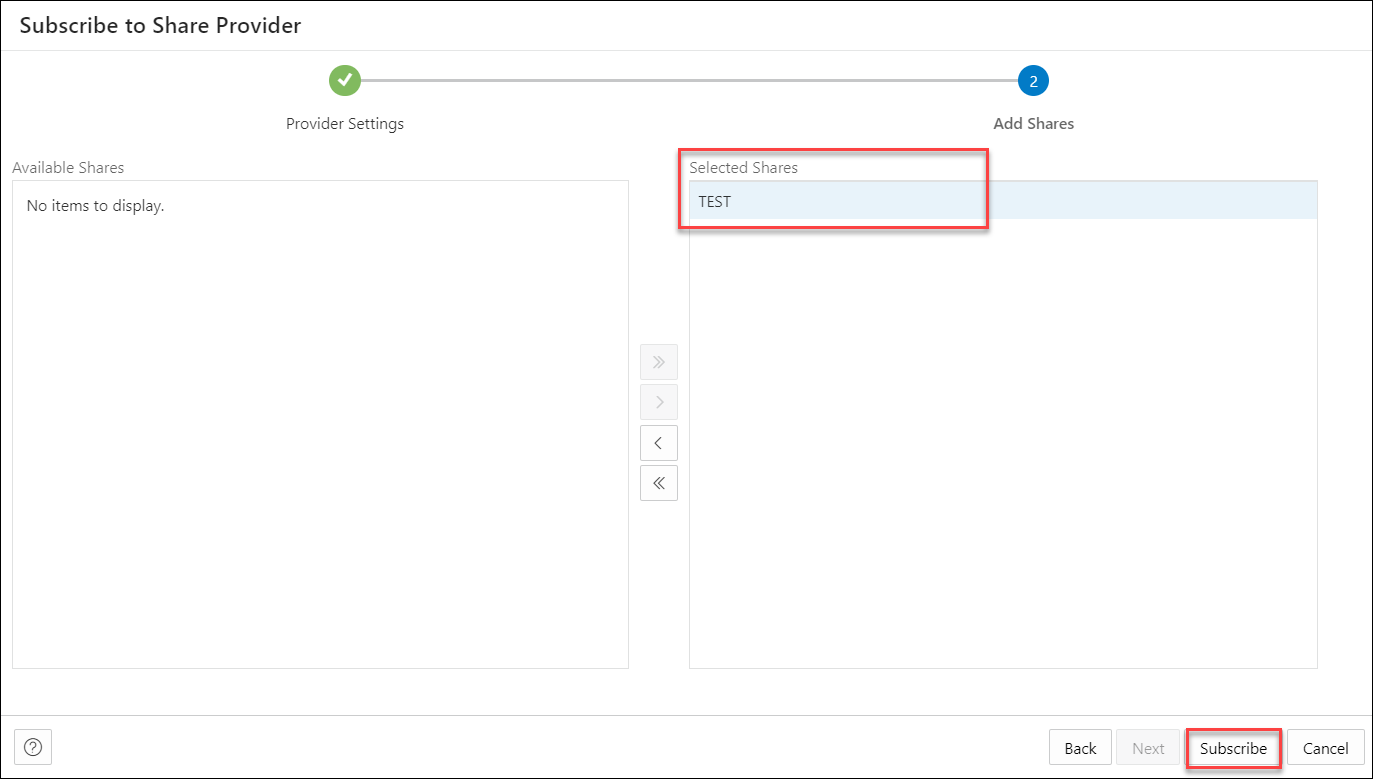
Description of the illustration subscribe-share-provider-version-addshares.png- >: This option enables you to move the Available Share to Selected Shares.
- <: Select this option to remove the selected share from Selected Shares.
- >>: This option allows you to move all the shares to the Selected Shares screen.
- <<: Select this option to remove all the selected shares from Selected Shares.
-
Click Subscribe to add the share. A confirmation prompt appears when the provider is created successfully. After successful creation of the provider, you will now view the Link Cloud Object screen of the Data Load page.
- You can view the name of the Share provider in the cloud storage location field. The share appears in the source file location with the files you add to the share.
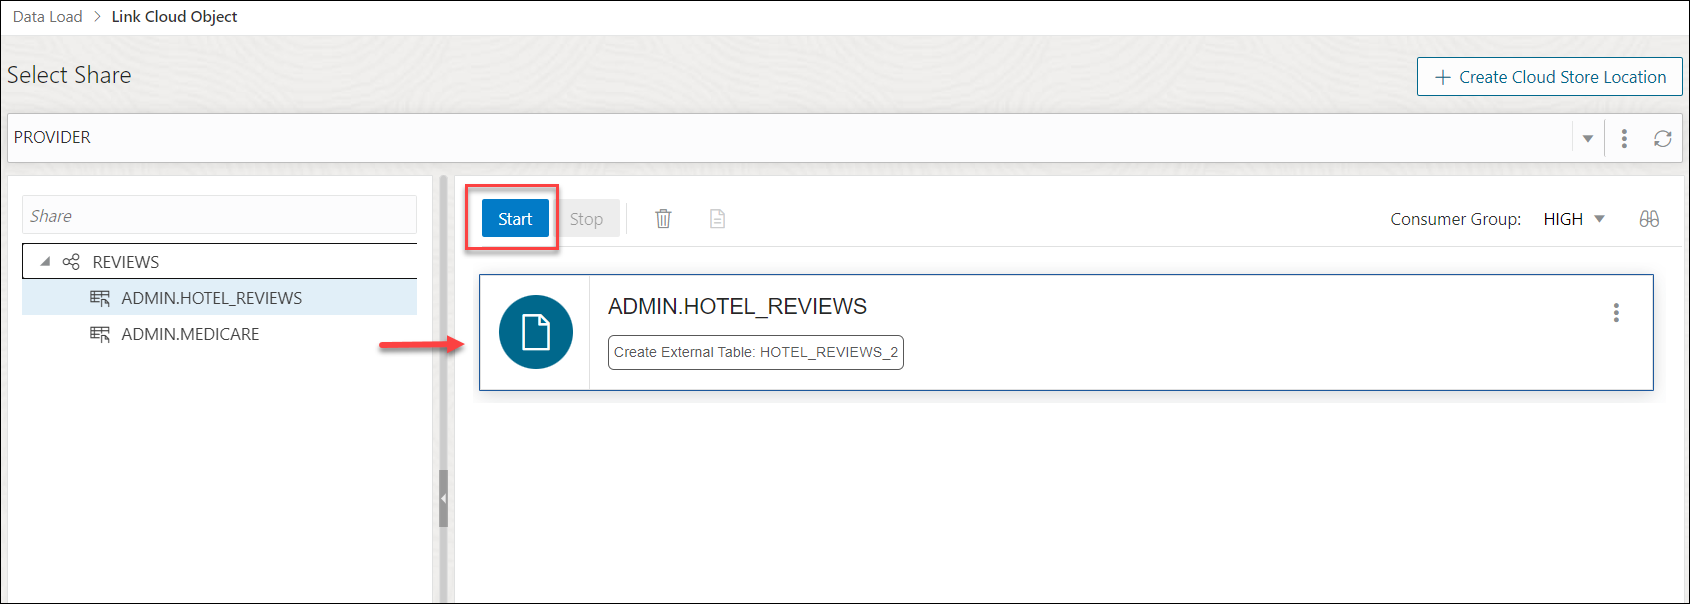
Description of the illustration link-cloud-object.pngExpand the Share folder cart, drag and drop the file you share from the source to the Data Link cart.
Select Start in the Data link cart to run the data link job.
- View the created tables from Database Actions.
- Click on Database Actions, in the breadcrumb, to go back to the Database Actions launchpad.
- Click on the SQL tile.
- Select the external table, drag and drop it into the worksheet.
The SQL Select statement for the table appears. This SQL statement can be run to consume the shared data.
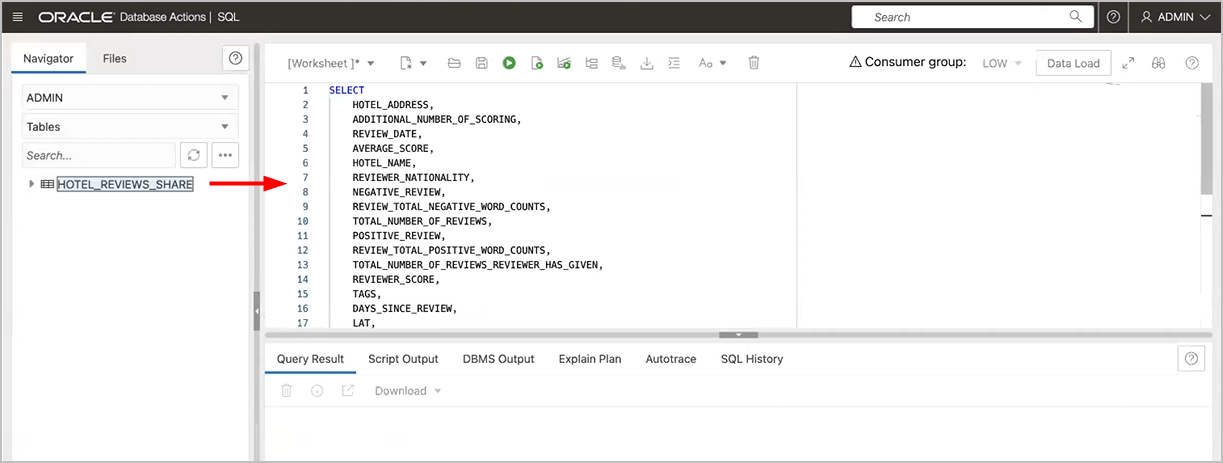
Description of the illustration xt_sql.png
Parent topic: Consume Share
Consume Live Share
Live data shared with you through data sharing is not automatically available for consumption.
To consume live data shares, you need to subscribe to them and create views of tables included in the live share. The views can be queried using SQL scripts.
- Open the Consume Share page and click + Subscribe to Share Provider to select Subscribe to Live Share Provider from the drop-down. This opens the Subscribe to Share Provider dialog box.
- On the Provider Settings pane of the Subscribe to Share Provider dialog box, specify the following details:
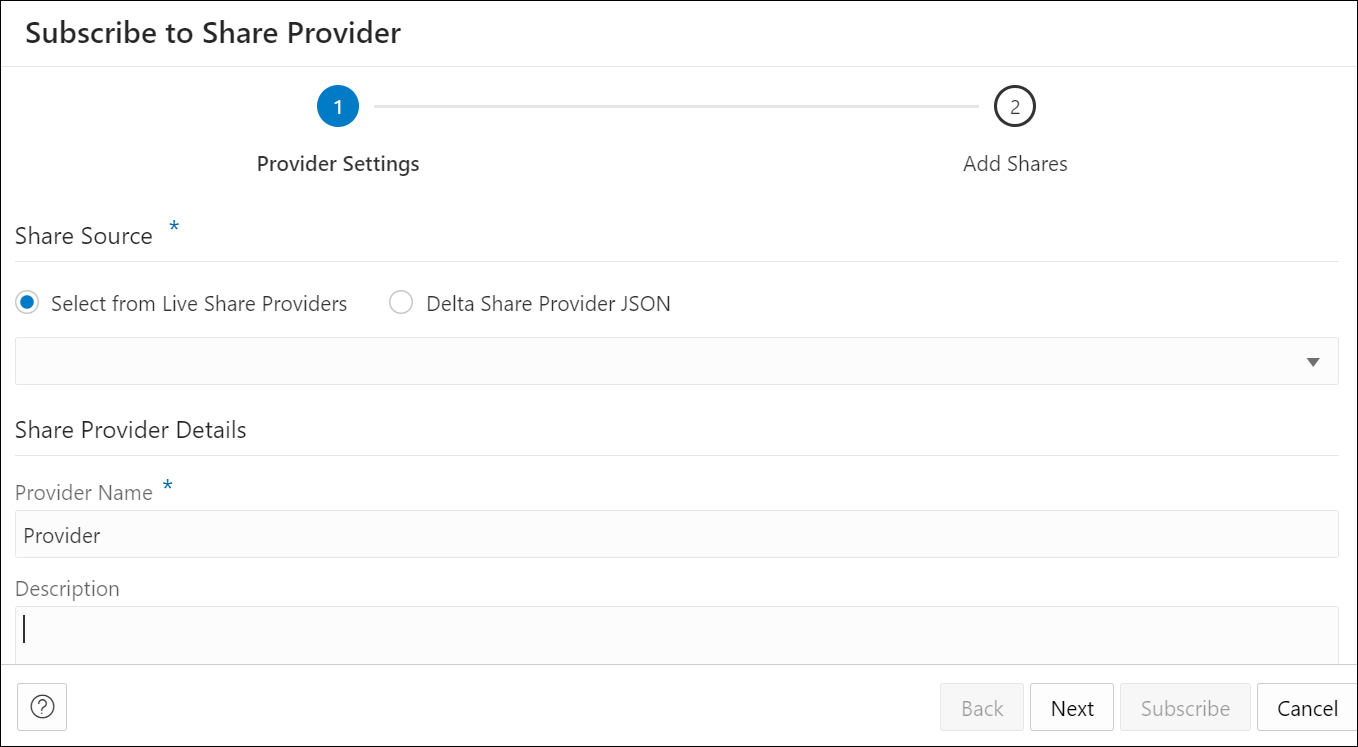
Description of the illustration subscribe-live-share-provider.pngUnder Share Source section, choose Select from Live Share Providers and select the provider from the drop-down.
Under Share Provider Details field, enter the following:- Provider Name: Specify the name of the provider.
- Description: Enter a description of the Provider.
Click Next to progress to the Add Shares tab.
- On the Add Shares tab of the dialog, you will view the list of available shares. Click the share you wish to consume from the Available Shares and select any of the available options:
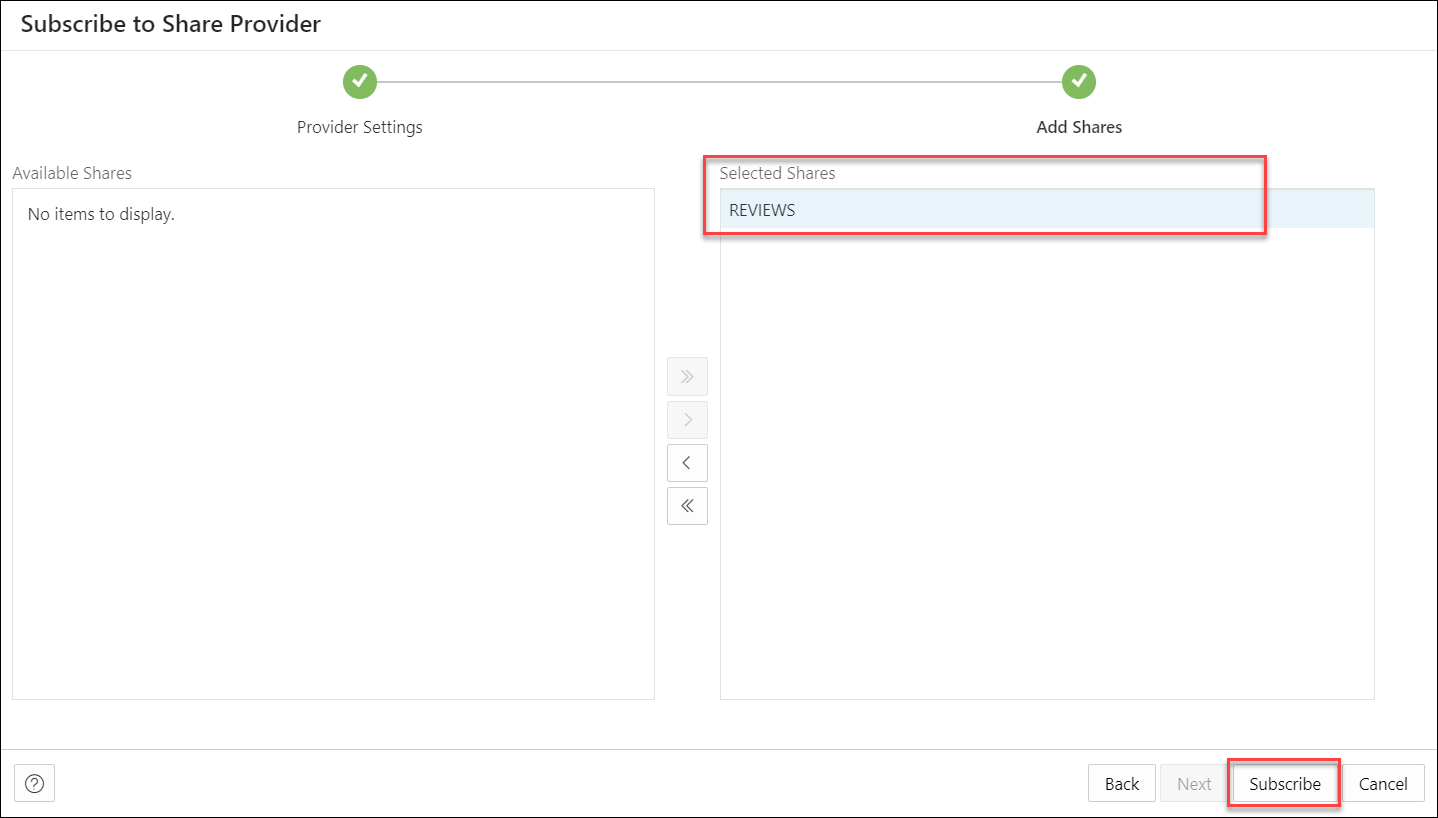
Description of the illustration add-shares.png- >: This option enables you to move the Available Share to Selected Shares.
- <: Select this option to remove the selected share from Selected Shares.
- >>: This option allows you to move all the shares to the Selected Shares screen.
- <<: Select this option to remove all the selected shares from Selected Shares.
Click Subscribe to add the share. A confirmation prompt appears when the provider is created successfully. After successful creation of the provider, you will now view the Link Cloud Object screen of the Data Load page.
- You can view the name of the Share provider in the cloud storage location field. The share appears in the source file location with the files you add to the share.

Description of the illustration link-cloud-object.pngExpand the Share folder cart, drag and drop the file you share from the source to the Data Link cart.
Select Start in the Data link cart to run the data link job.
Parent topic: Consume Share
View Share Provider Entity Details
To view details about the Share Provider entity, click the Actions icon at the right of the Share Provider entity entry, then click View Details.
For all entities, the details include Lineage and Impact sections.
For a specific Share Provider entity, you can perform the following actions using the Actions context menu.
- View Details: See View Share Provider Entity Details.
- Manage Shares: Opens a Manage Shares for Share provider dialog box. This lists the shares you select to share with the recipient. You can edit the list of shares you wish to share with the recipient. Click OK to save any changes or select Cancel to discard the process of editing.
- Rename: Renames the Provider Name. Select Yes to make changes else click No.
- Delete: Removes the Share Provider Entity.
- Load Tables: You are directed to the Load Data page with the Share tab selected.
- Link Tables: You are directed to the Link Data page with the Share tab selected to view and run the related link object. Drag and drop the shared data to add it to the data link job.
Parent topic: Consume Share
