Role Based Access Control IAM Connections
This topic provides instructions for IT management on how to prepare a domain-integrated application that enables Role Based Access Control using JSON Web Token (JWT) custom claims. This will enable domain users to log in to the database using their domain credentials instead of the schema password.
This chapter enables domain users to authenticate to the database with their domain credentials rather than using the schema specific password.
- Create custom attributes for users
- Assign custom role
- Create a domain Integrated application
- Define the Custom Claim
- Enable IAM Login for Autonomous AI Database Schema
- Create a connection file
Note:
We will use theDefault domain throughout this chapter, but you can select any domain of your preference.
Create custom attributes for users
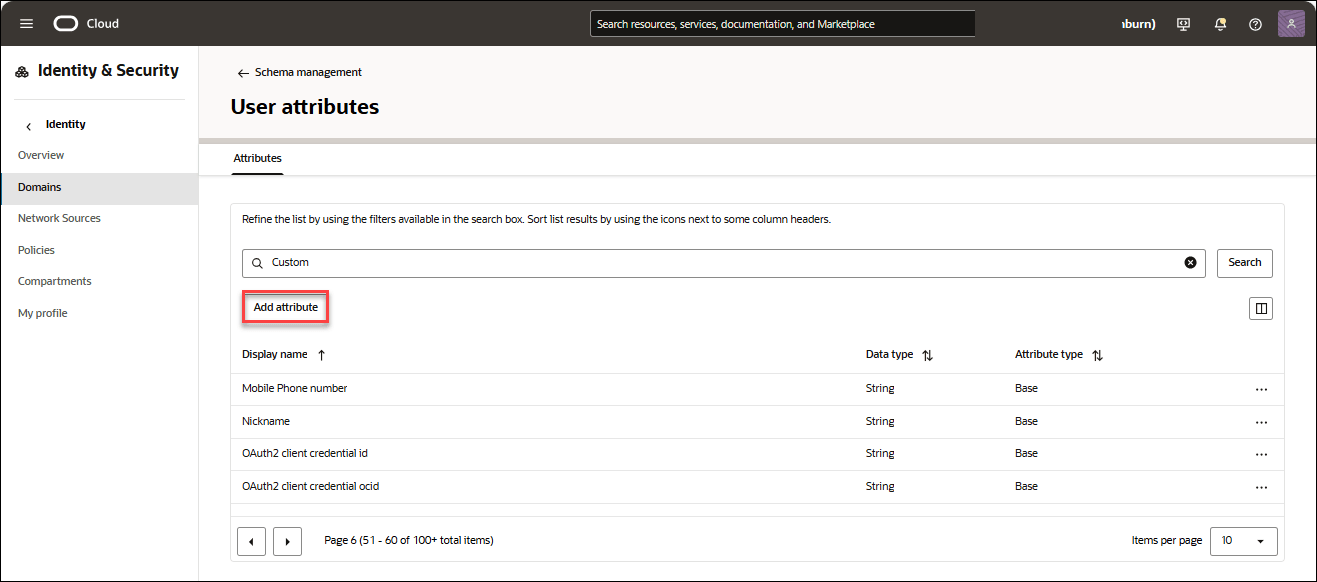
- Navigate to: Identity → Domains → Default. Click the Schema management tab and select User attributes.
- Click Add Attribute under User attributes.
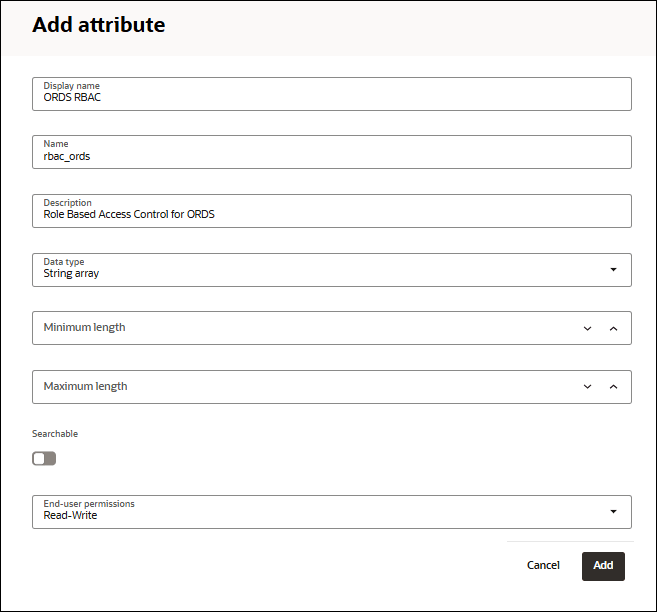
- On the Add Attributes dialog, specify the following fields:
- Display name: ORDS RBAC
- Name:rbac_ords
- Description:Role Based Access Control for ORDS
- Data type: String Array
You can leave the rest of the fields to their default state.
Click Add. You have added the custom attribute.
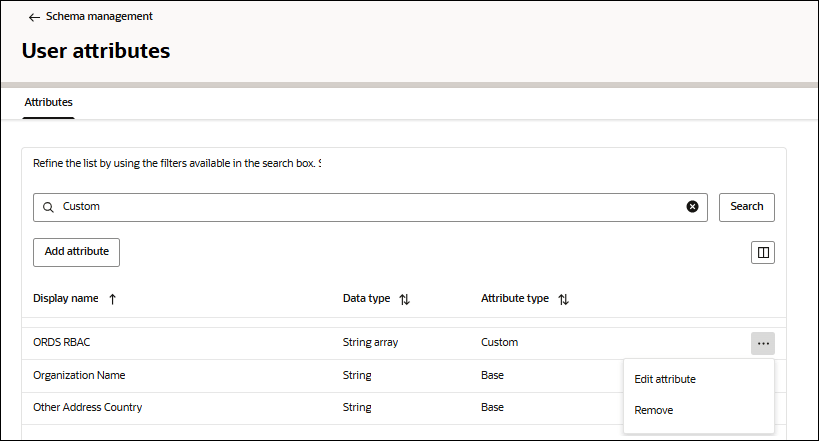
- Search for the newly added attribute by typing Custom in the search field. You will view ORDS RBAC attribute in the list.
Click Edit attribute.
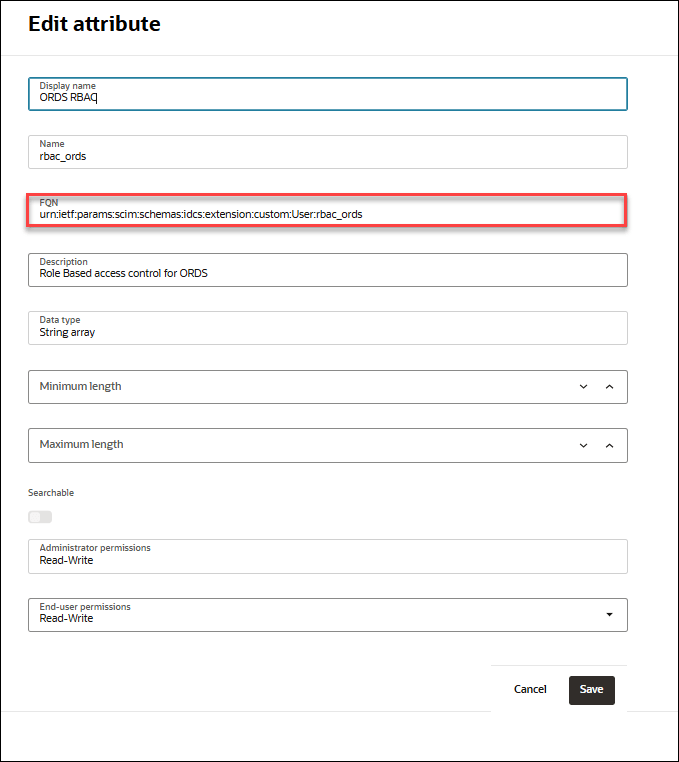
- Copy and note the value of FQN (Fully Qualified Name).
In this example, FQN is urn:ietf:params:scim:schemas:idcs:extension:custom:User:rbac_ords.
Assign custom role
- Navigate to: Identity → Domains → Default. Click the User Management tab and select your username from the list of users displayed.
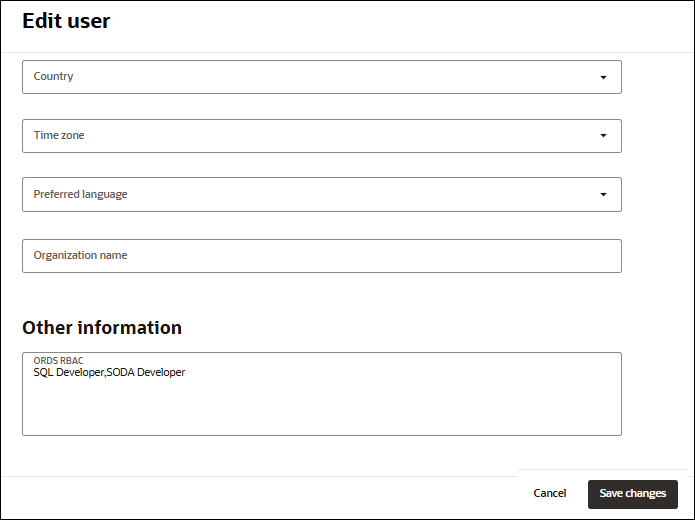
Click Edit user. Scroll down to the Other Information field and enter SQL Developer, SODA Developer under ORDS RBAC.
For more information on ORDS roles, refer to this chapter on About Oracle REST Data Services User Roles.
After you have added the roles, click Save changes.
Create a domain Integrated application
We will develop an integrated application within the domain that will issue a JWT token upon sign-in.
- Navigate to: Identity → Domains → Default. Click the Integrated applications tab and select Add application.
- Click Confidential Application and select Launch Workflow.
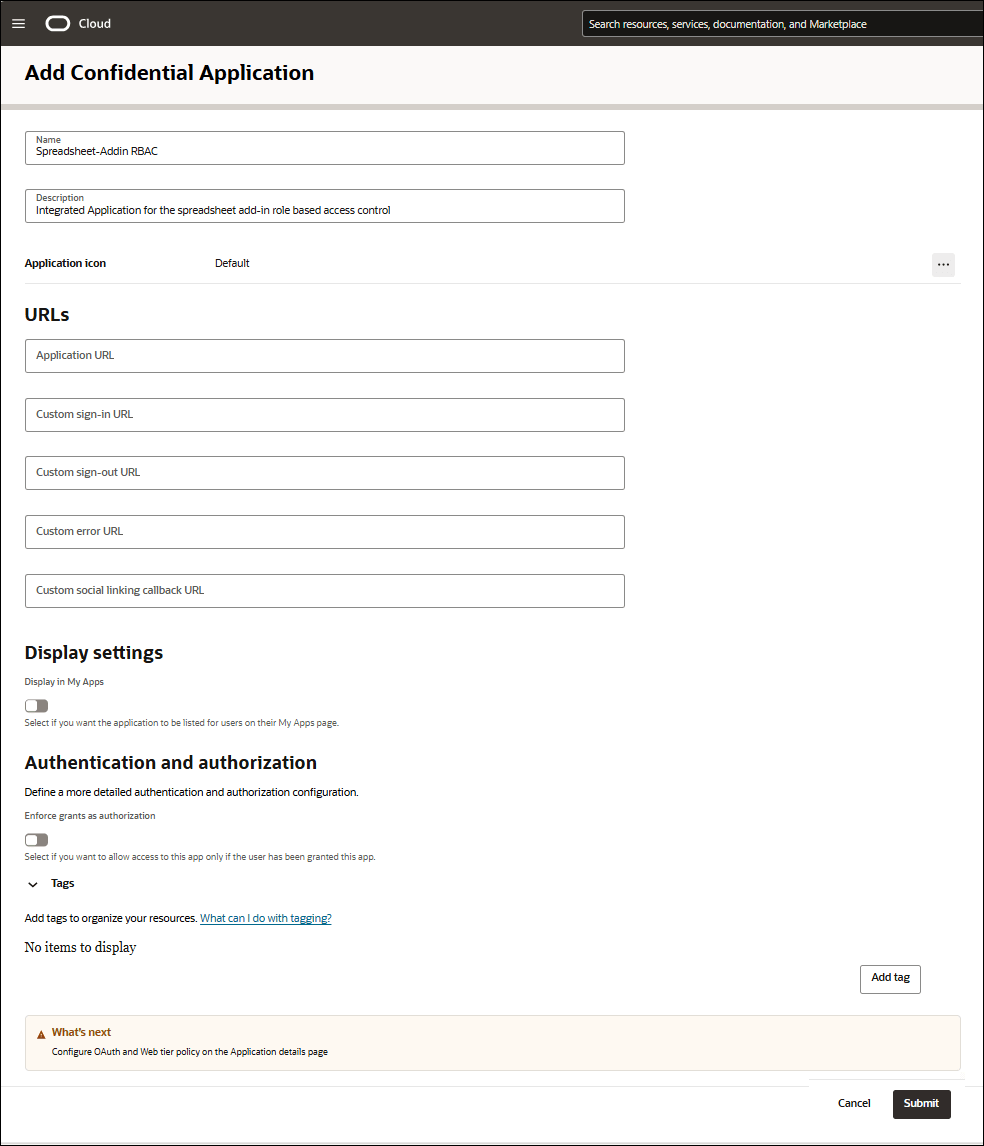
- On the Add Confidential Application dialog, specify the following fields:
- Name: Enter the name of the confidential application. For example, Spreadsheet-Addin RBAC.
- Description: Enter the description. For example, Integrated Application for the spreadsheet add-in role based access control.
Click Submit.
You will view the newly added Spreadsheet-Addin RBAC application page.
- Click Edit OAuth configuration in the OAuth configuration tab of the Spreadsheet-Addin RBAC page.
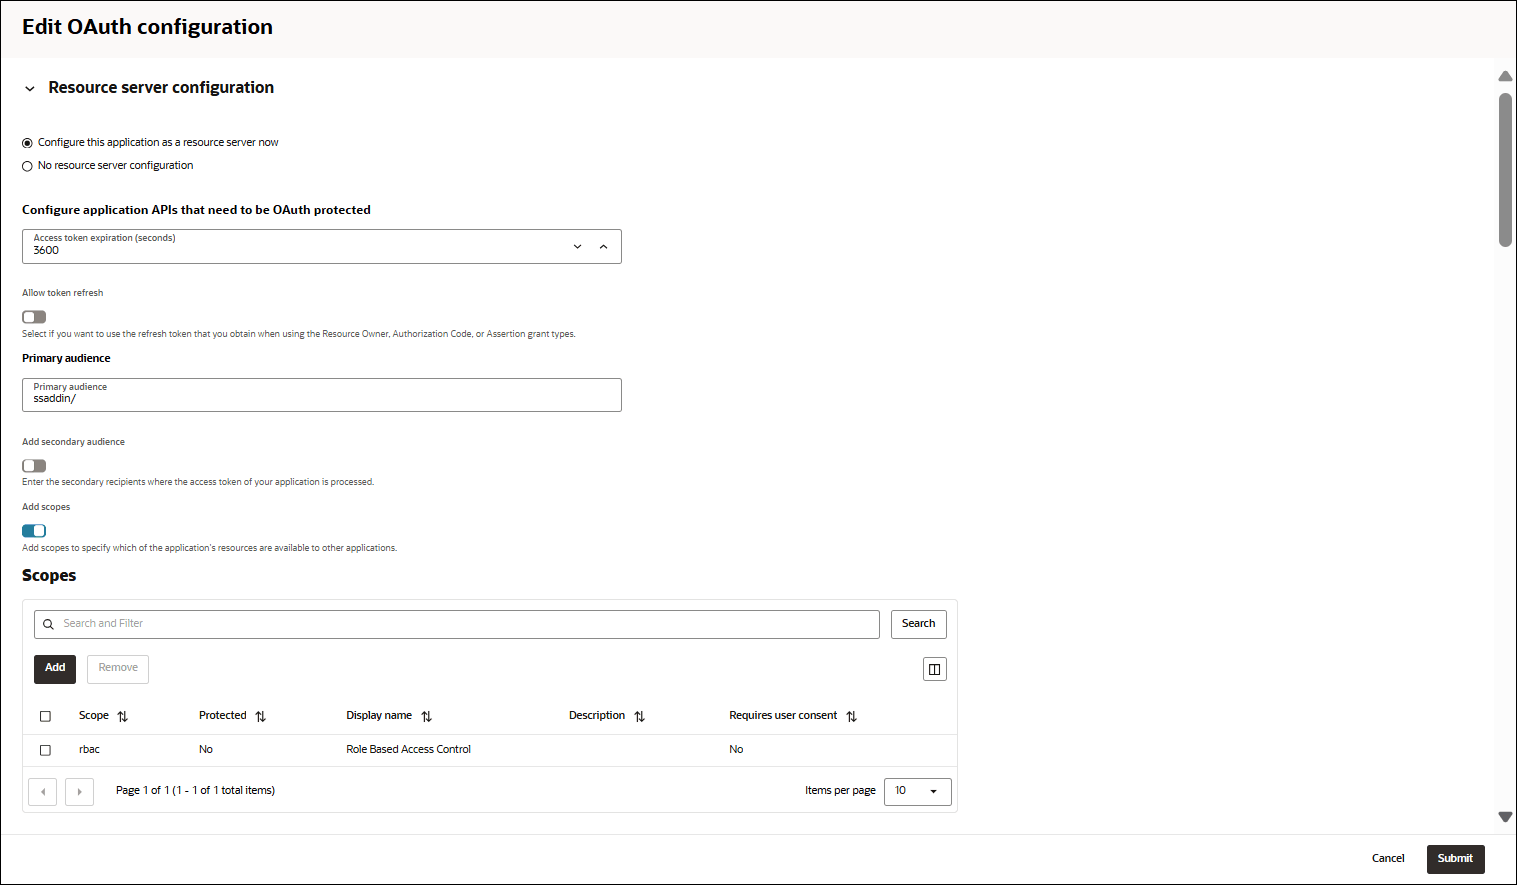
- Under Resource Server Configuration, select Configure this application as a resource server now.
- In Configure application APIs that need to be OAuth protected, select 3600 as Access token expiration (seconds).
- In the Primary audience field, enter ssaddin/.
- Click Add scopes and add rbac Scope.
- Under Client Configuration, specify the following fields:
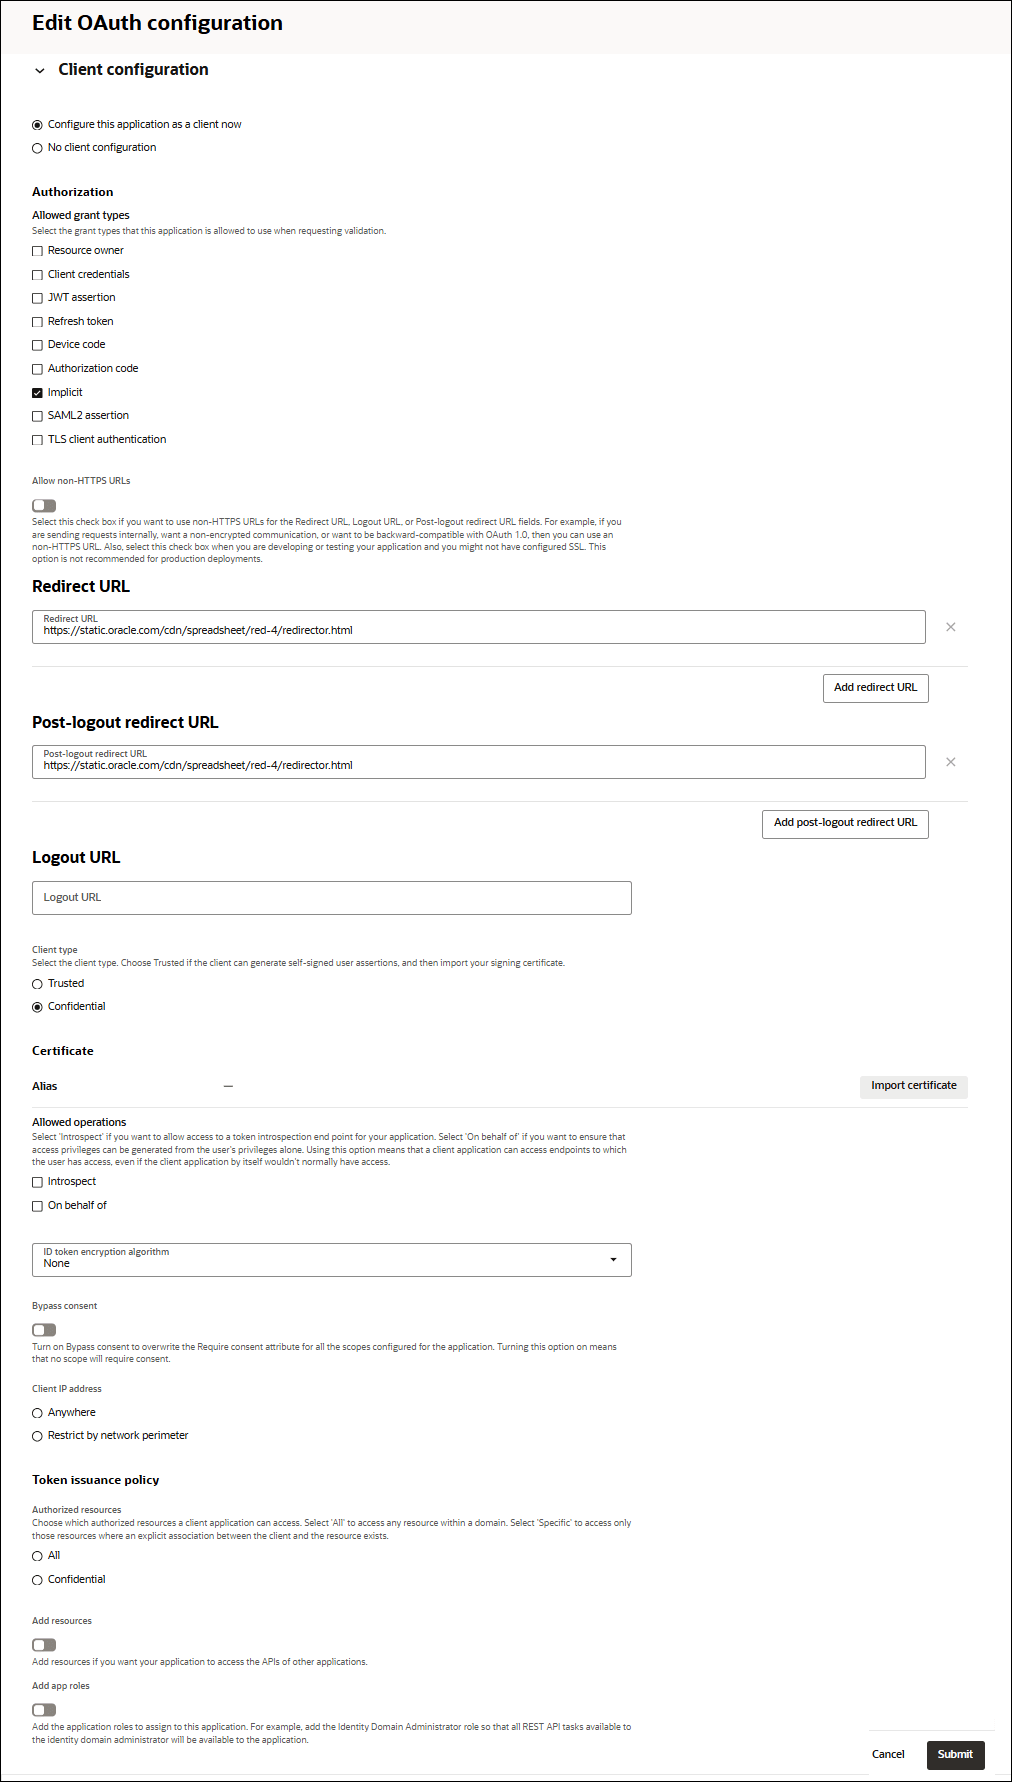
- Select Configure this application as a client now.
- Select Implicit under Allowed grant types.
- Enter the following value in the Redirect URL field:
https://static.oracle.com/cdn/spreadsheet/red-4/redirector.html - Enter the following value in the Post-logout URL field:
https://static.oracle.com/cdn/spreadsheet/red-4/redirector.html
Click Submit.Note:
Ensure you Activate the application.
Define Custom Claim
To include user roles within the JWT, we must map the custom attribute established in the first section into the JWT using a Custom Claim.
To achieve this, we need to create an additional temporary Integrated Application and attach the custom claim through it.
Create Identity domain integrated application
- Navigate to: Identity → Domains → Default.
- Click the Integrated applications tab and select Add application.
- Click Confidential application and select Launch workflow.
- Enter the name of the application: Identity domain integrated application
- Enter Description: This is a domain integrated application.
Click Submit.
- On the Identity domain integrated application page, select the OAuth configuration tab.
- Click Edit OAuth configuration on the Resource server configuration. On the Edit OAuth configuration dialog, specify the following fields:
- Under Client configuration, select the default valueConfigure this application as a client now.
- Under Authorization, select Client credentials. Keep the rest of the configurations to its default state.
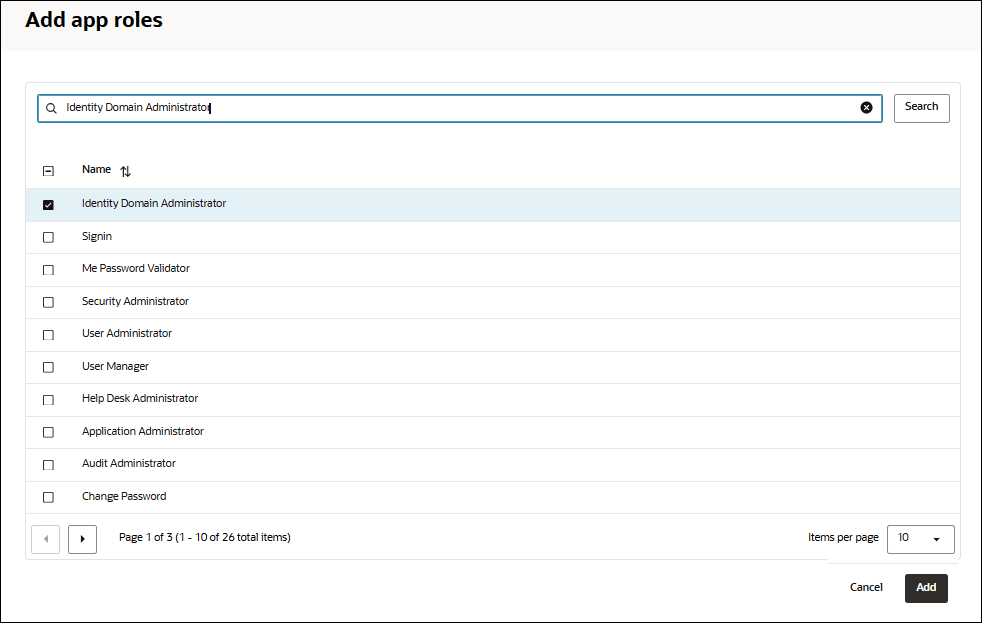
- Select Add app roles.
- On the Add app roles dialog, click Identity Domain Administratorand select Add.
- After adding App roles, click Submit.
- Activate the application.
Note:
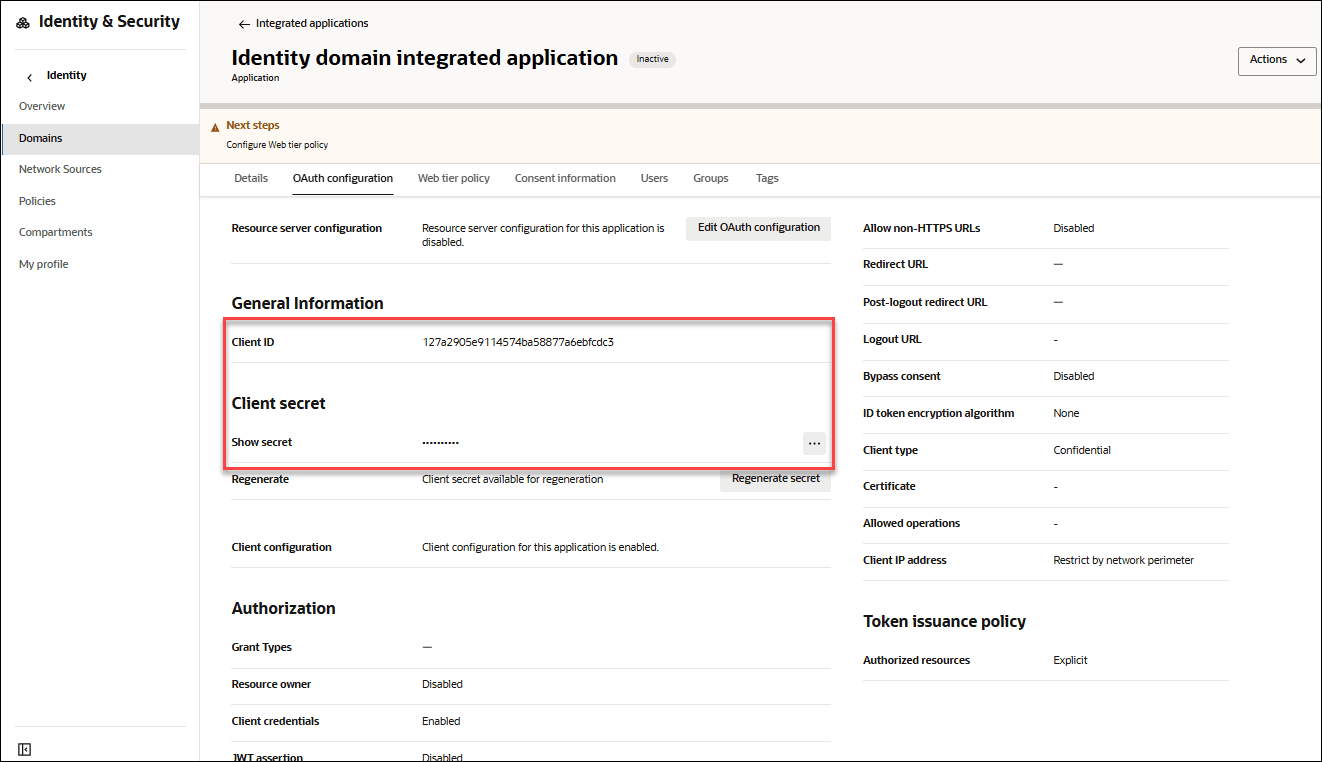
Ensure you make a note of the Client ID and Client Secret from the General Information section of the Integrated Application.
Create new claim for the JWT token
We require CLIENT ID , CLIENT SECRET and DOMAIN URL to retrieve a new access token for the Identity Domain Administrator Application.
We have the CLIENT ID and CLIENT SECRET from the domain integrated application you created in the previous step.
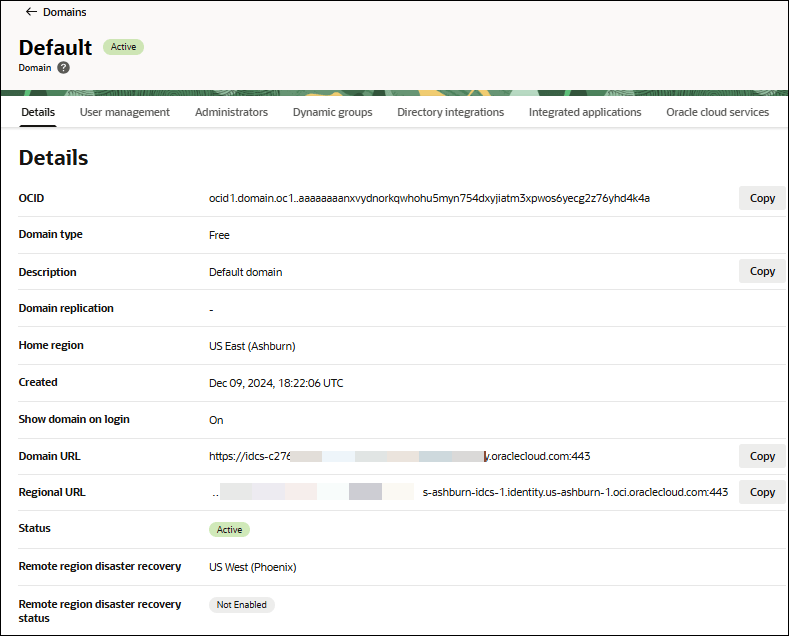
The DOMAIN URL can be found in the domain page under Domain information.
Run the following command and replace the (CLIENT ID) , (CLIENT SECRET) and (DOMAIN URL) values with your values.
export ACCESS_TOKEN=$(curl -s -i -u"(CLIENT ID):(CLIENT SECRET)" -H "Content-Type: application/x-www-form-urlencoded;charset=UTF-8" --request POST (DOMAIN URL)/oauth2/v1/token -d
      "grant_type=client_credentials&scope=urn:opc:idm:__myscopes__" | tail -n +1 | grep -o
'"access_token":"[^"]*' | cut -d'"' -f4)Client ID: 123a1234e1234567aa12345a1abcdefg1Client Secret: idcscs-12a1a123-a123-1234-1234-e1a05aabc123Domain URL: https://idcs-a123ab1ab12a4bb99a9aa9ab99aabbb9.identity.oraclecloud.com:443
export ACCESS_TOKEN=$(curl -s -i -u"123a1234e1234567aa12345a1abcdefg1: idcscs-12a1a123-a123-1234-1234-e1a05aabc123" -H "Content-Type: application/x-www-form-urlencoded;charset=UTF-8" --request POST https://idcs-a123ab1ab12a4bb99a9aa9ab99aabbb9.identity.oraclecloud.com:443/oauth2/v1/token -d "grant_type=client_credentials&scope=urn:opc:idm:__myscopes__" |
          tail -n +1 | grep -o '"access_token":"[^"]*' | cut -d'"'
        -f4)
echo $ACCESS_TOKENThe image below displays how the above commands appear in the Bash shell.
It displays output consisting of multiple lines (over 10) containing alphanumeric characters.
(ROLE CLAIM NAME) as ssaddin.role and (MODIFIED FQN) as urn:ietf:params:scim:schemas:idcs:extension:custom:User.rbac_ords:
Note:
Use the FQN from step 1 and replace the final ":" with a ".".
For example, the FQN from step 1 is:
urn:ietf:params:scim:schemas:idcs:extension:custom:User:rbac_ordsSo the MODIFIED FQN should be:
urn:ietf:params:scim:schemas:idcs:extension:custom:User.rbac_ordscurl -i -X POST (DOMAIN URL)/admin/v1/CustomClaims -H"Cache-Control: no-cache" -H"Accept:application/json" -H"Content-Type:application/json" -H"Authorization: Bearer $ACCESS_TOKEN" -d '{
"schemas": [
"urn:ietf:params:scim:schemas:oracle:idcs:CustomClaim"
],
"name": "(ROLE CLAIM NAME)",
"value": "$user.(MODIFIED FQN).*",
"expression": true,
"mode": "always",
"tokenType": "AT",
"allScopes": false,
"scopes": [
"ssaddin/rbac"
]
}'Note:
Replace theDomain URL with it's actual value in the code above.
You will view the following as output:HTTP/1.1 201 Created.
Enable RBAC IAM Login for Autonomous Database Schema
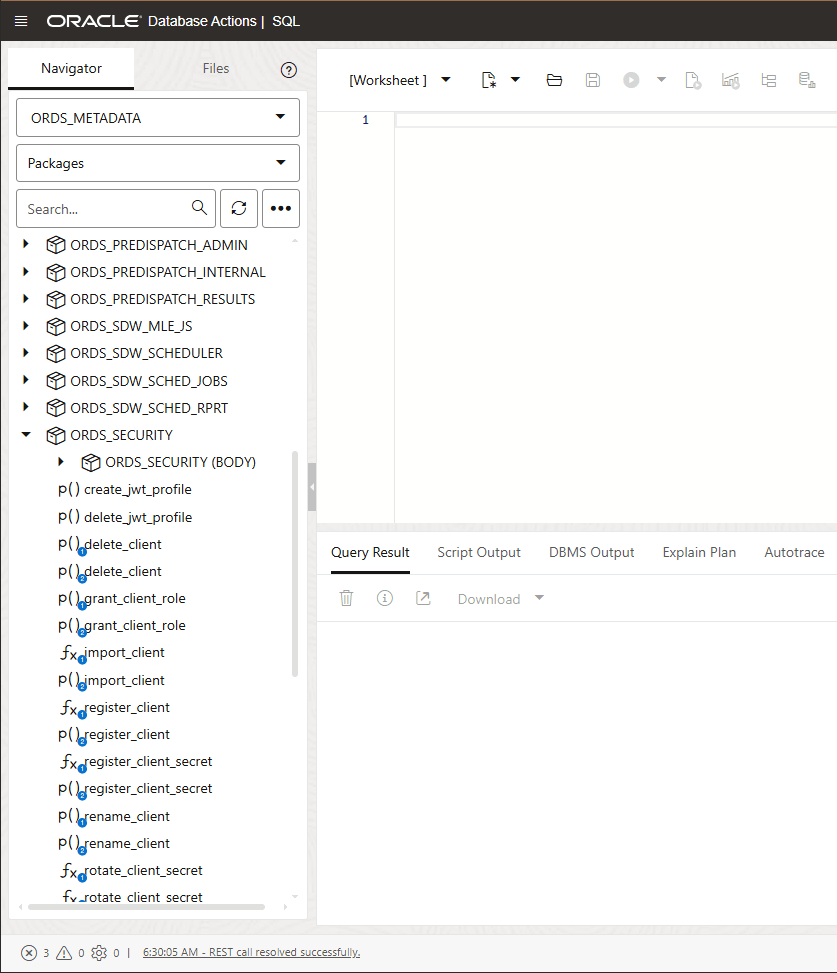
- On the SQL Worksheet, from the Navigator tab, select
ORDS_METADATAfrom the Schema drop-down list. - Select
Packagesfrom the Object type drop-down list. - Type
ORDS_SECURITYin the Search field. The search function retrieves all the entries that start withORDS_SECURITY. - Expand the
ORDS_SECURITYpackage. - Right click
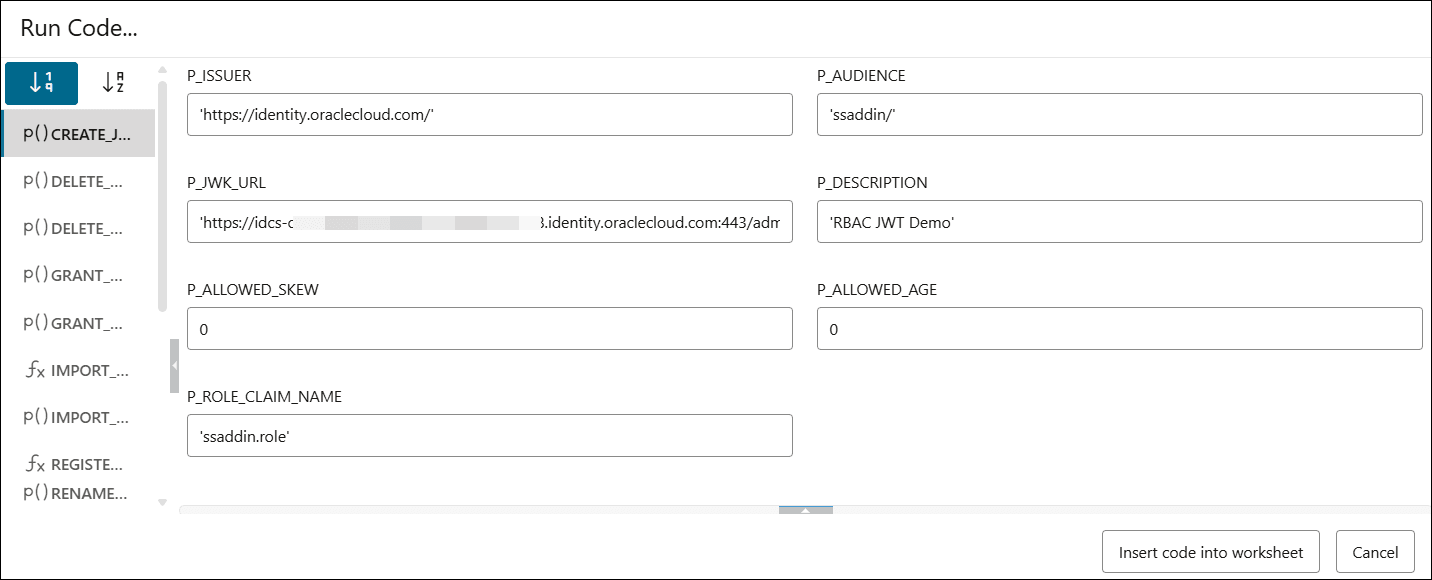
CREATE_JWT_PROFILEand clickRUN. This opens aRUN CODEdialog.On the Run Code… dialog, specify the following field values:- P_ISSUER- https://identity.oraclecloud.com/. This field must be a non-null value and must be filled within a single comma.
- P_AUDIENCE-ssaddin/. This field must be a non-null value.
- P_JWK_URL- Append the DOMAIN URL with /admin/v1/SigningCert/jwk. It must be a non-null value starting with https:// and identify the public verification key provided by the authorization server in a JSON Web Key (JWK) format.
You can view the Domain URL in the Domain information tab present in the Domains menu of Identity & Security navigation menu of the OCI console.
- P_DESCRIPTION- Enter the description for this profile. For example, “RBAC JWT Demo confluence”.
- P_ALLOWED_AGE-"0"
- P_ALLOWED_SKEW-"0"
- P_ROLE_CLAIM_NAME- "ssaddin.role"
Click Insert code into worksheet.
Run the procedure.
You will view "PL/SQL procedure successfully completed." in the output panel.
Create a connection file
-
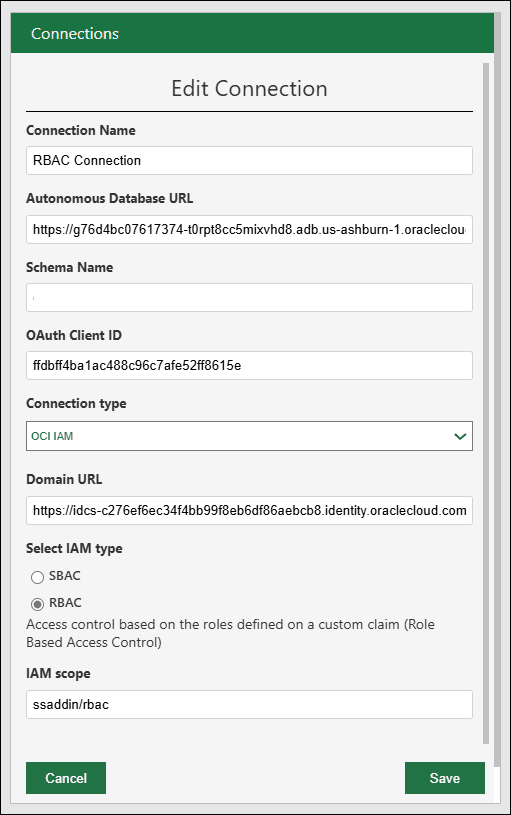
Click on the Add button on the header of the Connections pane to add a connection. This opens an Add new connection dialog box.
- Specify the following fields on the Add new connection dialog box:
- Connection name: Enter the name of the connection.
- Autonomous Database URL: Enter the URL of the Autonomous Database you wish to connect to. Copy the entire URL from the web UI of the Autonomous Database. For example, enter or copy the following link "https://<hostname>-<databasename>.adb.<region>.oraclecloudapps.com/" to connect to the database.
- Schema Name: Enter the same schema you use to Enable IAM Login for Autonomous Database Schema.
- Select the connection type: OCI IAM
- Domain URL: Enter the Domain URL from the domain information tab.
- Select RBAC IAM type.
- IAM Scope:
ssaddin/rbac
After the connection is created you can share it with other users of this domain.
Parent topic: The Data Analysis Tool
