Synchronize Specification File Changes With Generated Source Code
You can use the synchronization function to bring new changes from the specification file to the chaincode source files (model and controller). The function works with both TypeScript and Go projects.
- Synchronization is unidirectional: you can bring changes from your specification file into your chaincode project, but not the other way around. Changes made in your chaincode project remain as-is after the synchronizing process.
- The command works only if the chaincode project was scaffolded by using a specification file. Do not delete, rename or move the specification file if you plan to synchronize any changes from the specification file to the source code in future.
- During synchronization, the chaincode files in the
libfolder are automatically upgraded. If you make any changes to these library files, back up the modified files or track the changes that you make before you use the synchronization function, so that you can apply those changes again after synchronization.
- In the Specifications pane, select the specification file that you updated to open its Specification Details pane. At the top of the pane, click Chaincodes to open the pane showing which chaincodes were generated from the specification file.
- Select the Sync check box beside each chaincode that you want to update with the new changes. You can synchronize more than one chaincode that was generated from a specification file at a time. Click Synchronize.
Resolving Conflicts
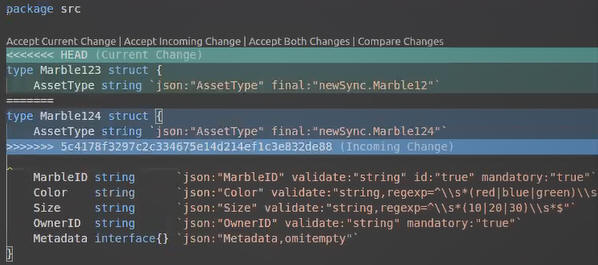
Because you can edit both the synchronization files and chaincode files, it's possible to end up with conflicts where the updated specification file could overwrite a change that you've made to the chaincode file. In these cases, when you attempt to synchronize an error is displayed stating that there's a conflict. You can use the Conflicts pane to resolve these errors.
- On the Conflicts pane, click the name of the chaincode file
where the conflicts exist. The file opens in an editor with the conflicts
highlighted.

In the example shown,
Marble124is in the specification file, andMarble123is in the chaincode model file. - Above the conflict is a list of options. Click Accept Current Change to override the specification file and use what is currently in the chaincode file. Click Accept Incoming Change to override the chaincode file and use what is currently in the specification file.
- Return to the Conflicts pane. Select the Sync check box next to the conflict name, and then click Confirm Changes. If you have multiple conflicts, resolve all of them before before clicking Confirm Changes.