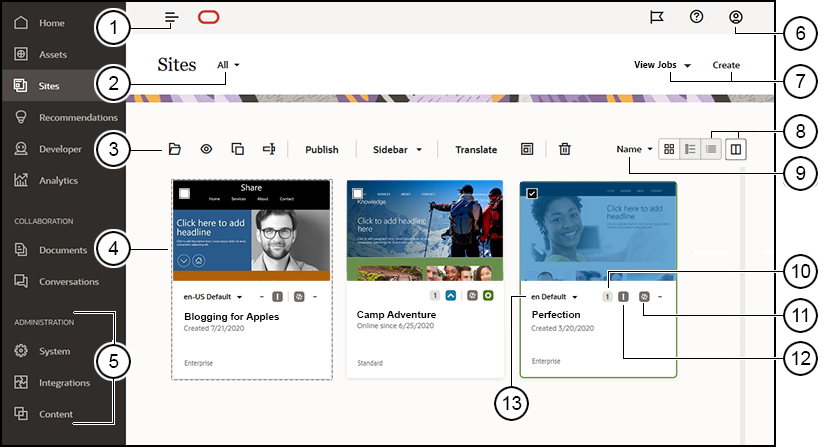
Get to Know the Sites Page
The Sites page is your gateway to working with web sites.
| Callout | Description |
|---|---|
| 1 |
The panel toggle hides and shows the navigation menu. |
| 2 |
The filter menu lets you filter the sites list to see all sites you have access to or subset of them. If site governance is enabled, you can view pending site requests. |
| 3 |
After you select a site in the list, the actions bar is available. Use the options on the actions bar to open, view, change the status of, or rename your sites, and perform other tasks. The options that are shown depend on your role for the selected site. For example, if you created the site, then you have the Manager role for that site and can perform all the tasks listed. But if someone has shared a site with you and assigned you the Viewer role, you can view site properties, but you can’t change anything. The actions bar options also depend on the current status of the site. For example, Compile is only available for sites that are published and the Compile site after publish option is enabled in the Static Content tab of the site properties panel. Also, the Rename and Delete options are available only if the site is offline. Tip: Looking for a shortcut? Right-click a site to open the context menu and choose an option. |
| 4 |
The sites list shows all the sites you own or that were shared with you. The list includes the site name, the number of updates, if the site is secure, and the status of the site (online, offline, or pending updates). |
| 5 |
The Administration menu is shown if you’re logged in as a content administrator. Options here let you change service settings, set up integrations, and set up repositories and other asset-related features. |
| 6 |
The user menu has options for setting your preferences, giving feedback, accessing help, and signing out. Click the user picture to display menu options. |
| 7 |
Click Create to start the process of creating a website. Before you can create a site, your administrator must enable site creation and provide one or more templates. If you don’t see the Create option on the sites page or templates on the template page, contact your service administrator. Click View Jobs and select an option to see a listing of translation, publishing, site export or site import jobs. |
| 8 | Click the view icon to display items in a list
view, a grid view, or a table view. In table view, click the
table preferences icon ( |
| 9 |
Use the sort options to change the display order for the sites. |
| 10 |
Click the update number to edit an existing update for the site or to create a new update for the site. If the site doesn’t have any updates, you can create a new update by opening the site and changing Site Builder to edit mode. |
| 11 |
Click the Offline, Online, or Republish icons to change the status of the site or publish changes that have been committed but not published to the live site. |
| 12 |
The security icons show whether a site requires log in or not. |
| 13 |
Use the language list to see the languages specified in the site's associated localization policy. To preview a localized version, select the language, and open the site. |
