Translate a Site
If you have assets on a page in a translated site, either directly or in a content list, and you've translated those assets, the assets will display in the same language as the site. You can also translate content items separate from a site; see Localize Content Items.
When translating a site that contains assets from multiple repositories, only assets from the default repository are included in the translation job
Note:
With Oracle Content Management Starter Edition, you cannot work with translations. For a full feature set and unlimited sites, upgrade to Oracle Content Management Premium Edition.
Create a Translation Job
When exporting a translation package for manual translation or using a translation connector, you need to create a translation job.
-
Select the site you want to translate, and then click Translate. You might need to click More to see the Translate option.
-
Enter information for the site files you’re exporting — the translation job, and then click Create:
- Enter a name for the translation job.
- Select the target languages into which the site will be translated.
- Select whether to export the complete site—site content (pages, structure, and site info) and targeted assets, just the site content, or just the targeted assets.
- Select Include only published versions of assets or not. Including only published asssets means any revisions of assets being worked on in the source language that have not yet been published will be excluded from the translation job. This is useful if content providers begin new drafts of assets in the source language as soon as a site is published.
- Select a translation connector or choose to export a translation package for manual translation.
- Click Create when done.
Once the translation job is finished, the translated package is imported into Oracle Content Management. If for any reason a translation job fails, select it and choose Resubmit in the right-click menu or actions bar. The original job is deleted and a new one submitted.
Manually Translate the Source Language Files
If you're manually translating content, you need to download the .zip file of the site files after the translation job has finished.
- Click Translation Jobs in the banner, select the translation job, then click Download.
- For each language you selected as a target language, create a folder
in the .zip file at the same level as the
rootfolder, for example,de,es, andfr. You can translate a subset of the selected languages. For example, you could translate into German (de) now, and then translate into Spanish (es) and French (fr) at a later time. - Copy all the
.jsonfiles from therootfolder to each language folder. - Translate the strings in all of the
.jsonfiles to the appropriate languages. Do not delete any strings from the .json files, and do not rename the files. - Zip up the
assets(if your translation job includes assets) andsite(if your translation job includes site content) folders, withjob.json,root, and all the language folders with the translated files.
Import a Manually Translated Package
Whether translation was done manually or automatically, you need to import the finished translation package.
-
On the Translation Jobs page, click Import.
- Click Upload, select the .zip file of translated site files, then click Open.
- After the upload is finished, click OK
- Oracle Content Management validates that the translations that are defined in the job are available in the .zip file. If you want to see which pages and assets are included in the translation job, click the link in the dialog.
- When you're ready to import the translations, click
Import.
The status of the import appears above the banner. You can view the details of the job by clicking Details.
Import a Translated Package from a Translation Connector
Whether translation was done manually or automatically, you need to import the finished translation package.
- Click the
 and select Translation Jobs.
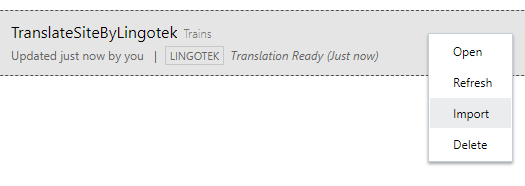
- Right-click on the finished translation job and select
Import.

- Oracle Content Management validates the translations that are defined in the job. If you want to see which pages and assets are included in the translation job, click the link in the dialog.
- When you're ready to import the translations, click
Import.
The status of the import appears above the banner. You can view the details of the job by clicking Details.
After importing your translations, you need to publish your site and make sure the site is online to make the translations available on your site.
If any changes are made to translations at the translation service after you've imported the translation package, you can click Refresh to update the translations.
If you change the site after translation, you'll need to translate any new or edited strings. When you edit a site in Site Builder, you edit the default language version of the site. Any site structure changes you make, such as adding components or rearranging pages, will be replicated in the localized versions of the site. You can then create a new translation job to translate the updated strings.