Define Audience Rules
After creating a recommendation, you must define the audience rules used to identify and display personalized content.
-
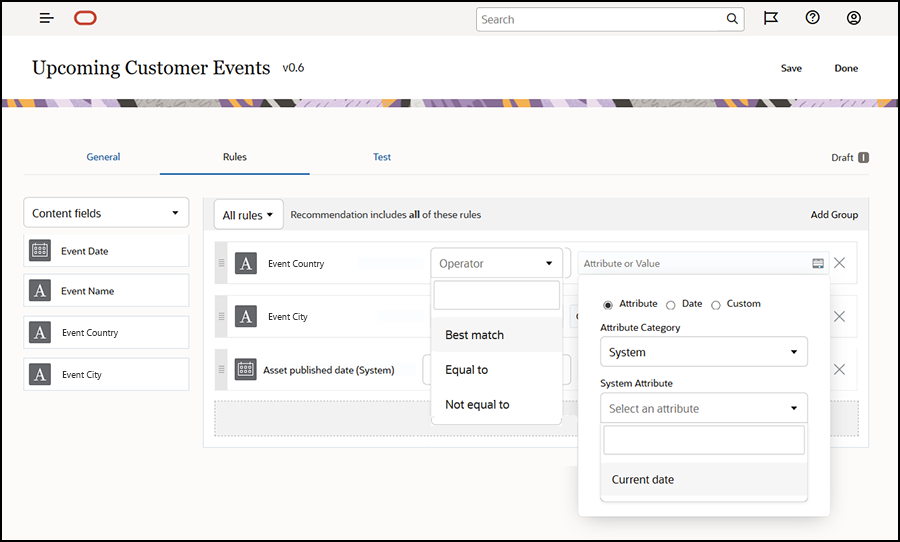
On the rules tab of a recommendation, select Content Field, Metadata, or Taxonomies from the selection menu.
-
Select the content field, metadata field, asset category or asset taxonomy, and drag it into the rules area. Content and metadata field options include all indexed fields available in the content type selected when creating the recommendation. Non-indexed fields such as Large Text, Relationship, and JSON fields are not available. Asset category and asset taxonomy are available if Taxonomies is selected from the menu.
-
Select the operator to use. Available options are dependent on the type of content field used. Taxonomies only support the Equal to operator.

-
Click
 and select an audience attribute or enter a specific value to
validate.
-
For content or metadata fields, when defining date fields, you can add custom functions for date fields to automatically define dates and date ranges. For example, you can specify an event recommendation to list events between now and the end of the month. If selecting Start of Day or End of Day attributes, you can set an offset to begin or end the results a number of days before or after the current day.
You can also enter a list of values if the rule uses an operator compatible with list values, such as Equal to, Not equal to, or Best match. Items in a list of values must be separated by a new line. For example, a rule using the Equal to operator and matching a sports interests field could take a list of values on new lines such as:basketball baseball soccerIn this case the rule would match if the content field has the value basketball, the value baseball, or the value soccer.
-
For asset category or asset taxonomy, only Custom is available as a valid attribute category. When testing, you will need to select a value for the custom audience attribute.
-
If you enable Include children for an asset category rule, then all assets that match the given category along with assets matching its descendants will be part of the result set.
-
All multi-value options in a single rule will use the OR operator.
-
-
When you've finished making your selections for a rule, click Done.
-
Continue to create additional rules if necessary. You can add as many rules as you need to return the results you want.
When creating multiple rules, select whether to validate all rules (this rule AND that rule) or to validate any rule (this rule OR that rule). If you select All, then all rules must be true in order for content to match, meaning all rules are connected by AND. For example, if a recommendation had one rule stating the event city is equal to Portland and the event state is equal to Oregon, you would see events happening only in Portland, Oregon but not also in Portland, Maine.
If you select Any, then at least one rule must be met for content to be valid, meaning each rule is connected by OR. For example, if a recommendation had one rule stating the event city is equal to New York and another rule stating the event city is equal to Boston, you would see events happening in New York as well as in Boston.
-
When you’re done adding rules, click Save.
-
When you're done editing the recommendation, click Done.
All audience rules of a recommendation are listed on the rules tab of the recommendation details.
Group Audience Rules
By grouping audience rules you can create complex expressions to return detailed results. This allows you to more exactly and accurately describe the content that should be shown to audience members. Also note that you can use the AND and ALL group operators to determine how multiple rules and sub-groups will interact to select your content.
For example, to select content related to an event, you may want to see events of 200 people or more that are near you within a certain price range. As it may be more expensive for you to travel to Boston than it is to travel to New York, the events in New York could have a higher ticket price than the events in Boston. Your rule would look like this:
Exhibitors >= 200 AND ((City = New York AND Price < $1000) OR (City = Boston AND Price <= $500))
- On the Rules tab, select All rules.
- Drag Number of exhibitors to the rules area, select Greater than or equal to and enter 200.
- Click Add Group to create a new grouping of rules and select Any rules.
- Click Add Group again to create a new child group within the group made in the previous step, and select All rules.
- Drag Event City into the rule group, select Equal to and enter New York.
- Drag Ticket price into the same rule group, select Less than and set it to 1000.
- Click Add Group again to create a new sibling group at the level of the group made in step 4, and select All rules.
- Drag Event City into the rule group, select Equal to and enter Boston.
- Drag Ticket price into the same rule group, select Less than or equal to and set it to 500.
The rule set will return events of at least 200 exhibitors in New York with a ticket price less than $1000 as well as those in Boston with a ticket price of less than $500.