Deploy Gatsby Applications on Netlify with Experience Orchestration in Oracle Content Management
Introduction
Netlify is a cloud platform that allows you to build and deploy static and serverless sites.
In this tutorial, we’ll deploy the Oracle Content Gatsby Blog sample on Netlify from a GitHub source. Once the application is configured and deployed, you’ll learn how experience orchestration can provide support for automatic rebuilds of the hosted site and how Netlify can inform Oracle Content Management of any state changes in the deployed application. Once configured, this can be monitored and controlled from within the Oracle Content Management web interface.
The tutorial consists of five steps:
- Create a Gatsby application to deploy
- Create and Deploy a Site on Netlify
- Configure outgoing webhooks
- Configure incoming webhooks
- Analyze the events
Prerequisites
Before proceeding with this tutorial, we recommend that you read the following information first:
To follow this tutorial, you’ll need:
- an Oracle Content Management subscription
- an Oracle Content Management account with the Content
Administrator role. If you don’t already have an Oracle Content
Management instance, see Quick
Start to learn how to register for Oracle Cloud, provision an
Oracle Content Management instance, and configure Oracle Content
Management as a headless CMS.
- a GitHub account. If you don’t have one yet, go to GitHub to create one. A basic free account is sufficient for this tutorial.
- a Netlify account. If you don’t have one yet, go to Netlify to create one. A free account is sufficient for this tutorial. An easy option is to tie your Netlify account to your GitHub account, whether it’s an existing account or a new one.
Task 1: Create a Gatsby Application to Deploy
This tutorial uses the Oracle Content Management sample Gatsby blog as the sample application to deploy in Netlify. Follow the Build a Blog in Gatsby with Headless Oracle Content Management tutorial to create the site to be deployed.
Creating the Gatsby application consists of these steps:
- Seed the data for the blog in Oracle Content Management
- Clone the Gatsby Blog to a private local repository
- Configure the Gatsby blog app
Seed the Data for the Blog in Oracle Content Management
The first part of the Gatsby blog tutorial, Preparing Oracle Content Management, should be completed in its entirety. It isn’t necessary to create your own content model, so follow the instructions for importing the Oracle Content Management Samples Asset Pack instead of manually creating and seeding the data structures.
Clone the Gatsby Blog to a Private Local Repository
The following steps are needed only for this tutorial. It creates a copy of the Gatsby blog sample code from the public Oracle GitHub repository into a private repository in your account.
Log in to GitHub.
Go to the Gatsby blog sample in the public Oracle sample code repository.
Click the green Use this template button.
Give your new repository a name. We’ll use “gatsbyblogsample” for the purpose of this tutorial.
Set the repository to private.
Accept the changes to complete the creation of your copy.
Configure the Gatsby Blog App
Next, you’ll need to take a few steps to configure the Gatsby blog application:
Complete the steps found in Build the Blog in Gatsby with one change: start by making a clone of the private repository created in the previous section instead of cloning the Oracle public repository.
After the blog application has been tested and proven to work, the .env file modified in the previous step should be committed to the new private repository. This is so that Netlify can clone the project from the private repository with the application preconfigured to use your Oracle Content Management data.
Task 2: Create and Deploy a Site on Netlify
At this point, your Oracle Content account contains all the data needed to display the blog site and GitHub contains a private repository with a preconfigured Gatsby application. The next step is to deploy the application as a Netlify-hosted site:
Log in to Netlify.
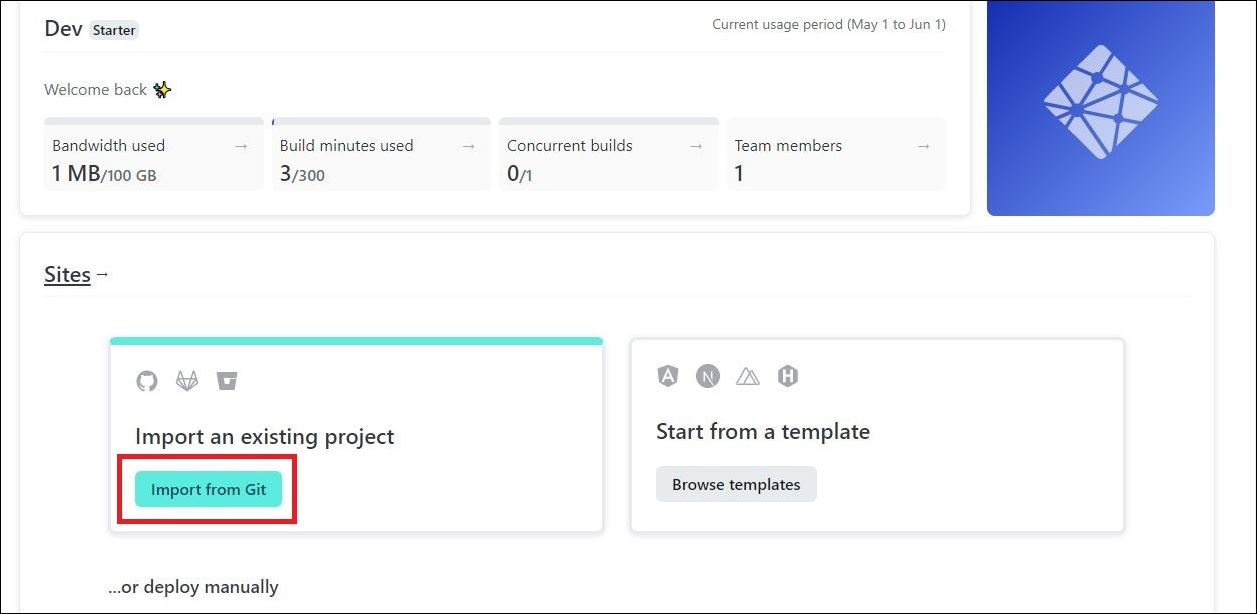
Under Import an existing project, choose Import from Git.
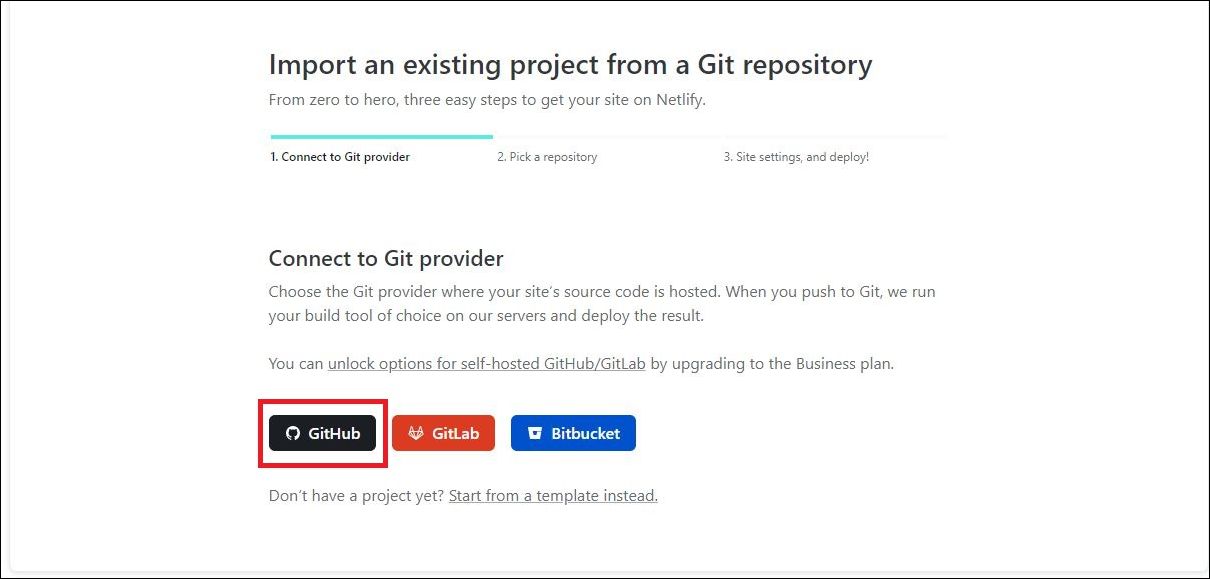
Select GitHub as your Git provider. If prompted for authorization, enter your GitHub login credentials.
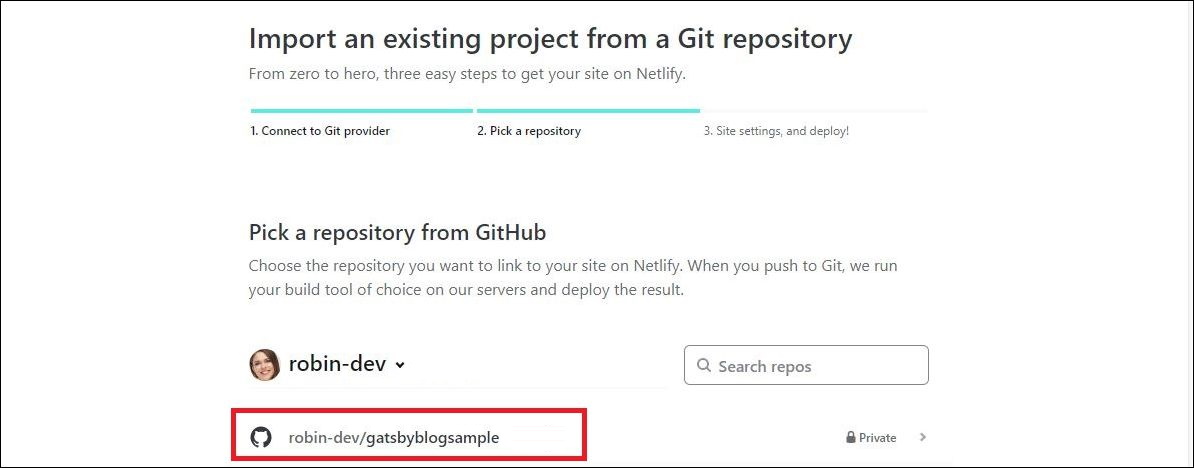
Select the project gatsbyblogsample from the list of projects in your GitHub account.
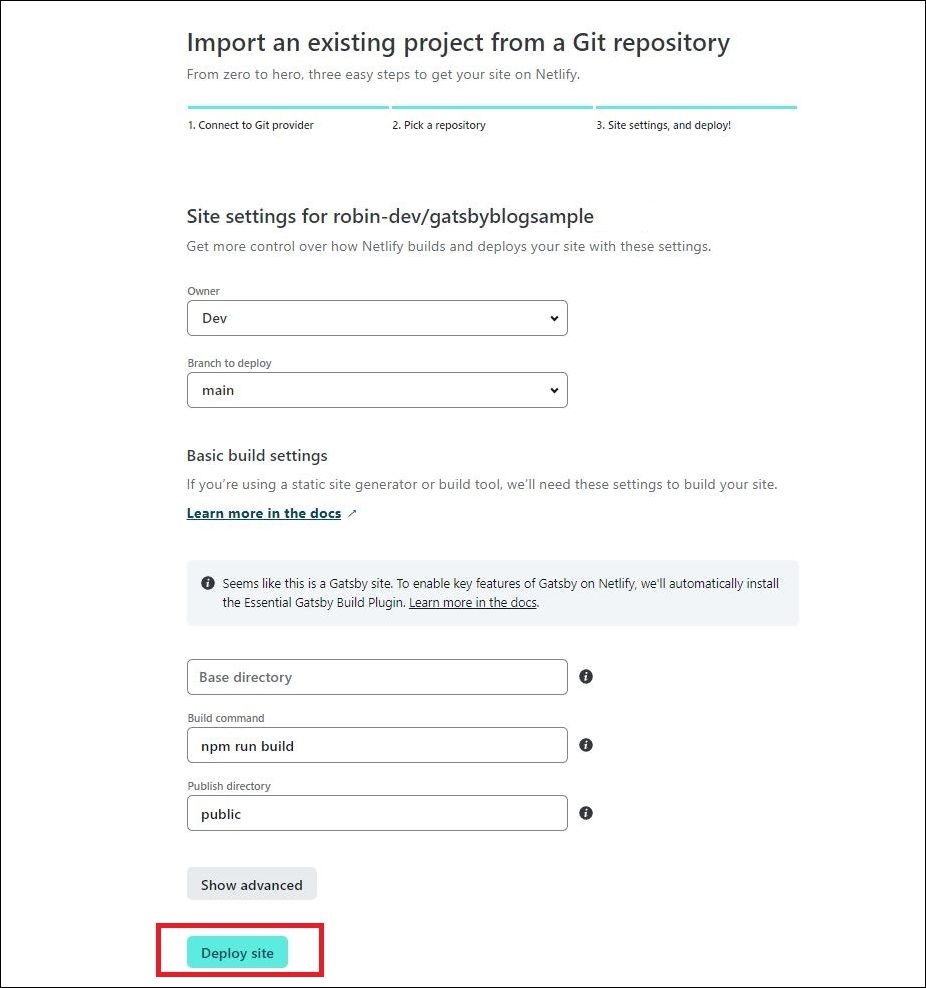
You should now see the Site Settings page. For this project you can simply click the blue Deploy site button. The defaults are all acceptable and can be tweaked later.
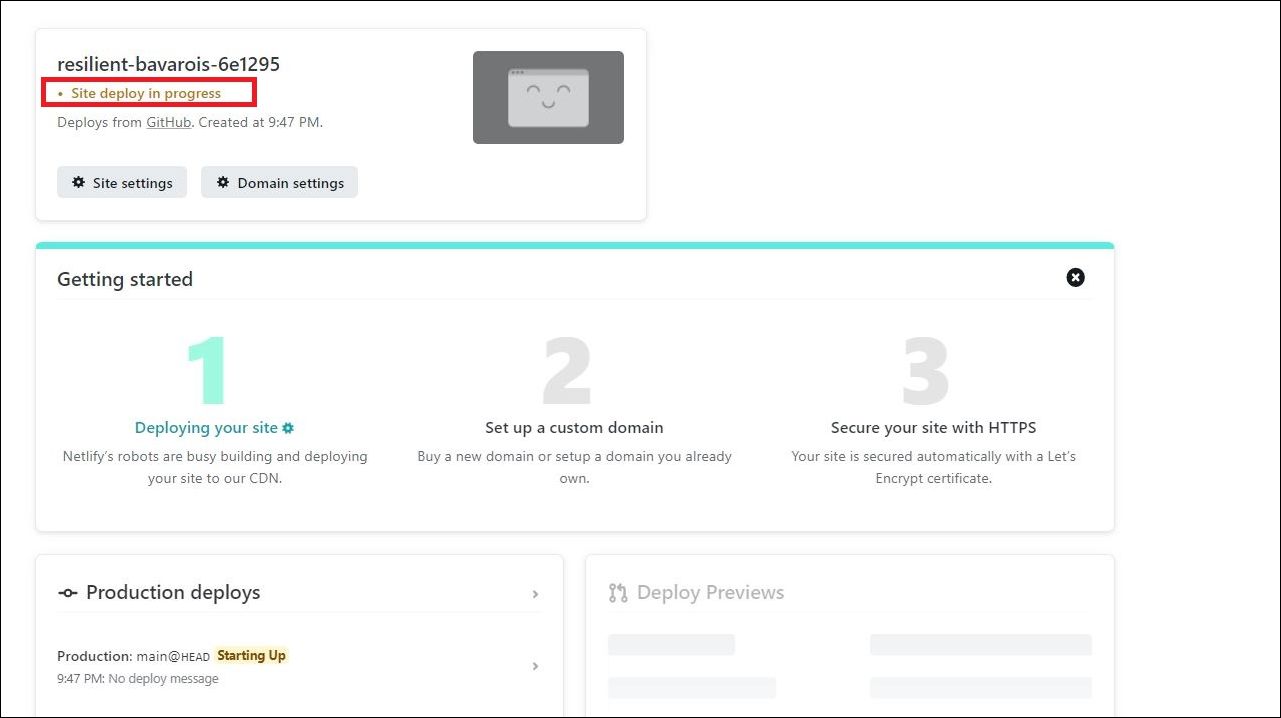
Netlify will start building the site. Note that it will initially give the site an autogenerated name, for example “resilient-bavarois-6e1295,” but this can be changed after a successful build. You can monitor the build process by clicking Site deploy in progress at the top of the page.
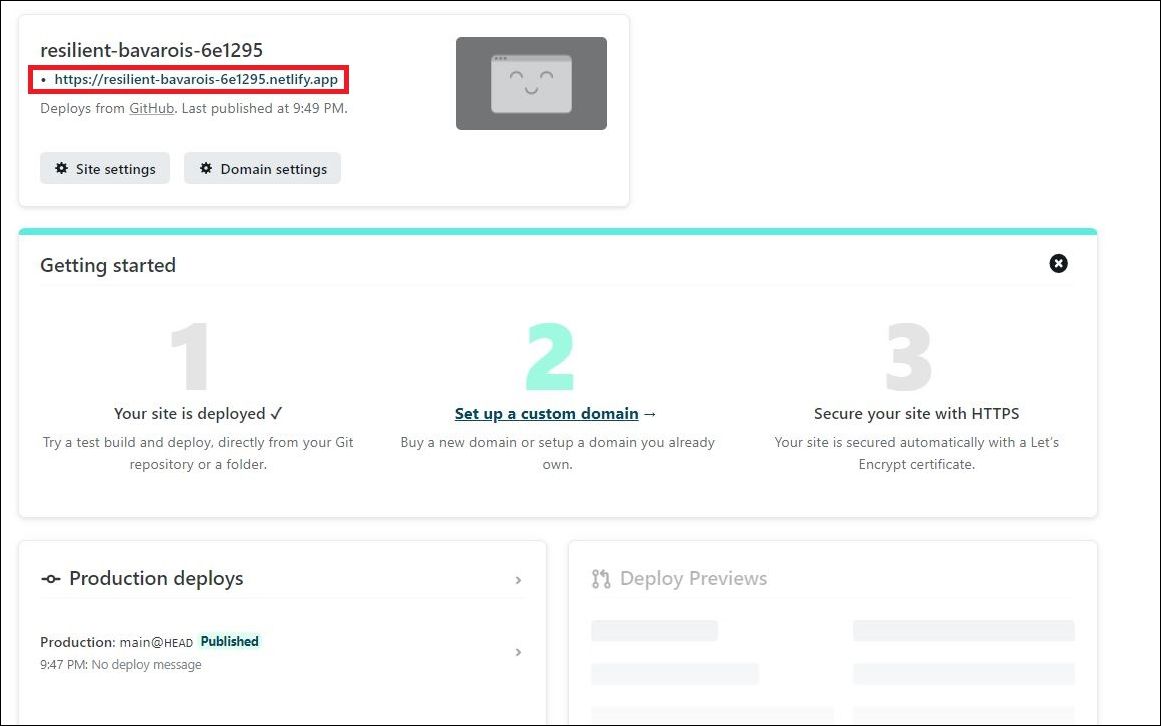
Once the site is successfully built, the Site deploy in progress link will change to a URL, which opens the application.
Please note the following:
If you need to set any environment variables before running the build, make sure to do this in the .env file located in the GitHub project.
If your deployment fails, read the build and application logs carefully for any errors.
You can find more information about deploying Gatsby applications on the Netlify website.
Task 3: Configure Outgoing Webhooks
Next, we’re going to configure the outgoing webhook, which will automatically trigger deployments from Oracle Content Management to Netlify based on content changes or published status. This consists of two steps:
Create a Build Hook in Netlify
The first step is to create a build hook in Netlify:
In Netlify, click Site details for the site that you just created.
Select Build and Deploy from the list on the left side of the page.
Scroll down to Build hooks and then click Add build hook.
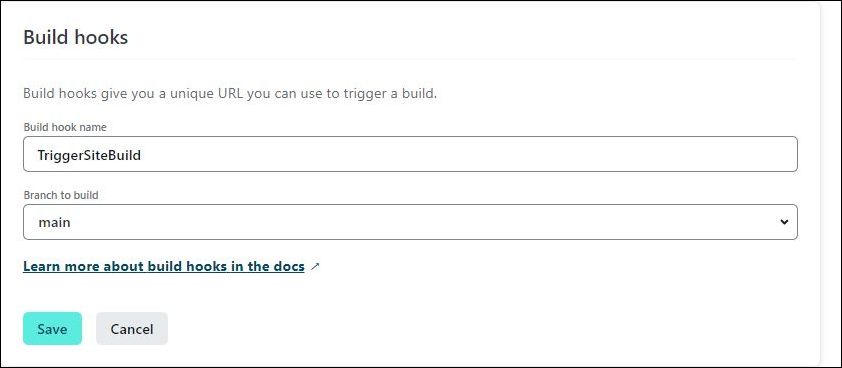
Give it a name such as “TriggerSiteBuild” and click Save.
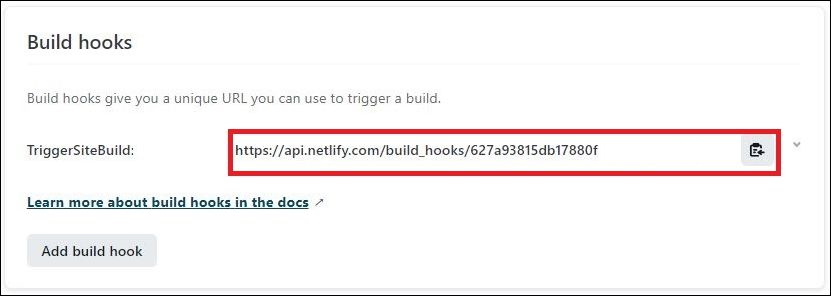
Copy and save the URL shown beside “TriggerSiteBuild.” We’ll use it in the next section.
Scroll to the top of the dialog and copy the URL below the Settings for… heading. It will be a URL made up of the generated name of the project followed by netlify.app. In our example, it would be https://resilient-bavarois-6e1295.netlify.app. You need this URL when creating the experience in Oracle Content Management in the next section.
Add the Build Hook in Oracle Content Management
The next step is to configure the outgoing webhook for the newly created Oracle Content Management experience object. The outgoing webhook is intended to automatically trigger deployments from Oracle Content Management to Netlify based on content changes or published status.
To configure the outgoing webhooks:
Log in to the Oracle Content Management web interface as an administrator.
Click Experiences in the left navigation panel.
Click Create in the upper right-hand corner.
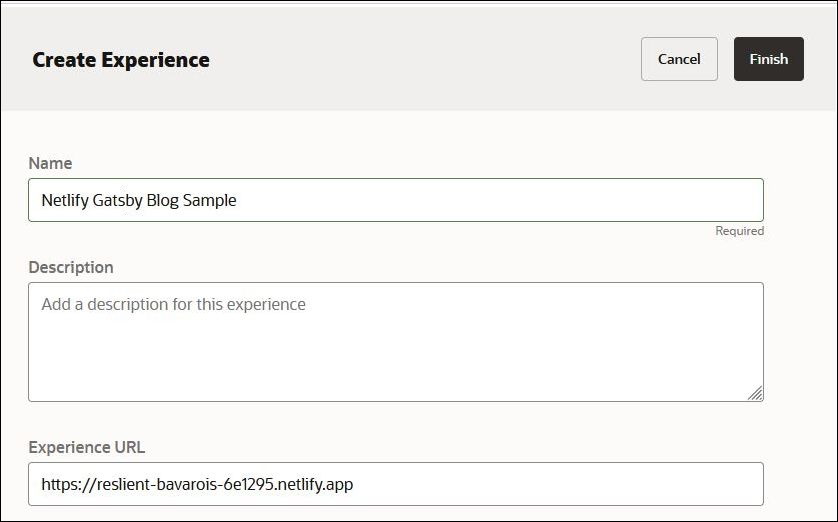
In the Create Experience dialog, enter a meaningful name, for example “Netlify Gatsby Blog Sample.” The experience URL is the URL used to open the deployed app, for example https://resilient-bavarois-6e1295.netlify.app. Click Finish when you’re done.
Select the experience that you want to configure and then open the Properties panel.
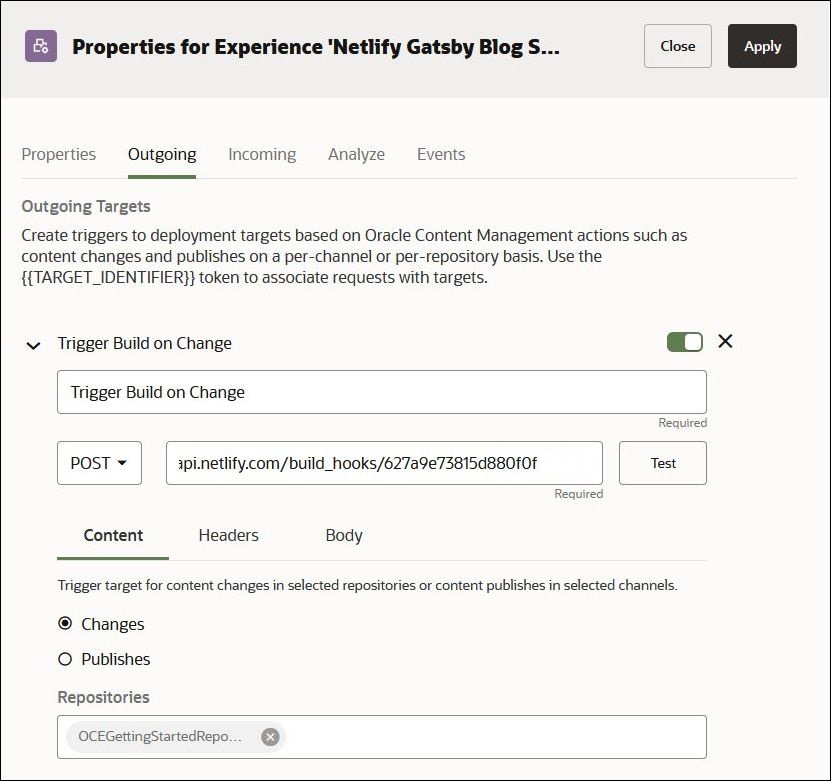
Open the Outgoing tab. This is where we’ll set the build trigger that we created earlier.
Enter a name for the target, and specify the method (GET or POST), URL endpoint, and trigger for the request.
Target name: You can give the target any name you want. Oracle Content Management will provide a unique target identifier (TARGET_IDENTIFIER) for this target.
Method: Specify either GET or POST in the request via the dropdown menu. For Netlify, we want to do a POST request to trigger a build.
URL endpoint: This is the API endpoint that will start a build. While preparing this tutorial, Netlify gave the endpoint
https://api.netlify.com/build_hooks/627a9e73815d880f0f, but you should use the value you obtained while creating a build hook in Netlify.Request trigger: This is on the Content tab, where you can specify a trigger based on a specific event. In the example below, a build will be triggered based on a change in the asset repository called OCEGettingStartedRepository, which represents the Blog channel in Oracle Content Management.
Task 4: Configure Incoming Webhooks
Next, we’re going to configure the incoming webhook from Netlify to Oracle Content Management for the newly created experience object. The incoming webhook is intended to give information about the build and its status back to Oracle Content Management The results can be viewed in the Events tab, where more information can be found when analyzing the events.
This consists of two steps:
Obtain the Webhook URL from Oracle Content Management
You first need to obtain the webhook URL from Oracle Content Management:
Log in to the Oracle Content Management web interface as an administrator.
Click Experiences in the left navigation panel.
Select the experience that you want to configure and then click Properties.
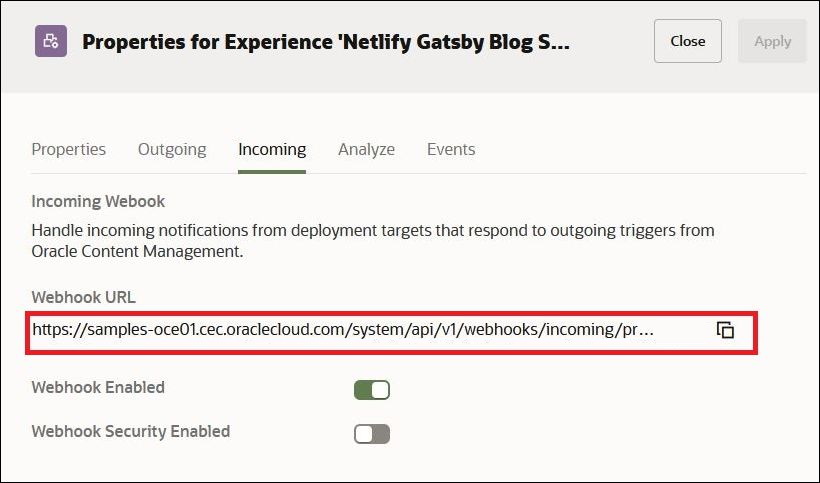
In the Properties panel of the experience, select the Incoming tab. Copy the URL shown there to set the webhook URL in Netlify.
Set the Webhook URL in Netlify
Next, set the webhook in URL in Netlify:
Log back in to Netlify and select your new application.
Click Site Settings to open the properties of the application.
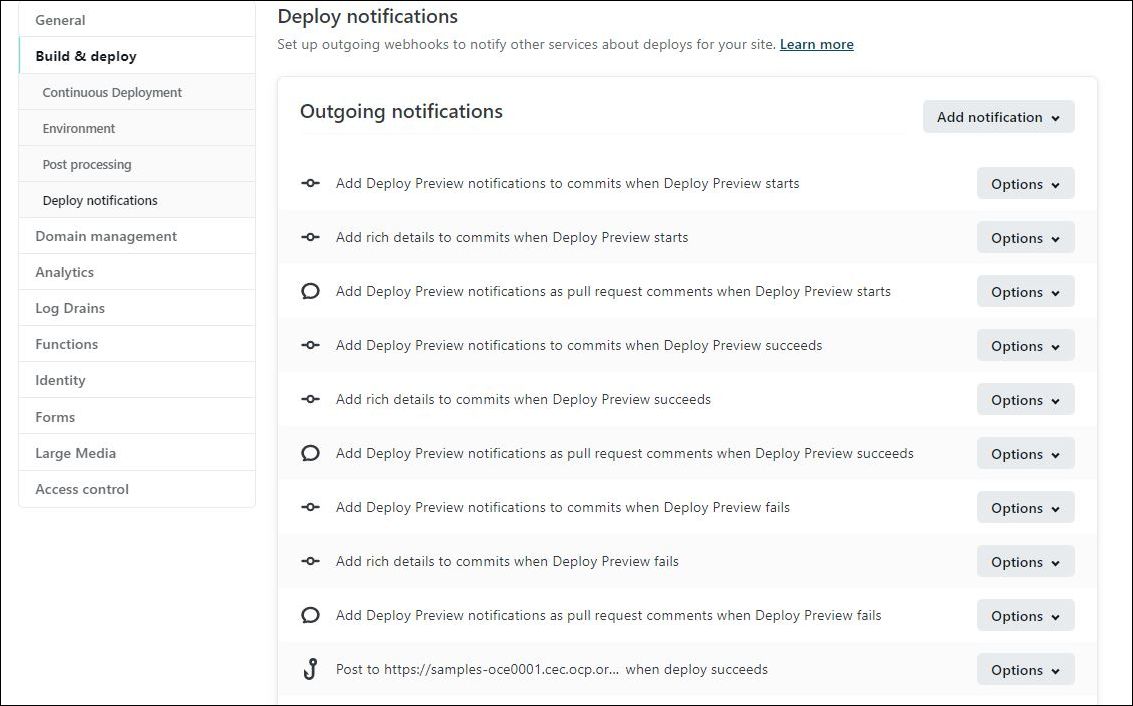
Select Build & Deploy and then Deploy Notifications in the left-hand navigation bar. You should see a dialog similar to this:
Click Add notification and select Outgoing webhook.
Select Deploy Succeeded as the event to listen for and set the URL to the value that was obtained from Oracle Content Management earlier. The JWS secret token may be ignored for the purposes of this tutorial. The dialog should look something like this:
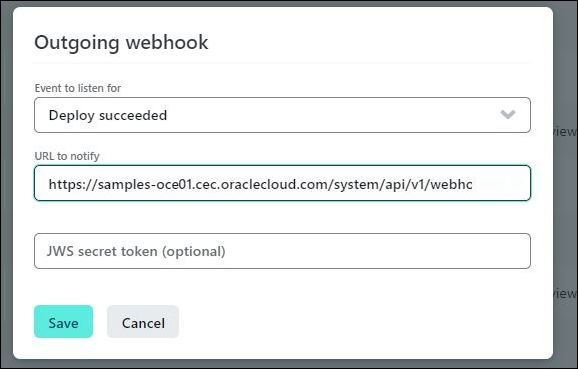
Click Save to preserve the webhook. This webhook will now alert Oracle Content Management every time the application is rebuilt successfully by Netlify.
Other statuses, such as notifying Oracle Content Management about failed builds, can be created by repeating steps 4 to 6 while selecting different events to listen to. The same notification URL may be used for multiple events since the payload of each event will differ. You can now proceed to analyze these different payloads.
Task 5: Analyze the Events
Finally, we can test the full experience orchestration in Oracle Content Management without having to leave the Oracle Content Management web interface. Based on changes in content or publish status, or by simply clicking the Test button on the Outgoing tab, the following steps will be performed:
Oracle Content Management triggers a build by calling the Netlify build webhook.
Netlify calls the OCM incoming webhook to tell Oracle Content Management it received the request and is starting a build. (This is done only if the administrator chose to create a webhook call for that event.)
The Netlify build process pulls the latest source code from GitHub and the latest assets from Oracle Content Management to complete the build and deployment.
When Netlify has finished the deployment, it makes another call to the webhook to inform Oracle Content Management of the results.
All of these events are displayed in the Events tab of the Properties panel. The following is a sample sequence of events numbered 1, 2, and 3, in order of occurrence:
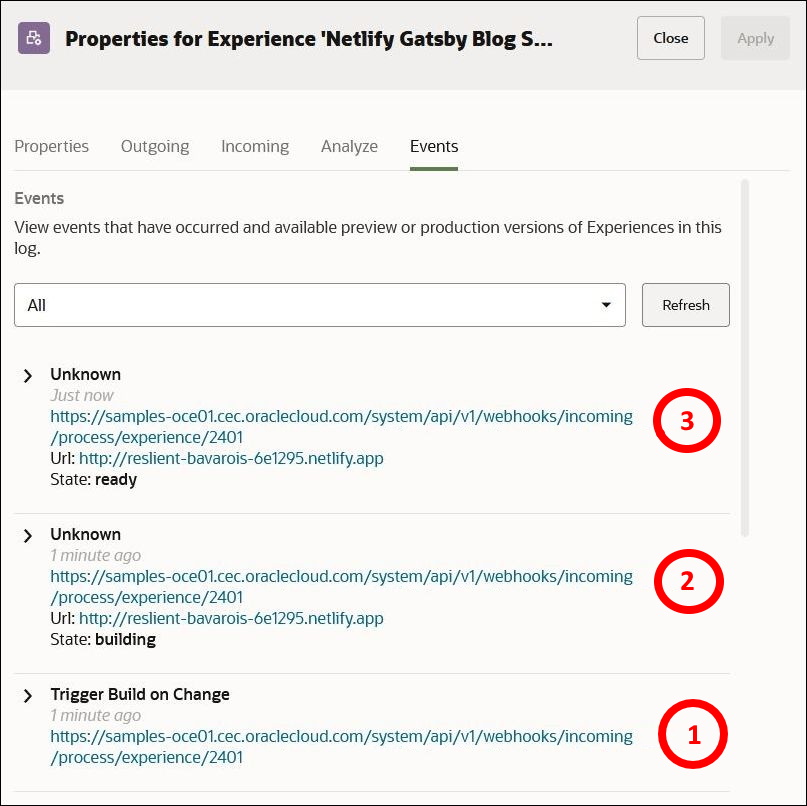
As shown, the first event (labeled 1) is the trigger from Oracle Content Management to Netlify to start a build. The second event (labeled 2) is the incoming webhook sent by Netlify to tell Oracle Content Management that the build has been started. The final event (labeled 3) is the successful build event, which is also reported via an incoming webhook from Netlify to Oracle Content Management. Each of these events can be analyzed in detail by clicking on them on the Events tab.
The content displayed below each event on the Events tab comes from the settings in the Analyze tab. The Analyze tab allows the experience administrator to extract information from an incoming response payload and display it on the Events tab to provide information important to content editors and contributors. This could include details such as whether a build failed or what URL can be used to access the site.
Additional information about the Analyze tab can be found in the Oracle Content Management documentation.
For the events displayed above, the following was specified on the Analyze tab:
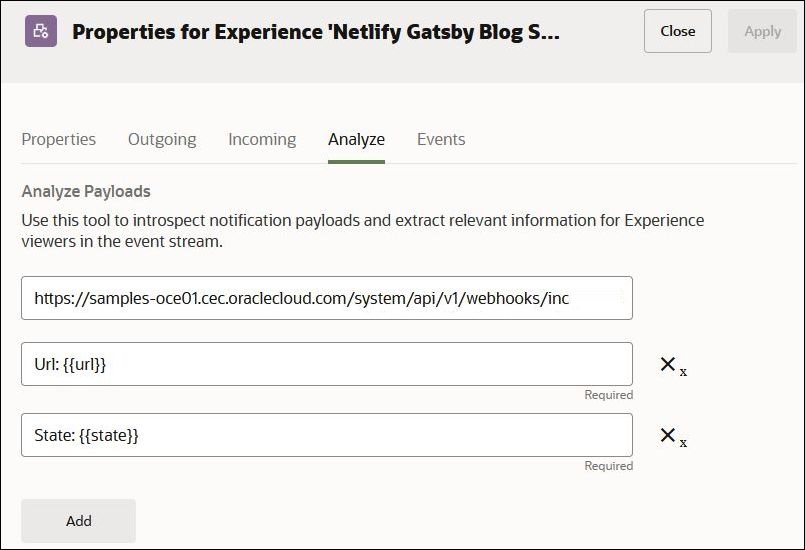
In this case the system is configured to look at any incoming webhook with the URL https://samples-oce01.cec.oraclecloud.com/system/api/v1/webhooks/incoming/process/experience/2401, which is the URL that was created in the Incoming panel. It will then look at the JSON data and extract the URL of the deployment and the build’s current state.
Conclusion
In this tutorial, we deployed an application on Netlify from a GitHub source using the experience orchestration features in Oracle Content Management.
We first created a Gatsby application that gets its data from Oracle Content Management. We then created a Netlify deployment to build and host our application. Finally, we used Oracle Content Management’s headless experiences to automate the build process of the application. Every time the application data changes in Oracle Content Management, a build is triggered on Netlify and Oracle Content Management is alerted when the build completes. This enables content creators to update and review their applications without requiring them to leave the Oracle Content Management web interface or even have detailed knowledge of the build process.
You can find more information about experiences in the Oracle Content Management documentation.
Deploy Applications on Netlify with Experience Orchestration in Oracle Content Management
F49441-01
May 2022
Copyright © 2021, 2022, Oracle and/or its affiliates.
Primary Author: Oracle Corporation