2 Prepare to Migrate DevCS to Oracle Cloud Infrastructure

Before you migrate your service instance from Traditional to Oracle Cloud Infrastructure (OCI), you should create and configure required resources, and learn about the required identity domain roles for the migration.

In this documentation, DevCS on Traditional is referred as the source DevCS instance and DevCS on OCI is referred as the target DevCS instance. A project in the source or target DevCS instance is referred as the source project or the target project.

To prepare for migration, you'll do the following:

  1. Migrate users and roles from Traditional to Identity Cloud Service
  2. Assign the required identity domain roles to yourself in the source and the target Oracle Cloud account
  3. Create the target DevCS instance in the OCI region
  4. Set up the required OCI connections in the target Oracle Cloud account
  5. Set up an OCI Object Storage bucket in the target Oracle Cloud account.

    You'll use the bucket to export the data of the source DevCS projects.

Migrate Users and Roles

You can migrate traditional cloud accounts to cloud accounts with Identity Cloud Service by migrating users and their roles. Make sure that you have administrative privileges to export users and role memberships from the traditional cloud account and to import users and role memberships in Oracle Identity Cloud Service.

To migrate users and roles, see Migrating Users, Migrating Role Memberships, and Migrating Identity Domain Administrator Roles in Administering Oracle Identity Cloud Service. To learn about how DevCS roles are mapped between a traditional cloud account and Identity Cloud Service, see Mapping Between Traditional Cloud Roles and Application Roles in Oracle Identity Cloud Service.

Required Identity Domain Roles

Make sure you're assigned the identity domain roles required for the migration.

You need this role: To:
DEVCS_APP_ENTITLEMENT_ADMINISTRATOR (Administrator Role for Developer Cloud Service Provisioning) Create the target DevCS instance

You need this role in the target Oracle Cloud account.

DEVELOPER_ADMINISTRATOR (Developer Service Administrator) Get VMs and VM templates details from the source DevCS instance and create them in the target DevCS instance

You need this role in the source as well as the target Oracle Cloud account.

OCI_Administrator (OCI Administrator) Set up the OCI account

You need this role in the target Oracle Cloud account.

To find out how to grant an identity domain role, see Add Users, Assign Policies and Roles in Getting Started with Oracle Cloud.

Create the Target DevCS Instance in the OCI Region

If your source and target instances are located in the same Oracle Cloud account, remember that they can't have identical instance names.

  1. Sign in to Oracle Cloud and open the My Services Dashboard page.
  2. In the Developer tile, click Action the Action menu icon and select Open Service Console.

    If the Developer tile isn’t available on the page, click Customize Dashboard. Under Platform, find the Developer service, click Show, and then close the Customize Dashboard window.

  3. In the Instances tab, click Create Instance.
  4. On the Create New Instance page, enter a unique name in Instance. In Description, enter a description.
    The name helps you to identify the service instance in the tenant domain.
  5. Click Next.
  6. On the Service Details page, click Next.
  7. On the Confirmation page, click Create.

Set Up the OCI Connections on the Target Oracle Cloud Account

After creating the target DevCS instance, set up your target Oracle Cloud account to host DevCS resources and connect to OCI Compute and OCI Object Storage. DevCS runs builds on OCI Compute VMs, and stores build and Maven artifacts on the OCI Object Storage buckets.

Set Up the OCI Account

To set up the account, sign in as the OCI administrator and follow these steps:
  1. Open the OCI dashboard.
  2. On the Compartments page, create a compartment to host DevCS resources.
    1. In the left navigation bar, under Governance and Administration, go to Identity and click Compartments.
    2. To create the compartment in the tenancy (root compartment), click Create Compartment.
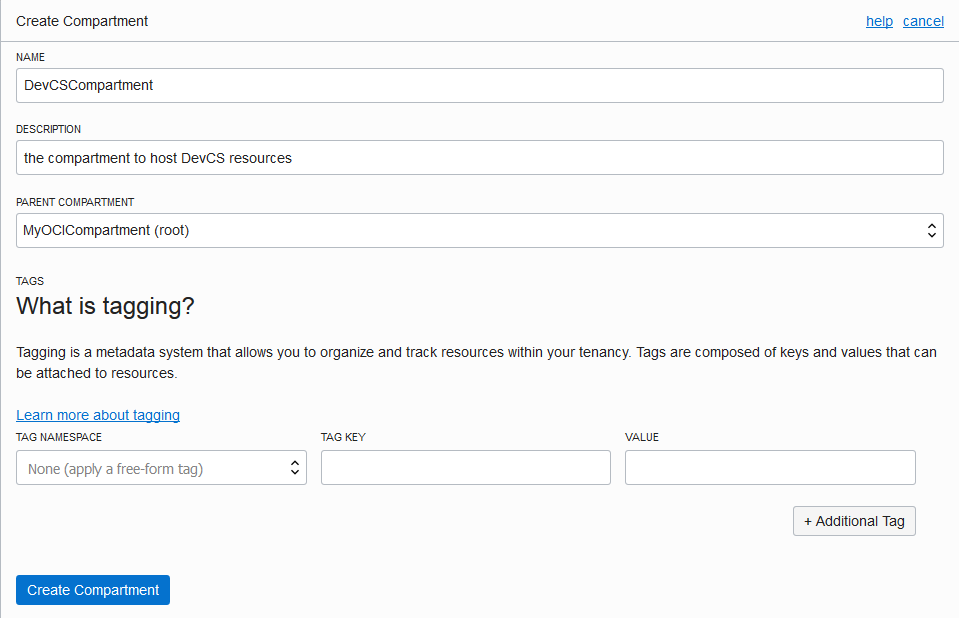
    3. In the Create Compartment dialog box, fill in the fields, and click Create Compartment.

      Here's an example:

      OCI Create Compartment dialog box
    To learn more about compartments, see Working with Compartments.
  3. Create a user to access the DevCS compartment.
    1. In the left navigation bar, under Governance and Administration, go to Identity and click Users.
    2. Click Create User.
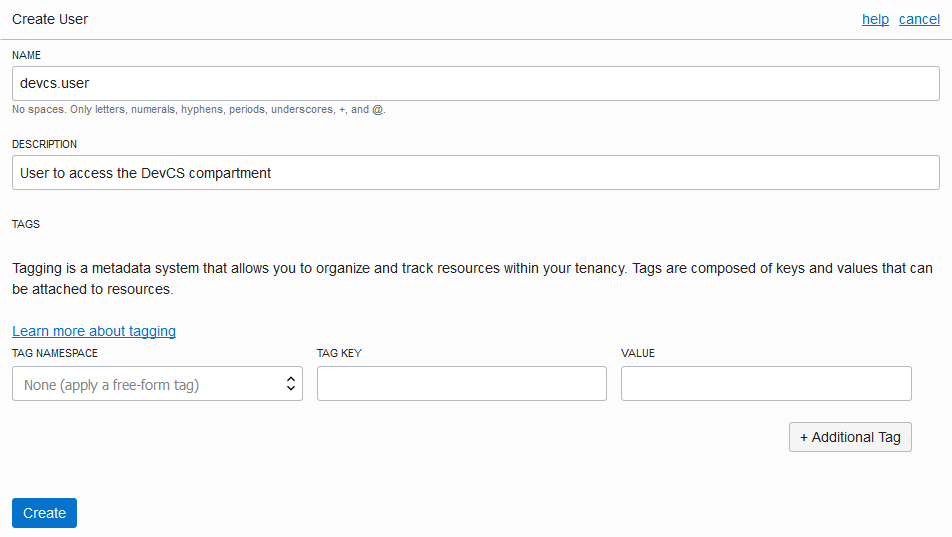
    3. In the Create User dialog box, fill in the fields, and click Create.

      Here's an example:

      Create User dialog box
    To learn more about OCI users, see Working with Users.
  4. On your computer, generate a private-public key pair in the PEM format.
    To find out how to generate a private-public key pair in the PEM format, see How to Generate an API Signing Key.

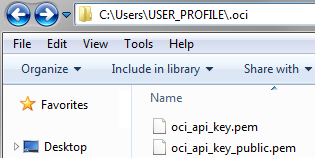
    Here's an example of private-public key files on a Windows computer:

    Private and Public key files
  5. Upload the public key to the user's details page.
    1. Open the public key file in a text editor and copy its contents.
    2. In the left navigation bar of the OCI dashboard, click under Governance and Administration, go to Identity and click Users.
    3. Click the user's name created in Step 3.
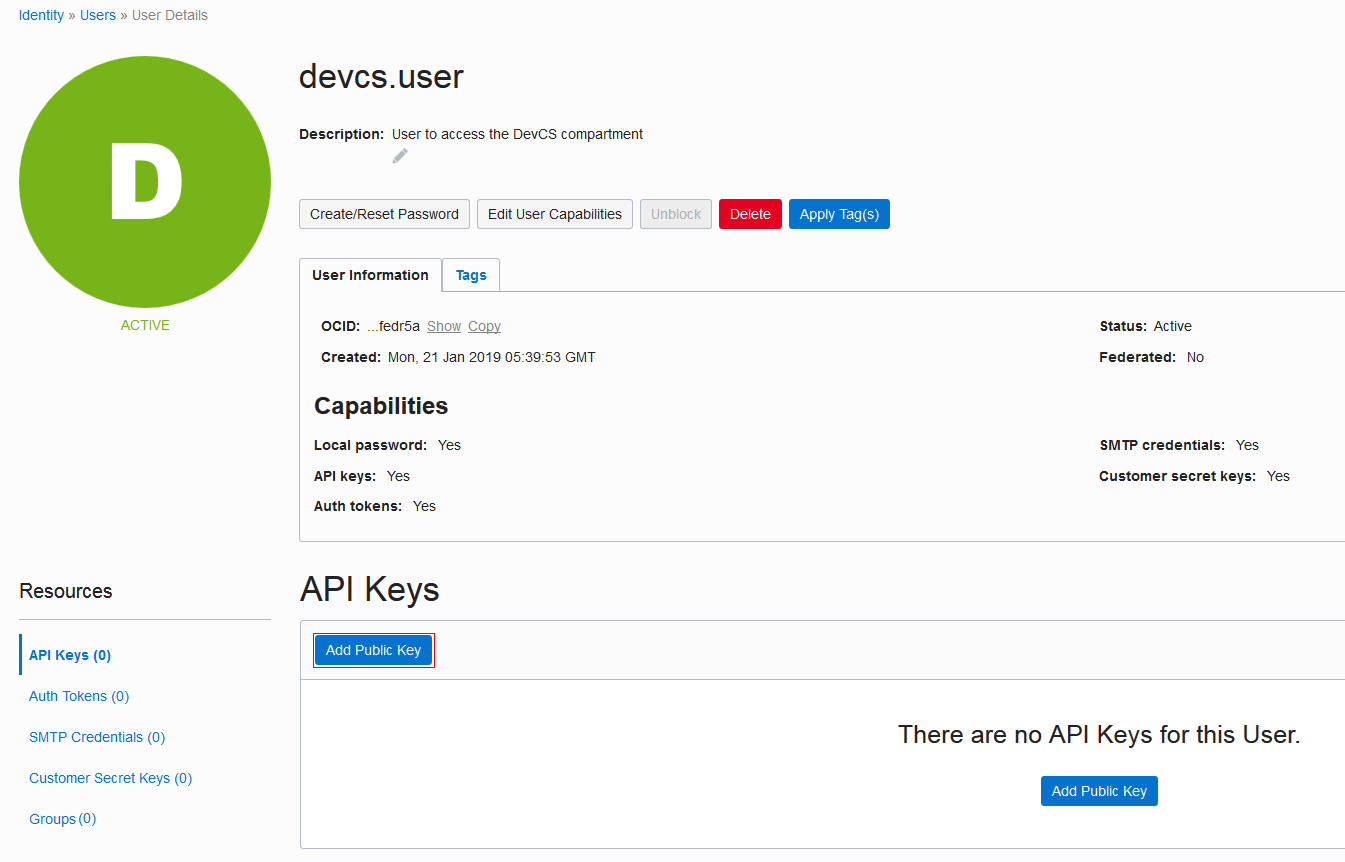
    4. In the User Details page, click Add Public Key.

      Here's an example:

      User Details page
    5. In the Add Public Key dialog box, paste the contents of the public key file, then click Add.
    To learn more about uploading keys, see How to Upload the Public Key.
  6. On the Groups page, create a group for the user who can access the DevCS compartment and add the user to the group.
    1. In the left navigation bar, under Governance and Administration, go to Identity and click Groups.
    2. Click Create Group.
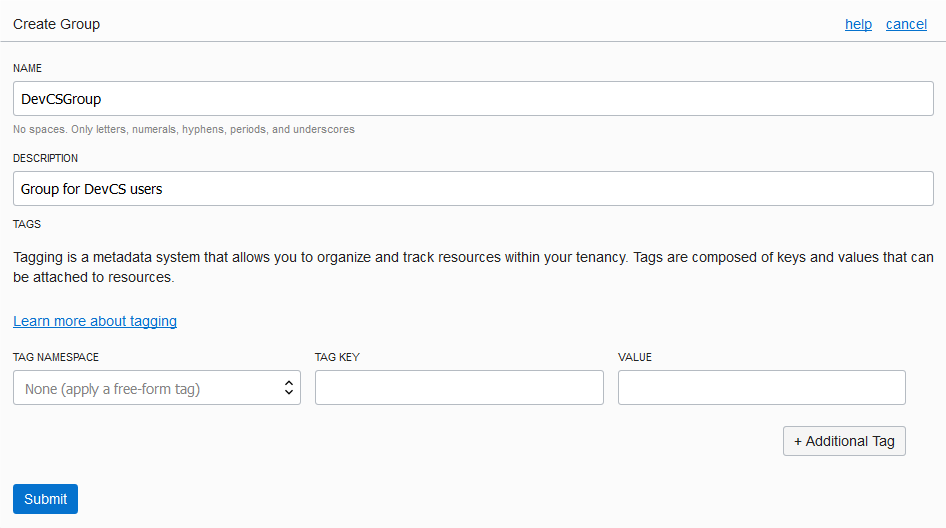
    3. In the Create Group dialog, fill in the fields and click Submit.

      Here's an example:

      Create Group dialog box
    4. On the Groups page, click the group's name.
    5. On the Group Details page, click Add User to Group.
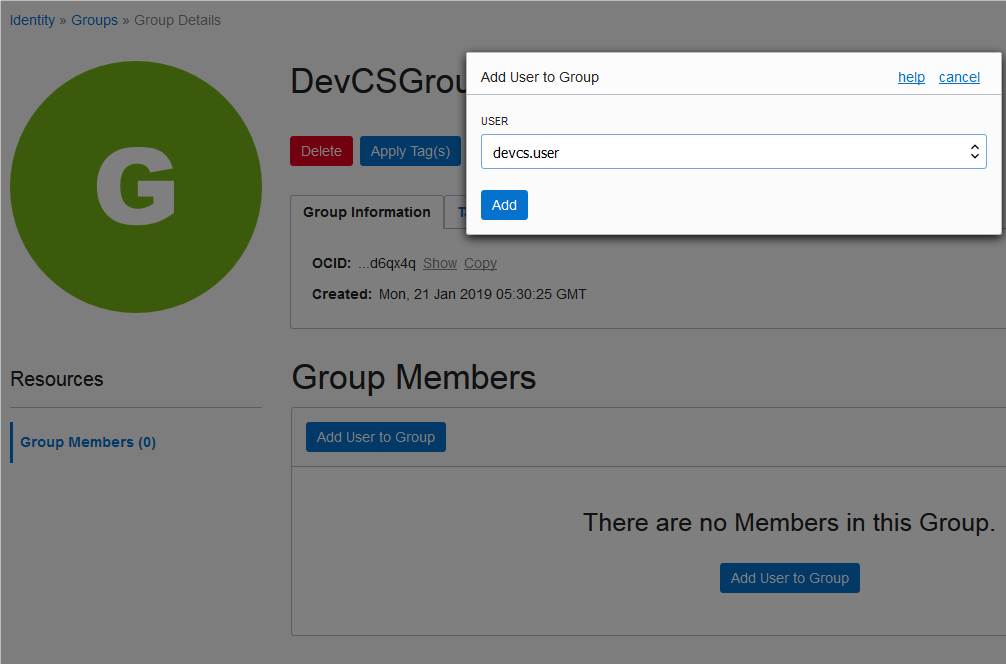
    6. In the Add User to Group dialog box, select the user created in Step 3, and click Add.

      Here's an example:

      Add user to a group
    To learn more about groups, see Working with Groups.
  7. In the root compartment, not the DevCS compartment, create a policy to allow the group created in step 6 to access the DevCS compartment.
    1. In the left navigation bar, under Governance and Administration, go to Identity and click Policies.
    2. On the left side of the Policies page, from the Compartment list, select the root compartment.
    3. Click Create Policy.
    4. In Name and Description, enter a unique name and a description.
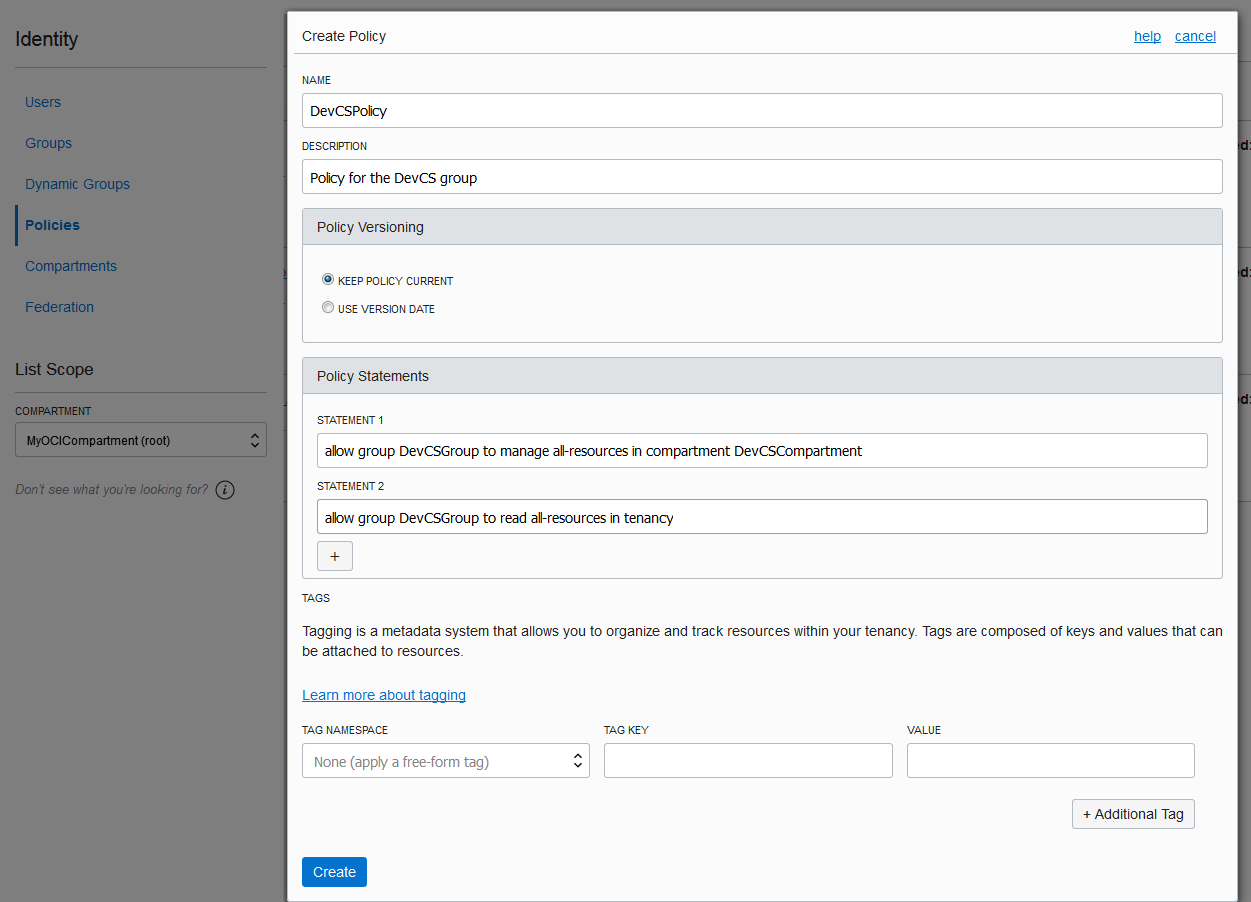
    5. In Policy Statements, add these statements.
      • allow group <group-name> to manage all-resources in compartment <compartment-name>

        This grants all permissions to the DevCS group users to manage all resources within the DevCS compartment.

      • allow group <group-name> to read all-resources in tenancy

        This grants read permissions to the DevCS group so that its users can read—but not use, create or modify—all resources inside and outside the DevCS compartment. The group users can't use, create, or modify the resources. This statement is optional.

      Here's an example:

      Create Policy dialog box
    6. Click Create.
    To learn more about policies, see Working with Policies.

Get the Required OCI Input Values

Every Oracle Cloud Infrastructure resource has an Oracle-assigned unique ID called an Oracle Cloud Identifier (OCID). To connect to OCI, you need the account's tenancy OCID, home region, the compartment's OCID that hosts DevCS resources, and the OCID and fingerprint of the user who can access the DevCS compartment. To connect to OCI Object Storage, you need the Storage namespace. You can get these values from the OCI Console pages.

This table describes how to get the OCI input values required for the connection.

To get these values ... Do this:
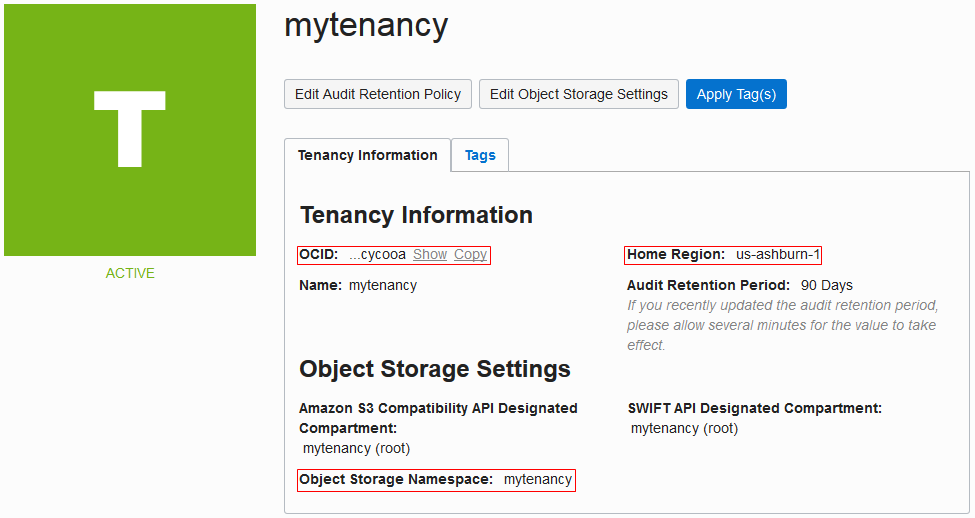
Tenancy OCID, Home Region, and Storage Namespace On the OCI console, from the left navigation bar, select Administration > Tenancy Details.

The Tenancy Information tab displays the tenancy OCID in OCID, home region in Home Region, and the storage namespace in Object Storage Namespace.

Here's an example:

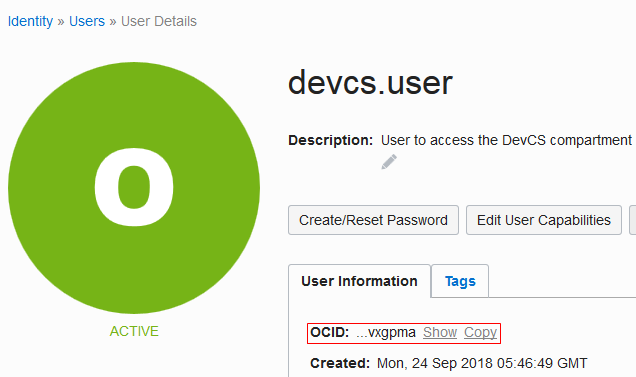
User OCID and Fingerprint On the OCI console, from the left navigation bar, under Governance and Administration, select Identity > Users.

The User Information tab displays the user OCID in OCID. Click the Copy link to copy it to the clipboard.

Here's an example of devcs.user:

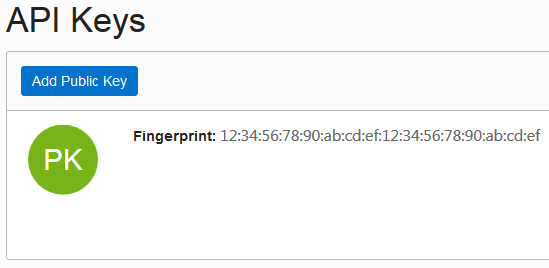
To get the fingerprint of the public key associated with your OCI account, scroll down to the API Keys section and copy the fingerprint value.

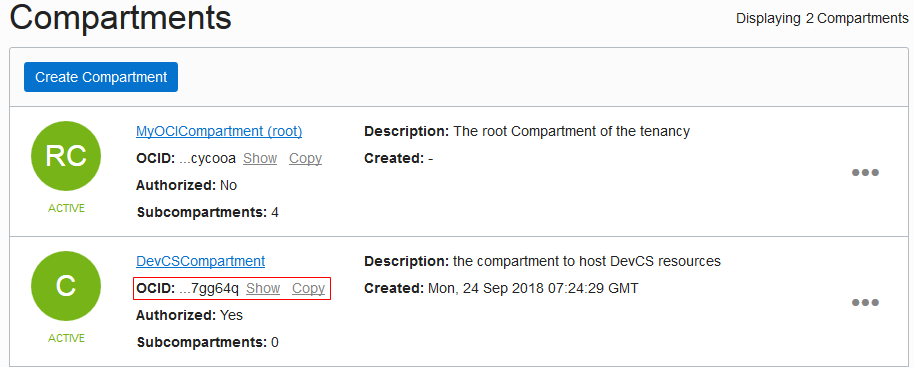
Compartment OCID On the OCI console, from the left navigation bar, select Identity > Compartments.

The Compartments list displays the compartments with the compartment OCID in the OCID field. Click the Copy link to copy it to the clipboard.

Here's an example:

Set Up the OCI Connection in the Target DevCS Instance

To connect to OCI, get the DevCS compartment, user details, and the required OCID values. Then, create an OCI connection from DevCS. If you're not the OCI administrator, get the details from the OCI administrator.

the organization administrator icon You must be the Organization Administrator to create the connection.
  1. Sign in to the target DevCS instance.
    On the Oracle Cloud Dashboard, in the Developer tile, click Action the Action menu icon and select Open Service Console.

    If the Developer tile isn’t visible, click Customize Dashboard. Under Platform, find the Developer service, click Show, and then close the Customize Dashboard window.

  2. In the Instances tab, for your DevCS instance, click Manage this instance the Action menu icon and select Access Service Instance.
  3. In the navigation bar, click Organization Organization.
  4. Click the OCI Account tab.
  5. To create a connection, click Connect.
    OCI Account tab
  6. In Account Type, select OCI.
  7. In Tenancy OCID, enter the tenancy's OCID copied from the Tenancy Details page.
  8. In User OCID, enter the OCID of the user who can access the DevCS compartment.
  9. In Home Region, select the home region of the OCI account.
  10. In Private Key, enter the private key of the user who can access the DevCS compartment.
  11. In Passphrase, enter the passphrase used to encrypt the private key. If no passphrase was used, leave the field empty.
  12. In Fingerprint, enter the fingerprint value of the private-public key pair.
  13. In Compartment OCID, enter the compartment's OCID copied from the Compartments page.
  14. In Storage Namespace, enter the storage namespace copied from the Tenancy Details page.
  15. To agree to terms and conditions, select the terms and conditions check box.
  16. To validate the connection details, click Validate.
  17. After validating the connection details, click Save.
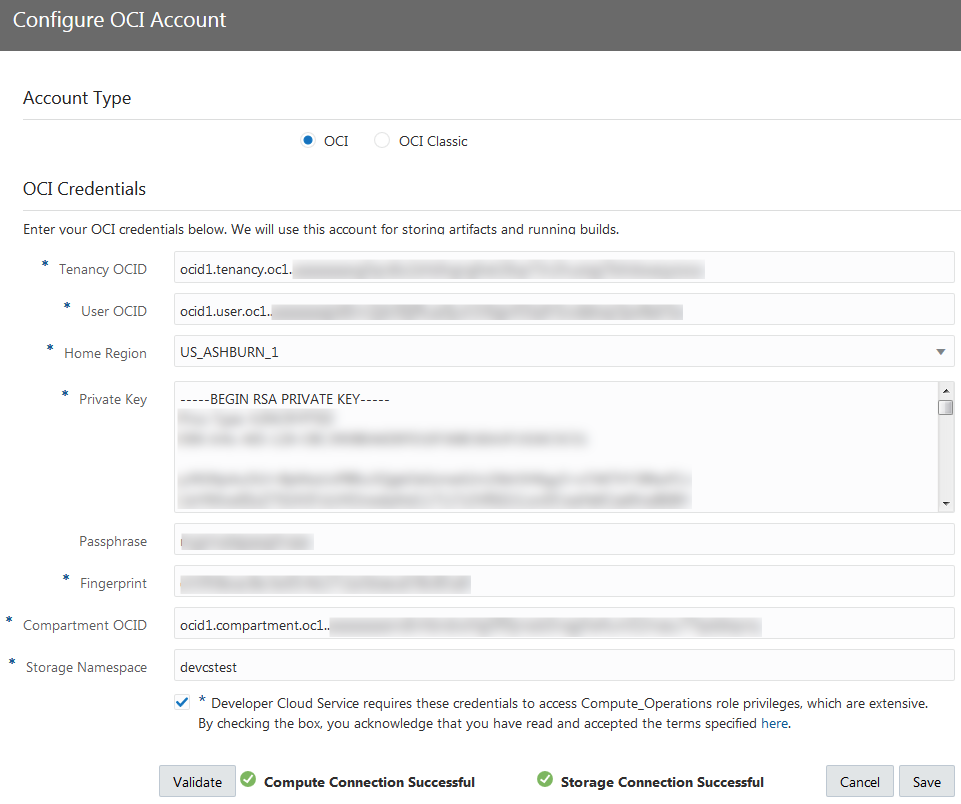
Here's an example of an OCI Account tab filed with required OCI details.
CI Account tab filled with OCI credentials and other details

Set Up an OCI Object Storage Bucket

To export a project's data, you need an OCI Object Storage bucket to host the data.

Set Up the OCI Object Storage Bucket

To set up the OCI Object Storage bucket, sign in as the OCI administrator and follow these steps:
  1. In the compartment that hosts DevCS resources, create a bucket for the project.
    1. In the left navigation bar, under Core Infrastructure, go to Object Storage and click Object Storage.
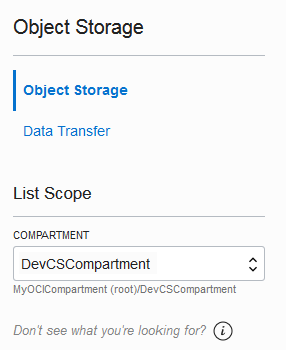
    2. On the left side of the Object Storage page, from the Compartment list, select the DevCS compartment.

      Example:

      Compartment list
    3. Click Create Bucket.
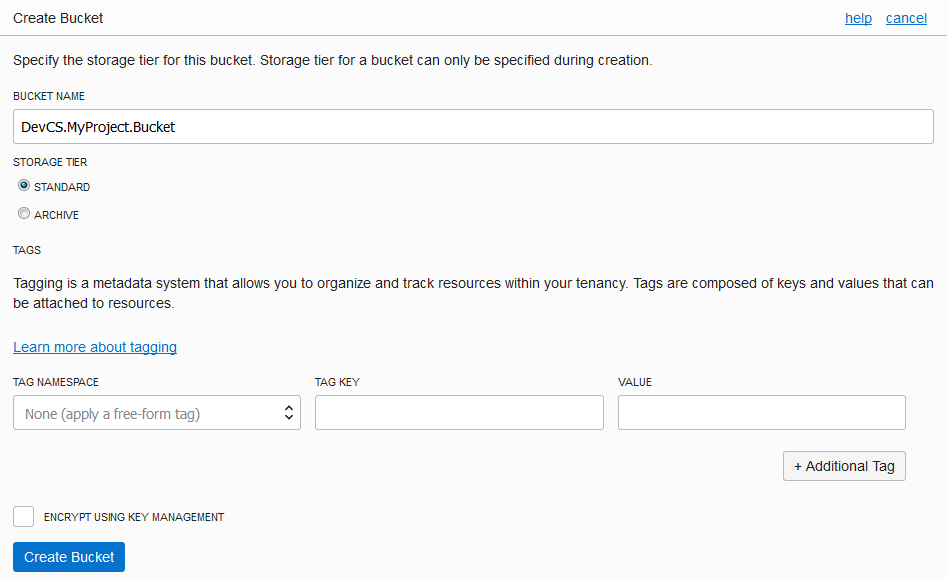
    4. In the Create Bucket dialog box, fill in the details, and click Create Bucket.

      Example:

      Create Bucket dialog box
  2. Create a user to access the bucket.
    1. In the left navigation bar, under Governance and Administration, go to Identity and click Users.
    2. Click Create User.
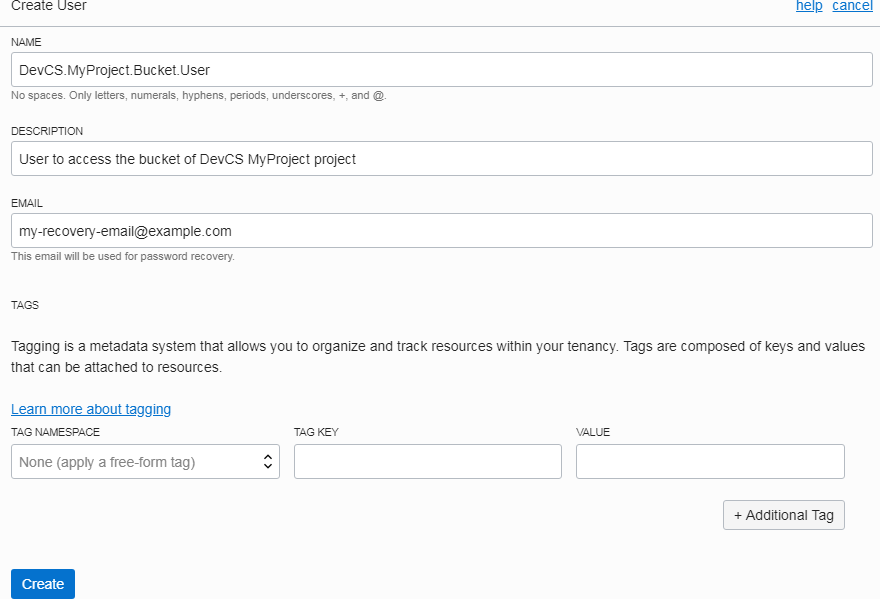
    3. In the Create User dialog box, fill in the fields, and click Create.

      Example:

      Add User dialog box
  3. On your computer, generate a private-public key pair in the PEM format.
    To learn more, see How to Generate an API Signing Key.

    Example of private-public key files on a Windows computer:

    Private and Public key files
  4. Upload the public key to the user's details page.
    1. Open the public key file in a text editor and copy its contents.
    2. In the left navigation bar of the OCI dashboard, under Governance and Administration, go to Identity and click Users.
    3. Click the user's name created in Step 2.
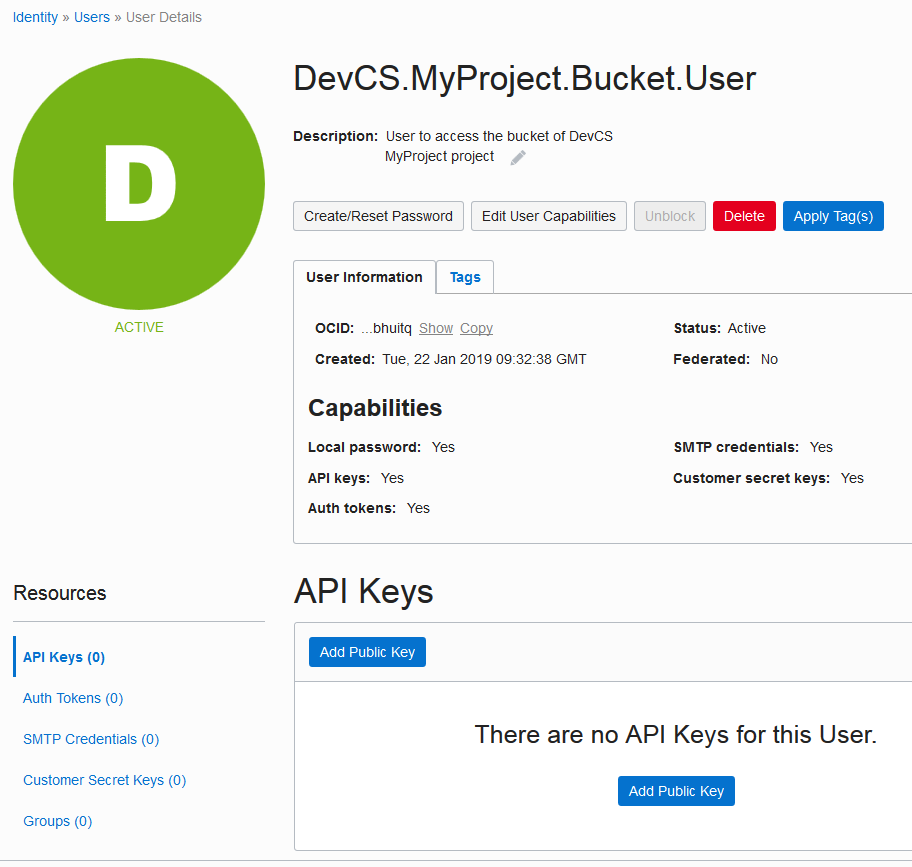
    4. In the User Details page, click Add Public Key.

      Example:

      User Details page
    5. In the Add Public Key dialog box, paste the contents of the public key file, and click Add.
    To learn more, see How to Upload the Public Key.
  5. On the Groups page, create a group for the user who can access the bucket and add the user to the group.
    1. In the left navigation bar, under Governance and Administration, go to Identity and click Groups.
    2. Click Create Group.
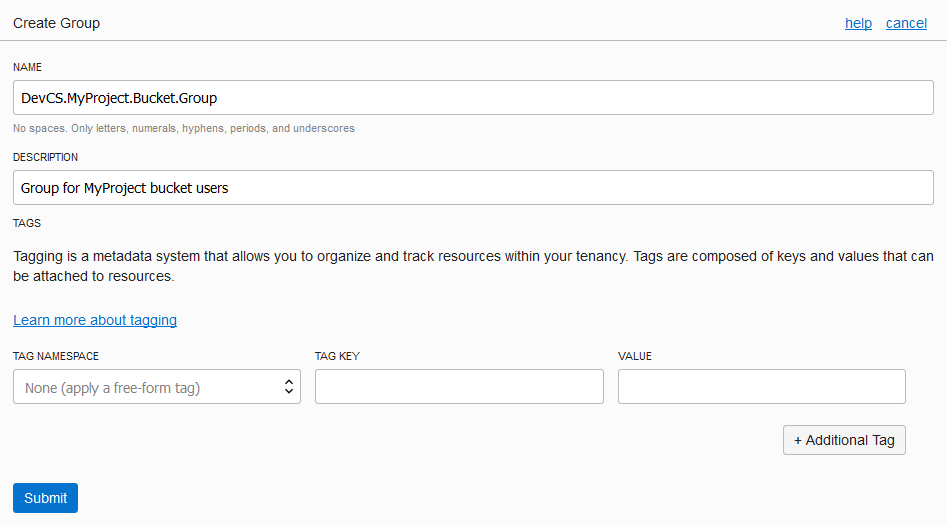
    3. In the Create Group dialog, fill in the fields and click Submit.

      Example:

      Create Group dialog box
    4. On the Groups page, click the group's name.
    5. On the Group Details page, click Add User to Group.
    6. In the Add User to Group dialog box, select the user created in Step 2, and click Add.

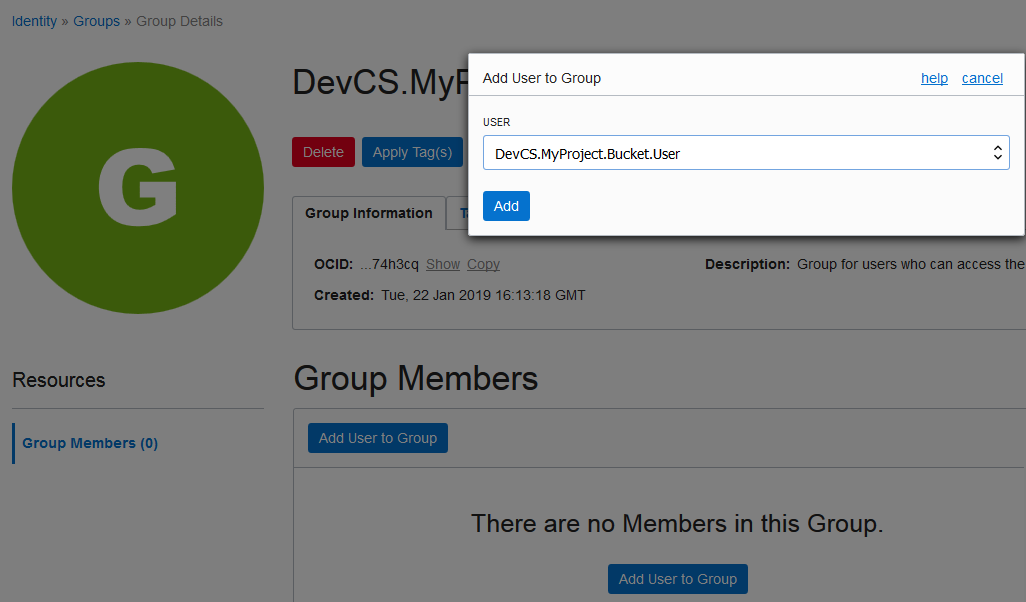
      Example:

      Add user to group
    To learn more, see Working with Groups.
  6. In the DevCS compartment, create a policy with read and write access to the bucket.
    You can give read and write access to the same user, or create different users.
    1. In the left navigation bar, under Governance and Administration, go to Identity and click Policies.
    2. On the left side of the Policies page, from the Compartment list, select the DevCS compartment.
    3. Click Create Policy.
    4. In Name and Description, enter a unique name and a description.
    5. In Policy Statements, add statements to restrict read and write access to the bucket.

      To allow different user groups to read objects from and write objects to the bucket, create separate policies. Here are some statement examples:

      To: Add these statements:
      Allow a group to read from and write objects to a bucket (required to import and export a project's data)

      allow group <group-name> to read buckets in compartment <compartment-name>

      allow group <group-name> to manage objects in compartment <compartment-name> where all {target.bucket.name='<bucket-name>', any {request.permission='OBJECT_CREATE', request.permission='OBJECT_INSPECT'}}

      Allow a group to download objects from a bucket (required to import a project's data)

      allow group <group-name> to read buckets in compartment <compartment-name>

      allow group <group-name> to read objects in compartment <compartment-name> where target.bucket.name='<bucket-name>'

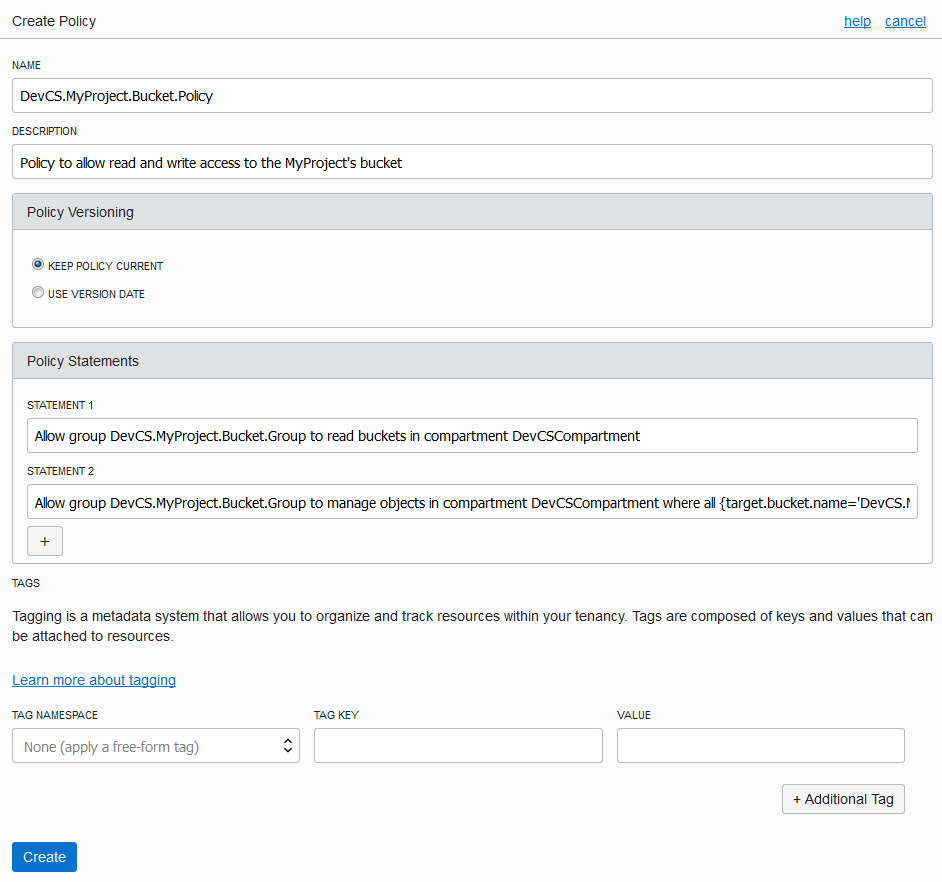
      Example:

      Bucket policy
    6. Click Create.
    To learn more, see Working with Policies.