3 Migrate an Oracle Developer Cloud Service Instance to Oracle Cloud Infrastructure

Migrating your projects from a source DevCS instance to a target involves migrating the Build VM and VM templates of the source instance, as well as each project's data.

In this documentation, the DevCS in OCI Classic icon indicates either the source DevCS instance or the source project. The DevCS in OCI icon indicates either the target DevCS instance or the target project.

Open the Source and the Target DevCS Instances

Open the source DevCS instance in a browser and the target DevCS instance in another browser. You can't open both instances in the same session of a browser; however, you may open an instance in a tab and another instance in an incognito or a private tab of the same browser.

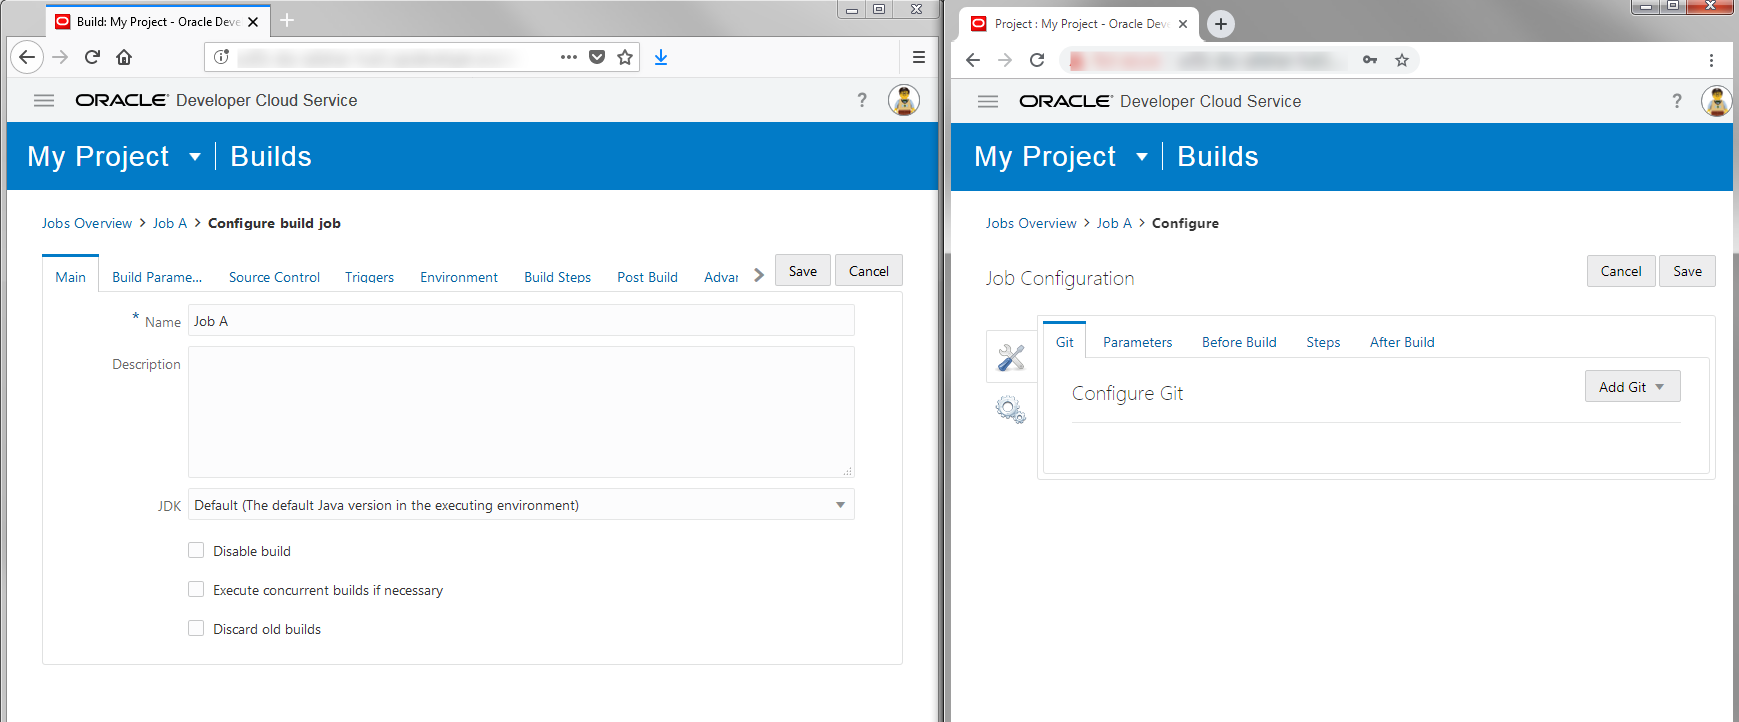
For example, in this image the source DevCS instance is open in Mozilla Firefox and the target DevCS instance is open in Google Chrome.
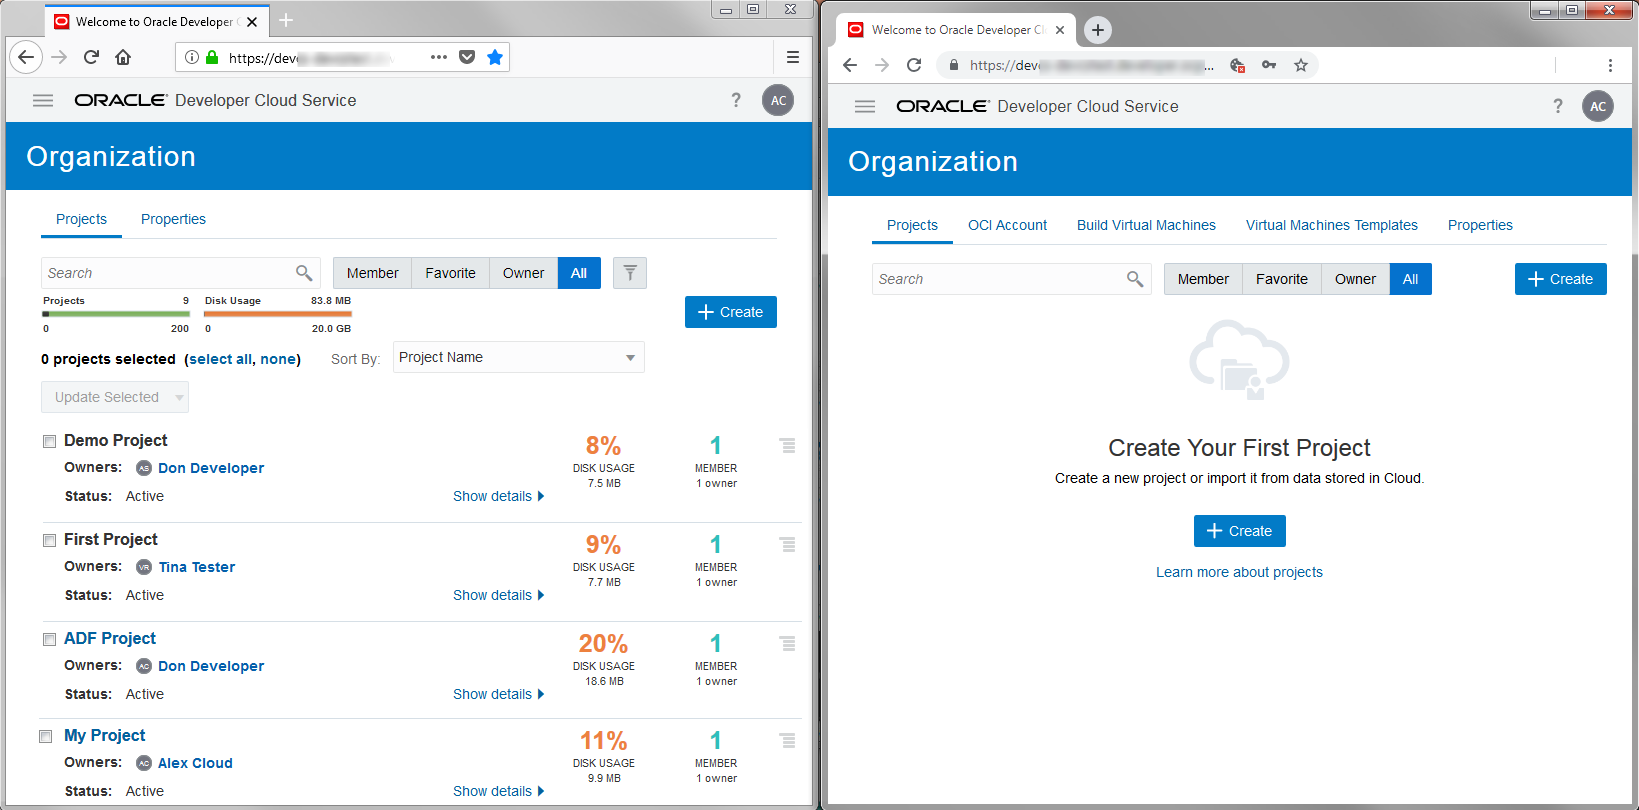
DevCS source and target instances in different browsers
To view the list of supported browsers, see https://www.oracle.com/technetwork/indexes/products/browser-policy-2859268.html.

To open the source DevCS instance:

  1. In a web browser, go to https://cloud.oracle.com/home, and click Sign In.
  2. On the Sign In page, click Sign In using Traditional Cloud Account.
  3. From the Data Center drop-down list, select your data center.
  4. In Traditional Cloud Account Name, enter your identity domain name and click Go.
  5. Enter your Oracle Cloud account credentials, and click Sign In.
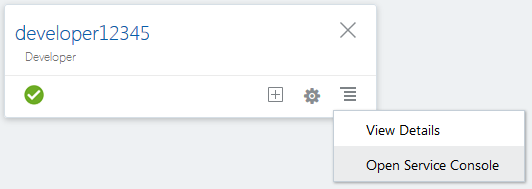
  6. On the Oracle Cloud Dashboard, in the developerNNNNN tile (where NNNNN is a number), click Action the Action menu icon and select Open Service Console.
    Dashboard of DevCS Traditional

    If the developerNNNNN tile isn’t visible, click Customize Dashboard. Under Platform, find the Developer service, click Show, and then close the Customize Dashboard window.

To open the target DevCS instance:

  1. In another web browser, go to https://cloud.oracle.com/home, and click Sign In.
  2. From the Cloud Account drop-down list, select Cloud Account with Identity Cloud Service. In Cloud Account Name, enter your tenant name or the identity domain name.
  3. Click Next.
  4. On the sign-in page, enter your Oracle Cloud account credentials, and click Sign In.
  5. Click Dashboard.
  6. On the Oracle Cloud Dashboard, in the Developer tile, click Action the Action menu icon and select Open Service Console.

    If the Developer tile isn’t visible, click Customize Dashboard. Under Platform, find the Developer service, click Show, and then close the Customize Dashboard window.

  7. On the Instances tab, click Manage this instance the Action menu icon and select Access service instance.

Migrate the Organization's Properties

To migrate the source DevCS instance's organization properties, note its details and then configure the target DevCS instance's Organization with the same properties.

Gather Information About the Organization From the Source DevCS Instance

Source DevCS Perform these steps in the source DevCS instance.

  1. Switch to the browser with the source DevCS instance.
  2. In the navigation bar, click Organization Organization.
  3. Click the Properties tab.
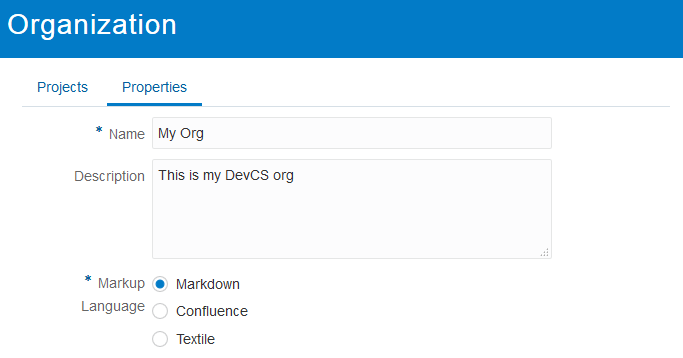
  4. Note the name, description, and the default wiki markup language of the organization.

    Example:

    Organization Properties tab

    This table shows the name, description, and the default wiki markup language values from the above image.

    Field Value
    Name My Org
    Description This is my DevCS org
    Markup Language Markdown

Configure Organization Properties in the Target DevCS Instance

DevCS in OCI Perform these steps in the target DevCS instance.

  1. Get the details of the Organization's properties from the source DevCS instance. You'll use the information to configure the target DevCS instance's Organization properties.

    Example:

    Field Value
    Name My Org
    Description This is my DevCS org
    Markup Language Markdown
  2. Switch to the browser with the target DevCS instance.
  3. In the navigation bar, click Organization Organization.
  4. Click the Properties tab.
  5. In Name and Description, update the organization name and description.
  6. In Markup Language, select the wiki markup language.

    Remember that the organization's wiki markup language defines the default wiki markup language of new projects, which you can change while creating a project.

When you're done, verify that the Organization's properties set in the target DevCS instance match the source DevCS instance.

Migrate Projects

To migrate projects from the source DevCS instance, you will export each project's data to an OCI Object Storage bucket.

You'll then create projects in the target DevCS instance using the exported data. Finally, you will copy any data or artifacts that were not part of the export from the source DevCS instance to the target DevCS instance.

Gather Information About a Project From the Source DevCS Instance

Note the name, description, security, and the wiki markup language of the project in the source DevCS instance.

To get the details, you must be assigned the project's Owner role. If the role is not assigned to you, sign in as the Organization Administrator and assign the Owner role to yourself.

DevCS in OCI Classic Perform these steps in the source DevCS instance.

  1. Switch to the browser with the source DevCS instance.
  2. In the navigation bar, click Organization Organization.
  3. In the Projects tab, click the All toggle button.
  4. Find the project to migrate. If you can't find it in the list, use the Search box.
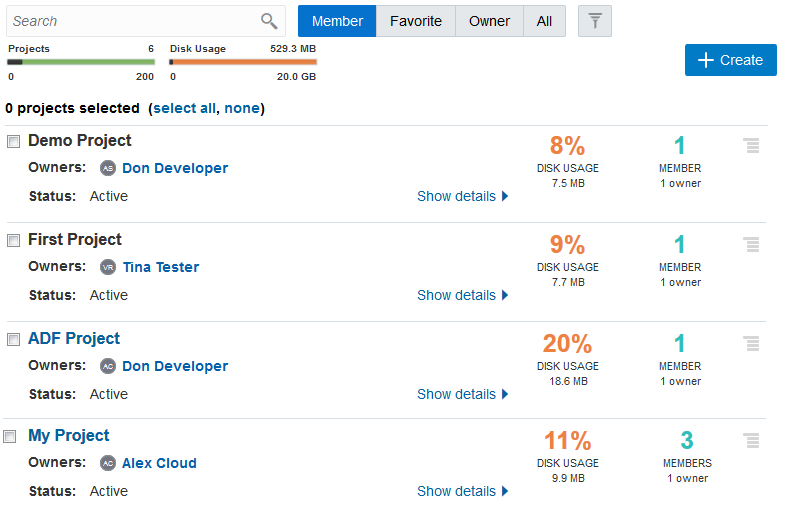
  5. After finding the project, note whether the project's name is a link and whether you are an owner. Projects where you're not a member don't appear as links. If you're a member, but not an owner, your name wouldn't appear in the Owners list.

    In this example, you're signed in as Alex Cloud. Note that some projects aren't links.

    List of projects

    This table shows the project's name and information whether you're a member of the project.

    Field Value
    Project Name My Project
    Are you a Member? Yes
    Are you an Owner? Yes
  6. If you're not an owner or the project doesn't appear as a link, select the project's check box. From Update Selected, select Assign Me as Owner.
  7. Click the project name.
  8. In the navigation bar, click Project Administration Gear.
  9. Click Properties.
  10. Note the values of Name, Description, Security, and Markup Language.

    Example:

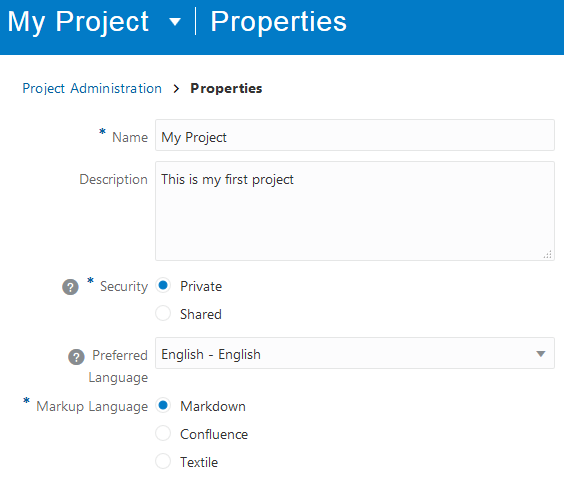
    Project Properties page

    This table shows the Project Name, Description, Security, and Wiki values from the above image.

    Field Value
    Project Name My Project
    Description This is my first project
    Security Private
    Wiki Markdown

Export Project Data From the Source DevCS Instance

You can export a project’s data to an OCI Object Storage bucket.

When you export project data, not all the artifacts are included. You'll have to manually export the remaining artifacts and data manually.

This table shows you which artifacts are exported and which aren't:

Artifact Exported? Notes
Project users No When you export a project's data, its users are not exported, but all data associated to usernames (such as issue ownership and reviewers of a merge request) is preserved.

After you import the project's data to another project, when you add a user to the project with the same username, the data associated to the username is automatically restored.

User's favorite settings or personal preferences No
Hosted Git repositories Yes
Mirrored public external Git repositories Yes
Mirrored private external Git repositories No Password protected external Git repositories aren't exported.

After you import the project's data to another project, you must add each external private Git repository.

Branch restrictions Yes
Issues Yes
Agile boards Yes
Wiki pages Yes
Merge Requests Yes
Default reviewers of a branch Yes After you import the project's data to another project, default reviewers are added automatically after the same users are added to the target project.
Build jobs No
Deployment configurations No
Maven artifacts No
Environments No
Releases Yes
Snippets Yes
Linked Docker registries No
Project template definition No
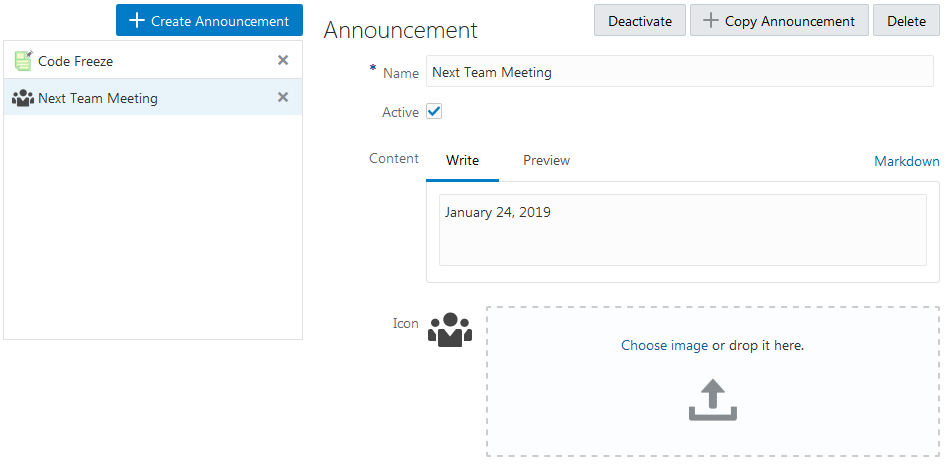
Announcements No
Webhooks No
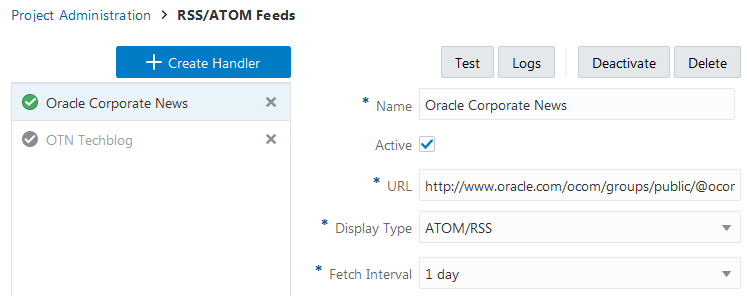
RSS/ATOM feeds No
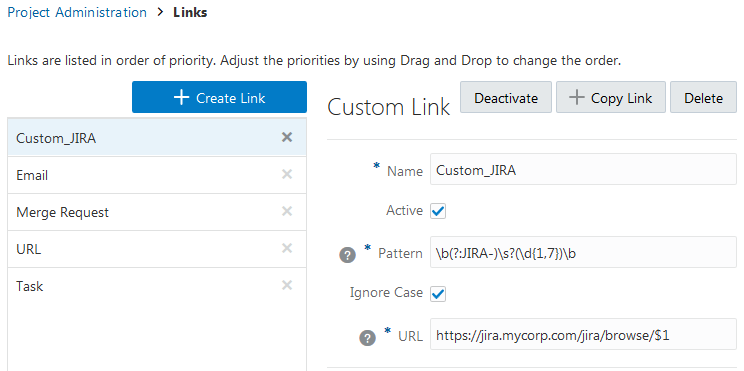
Link rules No
Project tags Yes
Issue products and components Yes
Default owners of issue components Yes After you import the project's data to another project, owners are activated automatically after the same users are added to the target project.
Issue custom fields Yes
Named passwords Yes
Export a Project's Data to an OCI Object Storage Bucket

To export a project's data to an OCI Object Storage bucket, you need the bucket's name, private key and fingerprint of a user who can write objects to the bucket, and details of the compartment that hosts the bucket.

To get the input values, see Get the Required OCI Input Values.

DevCS in OCI Classic Perform these steps for each project in the source DevCS instance as the project's Owner.

  1. Open the source project.
  2. In the navigation bar, click Project Administration Gear.
  3. Click Data Export/Import.
  4. Click the Job tab.
  5. In Account Type, select OCI.
  6. In Tenancy OCID, enter the tenancy's OCID copied from the Tenancy Details page.
  7. In User OCID, enter the user's OCID value who can access the bucket.
  8. In Home Region, select the home region of the OCI account.
  9. In Private Key, enter the private key of the user who can access the bucket.
  10. In Passphrase, enter the passphrase used to encrypt the private key. If no passphrase was used, leave the field empty.
  11. In Fingerprint, enter the fingerprint value of the private-public key pair.
  12. In Compartment OCID, enter the compartment's OCID copied from the Compartments page.
  13. In Storage Namespace, enter the storage namespace copied from the Tenancy Details page.
  14. Click Connect.
  15. In the Create Job section, in Type, select Export.
  16. In Name, enter a name for the export job.
  17. In Description, enter the job's description.
  18. In Storage Container, select the bucket to export the project data.
  19. In Storage Object, if required, update the default .zip file name.
  20. Click Export.
  21. In the Confirm Project Export dialog box, select the Export project data check box, and click Yes.
  22. In the Exporting Project page, expand Steps to see the status of each module.
  23. After the project export is successful, make a note of the bucket name and the archive file along with the project's other details.

    Example:

    Field Value
    Project Name My Project
    Description This is my first project
    Security Private
    Wiki Markdown
    Bucket/Container Name DevCS.MyProjects.Bucket
    Archive File Export-my-domain_My Project_2019-03-12T05-34-20.627Z-by_alex.admin.zip

Create a Project With an Exported Project's Data in the Target DevCS Instance

While creating a project, you can import data from an exported project's archive file stored in an OCI Object Storage bucket.

To import project data, you need these details:

  • Name of the target bucket
  • Name of the exported archive file
  • Private key and fingerprint of a user who has the BUCKET_INSPECT (or BUCKET_READ) and OBJECT_READ permissions of the bucket
  • Details of the compartment that hosts the bucket

After you have the required input values, you can import the project.

DevCS in OCI Perform these steps in the target DevCS instance.

  1. Get the details of the project from the source DevCS instance.

    Example:

    Field Value
    Project Name My Project
    Description This is my first project
    Security Private
    Wiki Markdown
    Bucket/Container Name DevCS.MyProjects.Bucket
    Archive File Export-my-domain_My Project_2019-03-12T05-34-20.627Z-by_alex.admin.zip
  2. Switch to the browser with the target DevCS instance.
  3. In the navigation bar, click Organization Organization, if required.
  4. On the Organization page, click + Create Project.
  5. On the Project Details page of the New Project wizard, in Name and Description, enter the project name and a description.
  6. In Security, select the project's privacy.
  7. Click Next.
  8. On the Template page, select Import Project, and click Next.
  9. In the Storage Connection section of the Project Properties page, to import the project's data from an OCI Object Storage bucket, in Account Type, select OCI.
  10. If you selected OCI as Account Type, enter the required connection details.
    1. In Tenancy OCID, enter the tenancy's OCID copied from the Tenancy Details page.
    2. In User OCID, enter the user's OCID value who can access the bucket.
    3. In Home Region, select the home region of the OCI account.
    4. In Private Key, enter the private key of the user who can access the bucket.
    5. In Passphrase, enter the passphrase used to encrypt the private key. If no passphrase was used, leave the field empty.
    6. In Fingerprint, enter the fingerprint value of the private-public key pair.
    7. In Compartment OCID, enter the compartment's OCID copied from the Compartments page.
    8. In Storage Namespace, enter the storage namespace copied from the Tenancy Details page.
  11. Click Next.
  12. On the Project Properties page, from Wiki Markup, select the project’s wiki markup language.
  13. In Container, select the storage bucket or the container where the data was exported.
  14. In File, select the exported file.
  15. Click Finish.
  16. After the import is complete, check the log to learn about the imported artifacts.
    1. In the navigation bar, click Project Administration Gear.
    2. Click Data Export/Import.
    3. Click the History tab.
    4. Select the import entry.
    5. In the Job Details section, expand Steps.

In the created project, verify artifacts listed in the table of Export Project Data From the Source DevCS Instance with Yes value in the Exported? column have been imported.

If the import fails, you can import the data again without creating the project. See Export Project Data to and Import Project Data from Oracle Cloud in Using Oracle Developer Cloud Service.

Migrate Other Artifacts and Data

After exporting a project from the source DevCS instance and creating the same name project with the exported project’s data in the target DevCS instance, migrate the artifacts that weren't exported.

Before you begin, open the source project in a browser and the target project in another browser. Then, to migrate an artifact, note and copy its details from the source project and create or add it manually to the new project.

For example, in this image the source project is open in Mozilla Firefox and the target project is open in Google Chrome.
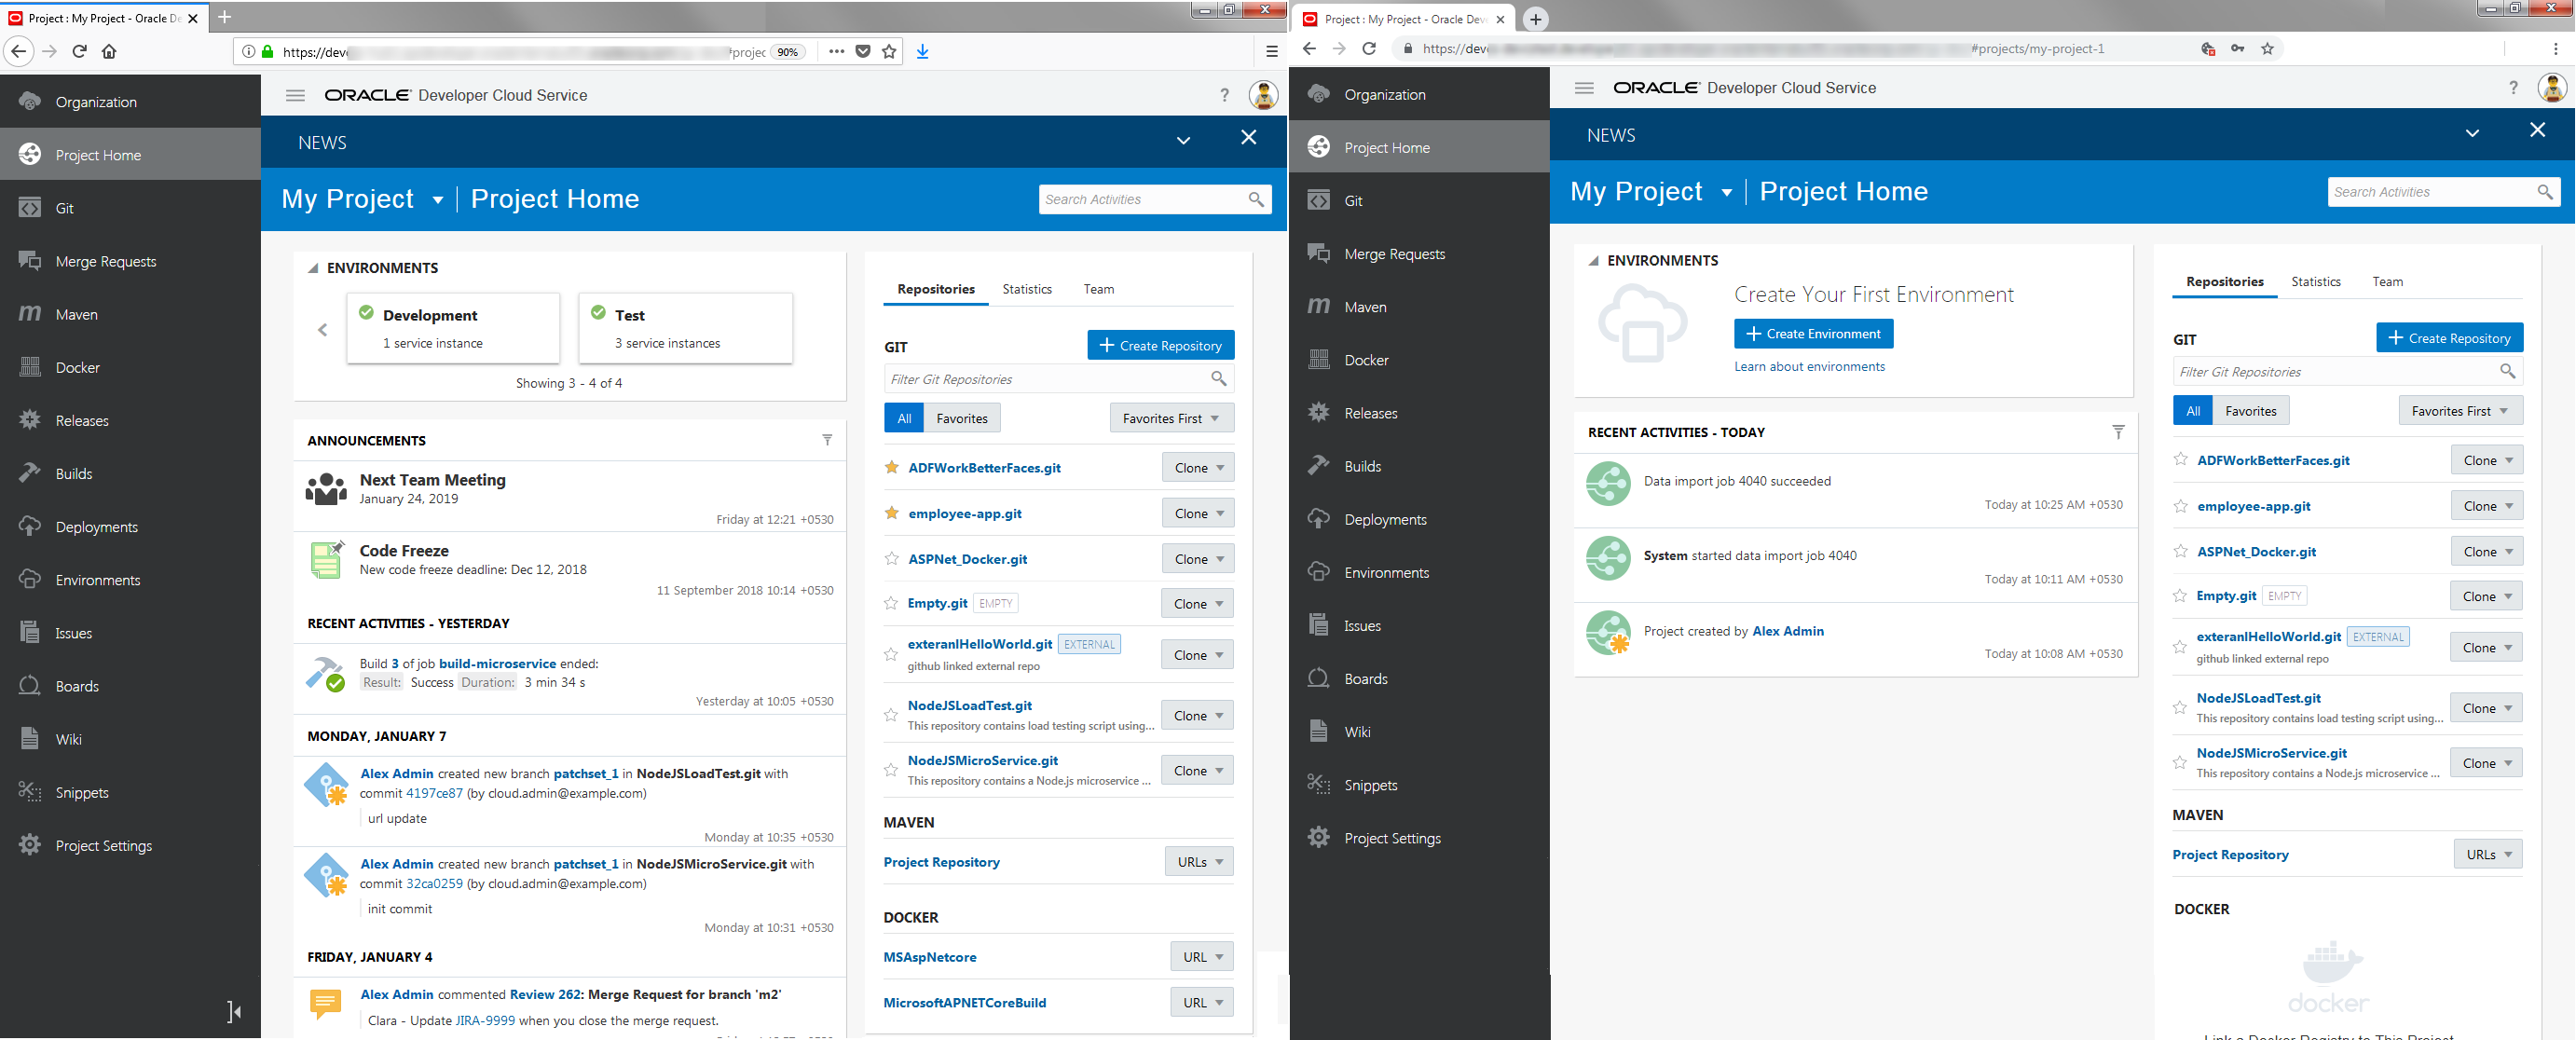
Source and Target Projects

Project Users

To migrate users, you'll need to add them manually to the new project.

If you're switching to another identity domain, make sure that DevCS users of the source identity domain are added to the target identity domain with the same usernames and roles. See Create Users and Assign Roles in Getting Started with Oracle Cloud.

Follow these steps to migrate project users:

  1. In the source and target projects, follow these steps:
    1. In the navigation bar, click Project Home Project Home.
    2. Click the Team tab.
  2. In the source project, gather information about the usernames and roles of project users.
  3. In the target project, add the users and assign them the same roles.
  4. After adding users, with the Team tab open in both source and target projects, verify that users and roles in the target project match the source project.
Gather Information About Users From the Source Project

Source DevCS Perform these steps in the source project.

  1. Switch to the browser with the source project.
  2. In the Team tab, for each user, note the usernames and project roles.
    Example:
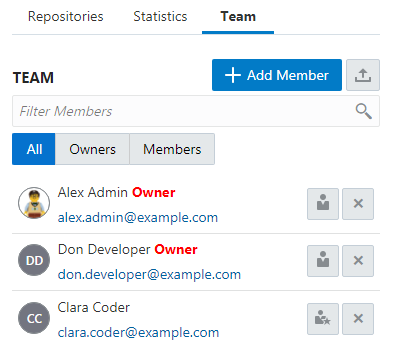
    Team

    This table shows the User Name and Owner values from the above image.

    User Name Project Role
    Alex Admin Owner
    Don Developer Owner
    Clara Coder Member
  3. Click Export the export members icon.
  4. In the Members List Export dialog box, copy the names of project members.
  5. Click OK or Close the close icon to close the dialog box.
Add Users in the Target Project

Target DevCS Perform these steps in the target project.

  1. Get the details of users from the source project. You'll use the information to add users and assign them the same roles in the target project.

    Example:

    User Name Project Role
    Alex Admin Owner
    Don Developer Owner
    Clara Coder Member
  2. Switch to the browser with the target project.
  3. In the Team tab, click + Create Member.
  4. In the New Member dialog box, select the Multiple Users check box.
  5. In Username List text box, enter the comma delimited list of usernames exported from the source project.
  6. Click Add.
  7. For each user who was assigned the Owner role, click Promote to Owner the Promote to Owner icon.

When you're done, verify that the users and roles in the target project match the source project.

Before you exported the source project's data, you noted whether you're a member or an owner in the source project. Don't delete that data. You'll use it after migrating all source project's artifacts to the target project.

Mirrored Private Git Repositories

If you’ve been using private Git repositories on another platform, such as GitHub or Bitbucket, and have mirrored them to your project, note that they aren't exported to the archive file when you export project data.

Follow these steps to migrate mirrored private Git repositories:

  1. In the source and target projects, follow these steps:
    1. In the navigation bar, click Project Administration Gear.
    2. Click Repositories.
    3. Expand External Repositories.
  2. Repeat these steps to migrate each mirrored private Git repository:
    1. In the source project, gather information about a mirrored private Git repository.
    2. In the target project, add a mirror to the private Git repository.
  3. After migrating all private Git repositories, with the Repositories page open in both source and target projects, verify that repositories in the target project match the source project.
Gather Information About Mirrored Private Git Repositories From the Source Project

Source DevCS Perform these steps in the source project.

  1. Switch to the browser with the source project.
  2. In External Repositories, note the name, description, and URL of the mirrored Git repository.
    You can get the URL from the Clone drop-down menu.

    Example:

    External Git repositories

    This table shows the Name, Description, and URL values from the above image.

    Field Value
    Repository Name myprivaterepo
    Description GitHub Private Repository
    URL https://github.com/alex-cloud/myprivaterepo.git

    Get the credentials of the repository too. They aren't displayed in the drop-down menu.

Mirror a Private Git Repository in the Target Project

Target DevCS Perform these steps in the target project.

  1. Get the details of the mirrored private Git repository from the source project. You'll use the information to add the external Git repository in the target project.

    Example:

    Field Value
    Repository Name myprivaterepo
    Description GitHub Private Repository
    URL https://github.com/alex-cloud/myprivaterepo.git
  2. Switch to the browser with the target project.
  3. In External Repositories, click + Link External Repository
  4. In the New Repository dialog box, enter the URL of the external Git repository in URL and enter the repository's description in Description.
  5. Expand the Credentials for non-public repos section and enter the credentials to access the external Git repository.
  6. Click Create.
  7. In the navigation bar, click Git Git.
  8. From the Repository list, select the external repository and verify that you can access its files.

Build Jobs

When you create a project with the exported project's data, the build jobs of the source project are not migrated to the target project.

Follow these steps to migrate build jobs:

  1. In the source and target projects, in the navigation bar, click Builds Builds.
  2. Repeat these steps to migrate each job:
    1. In the source project, gather information about the job's software packages.
    2. In the target instance, create a Build VM template with the job's software packages and allocate Build VMs to it.
    3. Open two browser windows, one that shows the configuration page of the source job and the other that shows the configuration page of the target job.
    4. Note the configuration settings of the source job and make the same settings in the target job.
    5. Save the target job.
  3. If the source job has any dependencies, create a pipeline in the target project.
  4. After creating the job and pipelines, run a build. If the build fails, verify the configuration.

Before you migrate jobs, you might want to learn about the differences between the Builds page's user interface on the source and target DevCS instances.

Builds Page User Interface

The Builds page and its sub-pages in the target DevCS instance have been redesigned and differ from the Builds pages in the source DevCS instance. In the Builds page of the target project, you'll notice some new fields and options were added, the names of some fields and options have changed, and some fields and options have been removed.

To see the differences, open the source project in a browser and the target project in another browser. Then, in both source and target projects, click Builds in the navigation bar.

Builds Page

On the target project's Builds page, you'll notice these differences:

  • A new tab, Pipelines, is available for creating and configuring build pipelines. More on that later.
  • Icons in the Actions column of the jobs table have changed.
  • In the toggle buttons, All Unstable jobs is now Test Failed Jobs.
  • Job Statistics doesn't show pending jobs anymore.

Example:
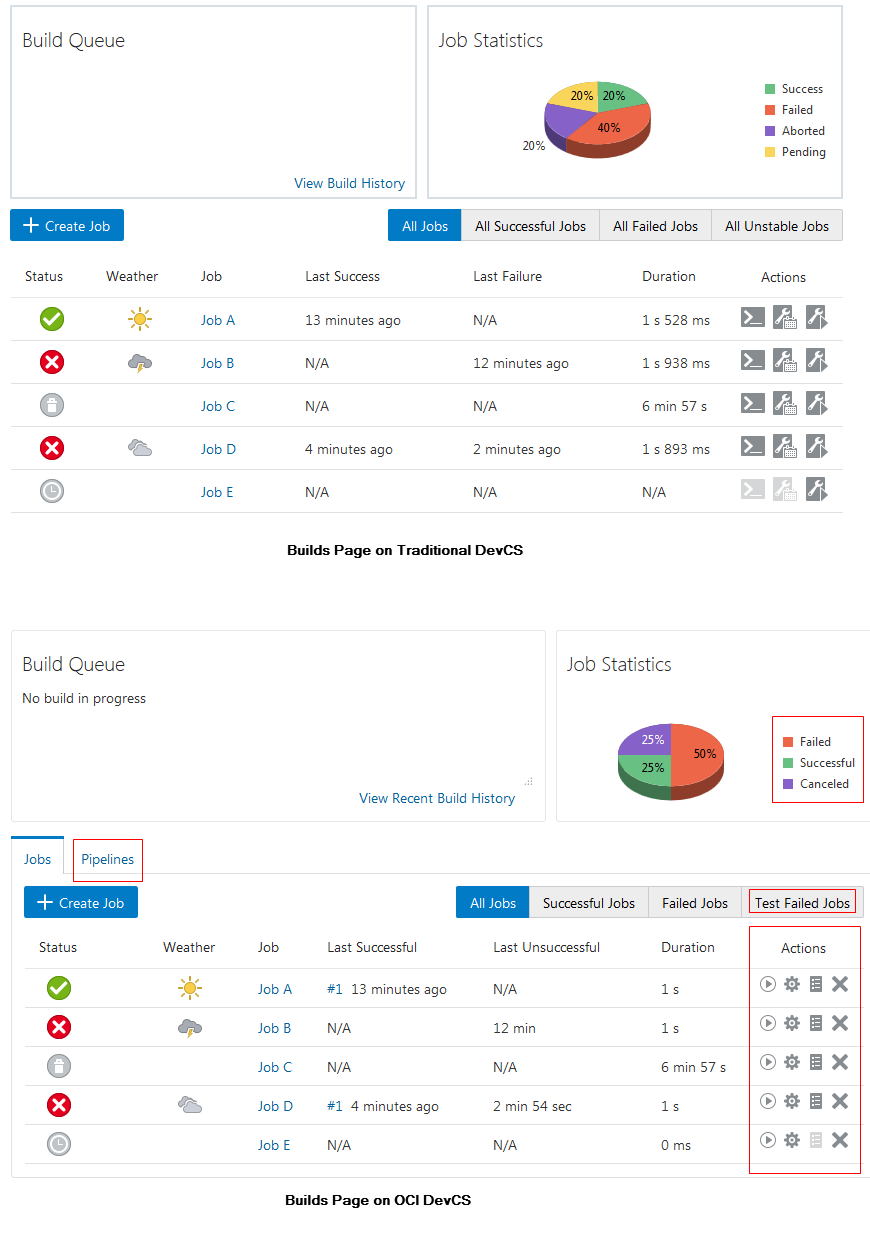
Compare Builds page

Job Details Page

Click a job's name to open the job's details page. On the target project, you'll notice these differences:

  • Descriptions is now Job Details.
  • There are some new report icons on the right. The icons of other reports have been updated too.
  • Build artifacts under Artifacts of Last Successful Build are now available in the Artifacts report.
  • Permalinks have moved above the build history
  • A new By column in the build history indicates who ran the build.
  • Icons in the Actions column of build history have changed.
  • The graph type of Build Trend has changed.

Example:
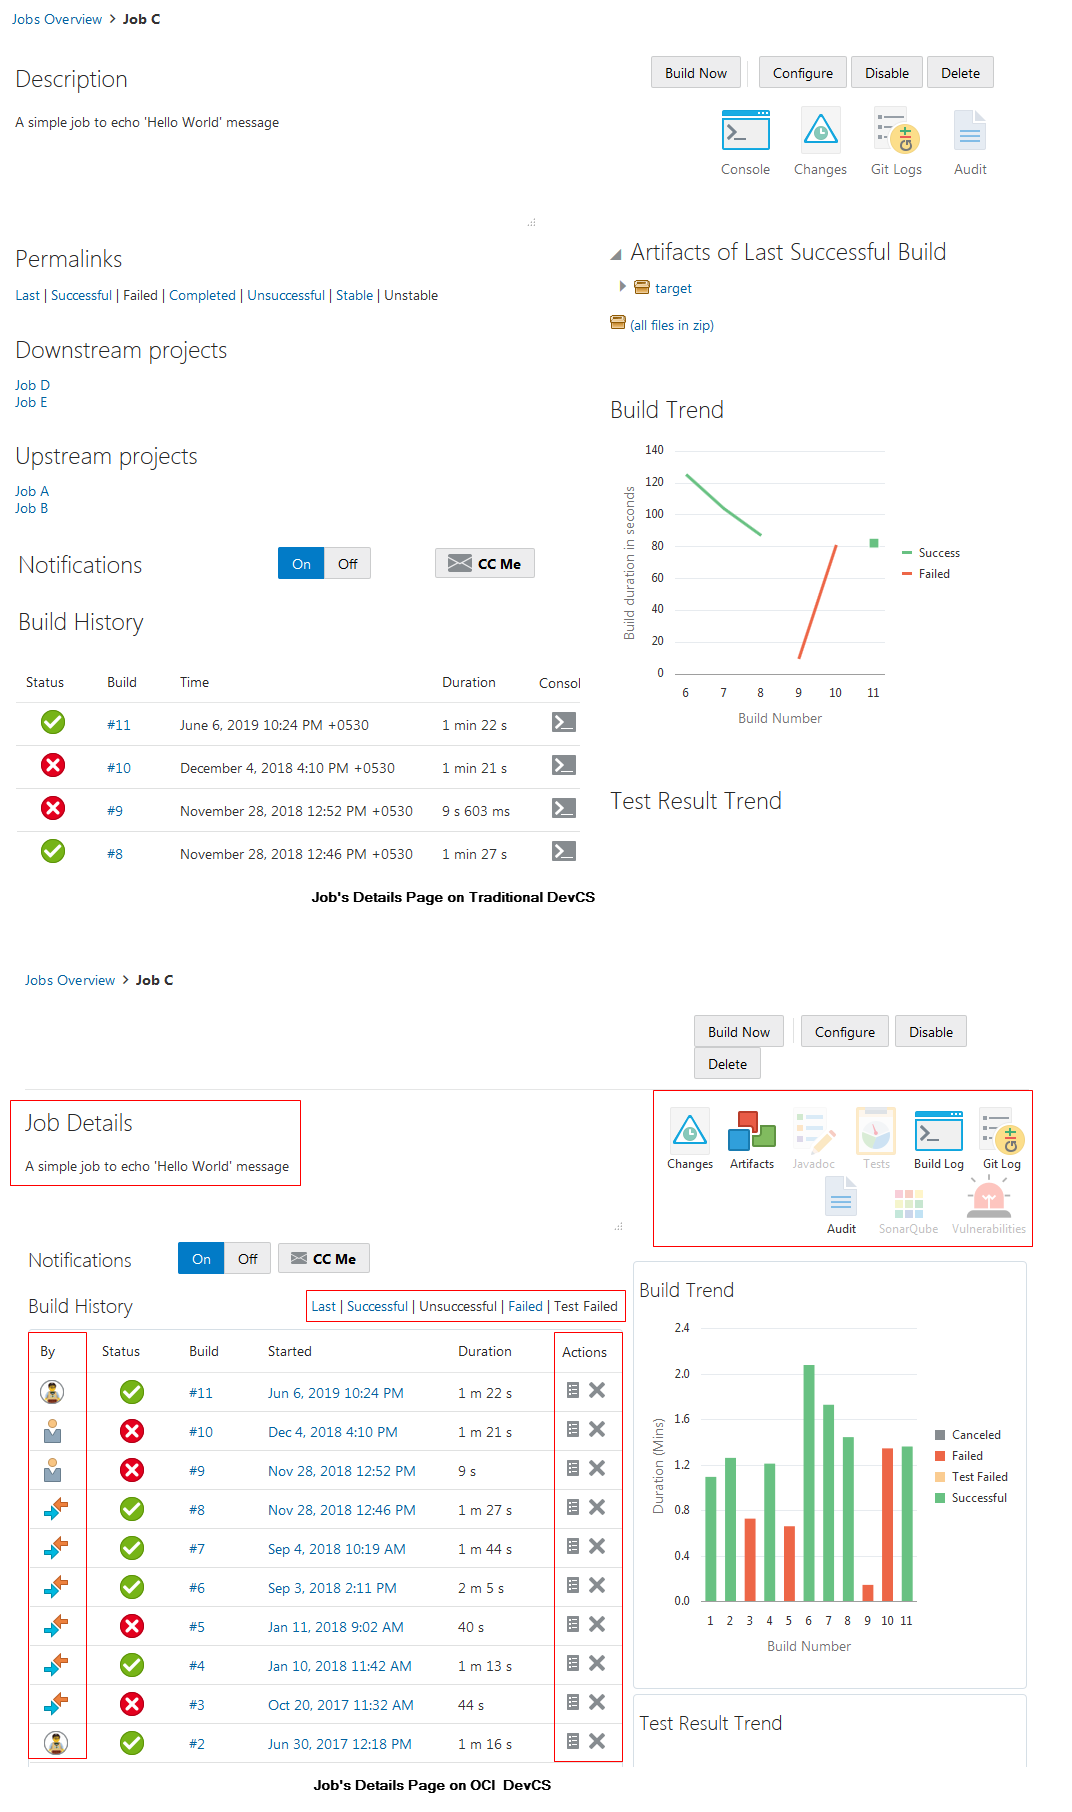
Compare Job Details page

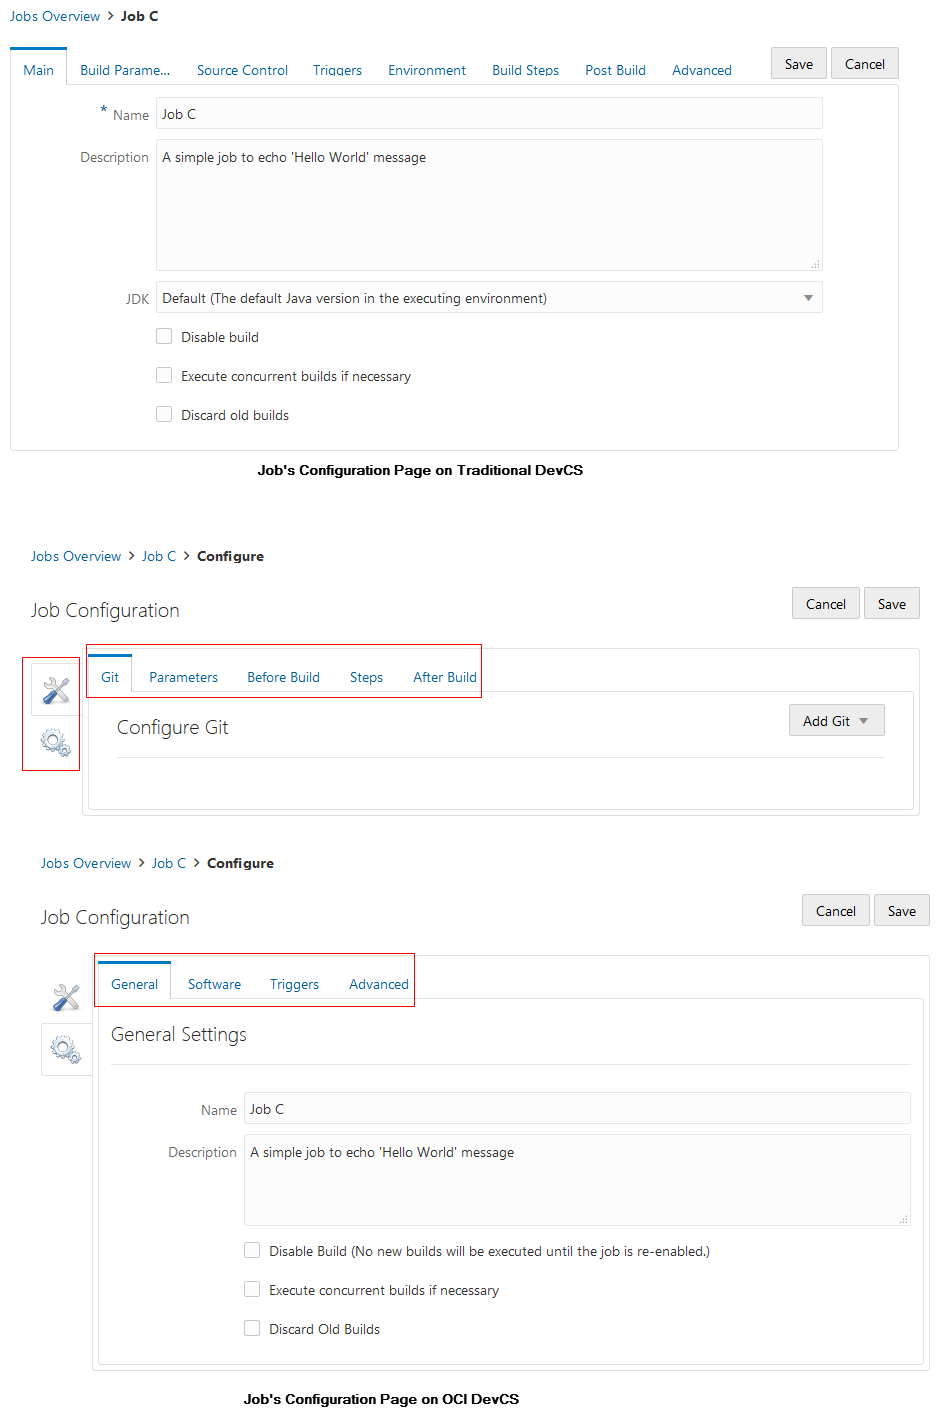
Job Configuration Page

Click the Configure button to open the job's configure page. On the target project, notice these differences:

  • The order and labels of horizontal tabs have changed.
  • The tabs are categorized into two vertical tabs: Settings the Gear icon and Configure the Tools icon.

Example:

Compare Job Configuration page
Gather Information About the Job's Software Packages From the Source Project

Source DevCS Perform these steps in the source project.

  1. Switch to the browser with the source project.
  2. In the source project, click the job's name and then click Configure to open the job's configuration page.
  3. From the Build Steps tab, note whether the job uses any of these build steps.
    • Gradle
    • Node.js
    • SQLcl
    • PSMcli

    If the source job uses any of the above software packages in the build steps, note their version (if specified explicitly) and add them to the job's software packages list. If the source job uses Node.js, note its version from the Environment tab.

    For example, this table shows a job's software packages list.

    Software Version
    Gradle 3.5
    Node.js 10.15.3
  4. From the Environment tab, note whether the Start Xvfb before the build, and shut it down after check box is selected. If it is, add Xvfb to the job's software packages list.
Create a VM Template and its Build VMs in the Target DevCS Instance

DevCS in OCI Perform these steps in the target DevCS instance.

Before you create Build VMs Templates and Build VMs, note these points:
  • Learn about the OCI regions and shapes where you'll create the VMs. A region is a localized geographic area, and an availability domain is one or more data centers located within a region. A shape is a template that determines the number of CPUs, amount of memory, and other resources allocated to a newly created instance. For more details, see Regions and Availability Domains and VM Shapes.
  • When you create a Build VM Template, some software packages (such as Maven, Ant, and Java) are available by default in the template's required Build VM components. They're are not available in the Software Catalog.
  • Some software packages are available on a particular platform only. For example, Xvfb is available on Oracle Linux 7. To find about the software packages available by default and their compatible platform, see Software Installed on the Build Executor in Using Oracle Developer Cloud Service.

Let's get started.

  1. Get the details of the software packages used by the source job.

    Example:

    Software Version
    Gradle 3.5
    Node.js 10.15.3
  2. Switch to the browser with the target DevCS instance.
  3. In the navigation bar, click Organization Organization.
  4. Click the Virtual Machines Templates tab.
    Virtual Machines Templates tab
  5. Check whether a Build VM Template exists with the same software packages and versions you noted in Step 1. If a template is available, note its name and jump to Step 12.
    If no such template is available, click + Create Template.
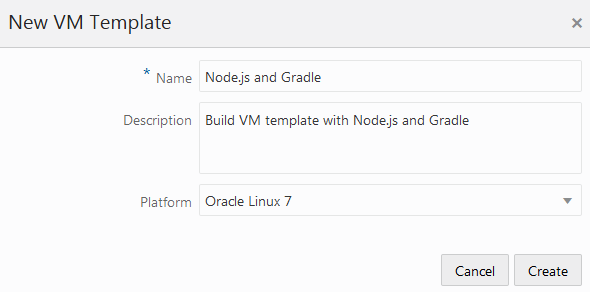
  6. In the New VM Template dialog box, enter the name and description of the VM template.

    Example:

    New VM Template dialog box
  7. In Platform, select the operating system.
    The build system of the source DevCS instance uses Oracle Linux 6. You can select the same platform or switch to Oracle Linux 7. If you switch to Oracle Linux 7, note that you might not find the same version of the software package used by the source job in Oracle Linux 7 and your application code might become incompatible. In such a case, remember to update your code to make it compatible with the platform and its software packages.
  8. Click Create.
  9. Select the template and click Configure Software.
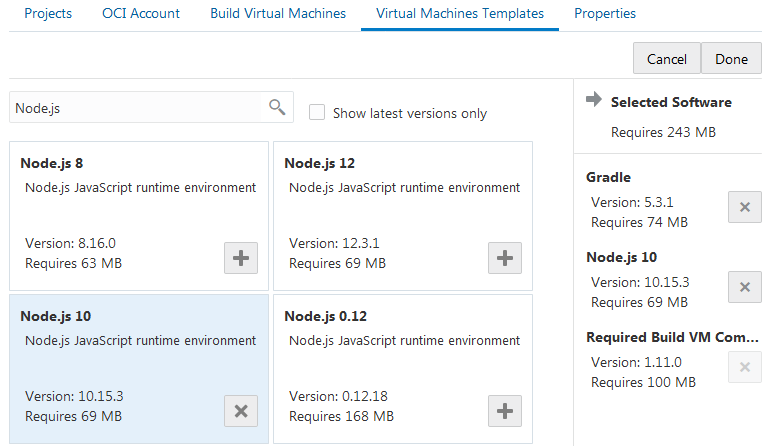
  10. For each software package of the VM template, in the Software Catalog, click Add the Add icon. If a software package is dependent on another software package, a message displays.
    If you can't find a software package, in Filter Software Packages, enter the search term and click Search the Search icon. To see the latest version of the software package, select the Show latest versions only check box. This is helpful if multiple versions of the same software package are available in the catalog.

    Example:

    Software Catalog

    For some software packages, you may not find the same version as you noted in the source job. In such a case, select the next available higher version or the latest version. If the software package version changes, note that your application code might become incompatible. In such a case, update your code to make it compatible with the software packages.

    To use Gradle, note that Gradle 5 is available in the target DevCS job. If you want to use an older version of Gradle, add Gradle to the Build VM template. When you configure the build job, use Gradle Wrapper and specify the older version of Gradle.

  11. Click Done.
  12. Click the Build Virtual Machines tab.
  13. In the Build VMs tab, click + Create VM.
    If sufficient number of VMs are already allocated to the template, then don't add Build VMs and skip the remaining steps.
  14. In the Add Build VM dialog box, in Quantity, enter the number of VMs. In VM Template, select the Build VM Template. In Region and Shape, specify the VM's region and shape.

    To minimize build execution delays, set the number of VMs to the number of jobs that you expect to run in parallel using that template. If the VM quota is available, that number of Build VMs will be added to the Build Virtual Machines tab. Note that the more VMs you have running at a specific time, the higher the cost. To minimize the higher cost, use the Sleep Timeout setting on the Virtual Machines tab to automatically shut down inactive VMs. You can always return to the Build Virtual Machines tab to add or remove VMs, based on your actual usage.

  15. Click Add.
Create and Configure a Job in the Target Project

To migrate a job, note its configuration from the source project. In the target project, create a job with the same name and then configure it accordingly.
  1. Switch to the browser with the source project.
  2. In the source project, click the job's name and then click Configure to open the job's configuration page.
  3. From the Main tab, note the job's name and description.
    Example:
    Field Value/Status
    Job Name build-microservice
    Description Job to build a Node.js microservice
  4. Switch to the browser with the target project.
  5. In the Jobs tab of the Builds page, click + Create Job.
  6. In the New Job dialog box, enter the job's name and description.

    In Template, select the Build VM template you created for the job and click Create.

Open the source job's configuration page in a browser and the target job's configuration page in another browser.
Compare the Build page on DevCS on Traditional with DevCS on OCI

The following topics help you migrate each tab's configuration from the source job to the target job. While migrating a job, you would notice some new fields and configuration options in the target job. This guide doesn't describe them, but if you want to learn about them, see Configure and Run Project Jobs and Builds in Using Oracle Developer Cloud Service.

Main Tab
  1. Switch to the browser with the source job.
  2. Click the Main tab.
  3. In the source job, note the JDK version. Then, follow these steps:
    1. Switch to the browser with the target job.
    2. Click Settings the Gear icon.
    3. Click the Software tab.
    4. In Java, select the Java version.
      JDK 6, 9, and 10 are not available in the target job. If the source job uses JDK 6, then use JDK 7 (or higher) in the target job. If the source job uses JDK 9 or 10, then use JDK 11 (or higher) in the target job.
  4. In the source job, note the state and values of the Disable Build, Execute concurrent builds if necessary, and Discard old builds check boxes and its fields. If any of them is selected, follow these steps:
    1. Switch to the browser with the target job.
    2. Click Settings the Gear icon.
    3. Click the General tab.
    4. From the selected check boxes, copy the values from the fields of the source job and paste them in the target job's fields.

    In the target job, some field names have changed. To help you migrate, this table maps the old field names in the source job to the new field names in the target job. Fields not listed in the table have the same names.

    Field Name in the Source Job Field Name in the Target Job
    Disable build Disable Build (No new build will be executed until the job is re-enabled)
    Discard old builds Discard Old Builds
    Days to keep builds Discard other builds after how many days
    Number of builds to keep Number of builds to keep at all times
    Days to keep artifacts Discard other artifacts after how many days
    Keep artifacts for this number of builds Minimum number of builds to retain artifacts for
Build Parameters Tab
  1. Switch to the browser with the source job.
  2. Click the Build Parameters tab.
  3. If the This build is parameterized check box is selected, note the parameter types and copy their values.

    Example:

    Parameter Values
    Boolean
    • Name: myBoolParam
    • Default Value: Selected
    • Description: <empty>
    String
    • Name: myStringParam
    • Default Value: Hello World
    • Description: Enter the Welcome message

    File and Run parameters aren't available in the target project. If the source job uses them, don't copy their values.

  4. Switch to the browser with the target job.
  5. Click Configure the Tools icon.
  6. Click the Parameters tab.
  7. For each parameter noted in Step 3, from the Add Parameter drop-down list, select the parameter.
  8. Enter the same values as noted in the parameter's fields.
    If the source job uses merge request parameters, enter their default values in the target job. You can't change the merge request parameter names in the target job.
Source Control Tab
  1. Switch to the browser with the source job.
  2. Click the Source Control tab.
  3. If the Git option is not selected, ignore the remaining steps. If it is selected, note the repository's name or URL from Repository. If a branch other than master is specified, note the branch's name too.
    For example, this table shows a job's Git repository details.
    Git Repository Value
    Name/URL MyNodeJSApp.git
    Branch Release_1.1
  4. Switch to the browser with the target job.
  5. Click Configure the Tools icon.
  6. Click the Git tab.
  7. From Add Git, select Git.
  8. In Repository, select the Git repository's name or enter the URL. In Branch, specify the branch's name.
  9. In the source job, if you've configured some advanced Git options, copy their values and paste them in the target job.

    In the target job, some field names have changed. To help you migrate, this table maps the old field names in the source job to the new field names in the target job. Fields not listed in the table have the same names.

    Field Name in the Source Job Field Name in the Target Job
    Advanced Repository Settings section Advanced Repository Options section
    Reference Spec Refspec
    Local Subdirectory Local Checkout Directory
    Advanced Git Settings section Advanced Git Settings section
    Included Regions Included Region
    Excluded Regions Excluded Region
    Excluded Users Excluded User
    Checkout/merge to local branch In Merge another branch, specify the branch name to merge to.

    In Checkout Revision, specify the branch to checkout.

    Config user.name Value Config user.name
    Config user.email Value Config user.email
    Merge before build
    • Name of repository
    • Branch to merge to
    Merge from another repository
    • Repository
    • Branch
    Wipe out workspace before build Wipe out workspace before checkout
Triggers Tab
  1. Switch to the browser with the source job.
  2. Click the Triggers tab.
  3. If the When these jobs are built check box is selected, you'll need to create a pipeline in the target project, after creating all dependent jobs that need to be in that pipeline. See Create and Configure Pipelines.
  4. In the source job, if the Based on this schedule check box is selected, follow these steps:
    If a schedule is specified, do this:
    1. Copy the schedule.
    2. Switch to the browser with the target job.
    3. Click Settings the Gear icon.
    4. Click the Triggers tab.
    5. From the Add Trigger drop-down list, select Periodic Build Trigger.
    6. Select the Expert mode check box and paste the schedule in the text box.
    If no schedule is specified, do this:
    1. Switch to the browser with the target job.
    2. Click Configure the Tools icon.
    3. Click the Git tab.
    4. In Git, select the Automatically perform build on SCM commit check box.
  5. In the source job, if the Based on SCM polling schedule check box is selected, follow these steps:
    1. Copy the schedule.
    2. Switch to the browser with the target job.
    3. Click Settings the Gear icon.
    4. Click the Triggers tab.
    5. From the Add Trigger drop-down list, select SCM Polling Trigger.
    6. Select the Expert mode check box and paste the schedule in the text box.
  6. In the source job, if the When Maven dependencies have been updated by Maven 3 integration check box is selected, ignore it because the option isn't available in the target job.
Environment Tab
  1. Switch to the browser with the source job.
  2. Click the Environment tab.
  3. If the Start Xvfb before the build, and shut it down after check box is selected, follow these steps:
    1. Switch to the browser with the target job.
    2. In the Software tab of Settings the Gear icon, ensure that the target job uses an Oracle Linux 7 Build VM template. Xvfb is available on Oracle Linux 7.
    3. Click Configure the Tools icon.
    4. Click the Before Build tab.
    5. From the Add Before Build Action drop-down list, select Xvfb Wrapper.

      In the target job, some field names have changed. To help you migrate, this table maps the old field names in the source job to the new field names in the target job. Fields not listed in the table have the same names.

      Field Name in the Source Job Field Name in the Target Job
      Xvfb Specific Displayname Display Number
      Xvfb Screen Screen Size
      Xvfb Display Name Offset Screen Offset
      Xvfb Additional Options Additional Options
  4. In the source job, if the Abort the build if it's stuck check box is selected, note the value of Timeout Minutes and whether the Fail the build check box is selected. Then, follow these steps:
    1. Switch to the browser with the target job.
    2. Click Settings the Gear icon.
    3. Click the Advanced tab.
    4. Select the Abort the build if it is stuck check box.
      In Hours and Minutes, specify the timeout duration.
    5. If the Fail the build check box is selected in the source job, select the Fail the build on abort check box in the target job.
  5. In the source job, if the Add Timestamps to the Console Output check box is selected, follow these steps:
    1. Switch to the browser with the target job.
    2. Click Settings the Gear icon.
    3. Click the Advanced tab.
    4. Select the Add Timestamps to the Console Output check box.
  6. In the source job, if the Connect Oracle Maven Repository check box is selected, then follow these steps:
    1. Switch to the browser with the target job.
    2. Click Configure the Tools icon.
    3. Click the Before Build tab.
    4. From the Add Before Build Action drop-down list, select Oracle Maven Repository Connection.
    5. Click the Use existing connection toggle button to disable it.
    6. Switch to the browser with the source job.
    7. Copy the values of OTN Login, OTN Password, Server Id, and Custom settings.xml.
    8. Switch to the browser with the target job.
    9. Paste the copied values into the fields with the same names.
  7. In the source job, if the Use NodeJS version check box is selected, then configure the target job to use a Build VM Template with the same (or higher) version of Node.js. You probably already did this when you created the Build VM Template.
Build Steps Tab
  1. Switch to the browser with the source job.
  2. Click the Build Steps tab.
  3. If the source job has an Execute Shell build step, follow these steps:
    1. Switch to the browser with the target job.
    2. Click Configure the Tools icon.
    3. Click the Steps tab.
    4. From the Add Step drop-down list, select Unix Shell.
    5. Switch to the browser with the source job.
    6. Copy the script/commands from Commands.
    7. Switch to the browser with the target job.
    8. Paste the copied script/commands to Script.
  4. If the source job has an Invoke Ant build step, follow these steps:
    1. Switch to the browser with the target job.
    2. Click Configure the Tools icon.
    3. Click the Steps tab.
    4. From the Add Step drop-down list, select Ant.
    5. Switch to the browser with the source job.
    6. Copy the values from Targets, Build File, Properties, and Java Options.
    7. Switch to the browser with the target job.
    8. Paste the copied values to the fields with the same names.
  5. If the source job has an Invoke Maven 2 (Legacy) build step, note that Maven 2 isn't available on the target job. Only Maven 3 is.
    First, configure the source job to use Maven 3 and run a build to verify its stability. After it is stable, migrate the job to the target project. as described in the next step.
  6. If the source job has an Invoke Maven 3 build step, follow these steps:
    1. Switch to the browser with the target job.
    2. Click Configure the Tools icon.
    3. Click the Steps tab.
    4. From the Add Step drop-down list, select Maven.
    5. Switch to the browser with the source job.
    6. Copy the values from Goals and POM File.
    7. Switch to the browser with the target job.
    8. Paste the copied values to the fields with the same names.
    9. Switch to the browser with the source job.
    10. If you've configured the Maven build step with additional options, copy values from its fields and paste them in the target job.

      First, in the target job, expand Advanced Maven Settings to see the Maven advanced options.

      In the target job, some field names have changed. To help you migrate, this table maps the old field names in the source job to the new field names in the target job. Fields not listed in the table have the same names.

      Field Name in the Source Job Field Name in the Target Job
      Private temporary directory Use Private Temp Directory
      Checksum Mode Checksum
      Snapshot Updates Snapshot
  7. If the source job has an Invoke Gradle build step, follow these steps:
    1. Switch to the browser with the target job.
    2. In the Software tab of Settings the Gear icon, ensure that the target job uses a Build VM template with the Gradle software package.
    3. Click Configure the Tools icon.
    4. Click the Steps tab.
    5. From the Add Step drop-down list, select Gradle.
    6. In the source job, if the Use Gradle Wrapper option is selected, note the state of its check boxes and select them in the target job.

      If the version of Gradle used in your source job is different from the Gradle's version available in the Build VM template, select the Use 'gradlew' wrapper check box and specify the version in Gradle version.

      In the target job, some field names have changed. To help you migrate, this table maps the old field names in the source job to the new field names in the target job. Fields not listed in the table have the same names.

      Field Name in the Source Job Field Name in the Target Job
      Use Gradle Wrapper Use 'gradlew' wrapper
      Make gradlew executable Create 'gradlew' wrapper
      From Root Build Script Dir In root build script directory
    7. In the source job, copy the values of other fields and paste them in the target job.

      In the target job, some field names have changed. To help you migrate, this table maps the old field names in the source job to the new field names in the target job. Fields not listed in the table have the same names.

      Field Name in the Source Job Field Name in the Target Job
      Build step description Description
      Root Build script Root build script directory
      Snapshot Updates Snapshot
  8. If the source job has an Invoke NodeJS build step, follow these steps:
    1. Switch to the browser with the target job.
    2. In the Software tab of Settings the Gear icon, ensure that the target job uses a Build VM template with the same (or higher) version of Node.js that you used in the source job.
    3. Click Configure the Tools icon.
    4. Click the Steps tab.
    5. From the Add Step drop-down list, select Node.js.
    6. Switch to the browser with the source job.
    7. Copy the values from Script.
    8. Switch to the browser with the target job.
    9. Select Script in Source, and then paste the copied contents in NodeJS Script.
  9. If the source job has an Copy artifacts from another job build step, follow these steps:
    1. Switch to the browser with the target job.
    2. Click Configure the Tools icon.
    3. Click the Before Build tab.
    4. From the Add Before Build Action drop-down list, select Copy Artifacts.
    5. In the source job, copy the field values and paste them in the target job.

      In the target job, some field names have changed. To help you migrate, this table maps the old field names in the source job to the new field names in the target job. Fields not listed in the table have the same names.

      Field Name in the Source Job Field Name in the Target Job
      Job Name From Job
      Stable build only The option isn't available
      Optional Optional (Do not fail build if artifacts copy failed)
  10. If the source job has an Invoke SQLcl build step, follow these steps:
    1. Switch to the browser with the target job.
    2. In the Software tab of Settings the Gear icon, ensure that the target job uses a Build VM template with SQLcl. You might have done this when you created the Build VM template.
    3. Click Configure the Tools icon.
    4. Click the Steps tab.
    5. From the Add Before Build Action drop-down list, select SQLcl.
    6. In the source job, copy the values from fields and enter those values into the fields with the same names in the target job.
  11. If the source job has an Invoke PSMcli build step, follow these steps:
    1. Switch to the browser with the target job.
    2. In the Software tab of Settings the Gear icon, ensure that the target job uses a Build VM template with PSMcli. You might have done this when you created the Build VM template.
    3. Click Configure the Tools icon.
    4. Click the Steps tab.
    5. From the Add Before Build Action drop-down list, select PSMcli.
    6. In the source job, copy the values from fields and enter those values into the fields with the same names in the target job.
Post Build Tab
  1. Switch to the browser with the source job.
  2. Click the Post Build tab.
  3. If the Aggregate all downstream test results check box is selected, ignore it because the option isn't available in the target job.
  4. If the Build other jobs check box is selected, you'll need to create a pipeline in the target project, after first creating all dependent jobs. See Create and Configure Pipelines.
  5. In the source job, if the Archive the artifacts check box is selected, follow these steps:
    1. Switch to the browser with the target job.
    2. Click Configure the Tools icon.
    3. Click the After Build tab.
    4. From the Add After Build Action drop-down list, select Artifact Archiver.
    5. Switch to the browser with the source job.
    6. In Archive the artifacts, note the state of check boxes or copy their values. In the target job, select the check boxes or paste the copied values.

      In the target job, some field names have changed. To help you migrate, this table maps the old field names in the source job to the new field names in the target job. Fields not listed in the table have the same names.

      Field Name in the Source Job Field Name in the Target Job
      Files To Archive Files to archive
      Enable auto validation for file masks The option isn't available
      Excludes Files to exclude
      Discard all but the last successful/stable artifact to save disk space The option isn't available
      Compression Type The option isn't available
  6. In the source job, if the Record fingerprints of files to track usage check box is selected, ignore it because the option isn't available in the target job.
  7. In the source job, if the Publish Javadoc check box is selected, follow these steps:
    1. Switch to the browser with the target job.
    2. Click Configure the Tools icon.
    3. Click the After Build tab.
    4. From the Add After Build Action drop-down list, select Javadoc Publisher.
    5. Switch to the browser with the source job.
    6. In Javadoc Publisher, note the state of check boxes or copy their values. In the target job, select the check boxes or paste the copied values.

      In the target job, some field names have changed. To help you migrate, this table maps the old field names in the source job to the new field names in the target job. Fields not listed in the table have the same names.

      Field Name in the Source Job Field Name in the Target Job
      Retain Javadoc for each successful build Retain Javadoc for each build
  8. In the source job, if the Publish JUnit test result report check box is selected, follow these steps:
    1. Switch to the browser with the target job.
    2. Click Configure the Tools icon.
    3. Click the After Build tab.
    4. From the Add After Build Action drop-down list, select JUnit Publisher.
    5. Switch to the browser with the source job.
    6. In Publish JUnit test result report, note the state of check boxes or copy their values. In the target job, select the check boxes or paste the copied values.

      In the target job, some field names have changed. To help you migrate, this table maps the old field names in the source job to the new field names in the target job. Fields not listed in the table have the same names.

      Field Name in the Source Job Field Name in the Target Job
      Test Report XMLs Include JUnit XMLs
  9. In the source job, if the Archive Maven 3 artifacts check box is selected, follow these steps:
    1. Switch to the browser with the target job.
    2. Click Configure the Tools icon.
    3. Click the After Build tab.
    4. From the Add After Build Action drop-down list, select Artifact Archiver.
      You can't add another Artifact Archiver post-build step if you've added it before.
    5. In Artifact Archiver, select the Archive Maven artifacts check box.
    6. Switch to the browser with the source job.
    7. In Archive Maven 3 artifacts, note the state of check boxes or copy their values. In the target job, select the check boxes or paste the copied values.

      In the target job, some field names have changed. To help you migrate, this table maps the old field names in the source job to the new field names in the target job. Fields not listed in the table have the same names.

      Field Name in the Source Job Field Name in the Target Job
      Include generated POMs Include pom.xml
      Discard old artifacts The option isn't available
  10. In the source job, if the Record fingerprints of Maven artifacts check box is selected, ignore it because the option isn't available in the target job.
  11. In the source job, if the Git Publisher check box is selected, follow these steps:
    1. Switch to the browser with the target job.
    2. Click Configure the Tools icon.
    3. Click the After Build tab.
    4. From the Add After Build Action drop-down list, select Git Publisher.
      In the source job, copy the values from fields and enter those values into the fields with the same names in the target job.
  12. In the source job, if the Notify that Maven dependencies have been updated by Maven 3 integration check box is selected, ignore it because the option isn't available in the target job.
  13. In the source job, if the Oracle Cloud Service Deployment check box is selected, follow these steps:
    1. Switch to the browser with the target job.
    2. Click Configure the Tools icon.
    3. Click the After Build tab.
    4. From Add After Build Action, select Oracle Cloud Service Deployment.
      In the source job, copy the values from fields and enter those values into the fields with the same names in the target job.
Advanced Tab
  1. Switch to the browser with the source job.
  2. Click the Advanced Tab tab.
  3. If the Quiet period check box is selected, note its period and follow these steps:
    1. Switch to the browser with the target job.
    2. Click Settings the Gear icon.
    3. Click the Advanced tab.
    4. Select the Quiet Period check box and specify its period.
  4. In the source job, if the Retry count check box is selected, note the SCM Checkout period and follow these steps:
    1. Switch to the browser with the target job.
    2. Click Settings the Gear icon.
    3. Click the Advanced tab.
    4. Select the Retry Count check box and specify the period in SCM Retries.
  5. In the source job, if the Block build when upstream job is building check box is selected, ignore it because the option isn't available in the target job.
  6. In the source job, if the Block build when downstream job is building check box is selected, ignore it because the option isn't available in the target job.
Create and Configure Pipelines

Some jobs of the source project might be configured to run when the builds of other jobs are complete, or to trigger builds of other jobs when their builds are complete. These dependencies are defined in the Triggers tab or the Post Build tab of the source job.

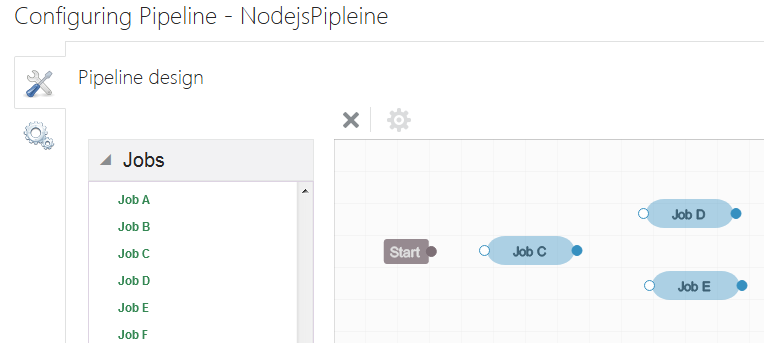
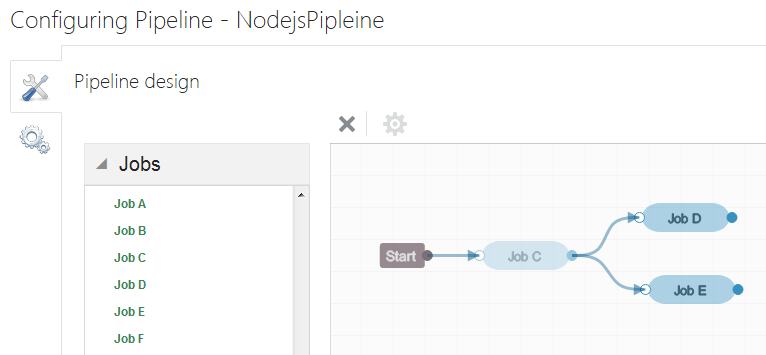
For example, in this image, Job C has an upstream dependency (or a many-to-one dependency) on Job A and Job B. When a build of any of these jobs complete, they trigger a build of Job C. Job C also has a downstream dependency (or a one-to-many dependency) on Job D and Job E. When a build of Job C is complete, it triggers builds of Job D and Job E.
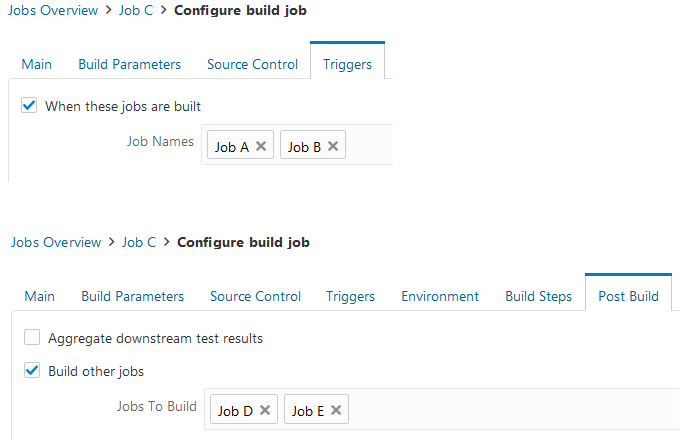
Dependencies defined in the source job

While migrating source jobs to the target project, you might have noticed that When these jobs are built and Build other jobs options aren't available in the target jobs. To set up a dependency in the target project, you'll create a pipeline. You must create the pipeline after creating and configuring all dependent jobs.

Before you create a pipeline, see What Is a Pipeline? and Use the Pipeline Designer in Using Oracle Developer Cloud Service to learn about pipelines and how to design pipeline diagrams.

Set Up a Pipeline
  1. Switch to the browser with the source project.
  2. Open the job with upstream or downstream dependencies.
  3. Click the Triggers tab.
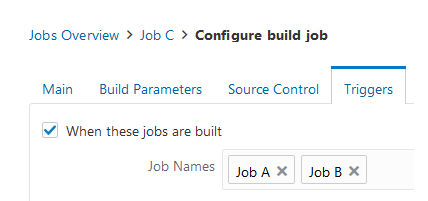
  4. If the When these jobs are built check box is selected, note the name of the upstream jobs, and follow these steps.

    For example, you have a Job C that is triggered when Job A and Job B are built:

    Triggers tab
    1. Switch to the browser with the target project.
    2. On the Builds page, click the Pipelines tab.
    3. Click + Create Pipeline.
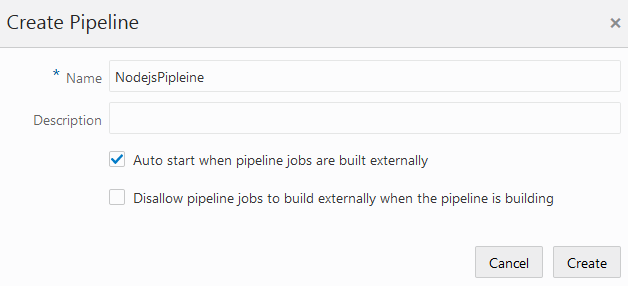
    4. In the Create Pipeline dialog box, enter a name and a description.

      Example:

      Create Pipeline dialog box

      If you want trigger the pipeline's build if a job of the pipeline is triggered externally (outside the pipeline), leave the select the Auto start when pipeline jobs are build externally check box selected. To disable manual or automatic builds of the jobs that are part of the pipeline when the pipeline is running, select the Disallow pipeline jobs to build externally when the pipeline is building check box.

    5. Click Create.
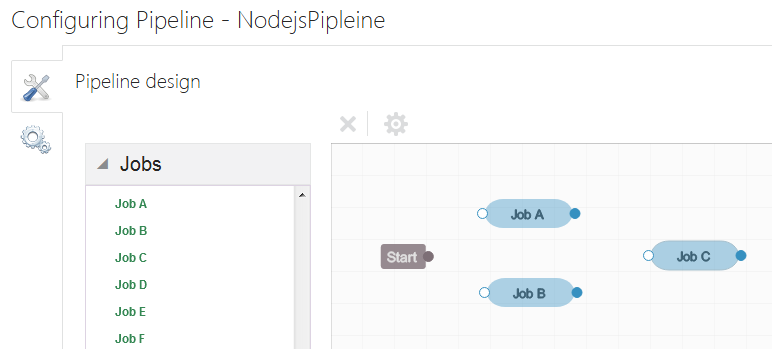
    6. In the Pipeline Design tab, from the left list, drag-and-drop the upstream jobs to the designer area. Then, drag-and-drop the job you opened in Step 2 to the designer area.

      Example:

      Pipeline Designer
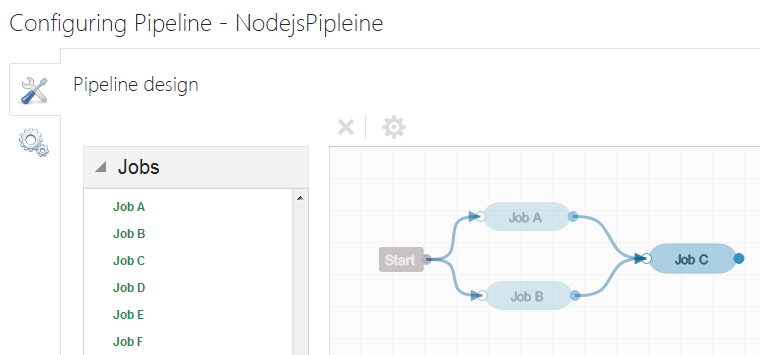
    7. Design the dependencies.

      Example:

      Pipeline Designer with dependencies
    8. Click Save.
  5. Switch to the browser with the source job.
  6. Click the Post Build tab.
  7. If the Build other jobs check box is selected, note the names of the downstream jobs, and follow these steps.

    For example, you have a Job C that triggers Job D and Job E:

    Post Builds tab
    1. Switch to the browser with the target project.
    2. On the Builds page, click the Pipelines tab.
    3. Click + Create Pipeline.
    4. In the Create Pipeline dialog box, enter a name and a description.

      Example:

      Create Pipeline dialog box

      If you want trigger the pipeline's build if a job of the pipeline is triggered externally (outside the pipeline), leave the select the Auto start when pipeline jobs are build externally check box selected. To disable manual or automatic builds of the jobs that are part of the pipeline when the pipeline is running, select the Disallow pipeline jobs to build externally when the pipeline is building check box.

    5. Click Create.
    6. In the Pipeline Design tab, from the left list, drag-and-drop the job you opened in Step 2 to the designer area. Then, drag-and-drop the downstream jobs to the designer area.

      Example:

      Pipeline Designer
    7. Design the dependencies.

      Example:

      Pipeline Designer with dependencies
    8. Click Save.
If a job has both upstream and downstream jobs, then instead of creating another pipeline for the upstream jobs, you can use the pipeline you created for downstream jobs and extend it. In the Pipelines tab, for the pipeline you created for downstream jobs, click Configure Configure and design the diagram.

For example, if you've a job (Job C) with upstream jobs (Job A and Job B) and downstream jobs (Job D and Job E):

Dependencies defined in the source job

Then, design a pipeline diagram like this:

Upstream and Downstream dependencies
Run a Build of a Job or a Pipeline
To run a build of the target job, open the job's details page and click Build Now.
To run a build of a pipeline, in the Pipelines tab, click Build Build.
After a build runs, open the job's details page and click the report icons to view the build reports. See View a Job’s Builds and Reports in Using Oracle Developer Cloud Service.

Docker Registries

Follow these steps to migrate Docker registries:

  1. In the source and target projects, follow these steps:
    1. In the navigation bar, click Project Administration Gear.
    2. Click Repositories.
    3. Expand Docker Repositories.
  2. Repeat these steps to migrate each Docker registry:
    1. In the source project, gather information about a Docker registry.
    2. In the target project, add the Docker registry.
  3. After migrating all Docker registries, with the Repositories page open in both source and target projects, verify that registries in the target project match the source project.
Gather Information About a Linked Docker Registry From the Source Project

Source DevCS Perform these steps in the source project.

  1. Switch to the browser with the source project.
  2. In Docker Repositories, note the linked Docker registry's name, URL, description, and authentication.
    Click Menu the Menu icon of the registry and select Edit. Copy the required details from the Edit Registry dialog box.

    If a registry is private, get its access credentials too. The password (or the auth token) is not visible in the dialog box.

    Example:

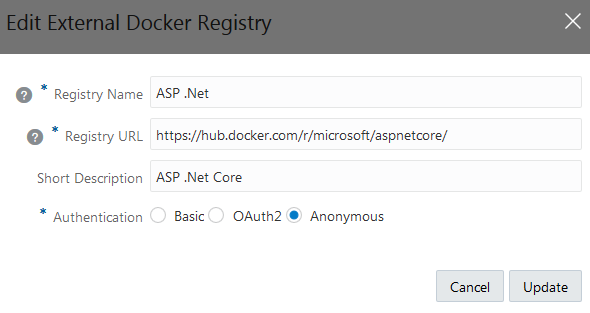
    Edit Registry dialog

    This table shows the Name, Description, URL, and Authentication values from the above image.

    Field Value
    Registry Name ASP.Net
    Registry URL https://hub.docker.com/r/microsoft/aspnetcore/
    Short Description ASP .Net Core
    Authentication Anonymous
Link Docker Registries in the Target Project

Target DevCS Perform these steps in the target project.

  1. Get the details of the Docker registry from the source project. You'll use the information to add the Docker registry in the target project.

    Example:

    Field Value
    Registry Name ASP.Net
    Registry URL https://hub.docker.com/r/microsoft/aspnetcore/
    Short Description ASP .Net Core
    Authentication Anonymous
  2. Switch to the browser with the target project.
  3. In Docker Registries, click + Link External Registry.
  4. In Registry Name and Short Description, enter the Docker registry name and a description.
  5. In Registry URL, enter the URL of the Docker registry.
  6. In Authentication, select the authentication type.
  7. Click Create.
  8. In the navigation bar, click Docker Docker Registry
  9. Browse and verify that you can access the repositories and images of the linked Docker registry.

Maven Artifacts

You might have several artifacts in the source project's Maven repository, such as dependencies and build artifacts. To migrate them, you'll need to note details of each artifact, download it, and then upload it again in the target project. You may choose not to migrate build artifacts stored in the Maven repository of the source project as you can generate and archive them by running a build in the target project.

Follow these steps to migrate Maven artifacts:

  1. In the source and target projects,, in the navigation bar, click Maven Maven.
  2. Repeat these steps to migrate each Maven artifact:
    1. In the source project, gather information about a Maven artifact and download it to your computer.
    2. In the target project, upload the Maven artifact.
  3. After migrating all Maven artifacts, with the Maven page open in both source and target projects, verify that artifacts in the target project match the source project.
  4. In the source and target projects, follow these steps:
    1. In the navigation bar, click Project Administration Gear.
    2. Click Repositories.
  5. Note the Maven auto-cleanup and overwrite settings of the source project and make the same settings in the target project.
  6. After migrating all Maven settings, with the Repositories page open in both source and target projects, verify that Maven settings in the target project match the source project.
Gather Information About a Maven Artifact From the Source Project

Source DevCS Perform these steps in the source project.

  1. Switch to the browser with the source project.
  2. On the right side of the page, click Browse.
  3. Browse and select the artifact.
  4. From the Artifact Details section on the right, note the artifact's name, path, group ID, artifact ID, and version number.
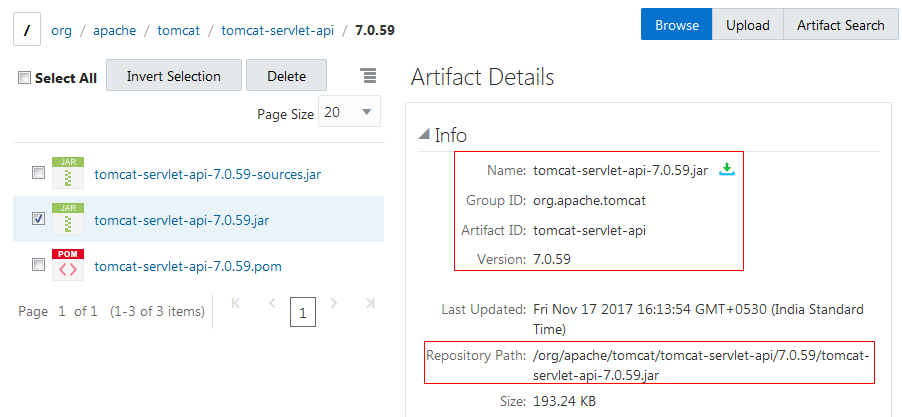
    Example:
    Maven artifact

    This table shows the Artifact Name, Path, Group ID, Artifact ID, and Version Number values from the above image.

    Field Value
    Name tomcat-servlet-api-7.0.59.jar
    Path /org/apache/tomcat/tomcat-servlet-api/7.0.59
    Group ID org.apache.tomcat
    Artifact ID tomcat-servlet-api
    Version Number 7.0.59
  5. Click Download Download.
Upload Maven Artifacts in the Target Project

Target DevCS Perform these steps in the target project.

  1. Get the details of the Maven artifact from the source project. You'll use the information to upload the artifact in the target project.
    Example:
    Field Value
    Name tomcat-servlet-api-7.0.59.jar
    Path /org/apache/tomcat/tomcat-servlet-api/7.0.59
    Group ID org.apache.tomcat
    Artifact ID tomcat-servlet-api
    Version Number 7.0.59
  2. Switch to the browser with the target project.
  3. On the right side of the Maven page, click Upload.
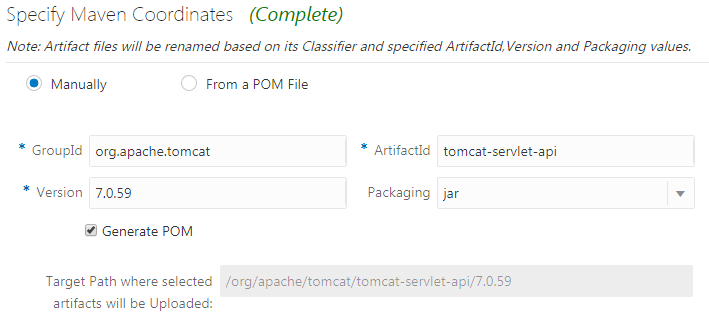
  4. In the Upload Artifacts section, add the artifact to upload, and specify its Maven coordinates (Group ID, Artifact ID, and version number) that you noted.
    Some fields might get populated automatically when you add the artifact in the Upload section. Make sure the path of the uploaded artifact is the same as you noted.

    Example:

    Maven coordinates in the Upload Maven artifacts page
  5. Click Start Upload.
  6. After uploading, verify the path of the uploaded artifact is same as you noted in the source project.
Gather Information About Maven Administration Settings From the Source Project

Source DevCS Perform these steps in the source project.

  1. Switch to the browser with the source project.
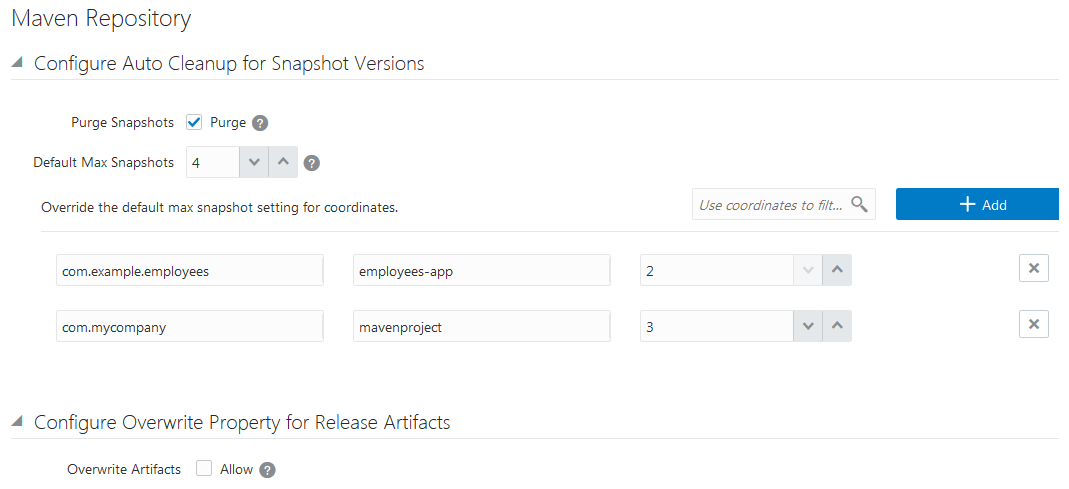
  2. In Maven Repository, expand Configure auto cleanup for Snapshot versions and Configure Overwrite Property for Release Artifacts, and note their field values.

    Example:

    Maven settings

    This table shows the Field and Value values from the above image.

    Field Value
    Purge Snapshots Selected
    Default Max Snapshots 4
    Customized Snapshot Counts

    Snapshot 1:

    • GroupID: com.example.employees
    • ArtifactID: employees-app
    • Snapshot Count: 2

    Snapshot 2:

    • GroupID: com.mycompany
    • ArtifactID: mavenproject
    • Snapshot Count: 3
    Overwrite Artifacts Not selected
Configure Maven Administration Settings in the Target Project

Target DevCS Perform these steps in the target project.

  1. Get the details of Maven administration settings from the source project. You'll use the information to configure Maven admin settings in the target project.
    Example:
    Field Value
    Purge Snapshots Selected
    Default Max Snapshots 4
    Customized Snapshot Counts

    Snapshot 1:

    • GroupID: com.example.employees
    • ArtifactID: employees-app
    • Snapshot Count: 2

    Snapshot 2:

    • GroupID: com.mycompany
    • ArtifactID: mavenproject
    • Snapshot Count: 3
    Overwrite Artifacts Not selected
  2. Switch to the browser with the target project.
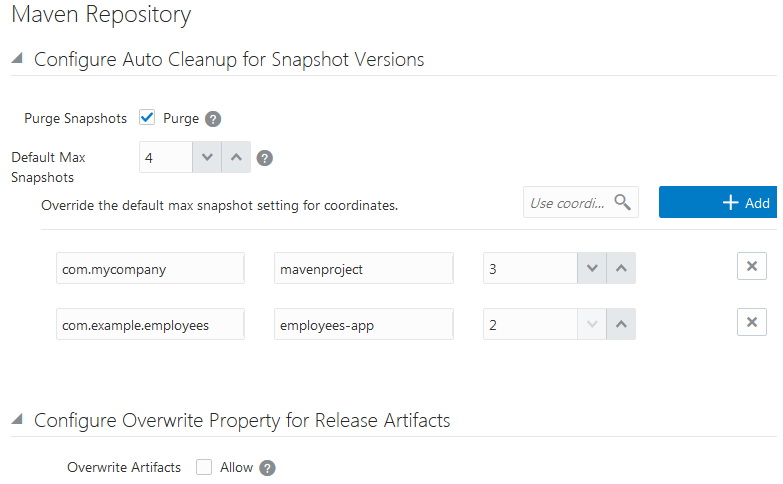
  3. In Maven Repository, expand Configure auto cleanup for Snapshot versions and Configure Overwrite Property for Release Artifacts.
  4. Set the fields of both sections as noted in the table.

    Example:

    Maven settings in the project administration page

Environments

Follow these steps to migrate environments and its service instances:

  1. In the source and target projects, in the navigation bar, click Environments Environments.
  2. Repeat these steps to migrate each environment:
    1. In the source project, gather information about an environment and its service instances.
    2. In the target project, create the environment and add its service instances.
  3. After migrating all environments, with the Environments page open in both source and target projects, verify that environments in the target project match the source project.
Gather Information About an Environment and Service Instances From the Source Project

Source DevCS Perform these steps in the source project.

  1. Switch to the browser with the source project.
  2. On the Environments page, from the left list, select the environment.
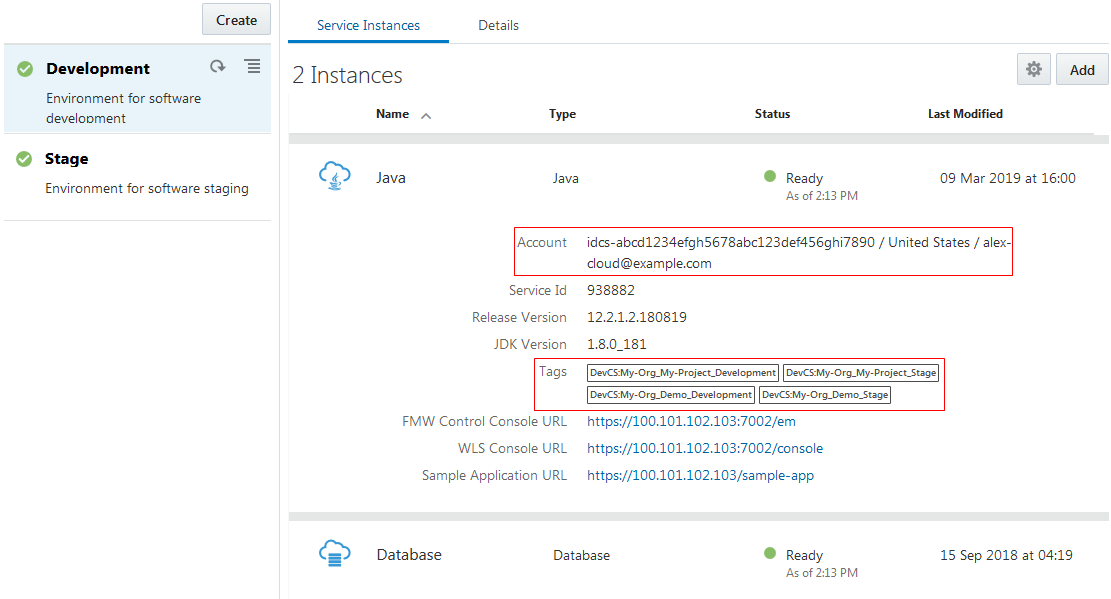
  3. Note the account and tags of each service instance of the environment.

    Example:

    Environments

    This table shows the Environment Name, Description, Service Instance, Account, and Tags values from the above image.

    Environment Name Description Service Instance Account Tags
    Development Environment for software development Java idcs-abcd1234efgh5678abc123def456ghi7890 / United States / alex-cloud@example.com DevCS:My-Org_My-Project_Development, DevCS:My-Org_My-Project_Stage, DevCS:My-Org_Demo_Development, DevCS:My-Org_Demo_Stage
        Database idcs-abcd1234efgh5678abc123def456ghi7890 / United States / alex-cloud@example.com DevCS:My-Org_My-Project_Development, DevCS:My-Org_My-Project_Stage, DevCS:My-Org_Demo_Development, DevCS:My-Org_Demo_Stage
Create an Environment and Add Service Instances in the Target Project

Target DevCS Perform these steps in the target project.

  1. Get the details of the environment from the source project.. You'll use the information to create the environment and add its service instances to them in the target project.
    Example:
    Environment Name Description Service Instance Account Tags
    Development Environment for software development Java idcs-abcd1234efgh5678abc123def456ghi7890 / United States / alex-cloud@example.com DevCS:My-Org_My-Project_Development, DevCS:My-Org_My-Project_Stage, DevCS:My-Org_Demo_Development, DevCS:My-Org_Demo_Stage
        Database idcs-abcd1234efgh5678abc123def456ghi7890 / United States / alex-cloud@example.com DevCS:My-Org_My-Project_Development, DevCS:My-Org_My-Project_Stage, DevCS:My-Org_Demo_Development, DevCS:My-Org_Demo_Stage
  2. Switch to the browser with the target project.
  3. On the Environments page, click Create (or Create Environment if the page is empty).
  4. In Environment Name, enter the name of the environment. In Description, enter the description.
  5. Click Create.
  6. In the Service Instances tab, click Add.
  7. Add the relevant service instances listed in the table from the appropriate identity domain. Make sure you specify the same tag names as applied to the service instance in the source DevCS project.

    To add instances from an identity domain other than the one you are currently connected to, click Edit at the top of the Add Service Instances dialog box.

Deployment Configurations

Follow these steps to migrate deployment configurations:

  1. In the source and target projects, in the navigation bar, click Deployments Deployments.
  2. Repeat these steps to migrate each deployment configuration:
    1. In the source project, gather information about a deployment configuration and its target.
    2. In the target project, create and configure the deployment configuration.
  3. After migrating all deployment configurations, with the Deployments page open in both source and target projects, verify that deployment configurations in the target project match the source project.
Gather Information About a Deployment Configuration From the Source Project

Source DevCS Perform these steps in the source project.

  1. Switch to the browser with the source project.
  2. Select the deployment configuration's tile.
  3. In the deployment configuration's tile, mouse over Settings Gear and select Edit Configuration.
  4. Note the application name, configuration name, status, deployment target, type, job, and artifact.

    Example:

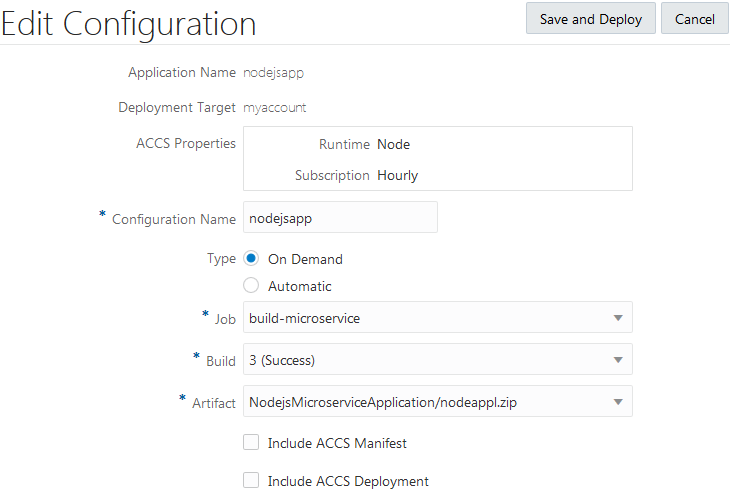
    Edit Deployment Configuration

    This table shows the Application Name, Deployment Target, Configuration Name, Status, Deployment Target, Type, Job, Build, and Artifact values from the above image.

    Field Value
    Application Name nodejsapp
    Configuration Name nodejsapp
    Deployment Target myaccount
    Type On Demand
    Job build-microservice
    Build 3
    Artifact NodejsMicroserviceApplication/nodeappl.zip
    Additional Info ACCS Properties

    Runtime: Node

    Subscription: Hourly

Create a Deployment Configuration in the Target Project

Target DevCS Perform these steps in the target project.

  1. Get the details of the deployment configuration from the source project. You'll use the information to create a deployment configuration in the target project.
    Example:
    Field Value
    Application Name nodejsapp
    Configuration Name nodejsapp
    Deployment Target myaccount
    Type On Demand
    Job build-microservice
    Build 3
    Artifact NodejsMicroserviceApplication/nodeappl.zip
    Additional Info ACCS Properties

    Runtime: Node

    Subscription: Hourly

  2. Switch to the browser with the target project.
  3. On the Build page, ensure that build job and build artifact required by deployment configuration exist in the project.
    If it doesn't exist, then run a build of the deployment configuration's job to generate the build artifact.
  4. On the Deployments page, click + Create Configuration.
  5. In Configuration Name, enter the configuration name you noted. By default, the same name is used by Application Name, however you can modify it.
  6. In Deployment Target, click New, and create the deployment target.
    You'll need credentials of a user who can access the target service instance.
  7. In Type, select the deployment type.
  8. In Job, Build, and Artifact, specify the job, build, and artifact to deploy to the target service.
  9. Click Save.
  10. Return to the Deployments page. In the deployment configuration's tile, mouse over Settings Gear and select Deploy or Redeploy.
    If the deployment fails, check the configuration again.

Webhooks

Follow these steps to migrate webhooks:

  1. In the source and target projects, follow these steps:
    1. In the navigation bar, click Project Administration Gear.
    2. Click Webhooks.
  2. Repeat these steps to migrate each webhook:
    1. In the source project, gather information about a webhook.
    2. In the target project, create and configure the webhook.
  3. After migrating all webhooks, with the Webhooks page open in both source and target projects, verify that webhooks in the target project match the source project.
Gather Information About a Webhook From the Source Project

Source DevCS Perform these steps in the source project.

  1. Switch to the browser with the source project.
  2. On the Webhooks page, in the left list, select the webhook and note the type and values of its fields. The webhook type is displayed as the title.
    Example:
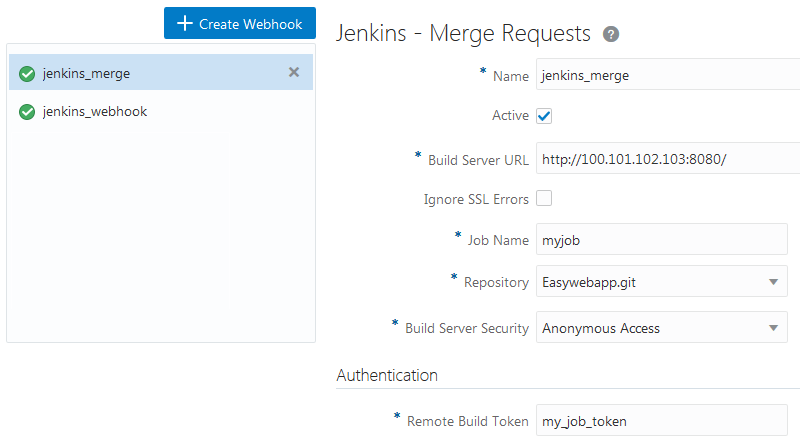
    Webhook

    This table shows the webhook's fields and its values from the above image.

    Field Value
    Webhook Type Jenkins - Merge Requests
    Name jenkins_merge
    Active Selected
    Build Server URL http://100.101.102.103:8080/
    Ignore SSL Errors Not selected
    Job Name myjob
    Repository Easywebapp.git
    Build Server Security Anonymous Access
    Remote Build Token my_job_token
Create a Webhook in the Target Project

Target DevCS Perform these steps in the target project.

  1. Get the details of the webhook from the source project. You'll use the information to create the webhook in the target project.
    Example:
    Field Value
    Webhook Type Jenkins - Merge Requests
    Name jenkins_merge
    Active Selected
    Build Server URL http://100.101.102.103:8080/
    Ignore SSL Errors Not selected
    Job Name myjob
    Repository Easywebapp.git
    Build Server Security Anonymous Access
    Remote Build Token my_job_token
  2. Switch to the browser with the target project.
  3. On the Webhooks page, click Webhooks.
  4. Click + Create Webhook.
  5. In Type, select the webhook type.
  6. In other fields, enter the values you noted.
  7. When you're done, click Create.
  8. On the Webhooks page, select the webhook, and click Test.
    If the test fails, reconfigure the webhook.

Template Definition

If the source project is a template, then to migrate its template variables and rules, you'll need to add them manually to the new project.

Follow these steps to migrate a project's template definition:

  1. In the source and target projects, follow these steps:
    1. In the navigation bar, click Project Administration Gear.
    2. Click Properties.
  2. In the source project, gather information about the project's template definition.
  3. In the target project, configure the template definition.
Gather Information About the Source Project's Template Definition

Source DevCS Perform these steps in the source project.

  1. Switch to the browser with the source project.
  2. In the Template section of the Properties page, click Edit.
  3. Note the project's title, description, and visibility. If there's an icon, right-click the icon, save it to your computer, and note the path of the icon on your computer.

    Example:

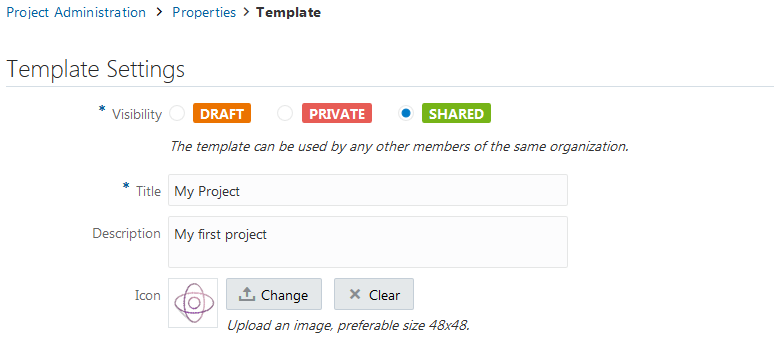
    Template Definition

    This table shows the Title and Visibility values from the above image. Also, note the icon's path.

    Field Value
    Visibility Shared
    Title My Project
    Description My first project
    Icon path on your computer D:\Images\Demo\demo_icon.png
  4. For each variable in the Variables section, click Edit Edit icon and note the name, display name, and values of the variable.

    Example:

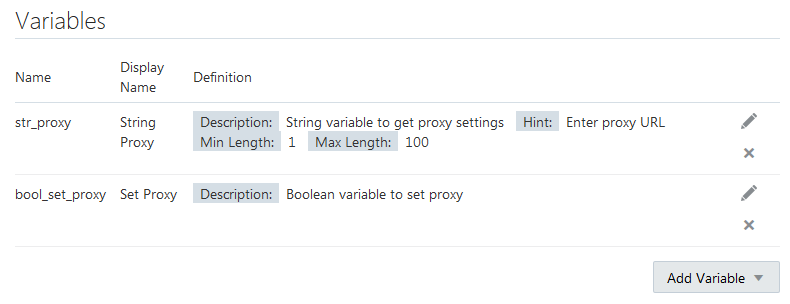
    Variables

    This table shows the Name, Display Name, Description, and Definition values from the above image.

    Name Display Name Description Definition
    str_proxy String Proxy String variable to get proxy settings

    Hint: Enter proxy URL

    Min Length: 1

    Max Length: 100

    bool_set_proxy Set Proxy Boolean variable to set proxy

    True Constant: true

    False Constant: false

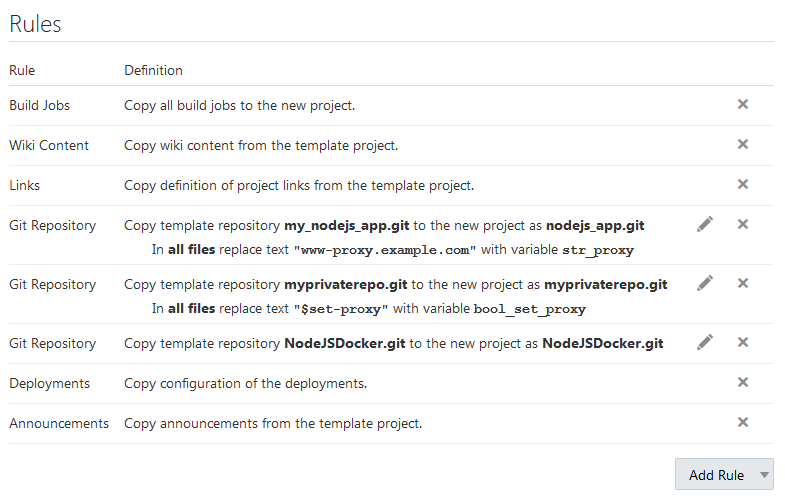
  5. For each rule in the Rules section, note its name and definition. For each Git repository, click Edit Edit icon and note the source repository name, the target repository name, and the replacement rules (if any).

    Example:

    Template Rules

    This table shows the Rule, Definition, and Additional Notes values from the above image.

    Rule Definition Additional Notes
    Build Jobs Copy all build jobs to the new project.  
    Wiki Content Copy wiki content from the template project.  
    Links Copy definition of project links from the template project.  
    Git Repository Copy template repository my_nodejs_app.git to the new project as nodejs_app.git

    Source Repository: my_nodejs_app.git

    Repository Name: nodejs_app.git

    Use target project name check box: Not selected

    Replacements:
    • In: All Files
    • Replace: www-proxy.example.com
    • With: Variable
    • variable value: str_proxy
    Git Repository Copy template repository myprivaterepo.git to the new project as myprivaterepo.git

    Source Repository: myprivaterepo.git

    Repository Name: myprivaterepo.git

    Use target project name check box: Not selected

    Replacements:
    • In: All Files
    • Replace: $set-proxy
    • With: Variable
    • variable value: bool_set_proxy
    Git Repository Copy template repository NodeJSDocker.git to the new project as NodeJSDocker.git

    Source Repository: NodeJSDocker.git

    Repository Name:NodeJSDocker.git

    Use target project name check box: Not selected

    Deployments Copy configuration of the deployments.  
    Announcements Copy announcements from the template project.  
Define the Target Project as a Template

Target DevCS Perform these steps in the target project.

  1. Get the details of the template from the source project. You'll use the information to define the project as a template.
    Example:
    Field Value
    Visibility Shared
    Title My Project
    Description My first project
    Icon path on your computer D:\Images\Demo\demo_icon.png

    Get the details of variables from the source project.

    Name Display Name Description Definition
    str_proxy String Proxy String variable to get proxy settings

    Hint: Enter proxy URL

    Min Length: 1

    Max Length: 100

    bool_set_proxy Set Proxy Boolean variable to set proxy

    True Constant: true

    False Constant: false

    Get the details of rules from the source project.

    Rule Definition Additional Notes
    Build Jobs Copy all build jobs to the new project.  
    Wiki Content Copy wiki content from the template project.  
    Links Copy definition of project links from the template project.  
    Git Repository Copy template repository my_nodejs_app.git to the new project as nodejs_app.git

    Source Repository: my_nodejs_app.git

    Repository Name: nodejs_app.git

    Use target project name check box: Not selected

    Replacements:
    • In: All Files
    • Replace: www-proxy.example.com
    • With: Variable
    • variable value: str_proxy
    Git Repository Copy template repository myprivaterepo.git to the new project as myprivaterepo.git

    Source Repository: myprivaterepo.git

    Repository Name: myprivaterepo.git

    Use target project name check box: Not selected

    Replacements:
    • In: All Files
    • Replace: $set-proxy
    • With: Variable
    • variable value: bool_set_proxy
    Git Repository Copy template repository NodeJSDocker.git to the new project as NodeJSDocker.git

    Source Repository: NodeJSDocker.git

    Repository Name:NodeJSDocker.git

    Use target project name check box: Not selected

    Deployments Copy configuration of the deployments.  
    Announcements Copy announcements from the template project.  
  2. Switch to the browser with the target project.
  3. In the Template section of the Properties page, click Define Template.
  4. Click Edit.
  5. In Visibility, set the template's visibility.
  6. In Variables, define the variables.
    For each variable to add, from the Add Variable menu, select the variable type. Fill in the fields of the variable and click Save Save Changes.
  7. In the Rules section, define the rules.
  8. Click Save.

Announcements

Follow these steps to migrate announcements:

  1. In the source and target projects, follow these steps:
    1. In the navigation bar, click Project Administration Gear.
    2. Click Announcements.
  2. Repeat these steps to migrate each announcement:
    1. In the source project, gather information about an announcement.
    2. In the target project, create and configure the announcement.
  3. After migrating all announcements, with the Announcements page open in both source and target projects, verify that announcements in the target project match the source project.
Gather Information About an Announcement From the Source Project

Source DevCS Perform these steps in the source project.

  1. Switch to the browser with the source project.
  2. On the Announcements page, in the left list, select the announcement and note its name, active status, and content. If there's an icon, right-click the icon, save it to your computer, and note the path of the icon on your computer.

    Example:

    Announcements

    This table shows the Announcement Name, Active, Content, and Icon values from the above image.

    Field Value/Status
    Announcement Name Next Team Meeting
    Active Selected
    Content January 24, 2019
    Icon's path on your computer D:\Announcements\team_icon.png
Create an Announcement in the Target Project

Target DevCS Perform these steps in the target project.

  1. Get the details of the announcement from the source project. You'll use the information to create the announcement in the target project
    Example:
    Field Value/Status
    Announcement Name Next Team Meeting
    Active Selected
    Content January 24, 2019
    Icon's path on your computer D:\Announcements\team_icon.png
  2. Switch to the browser with the target project.
  3. On the Announcements page, click + New Announcement.
  4. In Name and Contents, enter the name and the announcement’s text.
  5. Upload the icon's image, if there was an icon associated with the announcement in the source project.
  6. Click Create.
  7. In the navigation bar, click Project Home Project Home.
  8. Above the activities feed, verify the announcement.

RSS/ATOM Feeds

Follow these steps to migrate RSS/ATOM feeds:

  1. In the source and target projects, follow these steps:
    1. In the navigation bar, click Project Administration Gear.
    2. Click RSS/ATOM Feeds.
  2. Repeat these steps to migrate each RSS/ATOM feed:
    1. In the source project, gather information about a feed.
    2. In the target project, create and configure the feed.
  3. After migrating all feeds, with the RSS/ATOM Feeds page open in both source and target projects, verify that feeds in the target project match the source project.
Gather Information About a RSS/ATOM Feed From the Source Project

Source DevCS Perform these steps in the source project.

  1. Switch to the browser with the source project.
  2. On the RSS/ATOM Feeds page, in the left list, select a feed and note its name, active status, URL, display type, and fetch interval.

    Example:

    RSS/ATOM Feeds

    This table shows the Feed Name, Active, URL, Display Type, and Fetch Interval values from the above image.

    Field Value/Status
    Feed Name Oracle Corporate News
    Active Yes
    URL http://www.oracle.com/ocom/groups/public/@ocom/documents/webcontent/196280.xml
    Display Type ATOM/RSS
    Fetch Interval 1 day
Add a RSS/ATOM Feed in the Target Project

Target DevCS Perform these steps in the target project.

  1. Get the details of the RSS/ATOM feeds from the source project. You'll use the information to create RSS/ATOM feeds in the target project.
    Example:
    Field Value/Status
    Feed Name Oracle Corporate News
    Active Yes
    URL http://www.oracle.com/ocom/groups/public/@ocom/documents/webcontent/196280.xml
    Display Type ATOM/RSS
    Fetch Interval 1 day
  2. Switch to the browser with the target project.
  3. On the RSS/ATOM Feeds page, click + New Handler.
  4. In Name, enter the name of the handler.
  5. In URL, enter the URL of the feed.
  6. In Display Type, select the feed’s display type.
  7. In Fetch Interval, enter the feed’s fetch interval.
  8. Click Create.
  9. On the RSS/ATOM Feeds page, select the feed, and click Test.
    If the test fails, reconfigure the RSS/ATOM feed.
  10. In the navigation bar, click Project Home Project Home.
  11. In the activities feed, verify the feed's results.

Custom Link Rules

You don't need to migrate the default link rules as they are available in the target project.

Follow these steps to migrate link rules:

  1. In the source and target projects, follow these steps:
    1. In the navigation bar, click Project Administration Gear.
    2. Click Links.
  2. Repeat these steps to migrate each link rule:
    1. In the source project, gather information about a rule.
    2. In the target project, create and configure the link rule.
  3. After migrating all link rules, with the Links page open in both source and target projects, verify that link rules in the target project match the source project.
Gather Information About a Link Rule From the Source Project

Source DevCS Perform these steps in the source project.

  1. Switch to the browser with the source project.
  2. On the Links page, in the left list, select a custom rule and note its name, active status, pattern, ignore case status, and URL. Ignore the default link rules.

    Example:

    Link rules

    This table shows the Rule Name, Active Status, Pattern, Ignore Case, and URL values from the above image.

    Field Value/Status
    Rule Name Custom_JIRA
    Active Status Yes
    Pattern \b(?:JIRA-)\s?(\d{1,7})\b
    Ignore Case Selected
    URL https://jira.mycorp.com/jira/browse/$1
Create a Link Rule in the Target Project

Target DevCS Perform these steps in the target project.

  1. Get the details of a link rule from the source project. You'll use the information to create a link rule in the target project.
    Example:
    Field Value/Status
    Rule Name Custom_JIRA
    Active Status Yes
    Pattern \b(?:JIRA-)\s?(\d{1,7})\b
    Ignore Case Selected
    URL https://jira.mycorp.com/jira/browse/$1
  2. Switch to the browser with the target project.
  3. On the Links page, click + Create Link.
  4. In Name, enter a name.
  5. Deselect the Active check box, if it wasn't selected in the source project.
  6. In Pattern, enter the RegExp link rule pattern.
  7. In URL, enter the link URL.
  8. Deselect the Ignore Case check box, if it was in the source project.
  9. Expand Test and in Test Value, enter a test value. Verify the result link in Test Result.
  10. Click Create.

Remove Your Membership or Ownership

Before you exported the source project's data, you noted whether you're a member or an owner of the project. If you were not a member or owner, you assigned the project's ownership to yourself. See Gather Information About a Project From the Source DevCS Instance.

After migrating all artifacts of the source project to the target project, if you were not a member or an owner of the source project, you should remove your membership or ownership of the target project.

Target DevCS Perform these steps in the target project.

  1. Get the details of of the source project's ownership and membership.

    Example:

    Field Value
    Project Name Demo Project
    Are you a Member? No
    Are you an Owner? No
  2. Open the target project.
  3. In the navigation bar, click Project Home Project Home.
  4. Click the Team tab.
  5. If you were a member but not an owner of the source project, then for your username, click Demote to Member the Demote to Member icon.
  6. If you were not a member or an owner of the source project, then for your username, click Remove the remove icon.

Migrate User Preferences

After migrating a project's artifacts and adding team members, ask each user to sign in to DevCS and set their user preferences and project preferences.

User Preferences

To migrate your DevCS user preferences, note them in the source DevCS instance and set them again in the target DevCS instance.

User preferences include their display name, email address, and email notification preferences.

  1. In the source and target DevCS instances, click the user avatar, and select Preferences.
  2. In the source DevCS instance, gather information about your preferences.
  3. In the target project, set them again.
  4. After setting preferences, with the User Preferences tab open in both source and target DevCS instances, verify that your preferences in the target project match the source project.
Gather Information About Your User Preferences From the Source DevCS Instance

DevCS in OCI Classic Perform these steps in the source DevCS instance.

  1. Switch to the browser with the source DevCS instance.
  2. On the User Preferences, click the Profile tab.
  3. Note the values of First Name, Last Name, and Email Address.

    Example:

    Field Value/Status
    First Name Alex
    Last Name Admin
    Email Address alex.admin@example.com
  4. Click the Notifications tab.
  5. Note the selected check boxes only.

    Example:

    Field Value/Status
    First Name Alex
    Last Name Admin
    Email Address alex.admin@example.com
    Selected check boxes in Notifications
    • Issue updates, attachments, and comments
    • Merge Request updates and comments
    • Build activities
    • SCM/Push activities
Set User Preferences in the Target DevCS Instance

DevCS in OCI Perform these steps in the target DevCS instance.

  1. Get the details of the user preferences from the source DevCS instance.

    Example:

    Field Value/Status
    First Name Alex
    Last Name Admin
    Email Address alex.admin@example.com
    Selected check boxes in Notifications
    • Issue updates, attachments, and comments
    • Merge Request updates and comments
    • Build activities
    • SCM/Push activities
  2. Switch to the browser with the target DevCS instance.
  3. On the User Preferences, click the Profile tab.
  4. Set the name and email address. Changing the name and email address doesn't change your account's name and email, but the display name and display email address on DevCS pages.
  5. Click the Notifications tab.
  6. Select the check boxes that were selected in the source DevCS instance.
  7. Click the Authentication tab.
  8. Add the public key of the SSH private-public key pair. You must upload the public key to access a Git repository via SSH.
    If you don't have a key pair, generate it. See Generate an SSH Key in Using Oracle Developer Cloud Service.

    If you don't plan to use SSH to access a Git repository, ignore this step.

Project Preferences

To migrate your project preferences, note them in the source project and set them again in the target project.

Project preferences include favorite Git repositories and Agile boards, and the watch settings of branches and jobs.

Git Repositories and Branches
  1. In the source and target projects, follow these steps:
    1. In the navigation bar, click Project Home Project Home.
    2. Click the Repositories tab.
  2. Switch to the browser with the source project.
  3. Note the repositories marked as your favorite. You can identify them with the Favorite icon icon.
  4. Switch to the browser with the target project.
  5. In the Repositories tab, click the Favorite the Star iconicon of the repository to mark it as your favorite.
  6. In the source and target projects, follow these steps:
    1. In the navigation bar, click Git Git.
    2. Click the Refs tab.
  7. Switch to the browser with the source project.
  8. For each repository in the Repositories list, note the branches you watch. They are marked with the Subscribed the check mark icon.
  9. Switch to the browser with the target project.
  10. In the Refs tab, select the repository and click cc in the branch to watch it.
Jobs
In the source and target projects, open the Builds page and repeat these steps for each job in the source project:
  1. Switch to the browser with the source project.
  2. Click the job's name to open it.
  3. If CCme is CCed, click it and note the states of check boxes in the CC Me dialog box. Click Cancel. Then, follow these steps in the target project:
    1. Switch to the browser with the target project.
    2. Open the same job.
    3. Click CCme. In the CC Me dialog box, select the check boxes as noted, and click OK.
    4. Switch to the browser with the source project.
Agile Boards
  1. In the source and target projects, in the navigation bar, click Boards Boards.
  2. Switch to the browser with the source project.
  3. Note the boards marked as your favorite. You can identify them with the Favorite icon icon.
  4. Switch to the browser with the target project.
  5. For the boards marked as favorite in the source project, click the Favorite the Star iconicon to mark it as your favorite.