Send Notifications to External Software Using Webhooks

Using Webhooks, you can send notifications to remote services and applications about Oracle Developer Cloud Service (DevCS) events such as a Git push, an issue update, a merge request update, or a build completion.

When you create a webhook, you specify a webhook provider. When an event occurs and the webhook triggers, the webhook provider processes the event, sets the properties used to generate the HTTP request, and dispatches the HTTP request to the target service.

the project owner icon You must be assigned the project Owner role to create and configure a webhook.

Slack

Slack is a cloud based team collaboration software. Using a Slack Webhook, you can configure DevCS to send events and activities notifications to a Slack channel. To find more about Slack, see https://slack.com/.

To send notification to a Slack channel, get its incoming webhook URL. Then, create a DevCS webhook and add the incoming webhook URL to the webhook.

Get the Slack Channel’s Incoming Webhook URL

You must be the workspace owner to get the incoming webhook URL.
  1. Open the Slack workspace in a web browser or the Slack app.

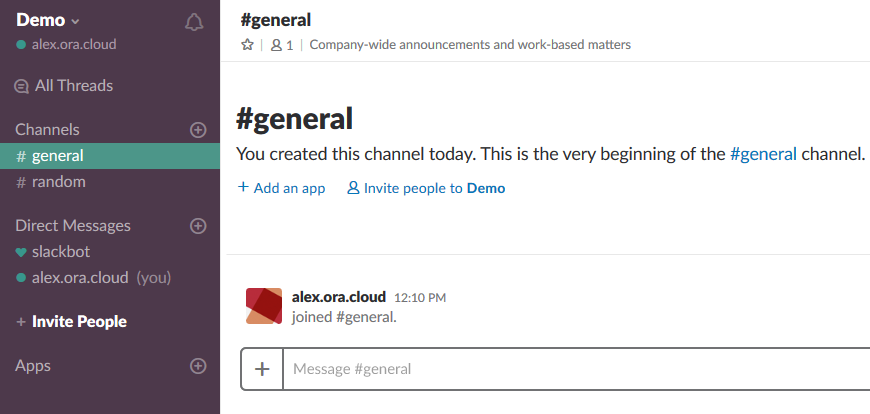
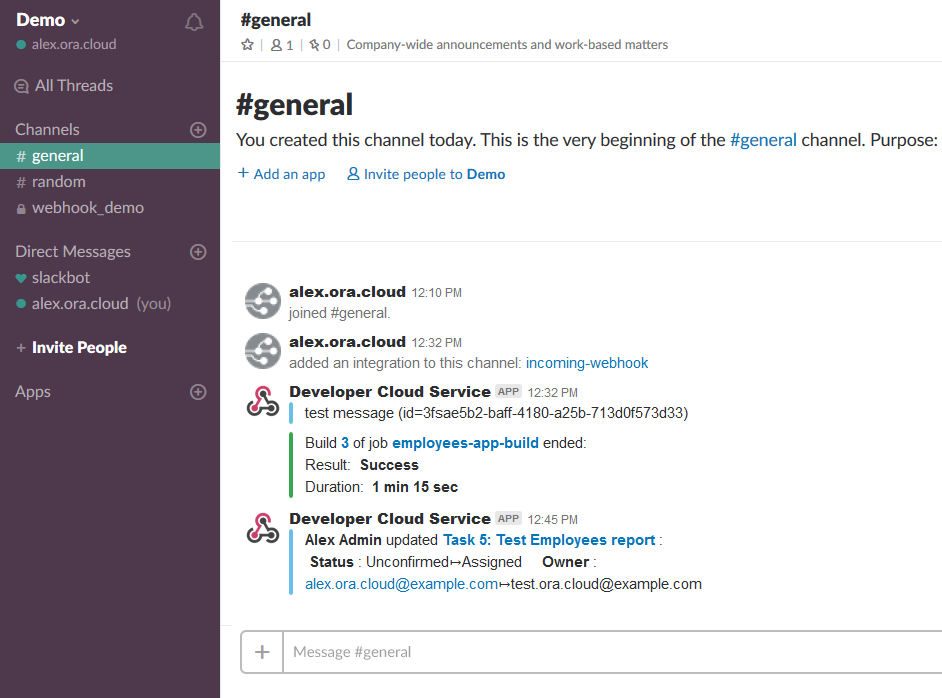
    For example, this image shows a Slack workspace called Demo.

    Description of slack_general.png follows
    Description of the illustration slack_general.png
  2. In the left navigation bar, click Apps.
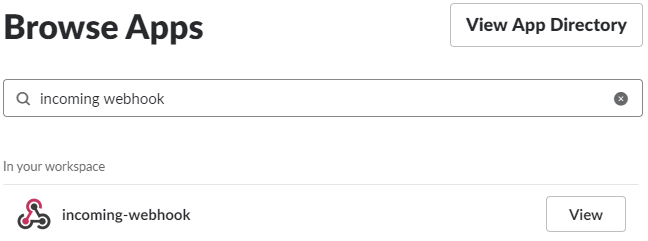
  3. In the search box on the Browse Apps page, enter incoming webhook.
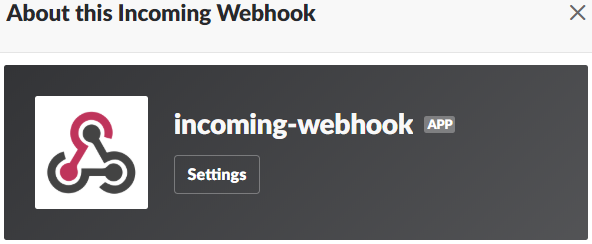
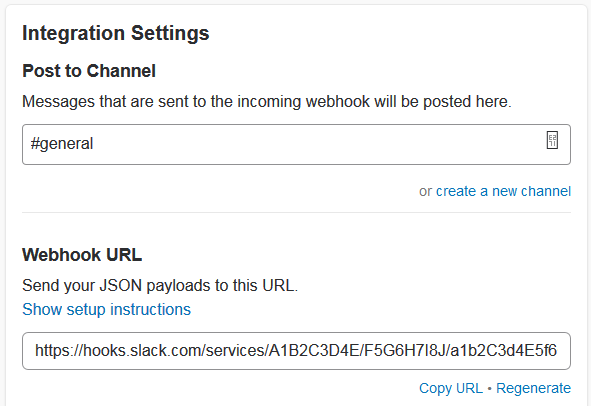
  4. If incoming-webhook is pre-installed, click View, and then click Settings.
    Description of slack_incoming_webhook_settings.png follows
    Description of the illustration slack_incoming_webhook_settings.png

    If it isn't installed, then install it and configure it.

    1. Click Install.
    2. On the Incoming WebHooks page, click Add Configuration.
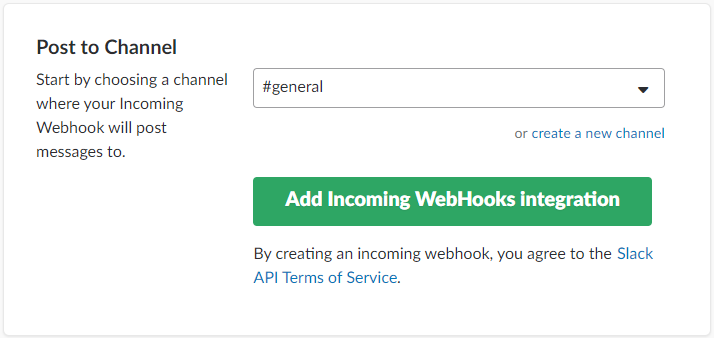
    3. From the Post to Channel list, select the channel, and click Add Incoming WebHooks integration.
  5. In Integration Settings, from the Post to Channel drop-down list, select the channel. In Webhook URL, click Copy URL.
  6. Scroll down to the bottom of the page and click Save Settings.

Configure a Slack Webhook in DevCS to Send Event Notifications

The Slack webhook is a outgoing webhook used to send DevCS event notifications to a Slack channel.

the project owner icon You must be assigned the project Owner role to create and configure a webhook.

  1. In the navigation bar, click Project Administration Gear.
  2. Click Webhooks.
  3. Click + Create Webhook.
  4. From Type, select Slack.
  5. In Name, enter a unique name.
  6. In URL, enter or paste the Slack channel’s incoming Webhook URL.
    Make sure it's in the https://hooks.slack.com/services/... format.
  7. In Subscribe, select the events that trigger the webhook.
    If you select the Select specific events option, in Events, select the check boxes of events that trigger the webhook.
  8. To test the webhook, click Test.
  9. Click Done.
When DevCS events happen, notifications are sent to the Slack channel.

Oracle Social Network

Oracle Social Network (OSN) is a secure enterprise collaboration and social networking solution for business. Using the Oracle Social Network webhook, you can send the DevCS events and activities to OSN conversations.

To send notification to a an OSN conversation, set up an DevCS Incoming Webhook in OSN and associate it with an OSN Conversation. When set up, the Incoming Webhook provides a URL with an authentication token to use in the OSN Webhook of your project. For more information, see https://cloud.oracle.com/social-cloud.

You can also set up the OSN functionality for Oracle Public Cloud from Oracle Content and Experience Cloud. The Oracle Content and Experience Cloud Administrator can create an incoming Webhook integration, associate it with an OSN conversation, and get the URL with an authentication token to use in the OSN Webhook of your project. See Configuring Webhooks in Administering Oracle Content and Experience Cloud.

Get OSN Conversation's Incoming Webhook URL

You must be the OSN Administrator to set up or get the incoming webhook URL.
  1. Sign in to Oracle Social Network as an administrator.
  2. Click Webhooks.
  3. To the right of Generic Incoming Webhook, click New Instance.
  4. In Webhook Name, enter a name.
  5. In Target Conversation or Wall, specify the OSN conversation.
  6. In Message Template, specify the wording of the text to be included in the webhook-based message.
  7. Fill in the details in other fields of the webhook and click Save.
  8. In Webhook URL, click Copy to Clipboard.

Configure an OSN Webhook in DevCS to Send Event Notifications

The Oracle Social Network webhook is a outgoing webhook used to send DevCS event notifications to an OSN conversation.

the project owner icon You must be assigned the project Owner role to create and configure a webhook.

  1. In the navigation bar, click Project Administration Gear.
  2. Click Webhooks.
  3. Click + Create Webhook.
  4. From Type, select Oracle Social Network.
  5. In Name, enter a unique name.
  6. In OSN URL, enter the OSN webhook URL (without the authentication token) where the webhook receiver is registered.
  7. In Event Groups, select the events to trigger the webhook.
    If you selected the Select specific events option, in Events, select the check boxes of events that trigger the webhook.
  8. Click Done.

PagerDuty

PagerDuty is an incident management platform that enables you to send notifications via email, push, SMS, and phone. Using the PagerDuty webhook, you can send notifications to your PagerDuty service about events in DevCS. When the PagerDuty service receives notifications from DevCS, it can redirect those notifications via email, push, SMS, and phone. To find more about PagerDuty, see https://www.pagerduty.com/.

To send notifications to PagerDuty, set up your PagerDuty account to receive notifications and create a DevCS webhook.

Set Up the PagerDuty Account

To set up PagerDuty, create an API key, add services, and add users who would receive PagerDuty notifications .
You must be the account owner or assigned the PagerDuty Admin role to set up the PagerDuty account.
  1. Log in to PagerDuty as the account owner or administrator.
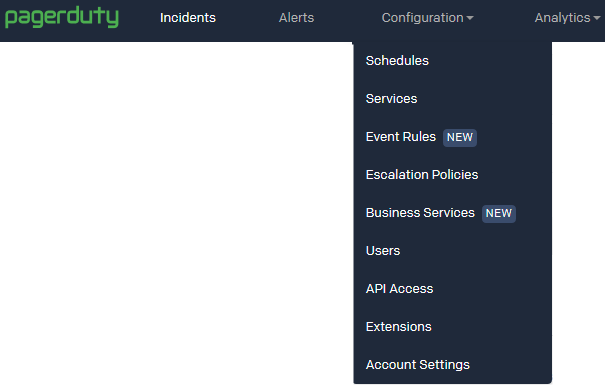
  2. To set up the API key, from the Configuration menu, select API Access.
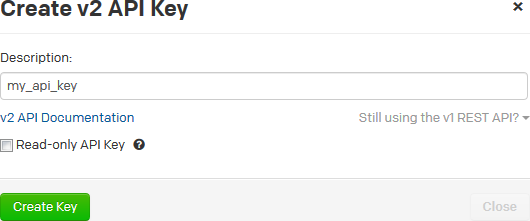
  3. Click Create New API Key.
  4. In the Create API Key dialog box, enter a name for the key and click Create Key.
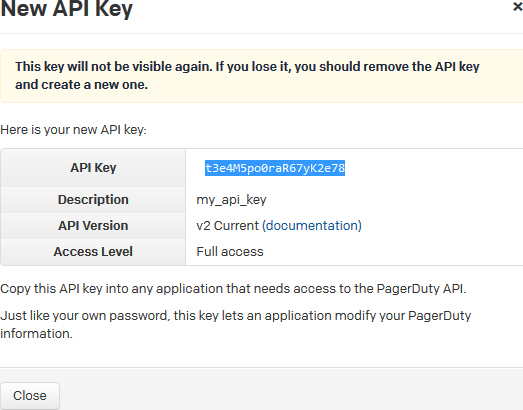
  5. From the New API Key dialog box, copy the API Key value and keep it safe.
    You can't view or copy the key after closing the dialog box.
  6. Click Close.
  7. If not configured, set up services (such as applications or components) you wish to open incidents against. From the Configuration menu, select Services.
  8. Click New Service.
  9. Fill in the details and click Add Service.
  10. If not configured, add users who'd receive notifications. From the Configuration menu, select Users.
  11. Click Add Users.
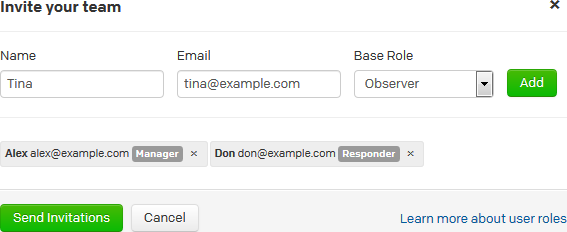
  12. In the Invite your team dialog box, add the details of users you want to invite, and click Add.
  13. When you're finished adding users, click Send Invitations.
  14. Return to the dashboard page of PagerDuty.

Configure a PagerDuty Webhook in DevCS to Send Event Notifications

The PagerDuty webhook is a outgoing webhook used to send DevCS event notifications to a PagerDuty account.

the project owner icon You must be assigned the project Owner role to create and configure a webhook.

  1. In the navigation bar, click Project Administration Gear.
  2. Click Webhooks.
  3. Click + Create Webhook.
  4. From Type, select PagerDuty.
  5. In Name, enter a unique name.
  6. In API Key, enter the API key of the PagerDuty service.
  7. In Service, select the desired PagerDuty service from the list. The webhook sends event notifications to the selected service.
  8. In Sender, select the PagerDuty registered user whose name will be attached to the events sent by the webhook.
  9. In Event Groups, select the events that trigger the webhook.
    If you selected the Select specific events option, in Events, select the check boxes of events that trigger the webhook.
  10. Click Done.

Jenkins

Jenkins is an open-source continuous integration software used to build and test your software applications. Using the various Jenkins webhooks, you can integrate your Jenkins with DevCS to run builds. Jenkins must be available on the public Internet to accept webhook notifications.

You can use these webhooks to integrate Jenkins with DevCS:

To do this ... Use this webhook
Trigger a Jenkins job on SCM polling of the job's Git repository Hudson/Jenkins Git Plugin
Trigger a Jenkins job on a project's Git repository update Hudson/Jenkins Build Trigger
Link a Jenkins job with a merge request Jenkins Merge Requests
Receive notifications in DevCS project's activity feed from Jenkins when a job's build runs or completes Jenkins Notification Plugin

Trigger a Jenkins Job on SCM Polling

Using the Hudson/Jenkins - Git Plugin Webhook, you can trigger a Jenkins job that uses a DevCS Git repository as source on SCM polling.

To trigger the Jenkins job:
  1. If not installed, install the Git plugin.
  2. Create or configure the Jenkins job to use the DevCS project Git repository as source.
  3. Enable SCM polling in the Jenkins job.
  4. Create or configure a webhook to send a notification to Jenkins when the job's Git repository (or any project Git repository) is updated.

When the Git plugin of Jenkins receives a notification, it goes through all Jenkins jobs that have SCM polling enabled and match the provided notification parameters (such as Git repositories and branches). For all matching jobs, it starts a build. The build won't run if no changes are found by polling.

For more information about the Jenkins Git plugin, see https://wiki.jenkins-ci.org/display/JENKINS/Git+Plugin#GitPlugin-Pushnotificationfromrepository.

Set Up Git on Jenkins
You must be assigned the Admin role of Jenkins to set up Git on it. Git must also be installed on the computer running Jenkins. If the plugin is already installed and configured, ignore this section.
  1. Log on to Jenkins using the administrator credentials.
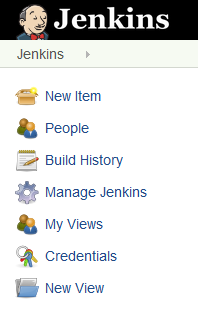
  2. From the links on the left side of the page, click Manage Jenkins.
  3. To install the Git plugin, click Manage Plugins.
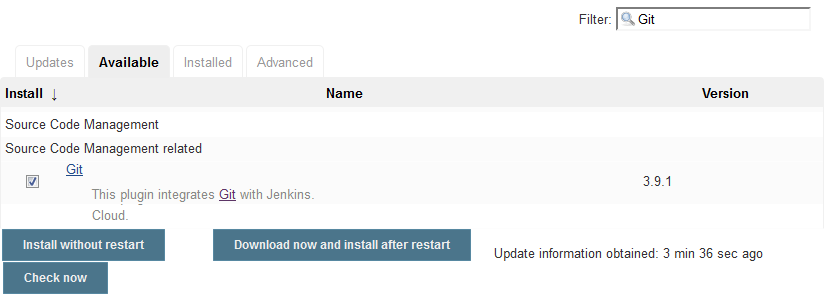
  4. In the Available tab, search for Git. Under Source Code Management, select the plugin's check box and click Download now and install after restart or Install without restart.
  5. Wait for the plugin to install.
  6. Restart Jenkins.
  7. From the links on the left side of the page, click Manage Jenkins.
  8. Click Global Tool Configuration.
  9. In Git, enter the local path of the Git executable.
  10. Click Save.
Configure the Jenkins Job to Use DevCS Git Repository and Enable SCM Polling

Configure the job to use the DevCS Git repository and enable SCM polling.

  1. Log on to Jenkins.
  2. Create or open a job.
  3. From the links on the left side of the page, click Configure.
  4. Click the Source Code Management tab.
  5. Select Git.
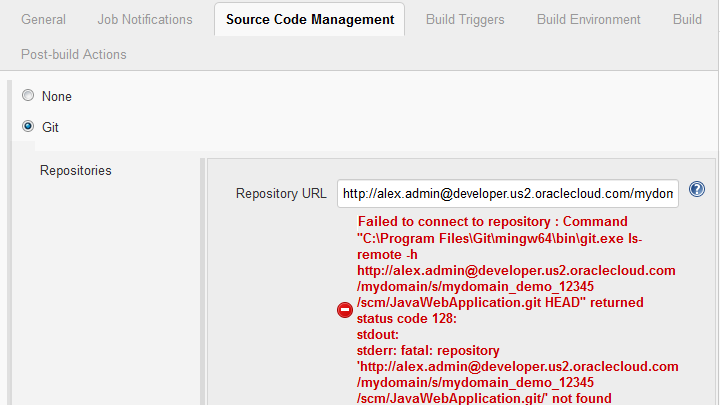
  6. In Repository URL, enter the DevCS project's Git repository URL.

    Remember the URL’s protocol as you’d need to specify it when you create the webhook.

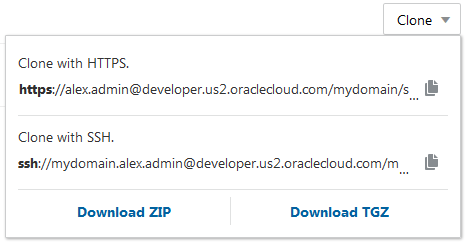
    You can copy the URL from the Clone menu of the DevCS Git page.

    After entering the URL, you might see a Failed to connect to repository … error message. It appears because you haven't provided the DevCS access credentials in Jenkins.

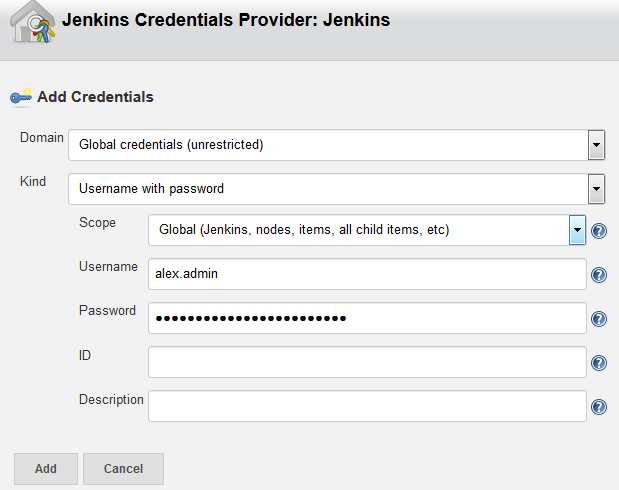
    1. Next to the Credentials list, click Add and then select Jenkins.
    2. In the Jenkins Credentials Provider dialog box, enter the DevCS username and password in Username and Password. Leave other fields with their default values.
    3. Click Add.

    The error message should disappear. If you still see the error message, configure the proxy settings of Jenkins. See the Jenkins documentation to know more.

  7. Click the Build Triggers tab.
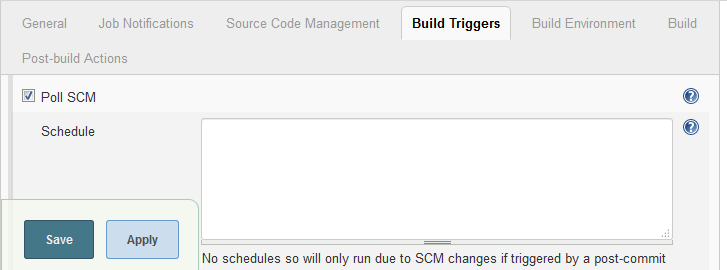
  8. Select the Poll SCM check box.
  9. Continue to configure the job.
  10. When you're finished, click Save.
Configure a Webhook in DevCS to Trigger a Jenkins Job on a Git Repository Update

After configuring the Jenkins job, create the DevCS webhook to trigger the job on Git repository update.

  1. In the navigation bar, click Project Administration Gear.
  2. Click Webhooks.
  3. Click + Create Webhook.
  4. From Type, select Hudson/Jenkins - Git Plugin.
  5. In Name, enter a unique name.
  6. In Notification URL, enter the URL of the target Jenkins server.
    The URL must be in the http://your_server/.../git/notifyCommit format. Example: http://my_jenkins.com:8080/git/notifyCommit
  7. To ignore SSL errors, select the Ignore SSL Errors check box.
  8. In Notification Parameters, specify the URL type.
    • In Repository URL Type, select HTTP Repository Address to send the HTTP URL of the selected Git repository in the webhook notification. Select SSH Repository Address to send the SSH URL of the selected Git repository in the webhook notification.

      You must specify the same protocol that’s used in the Jenkins job configuration.

    • In Append, to append the SHA-1 Checksum hash of the last commit in the webhook notification, select the sha1 (Jenkins only) check box.

    • To append branch information of the last commit in the webhook notification, select the branches check box. This enables jobs to poll the specified branches only.

  9. In Repository and Branches, specify the Git repository and branches that trigger the webhook.
    In Repository, select All Repositories to trigger all Jenkins jobs that uses a Git repository of the project.
  10. Click Done.

Trigger a Jenkins Job on a Git Repository Update

Using the Hudson/Jenkins - Build Trigger webhook, you can trigger a Jenkins job when a project Git repository updates. It's not necessary that the Jenkins job uses a DevCS project Git repository as source.

To allow the webhook to connect to Jenkins, you'd need to specify the security settings of Jenkins.

If ... Do this:
Jenkins allows anonymous user to trigger a build
  1. Create an authentication token in the Jenkins job.
  2. Configure the webhook to connect to the Jenkins job using the authentication token.
Jenkins allows only authenticated users to trigger a build
  1. Get an authenticated user's API Access token.
  2. Create an authentication token in the Jenkins job.
  3. Configure the webhook to connect to the Jenkins job using the API Access and the authentication token.

Anonymous access is disabled or lacks read permissions on Jenkins and you want to trigger the job without an authenticated user's credentials

Or

Jenkins uses a build token root to trigger builds

  1. If not installed, install the Build Authorization Token Root Plugin on Jenkins.
  2. Create an authentication token in the Jenkins job.
  3. Configure the webhook to connect to Jenkins job using the authentication token.
Security is completely disabled on Jenkins. Configure the webhook to connect to Jenkins job. No Jenkins configuration required.
Install the Build Authorization Token Root Plugin on Jenkins

If anonymous access is disabled on Jenkins and you want to trigger Jenkins jobs without an authenticated user's credentials, install the Build Authorization Token Root plugin on Jenkins. You must be assigned the Admin role of Jenkins to install the plugin. The plugin is required To find out more about the plugin, see https://wiki.jenkins-ci.org/display/JENKINS/Build+Token+Root+Plugin.

  1. Log on to Jenkins using the administrator credentials.
  2. From the links on the left side of the page, click Manage Jenkins.
  3. Click Manage Plugins.
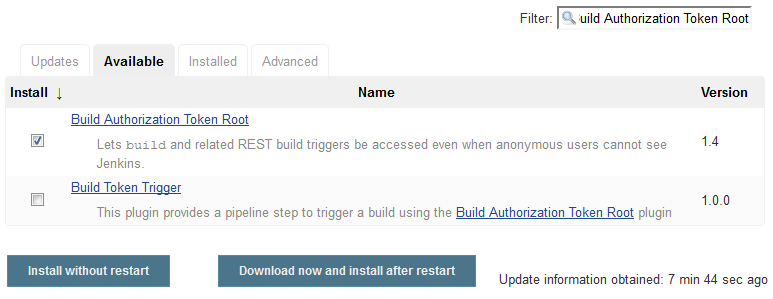
  4. In the Available tab, search for Build Authorization Token Root, select its check box, and click Download now and install after restart or Install without restart.
  5. Wait for the plugin to install.
  6. Restart Jenkins.
Get the Jenkins API Access Token

If Jenkins allows only authenticated users to trigger builds, use the API Access token of an authenticated user as the user's credentials in the DevCS webhook.

To use the API Access token in a DevCS webhook, provide the username and the token of an authenticated user. If you don't want to provide a user's details, create a separate username to trigger builds and assign the user the Overall/Read, Job/Read and Job/Build permissions. Then, use this user's details in the webhook.

  1. Log on to Jenkins using the user's credentials whose API Access Token you want to use in the webhook.
  2. In the upper-right corner, mouse over the user name, click Expand icon and select Configure.
  3. In the API Token section, add a new token or use the legacy token.
    To view the legacy token, click Show Legacy API Token and then copy the token. Keep the token value some place safe as you'd need to enter in the DevCS webhook.

    To create a token, click Add new token and copy the token value immediately. You can't see the token value later and would need to generate another token. Keep the token value some place safe as you'd need to enter in the DevCS webhook.

  4. Click Save.
Configure the Jenkins Job to Set an Authentication Token

You need to set the authentication token if Jenkins allows anonymous access, access to authenticated users only, or uses the build token root plugin. Use the same token name when you configure the webhook.

  1. Log on to Jenkins.
  2. Click the job name.
  3. From the links on the left side of the page, click Configure.
  4. Click the Build Triggers tab.
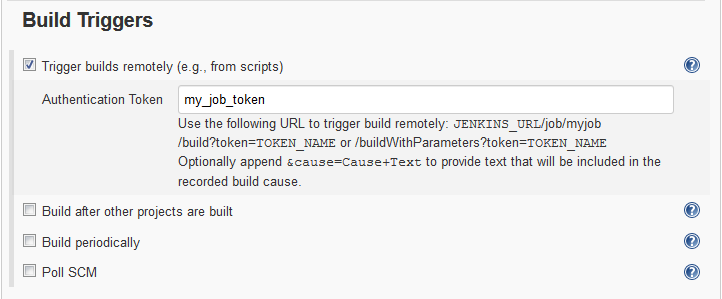
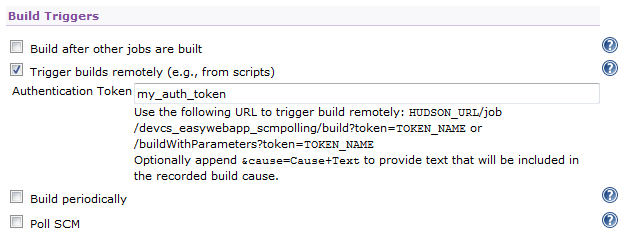
  5. Select the Trigger builds remotely (e.g., from scripts) check box.
  6. In Authentication Token, enter a unique string as a token. You can enter any string value. Example: my_auth_token
    Make sure that the authentication token isn't used in any other job.
  7. Continue to configure the job.
  8. When you're finished, click Save.
Configure a Webhook in DevCS to Trigger a Jenkins Job on a Git Repository Update

Before you create the webhook, ensure that you have installed the required plugins and have the required token to access Jenkins through the webhook.

  1. In the navigation bar, click Project Administration Gear.
  2. Click Webhooks.
  3. Click + Create Webhook.
  4. From Type, select Hudson/Jenkins - Build Trigger.
  5. In Name, enter a unique name.
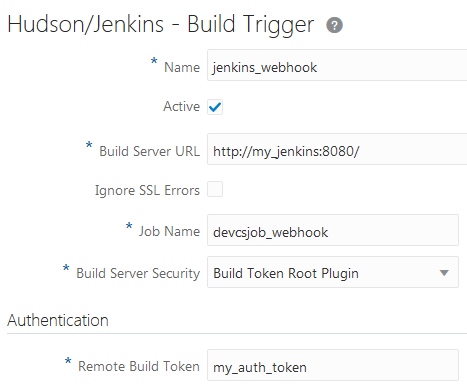
  6. In Build Server URL, enter the Jenkins base URL.

    If the Jenkins job URL is http://my_jenkins/path/job/my_job, then enter http://my_jenkins/path/.

  7. To ignore SSL errors if Jenkins uses self-signed (or an invalid) certificate and you’ve provided an HTTPS URL in Build Server URL, select the Ignore SSL Errors check box.
  8. In Job Name, enter the case sensitive name of the job on the target build server.
  9. From Build Server Security, select the security schema of Jenkins and enter the required details.
    Security Option Fill in these fields
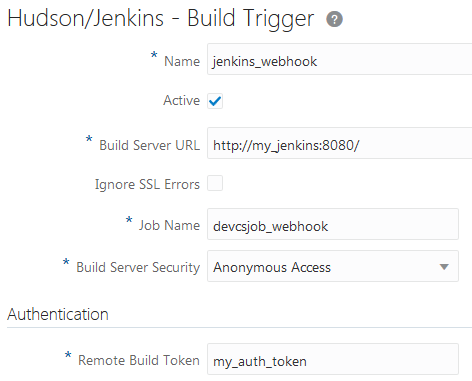
    Anonymous Access Under Authentication, in Remote Build Token, enter the Jenkins authentication token.

    Example:

    API Token Access

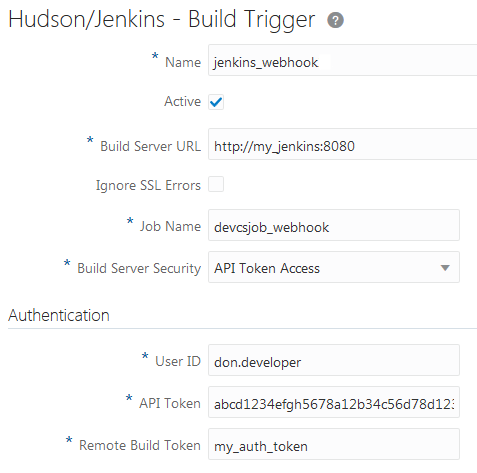
    Under Authentication, enter the authenticated user's details.

    • In User ID, enter the username of the Jenkins user.

    • In API Token, enter the API token of the Jenkins user.

    • In Remote Build Token, enter the Jenkins authentication token.

    Example:

    Build Token Root Plugin Under Authentication, in Remote Build Token, enter the Jenkins authentication token.

    Example:

    No Security NA
  10. In Trigger Event: Git Push, specify the Git repository and the branch or tag.

    Select the Parametrized Build check box if the build job on target server accepts parameters. The target URL differs for parametrized and non-parametrized builds.

    If the Parametrized Build is enabled, you can add build parameters using Add Parameter. For each parameter, set the name that must match the parameter name defined on build server side.

  11. Verify the URL displayed in Target URL.
    You can use the URL to check your configuration (for example using curl -X GET '<Target_URL>’).
  12. Click Done.

Trigger a Jenkins Job from a Merge Request

Using the Jenkins - Merge Requests webhook, you can link a Jenkins job to a merge request. When a commit is pushed to the review branch of the merge request, the webhook sends a notification to Jenkins and triggers a build of the linked job. When the build completes, it sends a notification back to DevCS. Based on the build’s status, the linked build approves or rejects the merge request.

The Jenkins Merge Request is an outgoing as well as an incoming webhook. The Jenkins job and the webhook must use the merge request's Git repository with parameters to define the branch. The Notification plugin must also be installed on Jenkins.

To allow the webhook to connect to Jenkins, you'd need to specify the security settings of Jenkins.

If ... Do this:
Jenkins allows anonymous user to trigger a build on Jenkins
  1. Create an authentication token in the Jenkins job.
  2. Configure the webhook to connect to the Jenkins job using the authentication token.
Jenkins allows only authenticated users to trigger a build
  1. Get an authenticated user's API Access token.
  2. Create an authentication token in the Jenkins job.
  3. Configure the webhook to connect to the Jenkins job using the API Access and the authentication token.

Anonymous access is disabled or lacks read permissions on Jenkins and you want to trigger the job without an authenticated user's credentials

Or

Jenkins uses a build token root to trigger builds

  1. If not installed, install the Build Authorization Token Root Plugin on Jenkins.
  2. Create an authentication token in the Jenkins job.
  3. Configure the webhook to connect to Jenkins job using the authentication token.
Security is completely disabled on Jenkins. Configure the webhook to connect to Jenkins job. No Jenkins configuration required.
Install the Notification Plugin on Jenkins

To send notifications from Jenkins, install the Notification plugin.

You must be assigned the Admin role of the Jenkins server to install plugins.
  1. Log on to Jenkins using the administrator credentials.
  2. From the links on the left side of the page, click Manage Jenkins.
  3. Click Manage Plugins.
  4. In the Available tab, search for Notification, select its check box, and click Download now and install after restart or Install without restart.
  5. Wait for the plugin to install.
  6. Restart Jenkins.
Install the Build Authorization Token Root Plugin on Jenkins

If anonymous access is disabled on Jenkins and you want to trigger Jenkins jobs without an authenticated user's credentials, install the Build Authorization Token Root plugin on Jenkins. You must be assigned the Admin role of Jenkins to install the plugin. The plugin is required To find out more about the plugin, see https://wiki.jenkins-ci.org/display/JENKINS/Build+Token+Root+Plugin.

  1. Log on to Jenkins using the administrator credentials.
  2. From the links on the left side of the page, click Manage Jenkins.
  3. Click Manage Plugins.
  4. In the Available tab, search for Build Authorization Token Root, select its check box, and click Download now and install after restart or Install without restart.
  5. Wait for the plugin to install.
  6. Restart Jenkins.
Get the Jenkins API Access Token

If Jenkins allows only authenticated users to trigger builds, use the API Access token of an authenticated user as the user's credentials in the DevCS webhook.

To use the API Access token in a DevCS webhook, provide the username and the token of an authenticated user. If you don't want to provide a user's details, create a separate username to trigger builds and assign the user the Overall/Read, Job/Read and Job/Build permissions. Then, use this user's details in the webhook.

  1. Log on to Jenkins using the user's credentials whose API Access Token you want to use in the webhook.
  2. In the upper-right corner, mouse over the user name, click Expand icon and select Configure.
  3. In the API Token section, add a new token or use the legacy token.
    To view the legacy token, click Show Legacy API Token and then copy the token. Keep the token value some place safe as you'd need to enter in the DevCS webhook.

    To create a token, click Add new token and copy the token value immediately. You can't see the token value later and would need to generate another token. Keep the token value some place safe as you'd need to enter in the DevCS webhook.

  4. Click Save.
Configure the Jenkins Job to Set an Authentication Token and Accept Build Parameters

To trigger the Jenkins job when it receives a notification from DevCS, configure it to accept the Git repository’s branch name as a parameter and set an authentication token.

  1. Log on to Jenkins.
  2. Create or open the job.
  3. On the left side of the page, click Configure.
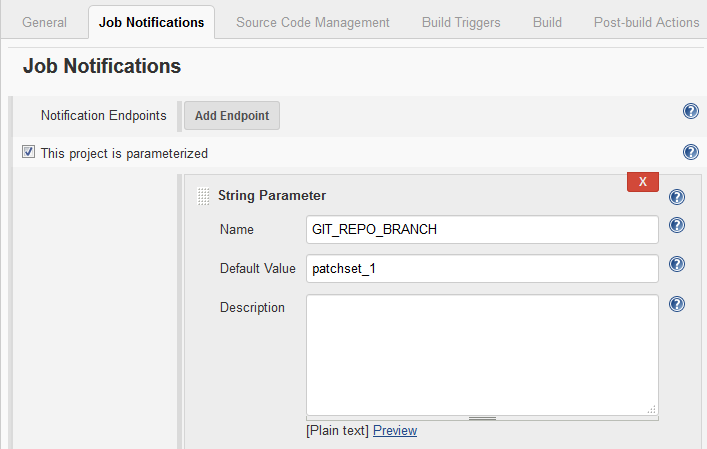
  4. Click the Job Notifications tab.
  5. Select the This project is parameterized check box.
  6. From Add Parameter, select String Parameter.
  7. In Name, enter GIT_REPO_BRANCH.
  8. In Default Value, enter the review branch name. Example: patchset_1
  9. Click the Build Triggers tab.
  10. Select the Trigger builds remotely (e.g., from scripts) check box.
  11. Enter a unique string as a token. You can enter any string value. Example: my_auth_token
    Make sure that the authentication token isn't used in any other job.
  12. Continue to configure the job.
  13. When you're finished, click Save.
Configure a Webhook in DevCS to Trigger a Jenkins Job on a Merge Request Update

After installing the required plugins and configuring the Jenkins job, create the webhook.

  1. In the navigation bar, click Project Administration Gear.
  2. Click Webhooks.
  3. Click + Create Webhook.
  4. From Type, select Jenkins - Merge Requests.
  5. In Name, enter a unique name.
  6. In Build Server URL, enter the Jenkins base URL.

    If the Jenkins job URL is http://my_jenkins/path/job/my_job, then enter http://my_jenkins/path/.

  7. To ignore SSL errors if Jenkins uses self-signed (or an invalid) certificate and you’ve provided an HTTPS URL in Build Server URL, select the Ignore SSL Errors check box.
  8. In Job Name, enter the case sensitive name of the job on the target build server.
  9. In Repository, select the merge request's Git repository.
  10. From Build Server Security, select the security schema of Jenkins and enter the required details.
    Security Option Fill in these fields
    Anonymous Access Under Authentication, in Remote Build Token, enter the Jenkins authentication token.
    API Token Access

    Under Authentication, enter the authenticated user's details.

    • In User ID, enter the username of the Jenkins user.

    • In API Token, enter the API token of the Jenkins user.

    • In Remote Build Token, enter the Jenkins authentication token.

    Build Token Root Plugin Under Authentication, in Remote Build Token, enter the Jenkins authentication token.
    No Security NA
  11. Click Done.
Link the Jenkins Job with the Merge Request
  1. In the navigation bar, click Merge Request.
  2. Open the merge request.
  3. Click the Linked Builds tab.
    The tab displays linked jobs, if any.
  4. In Search and Link Build Jobs, enter the Jenkins job name and select it from the list.
  5. Click Save OK.

When a commit is pushed to the review branch of the merge request, the webhook triggers a build of the specified job on the remote Jenkins server and notification is posted on the Recent Activity Feed of the project. If the build succeeds, it’s added to the Approve section of the Review Status list in the Merge Request page. If the build fails, it’s added to the Reject section of the Review Status list.

Receive Build Notifications from a Jenkins Job

Using the Jenkins - Notification Plugin Webhook, you can configure DevCS to accept build notifications from Jenkins and shows the build notification in the recent activities feed of the Project Home page.

Jenkins - Notification Plugin Webhook is an incoming Webhook and accepts build notifications only. Don’t use this webhook to pass information to any external server or accept information of any other type. To use the webhook, install the Notifications plugin on Jenkins, configure the DevCS webhook to connect to Jenkins, and then configure the Jenkins job to send build notifications.

Install the Notification Plugin on Jenkins

To send notifications from Jenkins, install the Notification plugin.

You must be assigned the Admin role of the Jenkins server to install plugins.
  1. Log on to Jenkins using the administrator credentials.
  2. From the links on the left side of the page, click Manage Jenkins.
  3. Click Manage Plugins.
  4. In the Available tab, search for Notification, select its check box, and click Download now and install after restart or Install without restart.
  5. Wait for the plugin to install.
  6. Restart Jenkins.
Configure a Webhook in DevCS to Accept Notifications from Jenkins
  1. In the navigation bar, click Project Administration Gear.
  2. Click Webhooks.
  3. Click + Create Webhook.
  4. From Type, select Jenkins - Notification Plugin.
  5. In Name, enter a unique name.
  6. In Base URL, enter the base URL of Jenkins.

    If the Jenkins job URL is http://my_jenkins/path/job/my_job, then enter http://my_jenkins/path/.

  7. In Track, select check boxes of build job actions to be listed in the Recent Activities Feed of the Project Home page.
    • To display an activity after the build server job is finished, select the Build Results check box.
    • To display an activity of running builds, select the Ongoing Builds check box.
  8. Click Done.
  9. On the Webhooks page, from the webhooks list, select the webhook. From the details displayed on the right, copy the value of URL.
Configure the Jenkins Job to Send Build Notifications

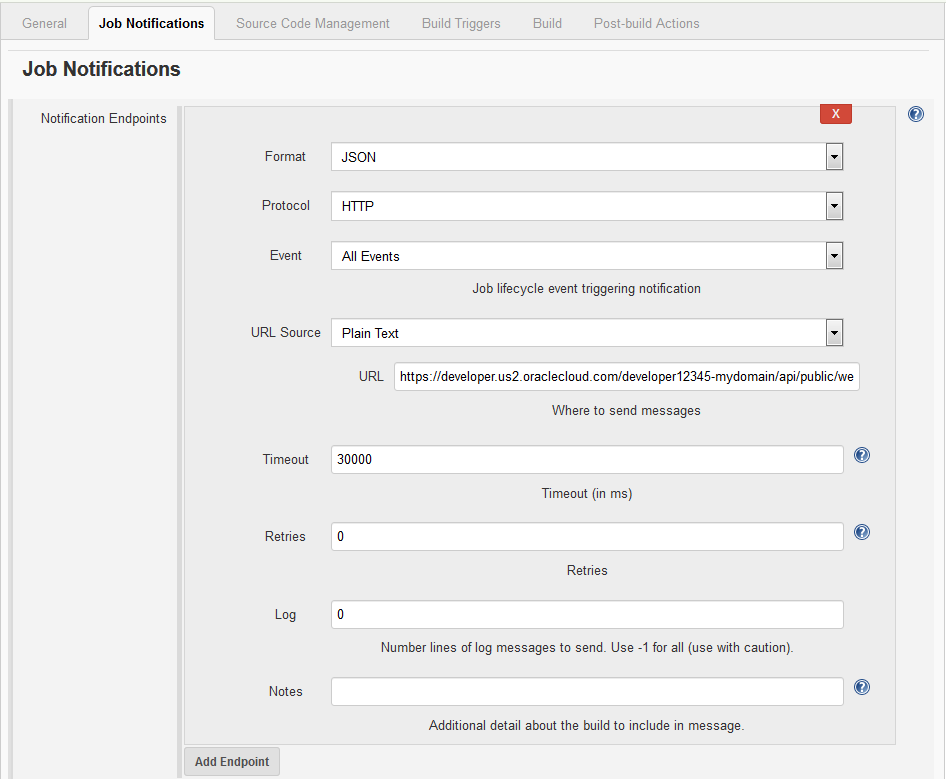
To configure the Jenkins job to send build notifications, add the DevCS webhook's URL as a notification endpoint URL.

  1. Log on to Jenkins.
  2. Click the job name.
  3. From the links on the left side of the page, click Configure.
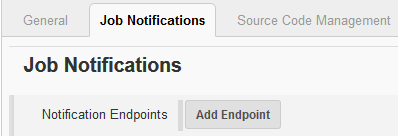
  4. Click the Job Notifications tab.
  5. In Notification Endpoints, click Add Endpoint.
  6. In the URL field, paste the URL that you copied from the DevCS webhook. Leave other fields with their default values.
  7. Click Save.

Hudson

Hudson is an open-source extensible continuous integration software used to build and test your software applications. Using webhooks, you can integrate your Hudson server with DevCS to run builds. Hudson must be available on the public Internet to accept webhook notifications.

You can use these webhooks to integrate Hudson with DevCS:

To do this ... Use this webhook
Trigger a Hudson job on SCM polling of the job's Git repository Hudson/Jenkins Git Plugin
Trigger a Hudson job on a project's Git repository update Hudson/Jenkins Build Trigger

Trigger a Hudson Job on SCM Polling

Using the Hudson/Jenkins - Git Plugin Webhook, you can trigger a Hudson job that uses a DevCS Git repository as source on SCM polling.

To trigger the job:

  • If not installed, install the Git plugin
  • Create or configure the Hudson job to use the DevCS project Git repository as source
  • Enable SCM polling in the Hudson job
  • Create or configure a webhook to send a notification to Hudson when the job's Git repository (or any project Git repository) is updated

When the Git plugin of Hudson receives a notification, it goes through all Hudson jobs that have SCM polling enabled and match the provided notification parameters (such as Git repositories and branches). For all matching jobs, it starts a build. The build won't run if no changes are found by polling.

For more information about the Hudson Git plugin, see http://wiki.hudson-ci.org/display/HUDSON/Git+Plugin#GitPlugin-PostCommitHook.

Set Up Git on Hudson

You must be assigned the Admin role of Hudson to set up Git on it. Git must also be installed on the computer running Jenkins. If the plugin is already installed and configured, ignore this section.

  1. Log on to Hudson using the administrator credentials.
  2. From the links on the left side of the page, click Manage Hudson.
  3. To install the Git plugin, click Manage Plugins.
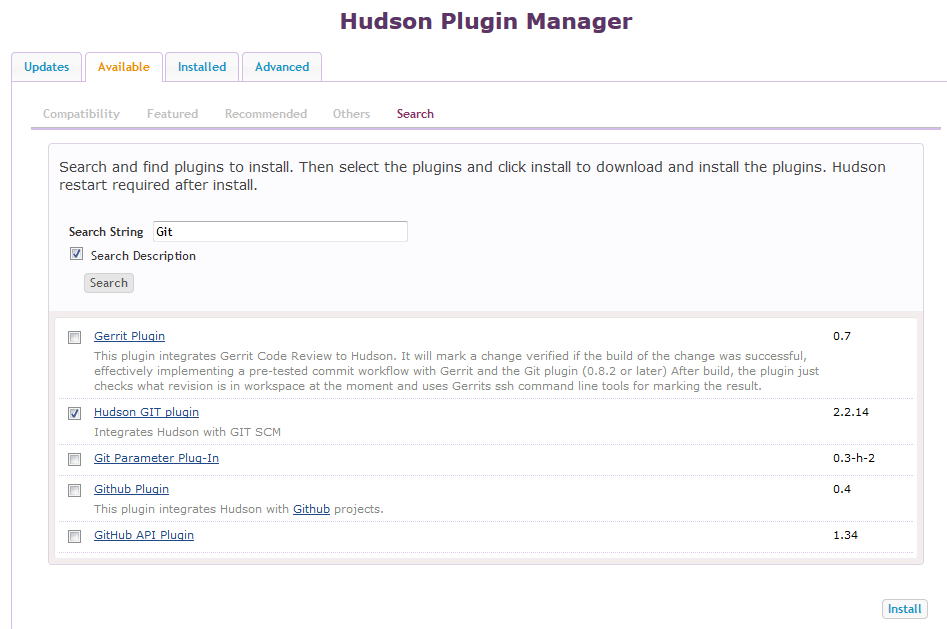
  4. In the Available tab, click the Search subtab, search for Git, select the Hudson GIT plugin check box, and click Install.
  5. Wait for the plugin to install.
  6. Restart Hudson.
  7. From the links on the left side of the page, click Manage Hudson.
  8. Click Configure System.
  9. In Git, enter the local path of the Git executable.
  10. Click Save.
Configure the Hudson Job to Use DevCS Git Repository and Enable SCM Polling

Configure the job to access the DevCS Git repository and enable SCM polling.

  1. Log in to Hudson.
  2. Create or open a job.
  3. From the links on the left side of the page, click Configure.
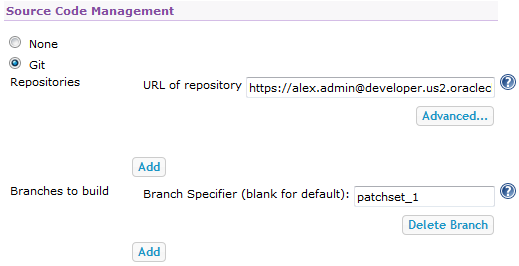
  4. In Source Code Management, select Git.
  5. In URL of repository, enter the DevCS project's Git repository URL.

    Remember the URL’s protocol as you’d need to specify it when you create the webhook.

    You can copy the URL from the Clone menu of the DevCS Code page.

  6. In Branches to build, specify the branch name.
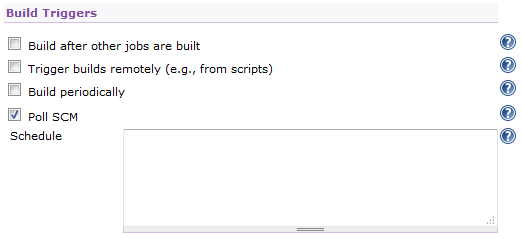
  7. In the Build Triggers section, select the Poll SCM check box.
  8. Continue to configure the job.
  9. Click Save.
Configure a Webhook in DevCS to Trigger a Hudson Job on the Git Repository Update

After configuring the Hudson job, create the DevCS webhook to trigger the job on Git repository update.

  1. In the navigation bar, click Project Administration Gear.
  2. Click Webhooks.
  3. Click + Create Webhook.
  4. From Type, select Hudson/Jenkins - Git Plugin.
  5. In Name, enter a unique name.
  6. In Notification URL, enter the Hudson URL.
    The URL must be in the http://your_server/.../git/notifyCommit format. Example: http://my_hudson.com:8080/git/notifyCommit
  7. To ignore SSL errors, select the Ignore SSL Errors check box.
  8. In Notification Parameters, specify the URL type.

    In Repository URL Type, select HTTP Repository Address to send the HTTP URL of the selected Git repository in the webhook notification. Select SSH Repository Address to send the SSH URL of the selected Git repository in the webhook notification.

    You must specify the same protocol that’s used in your the job configuration to access the Git repository.

    To append branch information of the last commit in the webhook notification, select the branches check box. This enables jobs to poll the specified branches only.

  9. In Repository and Branches, specify the Git repository and branches that trigger the webhook.
    In Repository, select All Repositories to trigger all Hudson jobs that uses a Git repository of the project.
  10. Click Done.

Trigger a Hudson Job on a Git Repository Update

Using the Hudson/Jenkins - Build Trigger webhook, you can trigger a Hudson job when a project Git repository updates. It's not necessary that the Hudson job uses a DevCS project Git repository as source.

To allow the webhook to connect to Hudson, you'd need to specify the security settings of Hudson.

If ... Do this:
Hudson allows anonymous user to trigger a build
  1. Create an authentication token in the Hudson job.
  2. Configure the webhook to connect to the Hudson job using the authentication token.
Hudson allows only authenticated users to trigger a build
  1. Get an authenticated user's credentials.
  2. Create an authentication token in the Hudson job.
  3. Configure the webhook to connect to the Hudson job using the credentials and the authentication token.
Security is completely disabled on Hudson Configure the webhook to connect to Hudson job. No Hudson configuration required.
Configure the Hudson Job
  1. Log in to the Hudson server.
  2. Click the job name.
  3. From the links on the left side of the page, click Configure.
  4. In the Build Triggers section, select the Trigger builds remotely (e.g., from scripts) check box.
  5. In Authentication Token, enter a unique string as a token. You can enter any string value. Example: my_auth_token
    Make sure that the authentication token name is not used in any other job.
  6. Click Save.
Configure a Webhook in DevCS to Trigger a Hudson Job on a Git Repository Update

Before you create the webhook, ensure that you have installed the required plugins and have the required token to access Hudson through the webhook.

  1. In the navigation bar, click Project Administration Gear.
  2. Click Webhooks.
  3. Click + Create Webhook.
  4. From Type, select Hudson/Jenkins - Build Trigger.
  5. In Name, enter a unique name.
  6. In Build Server URL, enter the Hudson URL.

    If the target build job has address http://my_server/path/job/my_job, then enter http://my_hudson/path/.

  7. To ignore SSL errors if the target build server uses self-signed (or an invalid) certificate and you’ve provided an HTTPS URL in Build Server URL, select the Ignore SSL Errors check box.
  8. In Job Name, enter the case sensitive name of the Hudson job.
  9. From Build Server Security, select the job’s security schema configured on the target server.
    Security Option Fill in these fields
    Anonymous Access Under Authentication, in Remote Build Token, enter the Jenkins authentication token.

    Example:

    API Token Access

    Under Authentication, enter the authenticated user's details.

    • In User ID, enter the username of the Jenkins user.

    • In API Token, enter the password of the user.

    • In Remote Build Token, enter the Hudson authentication token.

    No Security NA
  10. In Trigger Event: Git Push, specify the Git repository and the branch or tag.

    Select the Parametrized Build check box if the build job on target server accepts parameters. The target URL differs for parametrized and non-parametrized builds.

    If the Parametrized Build is enabled, you can add build parameters using Add Parameter. For each parameter, set the name that must match the parameter name defined on build server side.

  11. Verify the URL displayed in Target URL.
    You can use the URL to check your configuration (for example using curl -X GET '<Target_URL>’).
  12. Click Done.

GitHub Apps

If you're using apps that accept incoming webhook connections from GitHub, use the GitHub Compatible webhook to send DevCS event notifications to those apps. The payload is sent in the similar format as the GitHub, so you don't need to make changes to your GitHub apps.

To find more about GitHub webhooks, see https://developer.github.com/webhooks/.

  1. In the navigation bar, click Project Administration Gear.
  2. Click Webhooks.
  3. Click + Create Webhook.
  4. From the Type drop-down list, select GitHub Compatible.
  5. In Name, enter a unique name.
  6. In URL, enter the URL of the GitHub app.
  7. In Secret, enter a secret phrase that’s passed as a string with the HTTP request as a signature header.
  8. From the Payload Type drop-down list, select the media type for the payload. You can select either form–urlencoded (default) or json.
  9. To ignore the host’s SSL certificate verification when delivering the HTTP request, select the Ignore SSL Errors check box.
  10. In Event Groups, select the events that trigger the webhook.
    If you selected the Select specific events option, in Events, select the check boxes of events that trigger the webhook.
  11. Click Done.

When you’re finished, use the project navigation bar to switch to another page.

Send Event Notifications to Any Application

Using the DevCS Generic Webhook, you can sends event notifications to any application that accepts webhook requests and can parse payload specific content. The webhook payload format depends on the type of the event.

The generic webhook supports all possible events of DevCS, including Git pushes, issue updates, merge request updates, and project builds. It sends a POST request to the remote service in the JSON format with details of the subscribed events.

  1. In the navigation bar, click Project Administration Gear.
  2. Click Webhooks.
  3. Click + Create Webhook.
  4. From the Type drop-down list, select Generic.
  5. In Name, enter a unique name.
  6. In URL, enter the URL of the remote service where you want to deliver the HTTP request.
  7. In Secret, enter a secret phrase that’s passed as a string with the HTTP request as a signature header.
  8. To ignore the host’s SSL certificate verification when delivering the HTTP request, select the Ignore SSL Errors check box.
  9. In Event Groups, select the events that triggers the webhook.
    If you selected the Select specific events option, in Events, select the check boxes of the events to trigger the webhook.
  10. Click Done.
The newly created Webhook appears in the Webhooks table.
To find more about the data structure of a generic Webhook, see Data Structure of a Generic Webhook.

When you’re finished, use the project navigation bar to switch to another page.

Data Structure of a Generic Webhook

The information sent by a generic webhook is delivered using a POST request with the application/json content-type, with the UTF-8 character set, in a Message object.

This table describes the fields of the Message object.

Field Description

apiVersion

Version of the API. It changes when the payload format of the request changes.

messageId

Unique identifier of the message

timestamp

Timestamp of the message when it was generated

testEvent

Set to true if this event is generated by the Test button

projectId

Unique identifier of the project

events

List of events delivered by the message

Each event delivered by the message follows a common structure. There are three types of events (ISSUE/PUSH/BUILD/REVIEW/ACTIVITY).

Field Description

eventId

Type of the event (ISSUE/PUSH/BUILD/REVIEW/ACTIVITY)

projectId

Unique identifier of the project

timestamp

Timestamp of the event

data

Data specific to the type of the event

The structure of data of each event type is described in the following sections.

ISSUE Event

The ISSUE event contains the fields described in this table.

Field Description

type

Type of the activity (CREATED - issue is created, COMMENTED - comment added, UPDATED - fields changed)

date

Timestamp of the activity

description

Description of the change

task

Description of the issue after the change

id

Issue ID

version

Change version

url

URL of the issue

title

Title of the issue

type

Type of the issue (Defect, Feature, or Task)

resolution

Resolution of the issue. The value is null if the issue isn’t resolved, otherwise, it’s set to one of the issue resolution values such as FIXED, DUPLICATE, and WORKSFORME.

reporter

User who reported the issue

asignee

User to whom the issue is assigned

comment

Content of the added comment, available if the activity type is COMMENTED

fieldUpdates

List of changed fields, available if the activity type is UPDATED

name

Field name

oldValue

Value before the change

newValue

Value after the change

Here is a JSON payload example of an issue create event.

   {
    "apiVersion": "1.0",
    "messageId": "04abc282-a44e-4c23-ba53-15b519d30066",
    "projectId": "qa-dev_example-project",
    "testEvent": false,
    "timestamp": 1417810876408,
    "events": [
        {
            "eventId": "ISSUE",
            "projectId": "example-project",
            "timestamp": 1417810876,
            "data": {
                "activities": [
                    {
                        "type": "CREATED",
                        "date": 1417810875820,
                        "description": "",
                        "author": {
                            "gravatarHash": "8940829abebbc5d8d84e37af7161fd31",
                            "loginName": "alex.admin",
                            "realName": "Alex Admin"
                        },
                        "issue": {
                            "id": 2,
                            "resolution": null,
                            "title": "Test Issue",
                            "type": "Feature",
                            "url": "http://test-server/#projects/example-project/task/2",
                            "version": "1417810875834",
                            "reporter": {
                                "gravatarHash": "8940829abebbc5d8d84e37af7161fd31",
                                "loginName": "alex.admin",
                                "realName": "Alex Admin"
                            }
                        }
                    }
                ]
            }
        }
    ]
   }

Here is a JSON payload example of an issue update event.

   {
    "apiVersion": "1.0",
    "messageId": "ccce183e-097d-4668-a07b-cf762108716e",
    "projectId": "qa-dev_example-project",
    "testEvent": false,
    "timestamp": 1417811058243,
    "events": [
        {
            "eventId": "ISSUE",
            "projectId": "example-project",
            "timestamp": 1417811058
            "data": {
                "activities": [
                    {
                        "type": "UPDATED"
                        "date": 1417811057698,
                        "description": "Assign to alex.admin\nset Resolution to FIXED\nset Status to RESOLVED\n",
                        "author": {
                            "gravatarHash": "8940829abebbc5d8d84e37af7161fd31",
                            "loginName": "alex.admin",
                            "realName": "Alex Admin"
                        },
                        "issue": {
                            "id": 2,
                            "resolution": "FIXED",
                            "title": "Test Issue",
                            "type": "Feature",
                            "url": "http://test-server/#projects/example-project/task/2",
                            "version": "1417811057698",
                            "asignee": {
                                "gravatarHash": "8940829abebbc5d8d84e37af7161fd31",
                                "loginName": "alex.admin",
                                "realName": "Alex Admin"
                            },
                            "reporter": {
                                "gravatarHash": "8940829abebbc5d8d84e37af7161fd31",
                                "loginName": "alex.admin",
                                "realName": "Alex Admin"
                            }
                        },
                        "fieldUpdates": [
                            {
                                "name": "assigned_to",
                                "newValue": "alex.admin",
                                "oldValue": ""
                            },
                            {
                                "name": "resolution",
                                "newValue": "FIXED",
                                "oldValue": ""
                            },
                            {
                                "name": "bug_status",
                                "newValue": "RESOLVED",
                                "oldValue": "UNCONFIRMED"
                            }
                        ]
                    },
                    {
                        "type": "COMMENTED"
                        "date": 1417811057929,
                        "description": "Feature is implemented",
                        "author": {
                            "gravatarHash": "8940829abebbc5d8d84e37af7161fd31",
                            "loginName": "alex.admin",
                            "realName": "Alex Admin"
                        },
                        "comment": {
                            "author": {
                                "gravatarHash": "8940829abebbc5d8d84e37af7161fd31",
                                "loginName": "alex.admin",
                                "realName": "Alex Admin"
                            },
                            "date": 1417811057929,
                            "text": "Feature is implemented",
                            "type": "UNKNOWN"
                        },
                        "task": {
                            "id": 2,
                            "resolution": "FIXED",
                            "title": "Test Issue",
                            "type": "Feature",
                            "url": "http://test-server/#projects/qa-dev_example-project/task/2",
                            "version": "1417811057698",
                            "asignee": {
                                "gravatarHash": "8940829abebbc5d8d84e37af7161fd31",
                                "loginName": "alex.admin",
                                "realName": "Alex Alex Admin"
                            },
                            "reporter": {
                                "gravatarHash": "8940829abebbc5d8d84e37af7161fd31",
                                "loginName": "alex.admin",
                                "realName": "Alex Admin"
                            }
                        }
                    }
                ]
            }
        }
    ]
  }

PUSH Event

The PUSH event contains the fields described in this table.

Field Description

refName

Updated references

commits

Commits of the Push event

sha

Commit identifier

comment

Comment in the commit

author

Author of the commit

date

Timestamp of the commit

parents

List of commit parent identifiers

repository

Name of the repository to which the commit was pushed

Here is a JSON payload example of a Git Push event.

  {
    "apiVersion": "1.0",
    "messageId": "c3378be6-6be5-4191-9b20-1fb5d429bfce",
    "projectId": "example-project",
    "testEvent": false,
    "timestamp": 1417810424512,
    "events": [
        {
            "eventId": "GIT_PUSH",
            "projectId": "example-project",
            "timestamp": 1417810424,
            "data": {
                "refName": "refs/heads/master",
                "commits": [
                    {
                        "sha": "32e03bc46a3a42eeab5dd25144a90c5b4f0b2e11",
                        "repository": "example-project.git",
                        "date": 1417810387000,
                        "comment": "file1.txt deleted, file3.txt created\n",
                        "author": {
                            "email": "alex.admin@example.com",
                            "firstName": "Alex",
                            "lastName": "Admin",
                            "username": "alex.admin"
                        },
                        "parents": [
                            "1106e8c81cb49e71024e9017235f89dc3983d4ee"
                        ]
                    },
                    {
                        "sha": "1106e8c81cb49e71024e9017235f89dc3983d4ee",
                        "repository": "example-project.git",
                        "date": 1417810290000,
                        "comment": "file2.txt updated\n",
                        "author": {
                            "email": "alex.admin@example.com",
                            "firstName": "Alex",
                            "lastName": "Admin",
                            "username": "alex.admin"
                        },
                        "parents": [
                            "8dab56fb6ba6dd0fc0d0aa8c7ce4f01d77fa0835"
                        ]
                    }
                ]
            }
        }
    ]
  }

BUILD Event

The BUILD event contains the fields described in this table.

Field Description

jobName

Name of the job

timestamp

Build timestamp

number

Build number

url

Build URL

result

Build result (SUCCESS/UNSTABLE/FAILURE/NOT_BUILT/ABORTED)

duration

Build duration

fileName

Name of the artifact

relativePath

Path relative to the job workspace

url

URL of the artifact

Here is a JSON payload example of a Build event.

  {
   "apiVersion":"1.0",
   "messageId":"4a253425-4598-4838-a4b5-aac30d0b9710",
   "timestamp":1417795613257,
   "testEvent":true,
   "projectId":"test-project",
   "events":[
      {
         "eventId":"BUILD",
         "projectId":"test-project",
         "timestamp":1417795613256,
         "data":{
            "jobName":"example-job",
            "details":{
               "timestamp":1417795590256,
               "number":16,
               "url":"http://server/test-dev/s2/test-project/hudson/job/test-project.example-job/16/",
               "result":"SUCCESS",
               "duration":36905,
               "artifacts":[
                  {
                     "fileName":"sample-1.0-SNAPSHOT.jar",
                     "relativePath":"sample-project/target/sample-1.0-SNAPSHOT.jar",
                     "url":"http://server/test-dev/s2/test-project/hudson/job/test-project.example-job/16/artifact/sample-project/target/sample-1.0-SNAPSHOT.jar"
                  }
               ]
            }
         }
      }
   ]
  }

REVIEW Event

The REVIEW event represents changes in merge requests and contains the fields described in this table.

Field Description

review

Description of the merge request

id

Unique ID of the merge request

title

Title of the merge request

created

Timestamp of the merge request creation

modified

Timestamp of the merge request last modification

reporter

Profile of the user who created the merge request

repository

Name of the Git repository

reviewBranch

Name of the review branch

targetBranch

Name of the target branch

user

Profile of the user who performed the action

action

Merge request action

Here is the list of merge request actions:

  • CREATED: Merge request is created

  • COMMIT: New commits are pushed to the review branch

  • MERGED: Review branch is merged into the target branch

    The MERGED action is created if the review branch is merged via the Merge button in the web user interface. If the review branch is merged from a Git client (such as the Git command line interface), no action is generated.

  • REVIEWED: Reviewer approves or rejects a merge request

  • COMMENTED: A comment is added to the merge request

  • CLOSED: Merge request is closed

commits

List of commits added to the merge request

The commits field is generated for the COMMIT action. These fields are also generated for the commits action:

  • author: Author of the commit

  • message: Commit message

  • sha: SHA-1 checksum hash of the commit

text

Text of the comment

The text field is generated for the COMMENTED action.

comment

Comment of the rejected or approved review action

The comment field is generated for the REVIEWED action.

result

Result of the merge (FAST_FORWARD, FAST_FORWARD_SQUASHED, ALREADY_UP_TO_DATE, FAILED, MERGED, MERGED_SQUASHED, MERGED_SQUASHED_NOT_COMMITTED, CONFLICTING, ABORTED, MERGED_NOT_COMMITTED, NOT_SUPPORTED, CHECKOUT_CONFLICT)

The result field is generated for the MERGED action.

status

Status of the merge request (APPROVED, REJECTED, COMPLETED, CANCELLED)

The status field is generated for the REVIEWED and the CLOSED action.

Here is a JSON payload example of a REVIEW event.

{
    "apiVersion": "1.0",
    "events": [
        {
            "data": {
                "action": "CREATED",
                "review": {
                    "created": 1431944319181,
                    "id": 6,
                    "modified": 1431944319635,
                    "reporter": {
                        "email": "alex.admin@example.com",
                        "firstName": "Alex",
                        "lastName": "Alex Admin",
                        "username": "alex.admin"
                    },
                    "repository": "example-project.git",
                    "reviewBranch": "bug_branch",
                    "targetBranch": "master",
                    "title": "Bug Fix"
                },
                "user": {
                    "email": "alex.admin@example.com",
                    "firstName": "Alex",
                    "lastName": "Alex Admin",
                    "username": "alex.admin"
                }
            },
            "eventId": "REVIEW",
            "projectId": "example-project",
            "timestamp": 1431944327
        }
    ],
    "messageId": "08758261-e4e7-4c8f-b9fe-7b74f715803f",
    "projectId": "example-project",
    "testEvent": false,
    "timestamp": 1431944329923
}


{
    "apiVersion": "1.0",
    "events": [
        {
            "data": {
                "action": "COMMIT",
                "commits": [
                    {
                        "author": "alex.admin",
                        "message": "fix version #3\n",
                        "sha": "8fd1d2a53a181aa7015e7535b6f64295c432eca7"
                    },
                    {
                        "author": "alex.admin",
                        "message": "fix version #2\n",
                        "sha": "ff2bdf91d0fb6fb664315879ec38acc0931beeb6"
                    }
                ],
                "review": {
                    "created": 1431944319181,
                    "id": 6,
                    "modified": 1431944340209,
                    "reporter": {
                        "email": "alex.admin@example.com",
                        "firstName": "Alex",
                        "lastName": "Alex Admin",
                        "username": "alex.admin"
                    },
                    "repository": "example-project.git",
                    "reviewBranch": "bug_branch",
                    "targetBranch": "master",
                    "title": "Bug Fix"
                },
                "user": {
                    "email": "alex.admin@example.com",
                    "firstName": "Alex",
                    "lastName": "Alex Admin",
                    "username": "alex.admin"
                }
            },
            "eventId": "REVIEW",
            "projectId": "example-project",
            "timestamp": 1431944353
        }
    ],
    "messageId": "5de98d08-49cd-4a19-86b5-d89757f75a1d",
    "projectId": "example-project",
    "testEvent": false,
    "timestamp": 1431944355646
}

{
    "apiVersion": "1.0",
    "events": [
        {
            "data": {
                "user": {
                    "email": "clara.coder@example.com",
                    "firstName": "Clara",
                    "lastName": "Coder",
                    "username": "clara"
                },
                "review": {
                    "created": 1436521285722,
                    "id": 23,
                    "modified": 1438246154916,
                    "reporter": {
                        "email": "alex.admin@example.com",
                        "firstName": "Alex",
                        "lastName": "Admin",
                        "username": "alex"
                    },
                    "repository": "example-project.git",
                    "reviewBranch": "bug_branch",
                    "targetBranch": "master",
                    "title": "Some Review"
                },
                "action": "REVIEWED",
                "status": "REJECTED",
                "comment": "rejected the request because ...",
            },
            "eventId": "REVIEW",
            "projectId": "example-project",
            "timestamp": 1438246163
        }
    ],
    "messageId": "f0a75815-3470-4dc4-be82-975935152ed3",
    "projectId": "example-project",
    "testEvent": false,
    "timestamp": 1438246165924
}

{
    "apiVersion": "1.0",
    "events": [
        {
            "data": {
                "action": "COMMENTED",
                "review": {
                    "created": 1431944319181,
                    "id": 6,
                    "modified": 1431944478701,
                    "reporter": {
                        "email": "alex.admin@example.com",
                        "firstName": "Alex",
                        "lastName": "Alex Admin",
                        "username": "alex.admin"
                    },
                    "repository": "example-project.git",
                    "reviewBranch": "bug_branch",
                    "targetBranch": "master",
                    "title": "Bug Fix"
                },
                "text": "General comment",
                "user": {
                    "email": "alex.admin@example.com",
                    "firstName": "Alex",
                    "lastName": "Alex Admin",
                    "username": "alex.admin"
                }
            },
            "eventId": "REVIEW",
            "projectId": "example-project",
            "timestamp": 1431945965
        }
    ],
    "messageId": "d2a36692-dae6-44d4-a112-7a615b524cc3",
    "projectId": "example-project",
    "testEvent": false,
    "timestamp": 1431945967166
}

{
    "apiVersion": "1.0",
    "events": [
        {
            "data": {
                "action": "MERGED",
                "result": "FAST_FORWARD",
                "review": {
                    "created": 1431944319181,
                    "id": 6,
                    "modified": 1431944478701,
                    "reporter": {
                        "email": "alex.admin@example.com",
                        "firstName": "Alex",
                        "lastName": "Alex Admin",
                        "username": "alex.admin"
                    },
                    "repository": "example-project.git",
                    "reviewBranch": "bug_branch",
                    "targetBranch": "master",
                    "title": "Bug Fix"
                },
                "user": {
                    "email": "alex.admin@example.com",
                    "firstName": "Alex",
                    "lastName": "Alex Admin",
                    "username": "alex.admin"
                }
            },
            "eventId": "REVIEW",
            "projectId": "example-project",
            "timestamp": 1431945438
        }
    ],
    "messageId": "b06d5581-d38a-4972-9c80-dc1455547776",
    "projectId": "example-project",
    "testEvent": false,
    "timestamp": 1431945440287
}

{
    "apiVersion": "1.0",
    "events": [
        {
            "data": {
                "action": "CLOSED",
                "review": {
                    "created": 1431944319181,
                    "id": 6,
                    "modified": 1431945453967,
                    "reporter": {
                        "email": "alex.admin@example.com",
                        "firstName": "Alex",
                        "lastName": "Alex Admin",
                        "username": "alex.admin"
                    },
                    "repository": "example-project.git",
                    "reviewBranch": "bug_branch",
                    "targetBranch": "master",
                    "title": "Bug Fix"
                },
                "status": "COMPLETED",
                "user": {
                    "email": "alex.admin@example.com",
                    "firstName": "Alex",
                    "lastName": "Alex Admin",
                    "username": "alex.admin"
                }
            },
            "eventId": "REVIEW",
            "projectId": "example-project",
            "timestamp": 1431945459
        }
    ],
    "messageId": "b434f6d2-b5c7-4c0a-bab2-3e6614025865",
    "projectId": "example-project",
    "testEvent": false,
    "timestamp": 1431945453967
}
  

ACTIVITY Event

The ACTIVITY event contains the fields described in this table.

Field Description

author

Profile of the user whose action produced the activity

The value is null for system activities.

name

Name of the activity

properties

Description of the activity, or the object whose fields depends on the name field.

Here is the list of supported activities:

  • BUILD: Triggered when a build in the integrated Hudson server ends.

  • DEPLOYMENT: Triggered when the application is deployed, undeployed, started, or stopped using Deploy page in the web user interface.

  • MEMBER: Triggered when a user is added, removed, or role is updated.

  • REVIEW: Triggered when a merge request is created, closed, or updated.

  • RSS: Triggered when a new article is acquired from a registered feed.

  • SCM_COMMIT: Triggered when a commit is pushed to a project repository.

  • SCM_REPO: Triggered when a project repository is added or removed.

  • TASK: Triggered when an issue is created or updated.

  • WIKI: Triggered when a wiki page is created or updated.

Here is a JSON payload example of an Activity event.

{
    "apiVersion": "1.0",
    "events": [
        {
            "data": {
                "author": {
                    "email": "alex.admin@example.com",
                    "firstName": "Alex",
                    "lastName": "Alex Admin",
                    "username": "alex.admin"
                },
                "name": "WIKI",
                "properties": {
                    "page": "New Page Title",
                    "type": "CREATED"
                }
            },
            "eventId": "ACTIVITY",
            "projectId": "example-project",
            "timestamp": 1432035029
        }
    ],
    "messageId": "45066d85-5a5c-4647-9a6c-43fc8e99481a",
    "projectId": "qa-dev_test-rss",
    "testEvent": false,
    "timestamp": 1432035031418
}