Export Project Data to and Import Project Data from Oracle Cloud

You can export your project’s data to an OCI Object Storage bucket or an OCI Object Storage Classic container of any data center to perform a backup. You can then import the data into the same or another project of the same or a different data center when you want.

To export or import data, first, you’d need to set up a connection to OCI Object Storage or OCI Object Storage Classic.

Exported Data

Before you export a project's data, note that not all the artifacts of the project are exported. You'll have to manually export the remaining artifacts and data manually.

This table shows you which artifacts are exported and which aren't:

Artifact Exported? Notes
Project users No When you export a project's data, its users are not exported, but all data associated to usernames (such as issue ownership and reviewers of a merge request) is preserved.

After you import the project's data to another project, when you add a user to the project with the same username, the data associated to the username is automatically restored.

User's favorite settings or personal preferences No  
Hosted Git repositories Yes  
Mirrored public external Git repositories Yes  
Mirrored private external Git repositories No Password protected external Git repositories aren't exported.

After you import the project's data to another project, you must add each external private Git repository.

Branch restrictions Yes  
Merge Requests Yes  
Default reviewers of a branch Yes After you import the project's data to another project, default reviewers are added automatically after the same users are added to the target project.
Maven artifacts No  
Linked Docker registries No  
Build jobs Yes All builds of jobs are exported, along with their logs and artifacts. If a job retains excessive builds, it affects the export process and consumes disk space on your bucket or container.

It's recommended that you configure a job to retain reasonable number of builds before you export the project.

Build job's history and artifacts Yes  
Build job's VM template name No  
Pipelines Yes  
Releases Yes  
Deployment configurations No  
Environments No  
Issues Yes  
Agile boards Yes  
Wiki pages Yes  
Snippets Yes  
Project template definition No  
Announcements No  
Webhooks No  
RSS/ATOM feeds No  
Link rules No  
Project tags Yes  
Issue products and components Yes  
Default owners of issue components Yes After you import the project's data to another project, owners are activated automatically after the same users are added to the target project.
Issue custom fields Yes  
Named passwords Yes  

Export to and Import from an OCI Object Storage Bucket

If you're an OCI user, you can export your project's data to an OCI Object Storage bucket and import from it.

The exported data isn't encrypted and can be downloaded from the bucket. If you're exporting the project's data for the first time, set up an OCI Object Storage bucket for the project and users who can read from or write to it. You can use a common bucket for all projects of the organization, but it's recommended that you use a separate bucket for each project. This allows you to organize archive files better as they aren't mixed with the archive files of other projects. Contact the OCI administrator to create the bucket. You should also ask the OCI administrator to set up users with read-write access to the bucket.

Set Up the OCI Object Storage Bucket

To set up the OCI Object Storage bucket, sign in as the OCI administrator and follow these steps:
  1. In the compartment that hosts DevCS resources, create a bucket for the project.
    1. In the left navigation bar, under Core Infrastructure, go to Object Storage and click Object Storage.
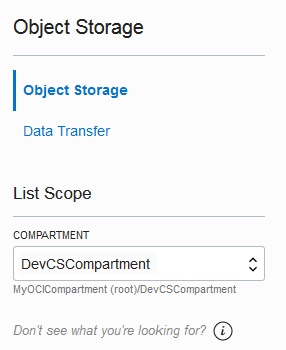
    2. On the left side of the Object Storage page, from the Compartment list, select the DevCS compartment.

      Example:

      Compartment list
    3. Click Create Bucket.
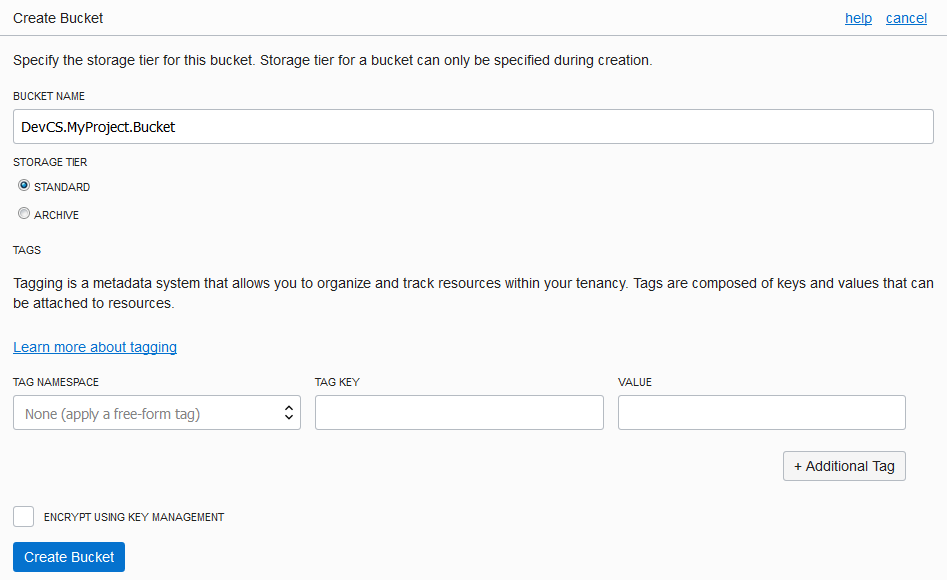
    4. In the Create Bucket dialog box, fill in the details, and click Create Bucket.

      Example:

      Create Bucket dialog box
  2. Create a user to access the bucket.
    1. In the left navigation bar, under Governance and Administration, go to Identity and click Users.
    2. Click Create User.
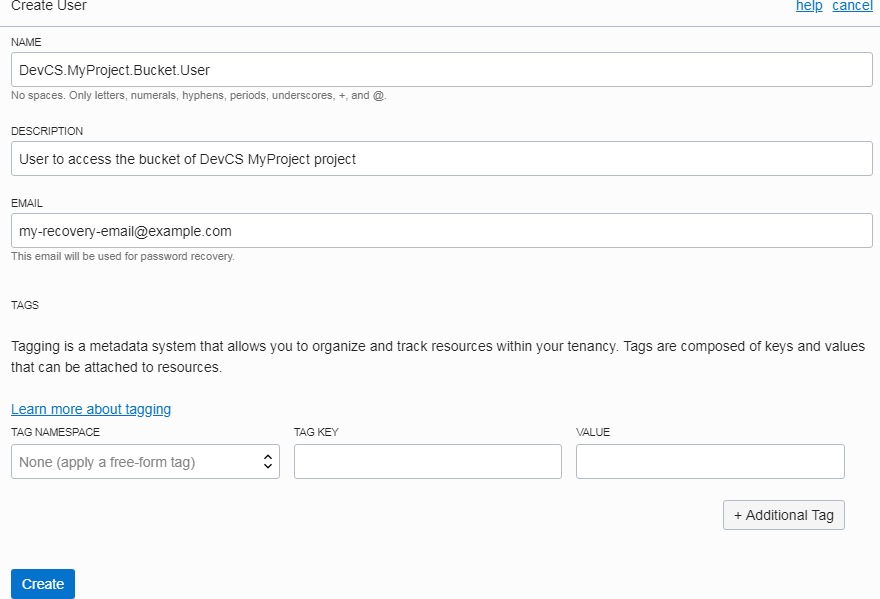
    3. In the Create User dialog box, fill in the fields, and click Create.

      Example:

      Add User dialog box
  3. On your computer, generate a private-public key pair in the PEM format.
    To learn more, see How to Generate an API Signing Key.

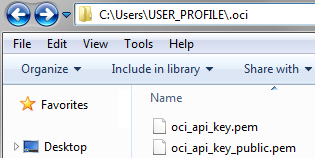
    Example of private-public key files on a Windows computer:

    Private and Public key files
  4. Upload the public key to the user's details page.
    1. Open the public key file in a text editor and copy its contents.
    2. In the left navigation bar of the OCI dashboard, under Governance and Administration, go to Identity and click Users.
    3. Click the user's name created in Step 2.
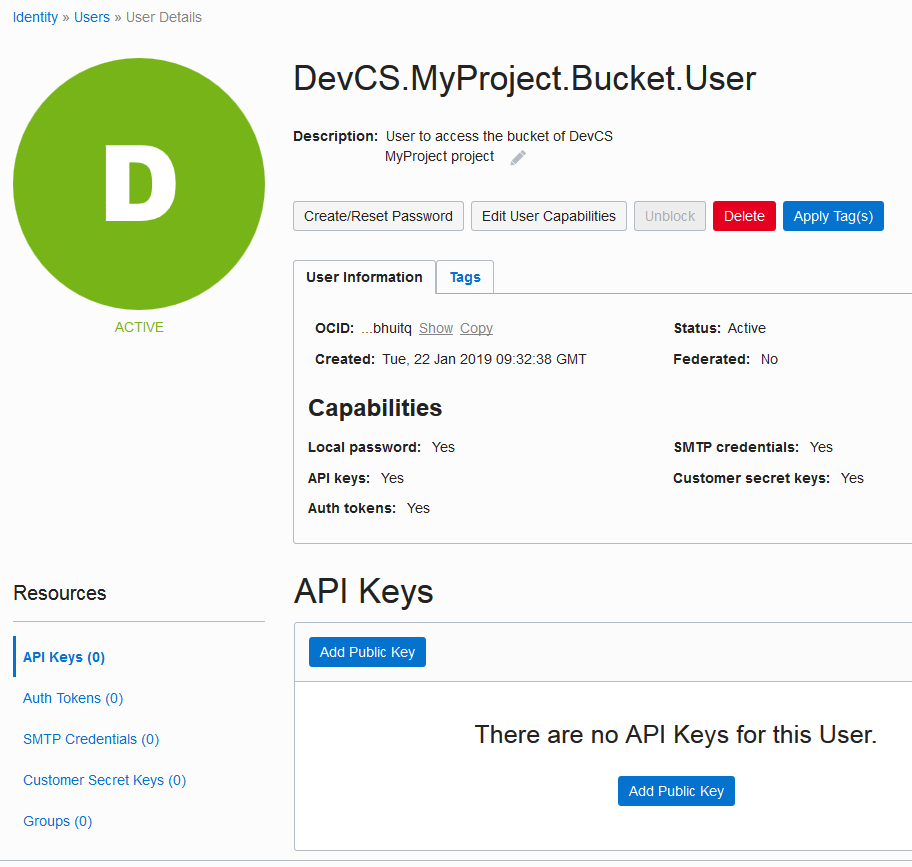
    4. In the User Details page, click Add Public Key.

      Example:

      User Details page
    5. In the Add Public Key dialog box, paste the contents of the public key file, and click Add.
    To learn more, see How to Upload the Public Key.
  5. On the Groups page, create a group for the user who can access the bucket and add the user to the group.
    1. In the left navigation bar, under Governance and Administration, go to Identity and click Groups.
    2. Click Create Group.
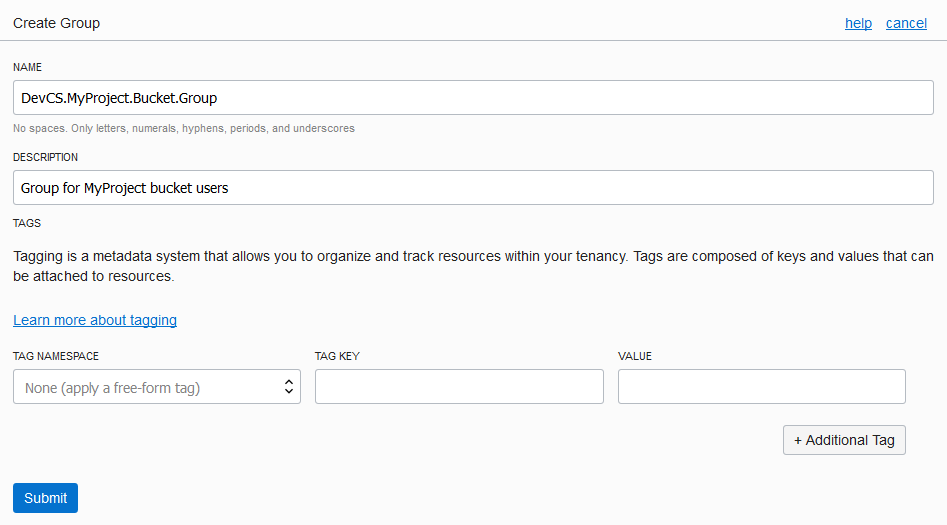
    3. In the Create Group dialog, fill in the fields and click Submit.

      Example:

      Create Group dialog box
    4. On the Groups page, click the group's name.
    5. On the Group Details page, click Add User to Group.
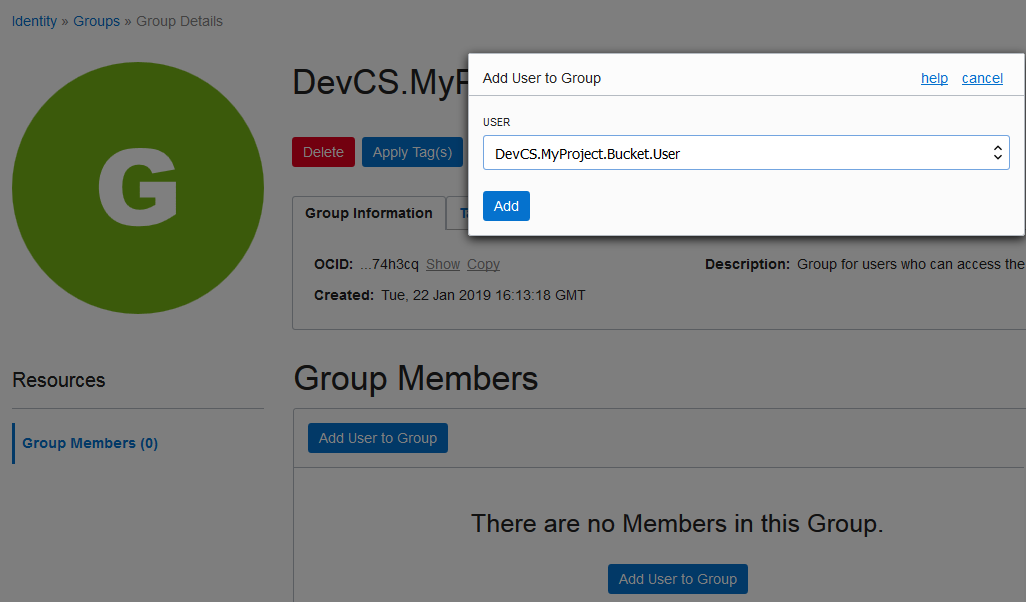
    6. In the Add User to Group dialog box, select the user created in Step 2, and click Add.

      Example:

      Add user to group
    To learn more, see Working with Groups.
  6. In the DevCS compartment, create a policy with read and write access to the bucket.
    You can give read and write access to the same user, or create different users.
    1. In the left navigation bar, under Governance and Administration, go to Identity and click Policies.
    2. On the left side of the Policies page, from the Compartment list, select the DevCS compartment.
    3. Click Create Policy.
    4. In Name and Description, enter a unique name and a description.
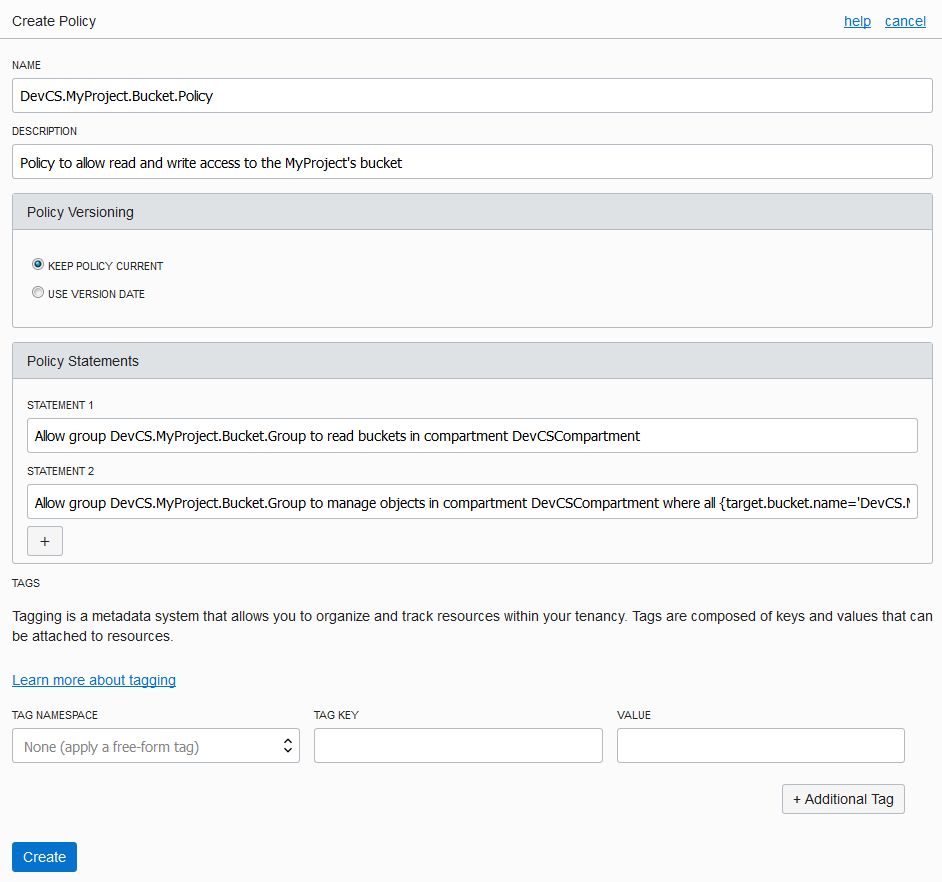
    5. In Policy Statements, add statements to restrict read and write access to the bucket.

      To allow different user groups to read objects from and write objects to the bucket, create separate policies. Here are some statement examples:

      To: Add these statements:
      Allow a group to read from and write objects to a bucket (required to import and export a project's data)

      allow group <group-name> to read buckets in compartment <compartment-name>

      allow group <group-name> to manage objects in compartment <compartment-name> where all {target.bucket.name='<bucket-name>', any {request.permission='OBJECT_CREATE', request.permission='OBJECT_INSPECT'}}

      Allow a group to download objects from a bucket (required to import a project's data)

      allow group <group-name> to read buckets in compartment <compartment-name>

      allow group <group-name> to read objects in compartment <compartment-name> where target.bucket.name='<bucket-name>'

      Example:

      Bucket policy
    6. Click Create.
    To learn more, see Working with Policies.

Export Project Data

When you export project data, DevCS exports data to an archive file in the specified OCI Object Storage bucket.

To export project data to an OCI Object Storage bucket, you need the following:
  • Name of the target bucket
  • Private key and fingerprint of a user who can write objects to the bucket
  • Details of the compartment that hosts the bucket

Contact the OCI administrator for the details and get the required input values. See Get the Required OCI Input Values.

the project owner icon You must be assigned the project Owner role to export data.

  1. Open the DevCS project.
  2. In the navigation bar, click Project Administration Gear.
  3. Click Data Export/Import.
  4. Click the Job tab.
  5. In Account Type, select OCI.
  6. In Tenancy OCID, enter the tenancy's OCID copied from the Tenancy Details page.
  7. In User OCID, enter the user's OCID value who can access the bucket.
  8. In Home Region, select the home region of the OCI account.
  9. In Private Key, enter the private key of the user who can access the bucket.
  10. In Passphrase, enter the passphrase used to encrypt the private key. If no passphrase was used, leave the field empty.
  11. In Fingerprint, enter the fingerprint value of the private-public key pair.
  12. In Compartment OCID, enter the compartment's OCID copied from the Compartments page.
  13. In Storage Namespace, enter the storage namespace copied from the Tenancy Details page.
  14. Click Connect.
  15. In the Create Job section, in Type, select Export.
  16. In Name, enter a name for the export job.
  17. In Description, enter the job's description.
  18. In Storage Container, select the bucket to export the project data.
  19. In Storage Object, if required, update the default .zip file name.
  20. Click Export.
  21. In the Confirm Project Export dialog box, select the Export project data check box, and click Yes.
  22. In the Exporting Project page, expand Steps to see the status of each module.
After the export is complete, a notification is added to the Recent Activities feed of the Project Home page and to the History tab of the Data Export/Import page.

Import Project Data

When you import data, it overwrites the data of the project. All artifacts of the project are replaced with the components from the imported project.

To import project data from an OCI Object Storage bucket, you need the following:
  • Name of the target bucket
  • Name of the archive file with the project data
  • Private key and fingerprint of a user who can read objects from the bucket
  • Details of the compartment that hosts the bucket

Contact the OCI administrator for the details and get the required input values. See Get the Required OCI Input Values.

the project owner icon You must be assigned the project Owner role to import data.

  1. Open the DevCS project.
  2. In the navigation bar, click Project Administration Gear.
  3. Click Data Export/Import.
  4. Click the Job tab.
  5. In Account Type, select OCI.
  6. In Tenancy OCID, enter the tenancy's OCID copied from the Tenancy Details page.
  7. In User OCID, enter the user's OCID value who can access the bucket.
  8. In Home Region, select the home region of the OCI account.
  9. In Private Key, enter the private key of the user who can access the bucket.
  10. In Passphrase, enter the passphrase used to encrypt the private key. If no passphrase was used, leave the field empty.
  11. In Fingerprint, enter the fingerprint value of the private-public key pair.
  12. In Compartment OCID, enter the compartment's OCID copied from the Compartments page.
  13. In Storage Namespace, enter the storage namespace copied from the Tenancy Details page.
  14. Click Connect.
  15. In the Create Job section, in Type, select Import.
  16. In Name, enter a name for the import job.
  17. In Description, enter the job's description.
  18. In Storage Container, select the bucket to import the project data from.
  19. In Storage Object, select the .zip file name of the exported data.
  20. Click Import.
  21. In the Confirm Project Import dialog box, read and verify the container and object details, select the Import project data check box, and click Yes.
  22. In the Importing Project page, expand Steps to see the status of each module.
    If you want to cancel the import process, click Cancel.
When an import job is in progress, the project is in the locked state. You can’t access other pages of the project until the import job is complete. After the import is complete, you're redirected to the Project Home page. A notification of the import action is added to the Recent Activities feed of the Project Home page and to the History tab of the Data Export/Import page.

Export to and Import from an OCI Object Storage Classic Container

If you're an OCI Classic user, you can export project data to an OCI Object Storage Classic container and import from it.

The exported data isn't encrypted and can be downloaded from the container. If you're exporting the project's data for the first time, set up an OCI Object Storage Classic container for the project and users who can read from or write to it. You can use a common container for all projects of the organization, but it's recommended that you use a separate container for each project. This allows you to organize archive files better as they aren't mixed with the archive files of other projects. Contact the identity domain administrator or the OCI Object Storage Classic administrator to create the container. You should also ask the administrator to set up users with read-write access to the bucket.

Set Up the OCI Object Storage Classic Container

An identity domain administrator or the OCI Object Storage Classic administrator can create an OCI Object Storage Classic container. After creating the container, assign a user the Storage_ReadWriteGroup (Storage_ReadWriteGroup). If you want the user to read files from the container, but don't want them to write or delete files, assign the Storage_ReadOnlyGroup (Storage_ReadOnlyGroup) role to the user. Then, share the container and user details with the project owner. Project owner will need the details to connect to the container to export or import data.

You must be an identity domain administrator to create a container and set up the user.

  1. On the OCI Object Storage Classic console, create a container for the project.
    1. Open the Oracle Cloud My Services dashboard.
    2. On the Oracle Cloud Dashboard, in the Storage Classic tile, click Action the Action menu icon and select Open Service Console.
    3. On the Storage Classic page, click Create Container.
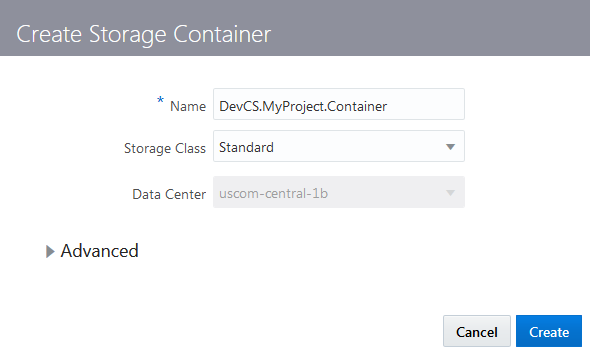
    4. In the Create Storage Container dialog box, enter the container name, and click Create.

      Example:

      Create Storage Container dialog box
  2. Set up a user to access the container.
    1. On the Oracle Cloud My Services dashboard, click Users.
    2. Click the user's name tile to whom you want to assign the access.
      To create a user, click Add and fill in the details.
    3. Click the Roles tab.
    4. In All Services, search for Storage Classic.
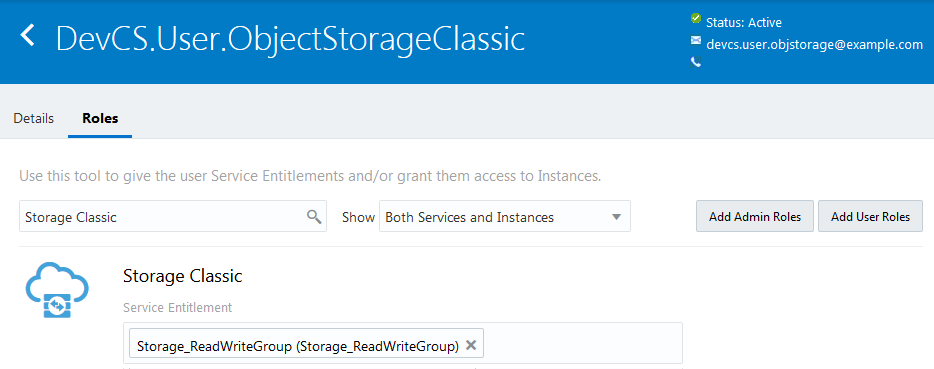
    5. To assign read and write access to the user, add the Storage_ReadWriteGroup (Storage_ReadWriteGroup) role.
      To assign the read access, add the Storage_ReadOnlyGroup (Storage_ReadOnlyGroup) role.

      Example:

      Storage Classic role
    6. Return to the dashboard.

Export Project Data

When you export project data, DevCS exports data to an archive file in the specified OCI Object Storage Classic container.

To export project data to an OCI Object Storage Classic container, you need the following:
  • Name of the target container
  • Credentials of a user with the Storage.Storage_Administrator or the Storage_ReadWriteGroup identity domain role.
  • Service ID and the authorization URL of OCI Object Storage Classic

Contact the identity domain administrator or the OCI Object Storage Classic administrator for the details and get the required input values. See Get OCI Object Storage Classic Input Values.

the project owner icon You must be assigned the project Owner role to export data.

  1. Open the DevCS project.
  2. In the navigation bar, click Project Administration Gear.
  3. Click Data Export/Import.
  4. Click the Job tab.
  5. In Account Type, select OCI Classic.
  6. In Service ID, enter the value copied from the last part of the REST Endpoint URL field of the Service Details page.
    For example, if the value of REST Endpoint URL is https://demo12345678.storage.oraclecloud.com/v1/Storage-demo12345678, then enter Storage-demo12345678.
  7. In Username and Password, enter the credentials of the user assigned the Storage.Storage_Administrator or Storage_ReadWriteGroup identity domain role.
  8. In Authorization URL, enter the URL copied from the Auth V1 Endpoint field of the Service Details page.
    Example: http://storagetria01234-usoracletria12345.storage.oraclecloud.com/auth/v1.0.
  9. Click Connect.
  10. In the Create Job section, in Type, select Export.
  11. In Name, enter a name for the export job.
  12. In Description, enter the job's description.
  13. In Storage Container, select the container to export the project data.
  14. In Storage Object, if required, update the default .zip file name.
  15. Click Export.
  16. In the Confirm Project Export dialog box, select the Export project data check box, and click Yes.
  17. In the Exporting Project page, expand Steps to see the status of each module.
After the export is complete, a notification is added to the Recent Activities feed of the Project Home page and to the History tab of the Data Export/Import page.

Import Project Data

When you import data, it overwrites the data of the project. All artifacts of the project are replaced with the components from the imported project.

To import project data from an OCI Object Storage Classic container, you need the following:
  • Name of the target container
  • Name of the archive file with the project data
  • Credentials of a user with the Storage.Storage_Administrator, Storage_ReadWriteGroup, or Storage_ReadOnlyGroup identity domain role
  • Service ID and the authorization URL of OCI Object Storage Classic

Contact the identity domain administrator or the OCI Object Storage Classic administrator for the details and get the required input values. See Get OCI Object Storage Classic Input Values.

the project owner icon You must be assigned the project Owner role to import data.

  1. Open the DevCS project.
  2. In the navigation bar, click Project Administration Gear.
  3. Click Data Export/Import.
  4. Click the Job tab.
  5. In Account Type, select OCI Classic..
  6. In Service ID, enter the value copied from the last part of the REST Endpoint URL field of the Service Details page.
    For example, if the value of REST Endpoint URL is https://demo12345678.storage.oraclecloud.com/v1/Storage-demo12345678, then enter Storage-demo12345678.
  7. In Username and Password, enter the credentials of the user assigned the Storage.Storage_Administrator, Storage_ReadWriteGroup, or Storage_ReadOnlyGroup identity domain role.
  8. In Authorization URL, enter the URL copied from the Auth V1 Endpoint field of the Service Details page.
    Example: http://storagetria01234-usoracletria12345.storage.oraclecloud.com/auth/v1.0.
  9. Click Connect.
  10. In the Create Job section, in Type, select Import.
  11. In Name, enter a name for the import job.
  12. In Description, enter the job's description.
  13. In Storage Container, select the container to import the project data from.
  14. In Storage Object, select the .zip file name of the exported data.
  15. Click Import.
  16. In the Confirm Project Import dialog box, read and verify the container and object details, select the Import project data check box, and click Yes.
  17. In the Importing Project page, expand Steps to see the status of each module.
    If you want to cancel the import process, click Cancel.
When an import job is in progress, the project is in the locked state. You can’t access other pages of the project until the import job is complete. After the import is complete, you're redirected to the Project Home page. A notification of the import action is added to the Recent Activities feed of the Project Home page and to the History tab of the Data Export/Import page.

View Export and Import History of the Project

If you want to know the export and import history of a project, you can do so from the History tab of the Data Export/Import page.

  1. In the navigation bar, click Project Administration Gear.

  2. Click Data Export/Import.

  3. Click the History tab.

The history of all export and import jobs is displayed. Select a job to view its details. In the case of a failure, expand Steps to view the modules that passed and failed.