Manage the Project
As an Oracle Developer Cloud Service (DevCS) project owner, you can perform various project-wide actions, such as edit a project’s name and description, configure the project as a project template, create announcements, set project tags, manage repositories, and configure link rules.
![]() You must be assigned the project Owner role to manage a project.
You must be assigned the project Owner role to manage a project.
Edit a Project’s Name, Description, or Visibility
After creating a project, you can edit a project's properties from the Project Administration page.
- In the navigation bar, click Project Administration
 .
. - Click Properties.
- In Name and Description, update the project name and description.
- In Security, update the project’s share status.
When you’re finished, use the project navigation bar to switch to another page.
Configure Project Templates
You can define an existing project as a template for new projects that users can use as a starting point. When creating a project, if a user selects a project template, the project template’s data is copied to the new project, which the user can modify.
Project template data may include its Git repositories, build job configurations, deployment configurations, links, wikis, and announcements. For example, if a project template hosts an application in its Git repositories; information on how to use the application in its wiki pages; build configuration in its jobs; and Oracle Cloud deployment target details in its deployment configurations, then the data of the project template is copied to the new project. Members of the new project can use the application, run builds of pre-configured jobs, and deploy build artifacts to Oracle Cloud using pre-configured deployment configurations without making any changes to the code or any of its configurations.
When you define a project template, you define its visibility (who can use the project template), configure rules (what data can be copied from the project template), and use variables (customize actions based on user input when the data is copied).
After a project is created using a template, any updates made to the template project aren’t reflected in the created project.
Define and Manage a Project Template
You can define a project template from the Project Administration page.
Define a Private Project Template
You can define a private project template if you don’t want all users of the organization to copy data from the project. Private project templates aren’t listed by name in the Templates page of the New Project wizard unless you’re a member of the project template. Non-members can use a private project template only if they have the private key of the project template.
To generate a new private key, edit the project template, click Show, and then click Regenerate. You may want to do this if you don't want users who already have the old key value to copy the project data from the template.
Define Project Template Rules
Rules define the artifacts to copy from the template project to the new project.
When you define a project as a project template, all rules are enabled by default. Some rules can't be edited and some rules can’t be added more than once.
This table describes the available rules.
| Use this rule ... | To copy: | Can this rule be edited? | Can this rule be added more than once? |
|---|---|---|---|
|
Build Jobs |
Build jobs and pipelines of the project template to the new project. |
No |
No |
|
Wiki Content |
Wiki pages of the project template to the new project. |
No |
No |
|
Links |
Link rules of the project template to the new project. |
No |
No |
|
Git Repository |
Specified Git repositories along with its branches to the new project. |
Yes |
Yes |
|
External Git Repository |
Specified external Git repository along with its branches to the new project. |
Yes |
Yes |
|
Deployments |
Oracle Java Cloud Service - SaaS Extension deployment configurations of the project template to the new project. Other deployment configurations are not copied. |
No |
No |
|
Announcements |
Announcements of the project template to the new project. |
No |
No |
To add or remove a rule, follow these steps.
- Open the Template Settings page.
- To add a rule, scroll to the Rules section. From the
Add Rule drop-down list, select the Git
Repository rule.
To remove a rule, click Remove
 .
.
Add or Edit a Git Repository Rule
By default, all hosted and external Git repositories rules are enabled.
You can edit the default rules and add new Git Repository rules if you added Git repositories to the project after the template was defined. You can also add a rule to make a copy of an existing Git repository on the new project that uses the template. If you don't want a Git repository to be included in the template, remove its rule.
| Action | How To |
|---|---|
|
Add or edit a hosted Git repository rule |
|
|
Add or edit an external Git repository rule |
|
Add and Manage Variables
Variables define user input. Based on the input, you can configure the template to change the action or properties of data that’s copied to the new project. You can add or edit variables from the Variables section on the Template page.
Delete a Project's Template
When you delete a project template, you delete the template metadata (rules and variables). The project itself isn’t deleted.
- In the navigation bar, click Administration.
- Click Properties.
- In the Template section, click Delete Template.
- In the Delete Template Definition dialog box, click Delete Template.
Manage Project Announcements
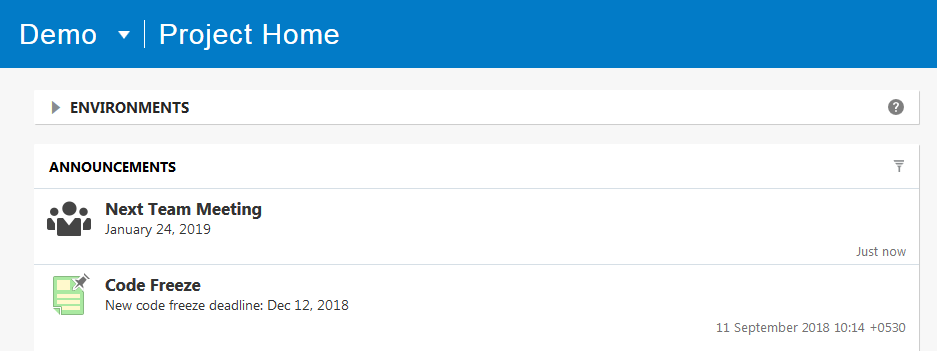
Project announcements are messages available on the Project Home page above the Recent Activity feed.
Example:

To create an announcement, follow these steps:
- In the navigation bar, click Project Administration
 .
.
- Click Announcements.
| Action | How To |
|---|---|
|
Create an announcement |
|
|
Copy an announcement |
Instead of creating an announcement, you can copy the contents and icon of an existing announcement, and edit it.
|
|
View or edit an announcement |
Any changes made to the fields are saved immediately when the focus moves out of the field. |
|
Deactivate or activate an announcement |
If you don’t want to display an announcement and don’t want to delete it either, you can deactivate it. Deactivated announcements aren’t visible on the Project Home page. Later, if you want, you can activate it and make it visible.
|
|
Delete an announcement |
|
Manage Project Tags
A project tag is a keyword that you can use to categorize an artifact, such as an issue or a merge request. You can use the tags to search for artifacts. By default, three tags (Plan, Release, and Epic) are available in a project.
- In the navigation bar, click Project Administration
 .
. - Click Tags.
| Action | How To |
|---|---|
|
Create a project tag |
|
|
Rename a tag |
|
|
Delete a tag |
You can’t delete a tag if artifacts refer to it. First, remove all artifacts that refer to the tag or remove the tag from those artifacts, and then remove the tag. In the Tags page, to the right side of the tag name, click Delete |
View a Project’s Usage Metrics
When you subscribe to DevCS, you’re entitled to some storage space on Oracle Cloud. To learn about your storage entitlement, see the Pricing tab on https://cloud.oracle.com/developer_service.
You can find out the disk usage metrics of your project’s components, such as Git repositories, wikis, and issues.
- In the navigation bar, click Project Administration
 .
. - Click Usage Metrics.
Manage Repositories
You can manage the Git, Maven, and linked Docker registries from the Project Administration: Repositories page.
See these links to find out how to manage repositories.
Display RSS/ATOM Feeds
Some websites use ATOM and RSS feeds to publish news feeds. You can subscribe to the RSS/ATOM feeds and configure your project to display them in the Recent Activities feed of the Project Home page. All project members can see the feed. You can add any RSS/ATOM feed including Oracle approved RSS Feeds, News, Site monitors, and Jenkins or Hudson servers.
To configure RSS/ATOM feeds, follow these steps:
- In the navigation bar, click Project Administration
 .
.
- Click RSS/ATOM Feeds.
| Action | How To |
|---|---|
|
Create an RSS/ATOM Feeds handler |
|
|
Test a feed handler |
If the test is successful, the status icon changes from Untested |
|
View logs |
In the Logs page, all Request and Response logs of each test are available. Select the date-time stamp in the left list of the test to view its logs. |
|
Edit a feed’s handler |
|
|
Deactivate or activate a handler |
|
|
Delete a handler |
|
Configure Link Rules
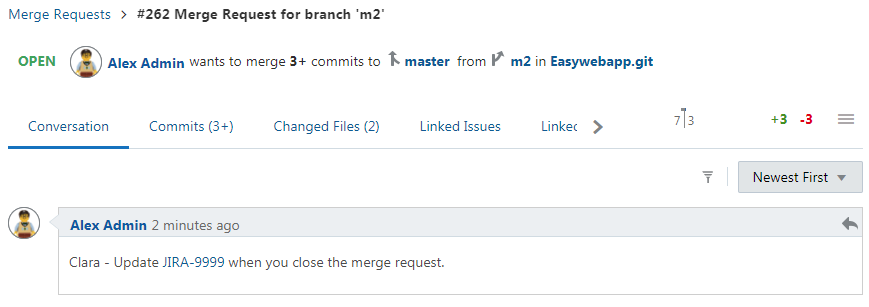
In a project, you can define rules to convert plain text to URL links automatically when the text is entered in commit comments and merge request comments. For example, when you enter an email address or a URL in a merge request comment, it’s automatically converted to a link.
To configure link rules, follow these steps:
- In the navigation bar, click Project Administration
 .
.
- Click Links.
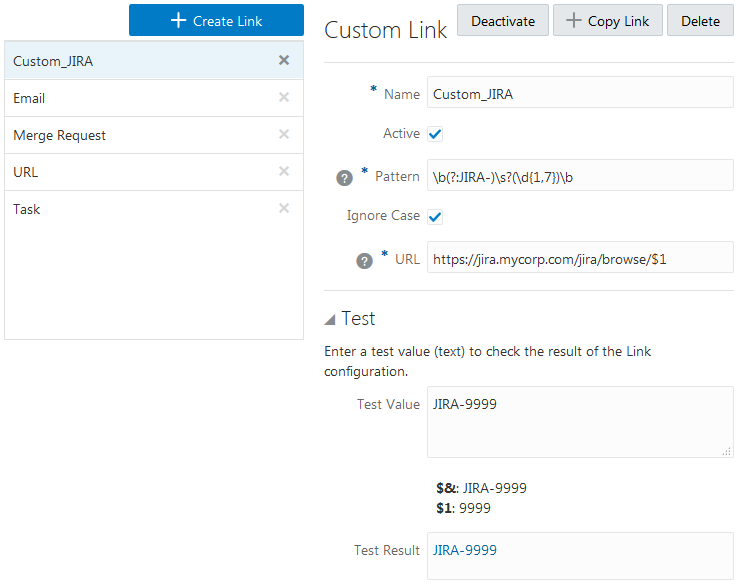
From the Links page, you can create and manage link rules that convert plain text to URL links automatically. You can use Regular Expressions, also called as RegExp, to define the link rules. Some pre-defined built-in link rules are available on the Links page. To create a custom rule, you can either copy an existing link rule or create a blank rule. To find more about RegExp, see http://www.regular-expressions.info.
This illustration shows an example of a custom link rule.
This illustration shows an example of the link in a merge request comment.
| Action | How To |
|---|---|
|
Create a link rule |
|
|
Copy a link rule |
|
|
Edit a link rule |
You can’t edit a built-in link rule. You can create a copy of built-in rule and edit it, and if required, disable the original pre-configured rule. On the Links page, in the link rule list on the left, select the rule to edit its details on the right. |
|
Activate or deactivate a link rule |
If deactivated, the text that matches the rule is not converted to a link. On the Links page, in the link rule list on the left, select the rule. Click Activate or Deactivate. You can also select or deselect the Active check box. |
|
Delete a link rule |
You can’t delete a built-in rule. On the Links page, in the link rule list on the left, select the rule. On the right side of the page, click Delete. |

