Manage the Organization
You can update your Oracle Developer Cloud Service (DevCS) organization’s name, description, manage projects, manage virtual machines (VM) and VM templates, and view the usage metric of projects.
![]() You must be the Organization Administrator to manage the organization.
You must be the Organization Administrator to manage the organization.
Update the Organization’s Display Name and Description
<your_devcs_instance_name>-<your_oracle_account_name>.
- In the navigation bar, click Organization
 .
. - Click the Properties tab.
- In Name, edit the organization name.
- In the Confirm Organization Name Change dialog, click Yes.
- In Description, if necessary, enter or edit the description of the organization.
Manage Projects of the Organization
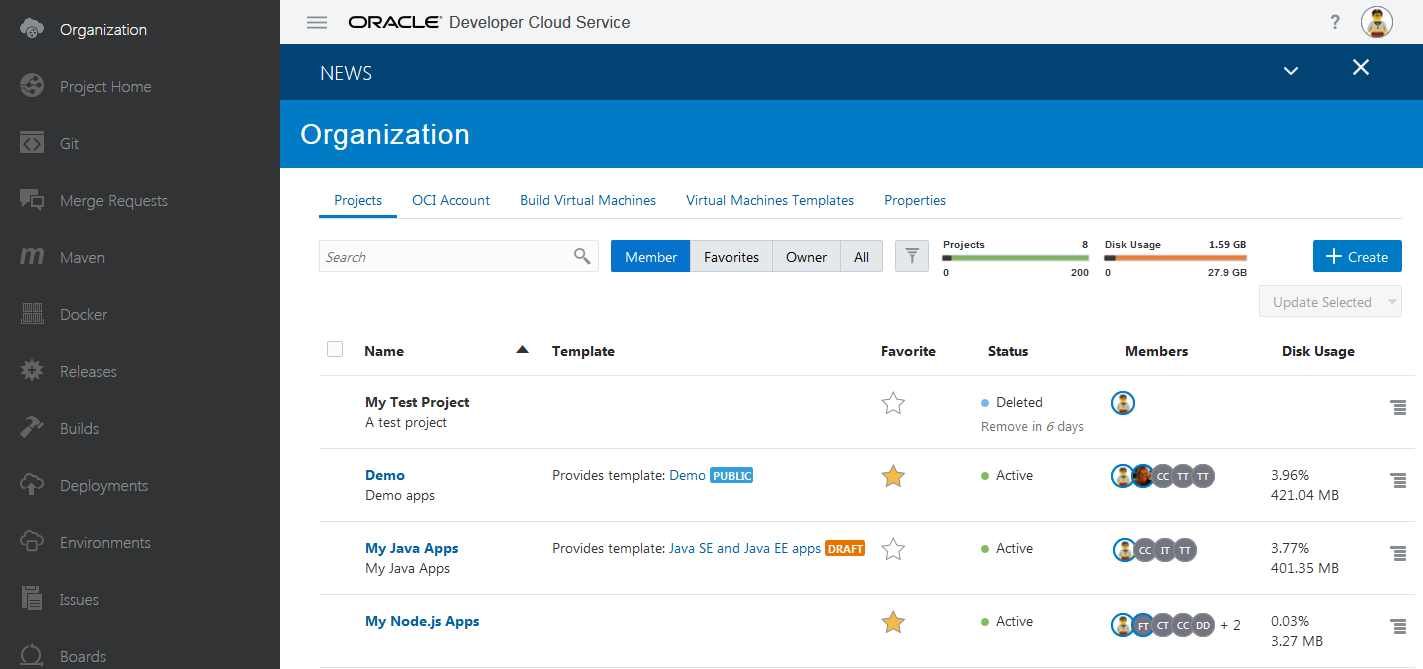
As the Organization Administrator, you can access and manage all projects. You can assign a project’s Owner role to yourself, delete a project, revoke a deleted project, or postpone a deleted project by a few days.
- In the navigation bar, click Organization
 .
.
-
Click the Projects tab.
Example:
| Action | How To |
|---|---|
|
Create a project |
Click + Create.
See Create a Project. |
| Open a project | In the Name column, click the project name.
See Open a Project. Note that you can open a project only if you're a member or an owner. Projects where you aren't a member or an owner don't appear as links. You can't open a project that's in the deleted state. |
| Search for a project | Use the search box above the projects list. |
| Filter projects |
In Member/Owner/Favorite/All, click a filter option to enable it. Click the Member button to view projects where you're a member. Click Owner to view projects where you're an Owner. Click Favorite to view your favorite projects. Click All to view all projects of the organization.To see more filter options, click Detailed Filter |
| Mark a project as a favorite | In the Favorite column, click Favorite |
| View a project's team members | The Members column shows the gravatars of the project's team members. A blue circle around a user's gravatar indicates the user is assigned the project's Owner role. Click the gravatars to display names and email addresses of all team members. |
|
Assign a project’s Owner role to yourself |
You can assign a project’s Owner role to yourself. This is usually helpful in a case when all Owners of the project are removed or have left the organization. As the Organization Administrator, you can then take the ownership of such projects and then assign the Owner role to another project user. For the project whose ownership you want to assign to yourself, click Update Project |
|
Delete a project |
As the Organization Administrator, you can delete any project.
The project’s State is marked as |
|
Postpone removal of a deleted project |
At times, you may be unsure if you want to revoke a deleted project that’s close to its permanent removal date. For such projects, you can choose to postpone their removal by a few days. For the deleted project you want to postpone, click Update Project The project’s permanent removal date is rescheduled and the message is displayed at the top. In Status, check the project’s delete message to know when the project will be permanently removed. |
|
Undelete a project |
When you undelete a project, you get an option to update the name and description of the project. When revoked, the project URLs will change if a different name of the deleted project is specified.
|
|
Select multiple projects |
You can select multiple projects and perform a common action on them.
Some options, such as Undelete, are not available in the Update Selected menu. |
| View usage metrics of projects |
Next to the Detailed Filter For each project, the Disk Usage column shows the project's disk usage and its usage percentage with respect to the total disk usage of all projects. Click the number to open a pop-up with details of usage by each service in the project. |
Create and Manage OCI Account and Virtual Machines
To configure the OCI account, see Connect to OCI or OCI Classic. To manage virtual machines and virtual machine templates, see Set Up the Build System.
