Design and Use Job Pipelines
You can create, manage, and configure job pipelines from the Pipelines tab of the Builds page.
What Is a Pipeline?
A Pipeline lets you define dependencies of jobs and create a path or a chain of builds. A pipeline helps you in running continuous integration jobs and reduce network traffic.
To create a pipeline, you design a pipeline diagram where you define the dependencies of jobs. When you create a dependency of a job over another, you define the order of automatic builds of the dependent jobs. If required, the dependent jobs can be configured to use artifacts of the parent job too.
For example, in this diagram, Job 2 depends on Job 1 and runs after Job 1 is successful.
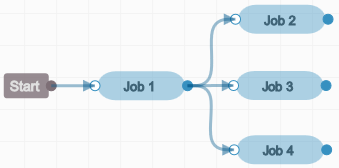
In this diagram, Job 2, Job 3, and Job 4 depend on Job 1 and run after Job 1 is successful.
This diagram shows a complex example.
The above diagram defines these dependencies:
-
Job 2 and Job 3 depend on Job 1 and run after Job 1 is successful
-
Job 4 and Job 5 depend on Job 2 and run after Job 2 is successful
-
Job 6 and Job 7 depend on Job 4 and run after Job 4 is successful
-
Job 8 depends on Job 6 and Job 7 and runs after Job 6 and Job 7 are successful
-
Job 1 is the master job. Running Job 1 triggers a chain and all jobs from Job 1 through Job 8 run automatically one after the other.
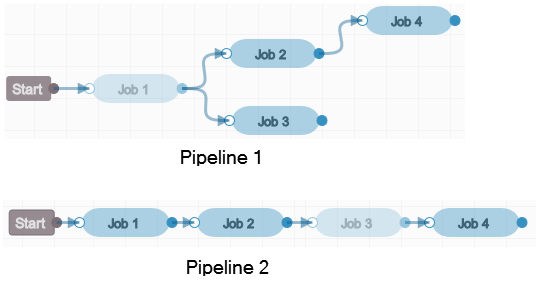
You can create multiple pipeline diagrams of jobs. If multiple pipelines have some common jobs, then multiple builds run of those jobs. For example, in this figure, Pipeline 1 and Pipeline 2 have common jobs.
Let’s assume that Pipeline 1 is defined first and Pipeline 2 is defined second. If both pipelines are triggered, the builds run in this order:
-
A build of Job 1 runs.
-
Builds of Job 2 and Job 3 of Pipeline 1 get in the build executor queue after Job 1 is successful. A build of Job 2 of Pipeline 2 also gets in the build executor queue after Job 1 is successful.
-
Builds of jobs in build executor queue run on first-come first-served basis. So, Job 2 and Job 3 of Pipeline 1 run first. Let’s call the build as Build 1 of Job 2 and Job 3. Then, another build of Job 2 of Pipeline 2 runs. Let’s call it Build 2 of Job 2.
-
A build of Job 4 of Pipeline 1 joins the build executor queue as soon as Job 2 is successful. A build of Job 3 of Pipeline 2 also joins the queue when Job 2 is successful.
-
As soon as the build executor is available, Build 1 of Job 4 runs and Build 2 of Job 3 also runs. Remember that Build 1 of Job 3 ran in Pipeline 1.
-
After a build of Job 3 of Pipeline 2 is successful, a build of Job 4 of Pipeline 2 joins the queue and runs when the build executor is available. Remember that this is Build 2 of Job 4 as Build 1 ran in Pipeline 1.
While creating multiple pipeline diagrams with common jobs, be careful if a job is dependent on artifacts of the parent job.
Set Up a Pipeline
You configure a job pipeline from the Pipelines tab of the Builds page. To set up a pipeline, design a pipeline diagram.
Create a Pipeline
- In the navigation bar, click Builds
 .
.
-
Click the Pipelines tab.
-
Click + Create Pipeline.
-
In the Create Pipeline dialog box, in Name and Description, enter a unique name and description.
-
To trigger the pipeline build if a job of the pipeline is triggered externally (outside the pipeline), select the Auto start when pipeline jobs are build externally check box.
In the pipeline, builds of jobs following the triggered job run as per the diagram, but builds of jobs preceding the triggered job don’t run.
-
To disable manual or automatic builds of the jobs that are part of the pipeline when the pipeline is running, select the Disallow pipeline jobs to build externally when the pipeline is building check box.
-
Click Create.
-
In the Designing Pipeline page, design the pipeline, and click Save.
Use the Pipeline Designer
You use the pipeline designer to create a pipeline diagram, that defines dependencies between jobs and the order of their builds.
The Jobs list shows all jobs of the project on the left side of the page. Drag and drop jobs to the designer area to design the pipeline diagram. Click Configure ![]() to configure the dependency condition between the parent and the child job.
to configure the dependency condition between the parent and the child job.
Create a One-to-One Dependency
A one-to-one dependency is formed between a parent and a child job. When a build of the parent job is successful, a build of the child job runs automatically.
To create a one-to-one dependency of a child job to its parent job:
-
From the Jobs list, drag-and-drop the parent job to the designer area.
-
From the Jobs list, drag-and-drop the dependent (or child) job to the designer area.
-
To indicate the parent job, the job that triggers the pipeline build, mouse over the
 handle of the Start node. The cursor icon changes to the + cursor icon.
Example:
In the above example, the Start node indicates the starting point of the pipeline. The Start node is available in all pipelines and can’t be removed.
Job 1is the parent job andJob 2is the dependent job. -
Drag the cursor from the Gray circle
 handle to the White circle
  handle of the job. An arrow line appears.
Example:
-
Similarly, mouse-over the Blue circle
 handle of the parent job and drag-and-drop the arrow head over the White circle
  of the child job.
A dependency is now formed. In the above example, Job 2 is now dependent on Job 1. A build of Job 2 will run automatically after every Job 1 build is successful.
To delete a job node or a dependency, click to select it, and then click Delete ![]() .
.
Create a One-to-Many Dependency
A one-to-many dependency is formed between one parent job and multiple child jobs. When a build of the parent job is successful, builds of child jobs run automatically.
To create a one-to-many dependency between jobs:
-
From the Jobs list, drag-and-drop the parent job to the designer area.
-
From the Jobs list, drag-and-drop all dependent (or child) jobs to the designer area.
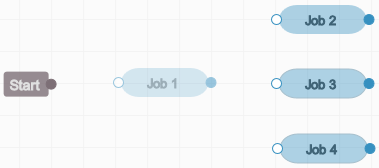
Example:
Here,Job 1is the parent job andJob 2,Job 3, andJob 4are the dependent jobs. -
To indicate the parent job, the job that triggers the pipeline build, mouse over the Gray circle
 handle of the Start node. The cursor icon changes to the + cursor icon.
-
Drag the cursor from the Gray circle
 handle to the White circle
  handle of the job. An arrow line appears.
Example:
-
Similarly, mouse-over the Blue circle
 handle of the parent job and drag-and-drop the arrow head over the White circle
  of the child jobs.
A dependency is now formed. In the above example, Job 2, Job 3, and Job 4 are now dependent on Job 1. A build of Job 2, Job 3, and Job 4 runs automatically after every Job 1 build is successful.
To delete a job node or a dependency, click to select it, and then click Delete ![]() .
.
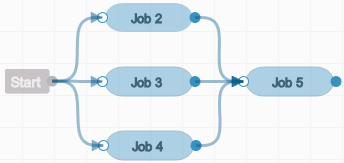
Create a Many-to-One Dependency
A many-to-one dependency is formed between multiple parent jobs and one child job. When builds of all parent jobs are successful, a build of the child job runs automatically.
To create a many-to-one dependency on parent jobs with a child job:
-
From the Jobs list, drag-and-drop all parent jobs to the designer area.
-
From the Jobs list, drag-and-drop the dependent (or child) jobs to the designer area.
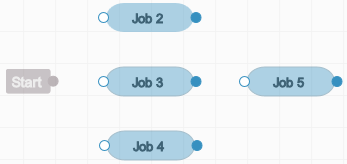
Example:
Here,
Job 2,Job 3, andJob 4are the parent jobs andJob 5is the dependent job. -
To indicate the parent job, the job that triggers the pipeline build, mouse over the Gray circle
 handle of the Start node. The cursor icon changes to the + cursor icon.
-
Drag the cursor from the Gray circle
 handle to the White circle
  handle of the parent job. Repeat the steps for all parent nodes.
-
Drag the cursor from the White circle
 handle of the parent job. An arrow line appears. Repeat the steps for all parent nodes.
-
Similarly, mouse over the Blue circle
 handle of the parent jobs and drag-and-drop the arrow head over the White circle
  handle of the dependent job.
Example:
A dependency is now formed. In the above example, Job 5 is dependent on Job 2, Job 3, and Job 4. A build of Job 5 will run automatically after Job 2, Job 3, and Job 4 are successful.
To delete a job node or a dependency, click to select it, and then click Delete ![]() .
.
Configure the Dependency Condition
When you create a dependency between a parent and a child job, by default, a build of the child job runs after the parent job’s build is successful. You can configure the dependency to run a build of the child job after the parent job’s build fails.
-
In the pipeline designer, click to select the dependency condition arrow.
-
In the pipeline designer toolbar, click Configure
 .
.
-
In the Pipeline config flow editor, in Result Condition, select Successful, Failed, or Test Failed.
You can also double-click the dependency arrow to open the Pipeline config flow editor. You can’t configure the dependency condition from the Start node.
-
Click Apply.
Manage Pipelines
You can manage a pipeline by editing the pipeline diagram from the Configure Pipeline page.
| Action | How To |
|---|---|
|
Design the pipeline diagram |
In the Pipelines tab, for the pipeline whose diagram you want to edit, Configure |
|
Run a pipeline |
To run all jobs of a pipe in the defined order, in the Pipelines tab, click Build |
|
View a pipeline’s instances |
When you trigger a pipeline, an instance of the pipeline is created. To view the instances, in the Pipelines tab, click the pipeline name. |
|
Edit a pipeline |
In the Pipelines tab, for the pipeline you want to edit, Configure |
| Delete a pipeline |
Deleting a pipeline deleted the dependency or the order of job builds. The jobs aren’t deleted. In the Pipelines tab, for the pipeline you want to delete, click Delete |
View a Pipeline’s Instances
When a pipeline build is triggered, an instance of the pipeline is created and is available in the pipeline’s instances page.
A pipeline's status is determined by the builds of its jobs.
-
Success
 : Indicates that all builds of the pipeline are successful.
-
Failed
 : Indicates that a build of a pipeline job failed, hence the pipeline has failed too.
-
Canceled
 : Indicates the pipeline was canceled.
-
In Progress
 : Indicates a pipeline is in progress.
In the pipeline diagram, the color of job nodes indicates the job’s status.
-
Green: The last build of the job was successful
-
White: A build of the job is running or hasn’t run yet
-
Red: The last build of the job failed
