 Transfer a Conversation to an Oracle Service Cloud Agent
 Before You Begin
This 45-minute tutorial shows you how to transfer a chat session from a skill to an Oracle Service Cloud live chat.
This is the first tutorial in a series. Read the tutorials in this order:
- Transfer a Conversation to an Oracle Service Cloud Agent
- Pass Customer Information to a Live Chat
- Transfer a Chat Session to a Live Chat Queue
Background
Oracle Digital Assistant is an environment for building digital assistants, which are user interfaces driven by artifical intelligence (AI) that help users accomplish a variety of tasks in natural language conversations. Digital assistants consist of one or more skills, each of which fulfills a specific type of task, such as order food, make reservations, or change contact information. You can add skills to digital assistants or expose them by themselves through multiple chat and voice channels, custom mobile apps, and websites.
Oracle Service Cloud provides users with access to live agents for questions and issues that require human interaction.
Here’s the scenario for this tutorial:
You run a pizza store and your customers can order pizzas by accessing a skill from either Facebook Messenger or a digital assistant on your website. Several of your customers have complained that the skill can't help in certain situations and that sometimes it would be nice to chat with a live agent to complete their orders.
When your customers aren't able to complete their orders using the skill, they know that they can use the live chat on your web site, but then they have to start over and they have to explain what their issues are. They prefer that the skill transfers them to the live chat along with all the information that they've provided so far.
Here's what you need to do:
- Set up an agent-integration channel.
- Clone the CbPizzaBot sample that's available in Oracle Digital Assistant.
- Add an intent to transfer the conversation to a live agent.
- Add states to the dialog flow to perform the transfer.
- Test the skill.
This should be quite an interesting experience, so let’s get started!
What Do You Need?
To complete this tutorial, you need:
- Access to Oracle Digital Assistant version 20.08 or later.
- Access to Oracle Service Cloud release 19A or later with the following chat configuration settings set to
true. Contact your Oracle account manager to set these configurations.- Chat Custom Interface API (
CHAT_CONSUMER_WS_API_ENABLED) - Chat Third Party Queue Integration API (
CHAT_UQ_WS_API_ENABLED)
- Chat Custom Interface API (
- A chat-enabled Oracle Service Cloud interface. You can use the Oracle Service Cloud Configuration Assistant, which you access from My Services, to verify that the interface is enabled for chat.
- Oracle Service Cloud chat-rules configuration that routes conversations that are transferred from the skill to the default queue.
- An Oracle Service Cloud staff account with the following profile permissions:
- Account Authentication for Agent Browser User Interface
- Account Authentication and Session Authentication for Public SOAP API
- Agent access to the default chat queue
Available - Unrestrictedchat agent status
- The domain name and host-name prefix from the URL that you use to launch the Agent Browser User Interface. For example,
if the URL is
sitename.example.com, then the host-name prefix issitenameand the domain name isexample.com.
 Set Up the Agent-Integration Channel
To enable Oracle Digital Assistant to connect with Oracle Service Cloud, you need to provide some basic information, such as the domain name, the host-name prefix, and access credentials. You use an agent-integration channel to set up the connection.
- In Digital Assistant, click
 to open the side menu.
 - Click Development and select Channels.
- Click
again to collapse the side menu.
- Click the Agent Integrations tab, and then click
 .
. - Enter these values:
- Name:
ServiceCloudIntegration. If a channel already exists with that name, add your inititals to create a unique name. Make a note of this name, you'll need it later when you modify the skill's dialog flow. - Integration Type: Service Cloud.
- Domain Name: The domain name of your Oracle Service Cloud instance (for example,
example.com). - Hostname Prefix: The host-name prefix of your Oracle Service Cloud instance (for example,
sitename).If you have multiple interfaces, then you might need to include the interface ID in the host (site) name. For example, for the interface that has an ID of 2, you would use something like
sitename-2. - User Name: The user name of a staff member who has the profile permissions that are listed in What Do You Need?
- Password: The user's password.
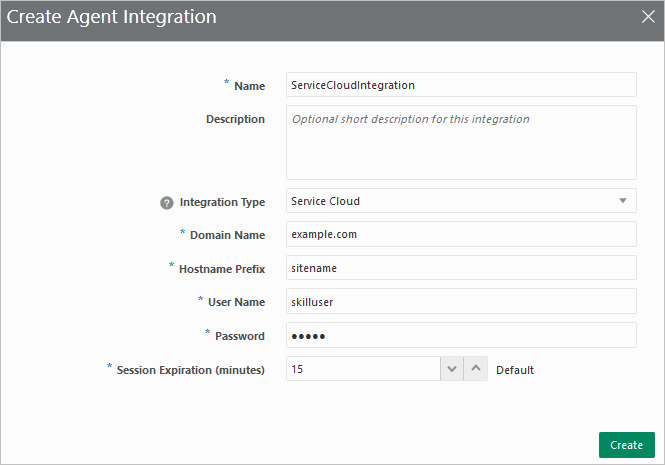
- Name:
- Click Create.
- Set the Interaction Enabled switch to On.
 Clone the CbPizzaBot Skill
To get started quickly, you'll clone an existing skill. The CbPizzaBot sample is a good choice for cloning because it's short and basic. It simply lets you order a pizza and cancel an order.
- In your Oracle Digital Assistant instance, click the hamburger icon
to open the side menu, and
then click Development > Skills.
- On the Skills page, enter
CbPin the filter field to locate the CbPizzaBot skill. - If your instance doesn't have this skill, then do these steps:
- In the side menu, click Development > Store.
- Enter
CbPin the filter field to locate the CbPizzaBot skill. - On the
CbPizzaBotcard, click Options and then click Pull.
 - Return to the Skills page, and then enter
CbPin the filter field to locate the CbPizzaBot skill that you just pulled.
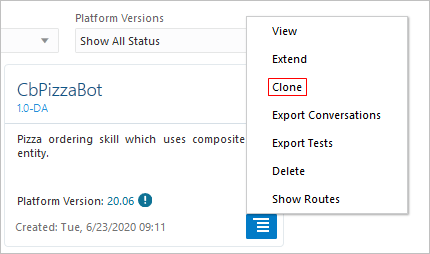
-
On the PizzaBot card, click Options , and then select Clone.
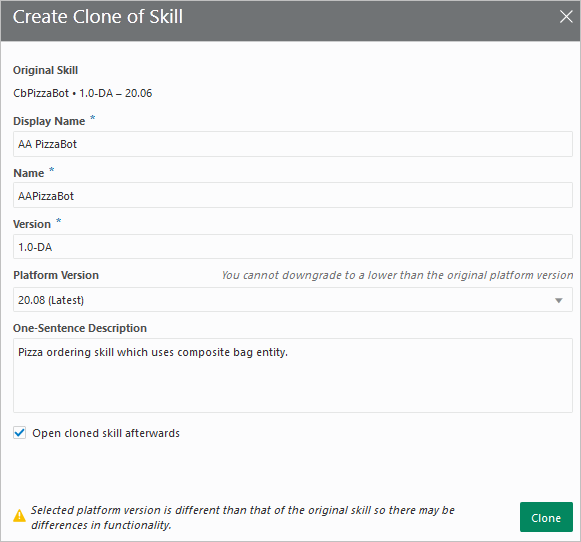
- Enter these values:
- Display Name: Your initials followed by
PizzaBot(for example,AA PizzaBot). - Version:
1.0.
- Display Name: Your initials followed by
- Select Open cloned skill afterwards, and then click Clone.
-
In the left navigation bar, click Settings
 ,
and verify that Enable Insights is switched to On.
,
and verify that Enable Insights is switched to On.
You must enable insights so that the skill can transfer the conversation history to the agent.
 Define an Intent to Transfer to a Live Agent
Now that you have a skill to work with, let's enable it to transfer a chat session to a live agent.
A skill uses intents to understand what tasks it's designed to assist with and how users request assistance for each task. Your skill already has intents for ordering pizzas and for cancelling orders. You need to add an intent for transferring to a live agent.
- In your copy of the CbPizzaBot skill, in the left navigation bar, click Intents
 .
. - Click
 to add an intent.
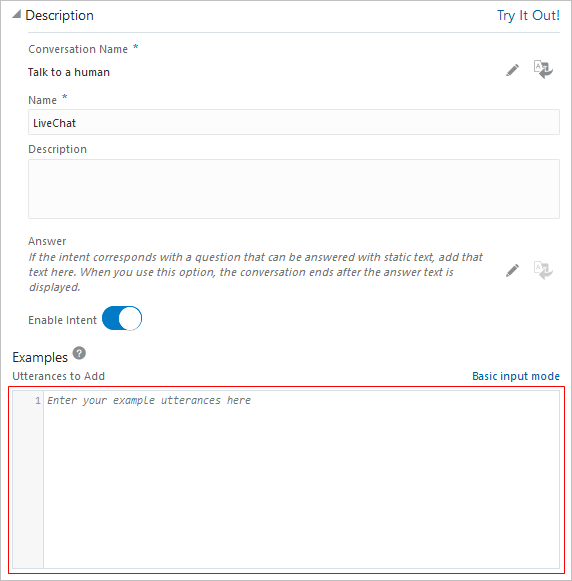
 - Set the intent's name to
LiveChat, and then press Enter. - Click the edit icon for Conversation Name, set the conversation name to
Talk to a human, and then press Enter. -
Click Advanced input mode to display a multi-line text box.
- Click Copy
 in the following code box, paste the text in the multi-line text box, and then click
  .
.
A person to answer my questions please Agent please Anybody there to chat about Are any agents available Are there any real people I can talk to Are there any live agents available Are there real customer service agents available Can I connect to a live agent can I converse with a customer assistant Can I talk with a human Can I discuss this with a live customer service representative can I engage with a customer support staff person Can I speak to a human connect to a living person? I need to chat with a human I want to speak to a person I want to talk to a manager I want to talk to somebody speak to an agent talk to a manager - Click
 , which is in the top-right corner of the page, and then click Submit.
Whenever you add or change an intent, you need to train the skill so that it can recognize utterances that are similar to the intent examples and know what intent an utterence should resolve to.
 Add a Dialog Flow to Transfer to a Live Agent
Now that you've added the intent, you need to make these changes create the dialog flow for transferring a chat session to a live agent:
- Add an
actionto transition to the new intent - Initiate a connection with Oracle Service Cloud live chat
- Transfer the chat session to live chat
- Resume the conversation when it's transferred back to the skill
- Click Flows
 .
. - In the dialog flow, search for
System.Intentto find theintentstate. - As shown in bold in the following snippet, add an action for the new
LiveChatintent to theactionskey.intent: component: "System.Intent" properties: variable: "iResult" transitions: actions: LiveChat: "livechatProfileFirstName" OrderPizza: "orderPizza" CancelPizza: "cancelorder" unresolvedIntent: "unresolved" - In a real implementation, the messaging platform channel populates the profile information.
For testing purposes, copy the following states that set profile information, and then paste the states after the last state in the dialog flow.
Replace
your first nameandyour last namewith your own nameTip: You can get the completed dialog flow for this tutorial from dialog-flow.txt.
#####################################
# Service Cloud Live Chat Integration
#####################################

  # Typically, the messaging client sets these values
  # We'll hard code them for testing purposes

  livechatProfileFirstName:
    component: "System.SetVariable"
    properties:
      variable: "profile.firstName"
      value: "your first name" #Set this property
    transitions:
      next: "livechatProfileLastName"

  livechatProfileLastName:
    component: "System.SetVariable"
    properties:
      variable: "profile.lastName"
      value: "your last name" #Set this property
    transitions:
      next: "livechatProfileEmail"

  livechatProfileEmail:
    component: "System.SetVariable"
    properties:
      value: "first.last@example.com"
      variable: "profile.email"
    transitions:
      next: "livechatInitConnection"
Digital Assistant passes the profile values to the live chat automatically.
- After the last state, add these states to initiate the connection with the agent-integration channel and to pass the chat session to the live agent.
  # Initiate a connection to Oracle Service Cloud

  livechatInitConnection:
    component: "System.AgentInitiation"
    properties:
      agentChannel: "ServiceCloudIntegration" #Set this property
      nlpResultVariable: "iResult"
      waitingMessage: "Let me connect you with a customer service agent who can further assist you"
      errorMessage: >
        Our apologies. We are having system issues and we can't
        connect you with an agent right now.
      rejectedMessage: "I'm sorry. It looks like no one's available now."
    transitions:
      actions:
        accepted: "livechatTransfer"
        rejected: "livechatHandleNoTransfer"
        error: "livechatHandleNoTransfer"

  # Transfer the conversation to an available agent

  livechatTransfer:
    component: "System.AgentConversation"
    properties:
      agentChannel: "ServiceCloudIntegration" #Set this property
      nlpResultVariable: "iResult"
      exitKeywords: "bye, good bye, good night, end, quit"
      conclusionMessage: "That ends our conversation. Have a nice day"
      expiryMessage: "Hmmm, neither you nor the agent have sent any messages in awhile."
      errorMessage: >
        We apologize but we are having system issues
        and we lost connection with the live agent
    transitions:
      actions:
        agentLeft: "livechatEndPrompt"
        expired: "livechatEndPrompt"
        error: "livechatHandleNoTransfer"
      next: "livechatEndPrompt"
Tip: Be sure to always have a
nexttransition for theSystem.AgentConversationcomponent to handle the case where the chat user types an exit keyword. -
If your agent-integration channel has a different name, change
ServiceCloudIntegrationin both states to the name that you used. -
After the last state in the dialog flow, add these states to handle the
System.AgentInitiationandSystem.AgentConversationtransitions.# Conversation ended or timed out, start over livechatEndPrompt: component: "System.Output" properties: text: "Connecting you back to the bot. What do you want to do next?" keepTurn: false transitions: return: "done" # No agents available or there was a Service Cloud system error livechatHandleNoTransfer: component: "System.Output" properties: text: "You can try again later or call us at 650.555.0185" transitions: return: "done" - Click Validate to ensure that your flow doesn't have any errors.
- If there are validation errors, click
 to get details about the errors. Typically, the errors are caused by invalid indentation.
 - If the Train button has an exclamation point (!), click the button to retrain the skill.
 Test the Transfer to a Live Agent
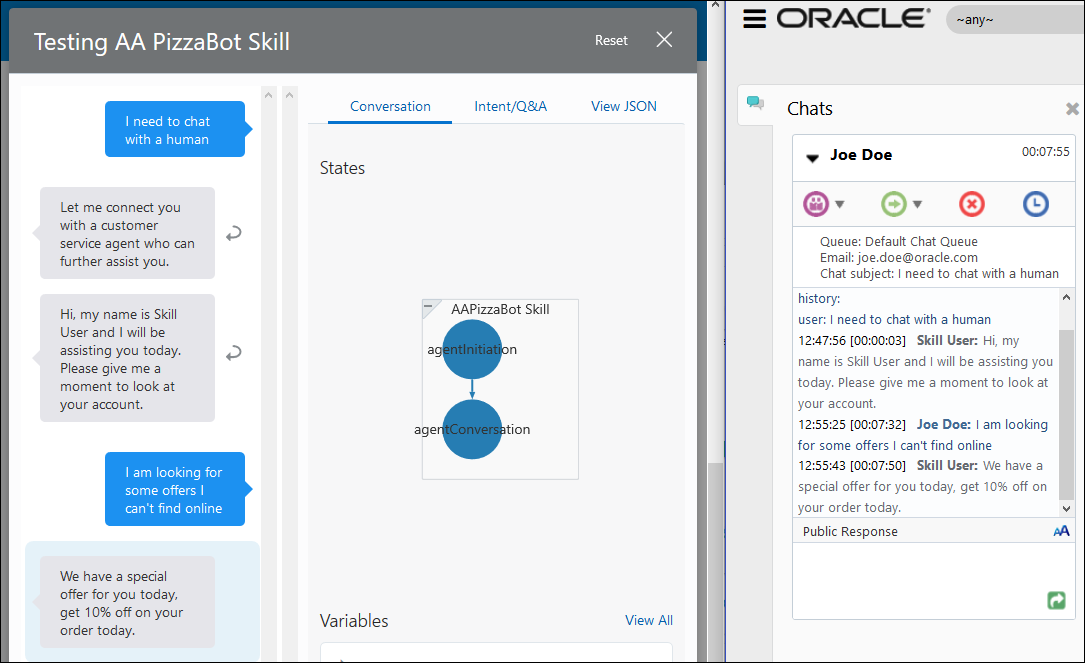
You can use the skill tester in the Digital Assistant UI to verify that the transfer to a live agent completes successfully. The skill tester lets you simultaneously test the dialog flow and see the intent resolution and entity matching. It accepts and processes user input, and it diagrams the dialog flow from state to state, displays the values of the context and system variables, and shows the resolved intent.
- In a browser, go to the Oracle Service Cloud Agent Browser UI (BUI), and sign in with the user name of a staff member
who has agent access to the default queue and the profile permissions that are listed in What Do You Need?.
The URL for the Agent Browser UI is typically
https://<site-name>.<domain-name>/AgentWeb/. - If you aren't signed into the chat, click Chat Logon
 .
. - Set your status to one that enables you to receive chats (for example,
unrestricted). If you see the Request a chat button, click it.
(Your profile determines if you need to request a chat or chats appear in your queue automatically.)
button, click it.
(Your profile determines if you need to request a chat or chats appear in your queue automatically.)
You are ready to accept the chat.

- Resize your browser windows such that you can see Digital Assistant and the Agent Browser UI and side-by-side.
-
In the Digital Assistant UI, click Skill Tester
 , and then select Oracle Web from the Channel drop-down.
-
Enter
I need to chat with a humanin the message field. - When the Agent Browser UI prompts you to accept the chat, click Accept.
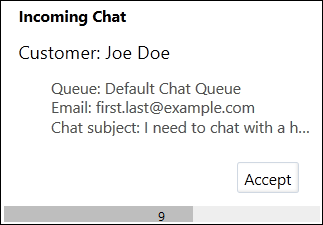
The live chat displays the conversation history in the Agent Browser UI, and then sends the default welcome message, which displays in both the tester and the Agent Browser UI.

- If, after a minute, you don't see a waiting message or a welcome message in the skill tester, enter some text into the skill tester.
This problem occurs only in the skill tester. It doesn't occur in messaging platforms.
- In the skill tester, enter
I am looking for some offers I can’t find online. - In the Agent Browser UI,
enter a reply. For example: We have a special offer for you today, get 10% off on your order today.
- To terminate the live chat, in the Agent Browser UI, click Terminate the chat session
 .
. - If, after a minute, you don't see the end prompt
Connecting you back to the skill. What do you want to do next?, enter some text into the skill tester.This problem occurs only in the skill tester. It doesn't occur in messaging platforms.
- Click X to close the tester.
 Transfer to Live Chat When the User is Stuck
If users are having problems using the skill, you can give them the opportunity to speak to a live agent so that they can complete the task successfully.
One way to capture and handle user problems is to create an intent for utterances that indicate user frustration. Then enhance the dialog flow to ask if they want to speak to a live agent.
- In the Intents page, click to add an intent.
- Set the intent's name to
HandleProblem, and then press Enter. - Click the edit icon for Conversation Name, set the conversation name to
Discuss problem with a human agent, and then press Enter. -
Add these example utterances, and then click Train.
I have a problem argh, this is frustrating why don't you understand me you've got it all wrong my order is messed up my order never arrived my pizza never came where is my pizza are you listening can you try being helpful Did you not hear me correctly did you understand dumb answer how frustrating I am displeased with you I am not getting the help I need this is not useful I am not sure that is correct I didn't want this I don't understand you -
In the dialog flow, find the
intentstate and add theHandleProblemaction to theactionskey, as shown here:intent: component: "System.Intent" properties: variable: "iResult" transitions: actions: LiveChat: "setupProfileFirstName" HandleProblem: "handleproblemAskChoice" OrderPizza: "orderPizza" CancelPizza: "cancelorder" unresolvedIntent: "unresolved" - Add these states to the bottom of the dialog flow.
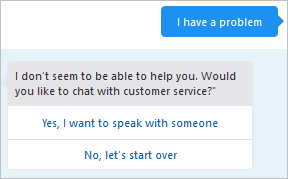
################# # Handle problem ################# # If user indicates a problem, ask if want to speak with someone handleproblemAskChoice: component: "System.CommonResponse" properties: processUserMessage: true metadata: responseItems: - type: "text" text: > I don't seem to be able to help you. Would you like to chat with customer service?" separateBubbles: true actions: - label: "Yes, I want to speak with someone" type: "postback" keyword: "yes,Yes,speak,someone" payload: action: "agent" - label: "No, let's start over" keyword: "no,No,start over, over" type: "postback" payload: action: "startover" transitions: actions: agent: "livechatProfileFirstName" startover: "handleproblemStartOver" textReceived: "intent" # User with problem chose to not speak to an agent but start over instead handleproblemStartOver: component: "System.Output" properties: text: > OK, let's start over. I can help you with a pizza order. You can say 'order pizza' or 'cancel my order' transitions: return: "done" - Click Validate to ensure that your flow doesn't have any errors.
- If the Train button has an exclamation point (!), click the button to retrain the skill.
- Open the skill tester and enter
I have a problemin the message field.The skill asks you if you want to speak with someone.
- Select the choice to speak with someone. And then, before you accept the incoming request from the Agent Browser UI, select the choice to speak with someone again.
You'll get a
Resuming chat with agentmessage in the skill tester, which doesn't make sense. We'll show you how to fix that next.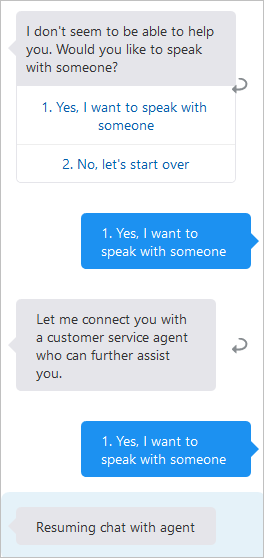
- In the Agent Browser UI, request and accept the chat, and then click Terminate the chat session.
- Click X to close the tester.
 Handle Multiple Live Chat Requests
As you saw, when someone impatiently selects the live-agent choice more than once
before the agent has a chance to accept the request, they see a Resuming chat with agent
message, which doesn't make sense. Let's fix this.
- In the dialog flow, find the
livechatInitConnectionstate and add theresumedMessageproperty as shown here:livechatInitConnection: component: "System.AgentInitiation" properties: agentChannel: "ServiceCloudIntegration" #Set this property nlpResultVariable: "iResult" waitingMessage: "Let me connect you with a customer service agent who can further assist you" errorMessage: > Our apologies. We are having system issues and we can't connect you with an agent right now. rejectedMessage: "I'm sorry. It looks like no one's available now." resumedMessage: "Please wait, someone will be with you shortly." transitions: actions: accepted: "livechatTransfer" rejected: "livechatHandleNoTransfer" error: "livechatHandleNoTransfer" - Click Validate to ensure that your flow doesn't have any errors.
- Open the skill tester and enter
I have a problemin the message field.The skill asks you if you want to speak with someone.
- Select the choice to speak with someone. And then, before you accept the incoming request from the Agent Browser UI, select the choice to speak with someone again.
You'll now get a
Please wait, someone will be with you shortlymessage in the skill tester.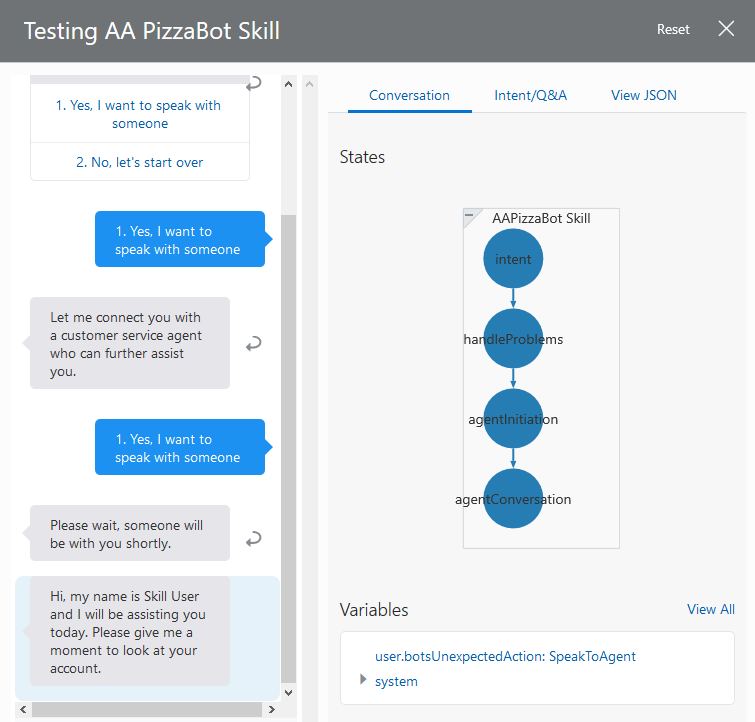
- In the Agent Browser UI, request and accept the chat, and then click Terminate the chat session.