Before you Begin
This 45-minute tutorial shows you how to debug a custom component service in the context of a skill's conversation in Oracle Digital Assistant.
Background
Custom components are reusable units of custom code that you can call from your skill's dialog flow. If you need to debug a custom component, you can run the custom component service on a local Node Express server and point your skill to that external service.
In this tutorial, you'll debug and fix a problem in a custom component. You'll learn how to:
Run custom components in a local Node Express server using the Oracle Bots Node.js SDK.
Add the custom component service as an external service for your skill.
Connect JavaScript IDEs, such as Microsoft Visual Studio Code, to the node server that's running on your local machine.
Debug custom components in the context of a skill conversation.
This tutorial is for developers who are familiar with JavaScript and Node.js. You should also be familiar with implementing custom components. If you are new to custom components, please complete the Create Custom Components to Integrate with Backend Services tutorial first.
What Do You Need?
To complete this tutorial, you need:
-
Access to an Oracle Digital Assistant instance.
-
A JavaScript IDE that supports Node debugging. For example, Microsoft Visual Studio Code version 1.58.0, which this tutorial uses in its instructions.
-
Node.js and Node Package Manager (NPM) installed for global access. If you used a Windows or Mac Node installer, then both the
nodeandnpmexecutables should be available to you. To test if you have Node.js and NPM installed, open a terminal window and enter the following commands separately:$ node -v$ npm -v -
If your computer isn't available as a server to the Internet, you'll need to use tunnelling software such as ngrok, which the tutorial uses in its instructions, or localtunnel.
You must either own the computer that you use for this tutorial or your IT administrators must allow you to use tunnelling software. Otherwise, you can't complete the debugging sections in this tutorial, and you'll need to use logging to debug custom component services.
Import or Clone the Quote Of The Day Skill
In this tutorial, you use the quote-of-the-day skill version 2.0, which we provide, to explore and debug the custom component service. If this skill exists in your instance, you can clone it. Otherwise, you must import it.
Clone the Quote Of The Day Skill
Here are the steps for cloning the Quote Of The Day Skill. If this skill isn't in your instance, skip to the next section for instructions on how to import it.
-
To open the Oracle Digital Assistant instance, open a browser and go to
<your-instance-url>/botsui. -
Click
 on the top-left corner of the page to expand the
side menu.
on the top-left corner of the page to expand the
side menu.
-
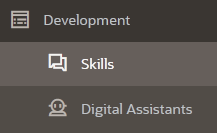
Expand Development and select Skills.
-
Click
again to hide the
side menu.
-
In the Skills dashboard, type
quote of the dayin the Filter field to find the Quote Of The Day Skill.If version 2.0 of the Quote Of The Day Skill isn’t available in your instance, then skip to the next section to import it.
-
On the Quote Of The Day Skill card, click Options
 , and then select Clone.
-
For the display name, enter
<your initials>_Quote Of The Day Skill, or use any prefix that creates a name that's unique to the instance. For example,FN_Quote Of The Day Skill. -
Enter a short description.
-
Select the latest platform version.
-
Select Open cloned skill afterwards, and then click Clone.
You might see a warning that the component package doesn't contain "node_modules". You can ignore this warning because the custom component doesn't have any module dependencies and thus doesn't need to contain "node_modules".
Import the Skill
If your instance doesn't have version 2.0 of the Quote Of The Day Skill, then import the one that we provide.
-
Download quote-of-the-day-skill-2.0.zip to your local machine.
-
To open the Oracle Digital Assistant instance, open a browser and go to
<your-instance-url>/botsui. -
Click
on the top-left corner of the page to expand the
side menu.
-
Expand Development and select Skills.
-
Click
again to hide the
side menu.
-
Click
 to start the import
process.
to start the import
process.
-
Browse to the folder where you saved the dowloaded
quote-of-the-day-skill-2.0.zipfile, select it, and then click Open to upload and install the skill.You might see a warning that the component package doesn't contain "node_modules". You can ignore this warning because the custom component doesn't have any module dependencies and thus doesn't need to contain "node_modules".
-
Locate the Quote of the Day Skill that you just imported.
If you don't see the skill, type
quote of the dayin the Filter field to find it. -
On the Quote Of The Day Skill card, click Options
, and then select Clone.
-
For the display name, enter
<your initials>_Quote Of The Day Skill, or use any prefix that creates a name that's unique to the instance. For example,FN_Quote Of The Day Skill. -
Enter a short description.
-
Select latest platform version.
-
Select Open cloned skill afterwards, and then click Clone.
Explore the Quote Of The Day Skill
Let's take a look at the skill that you just created.
In the Quote of the Day Skill, click Components
 to open the component-services page.
-
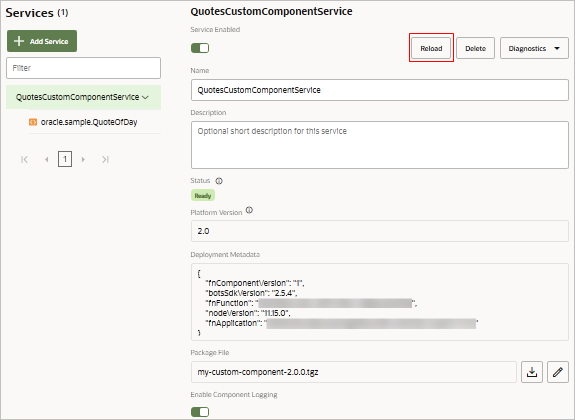
Select QuotesCustomComponentService, click Reload to deploy the component package to the embedded container, and wait for the status to indicate that it is ready.
Click Preview
 to open the conversation tester.
Enter
hiin the message field.When prompted, provide a name.
You should see a random quote similar to the one below:
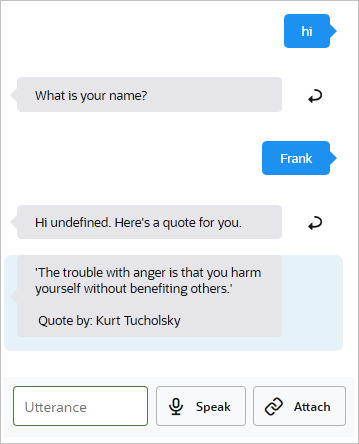
Notice that, although you provided a name, the skill response contains
Hi undefined.Click Reset to clear the context variable values.
Click
 to close the
tester.
to close the
tester.Click Flows
 to open the dialog flow
editor.
to open the dialog flow
editor.Note that the
askNamestate on line 12 prompts the user for a name and thegetQuotestate on line 19 passes the provided user name as an input property to the custom component.The dialog flow seems to be correct. Therefore, the problem that the user-entered name doesn't print might be caused by an error in the custom component.
Install the Oracle Bots Node.js SDK
The Oracle Bots Node.js SDK is a Node module for building and deploying custom component services for Oracle Digital Assistant. You'll need this SDK when you debug your custom component service. If you haven't already, install the Oracle Bots Node.js SDK on your local machine.
-
Open a terminal window.
-
If your Internet access is through a proxy, then you might need to do the following to be able to install the Oracle Bots Node.js SDK from the Internet. An alternative is to find a way to access the Internet without using a proxy, such as by using a mobile hotspot.
-
To get the external IP address of your proxy, open a browser and go to
http://www.whatismyproxy.com/. -
In the terminal window type:
npm config set proxy http://<external_ip>:80
npm config set https-proxy http://<external_ip>:80
-
-
To install Oracle Bots Node.js SDK for global access on your laptop, type this command:
npm install -g @oracle/bots-node-sdkOn a Mac, you use the sudo command:
sudo npm install -g @oracle/bots-node-sdk -
To verify the success of your installation, type:
bots-node-sdk -vThe command should print the Oracle Bots Node.js SDK version.
Run the Custom Component Service on Your Computer
To debug the custom component service, you must first run it on your local computer. That way, you'll later have a local process that you can connect to from your IDE. The full custom component service source code is in a ZIP file that we provide.
-
Download
quote-of-the-day-2.0.zipto your local computer. -
Unzip the file into a folder that doesn't contain spaces in its name or path.
-
Open a terminal window in the directory that contains the
quoteofthedayfolder. -
Issue the following command:
bots-node-sdk service quoteofthedayThe output will look similar to this:
---------------------------------------------------------------------
Component Service Ready (no auth):
        http://localhost:3000/components
---------------------------------------------------------------------
quoteoftheday    =>    oracle.sample.QuoteOfDay
The
bots-node-sdk service quoteofthedaycommand starts the Node Express server to run the custom component. The Express server is part of the custom component service project. It's added automatically when you initialize your custom component project. -
Open a browser window and go to
localhost:3000/components. -
If the service started successfully, you'll see a server response that displays the component service version and the component's name, properties, and supported actions, as shown here:
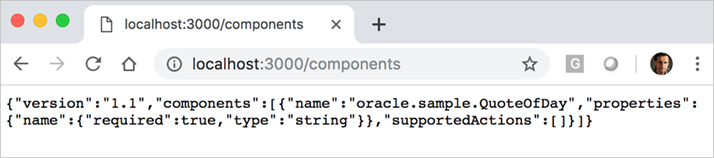
The response is from the custom component metadata definition. It's the same information that Oracle Digital Assistant reads when you register the custom component service in a skill. This response indicates that the Node Express server is up and running, and that the custom component is accessible.
Note that by default, the Node Express server listens on port 3000. You can change the port number with the following command:
bots-node-sdk service quoteoftheday --port <port-number>For example, use
bots-node-sdk service quoteoftheday --port 4000to start the Node Express server on port 4000.
Expose the Component Service to the Internet
Typically, your local computer isn't available as a server to the Internet. To make it available, you'll need to create a network tunnel as described in these steps.
As mentioned earlier, this tutorial uses the ngrok tool to create the tunnel. If you aren't able to use ngrok, you can try other tunnelling solutions such as localtunnel on GitHub. If you don't own the computer you are working on, and if your IT administrators don't allow you to use tunnelling software, then you can't complete the debugging sections in this tutorial. Instead, you can use logging to debug custom component services.
Caution:
Before using ngrok, ensure that you learn what it is and what it does so that you understand how it works and what the possible risks are. Ensure that you adhere to your company security policies.This section assumes that the Node Express server listens on port 3000.
If you haven't already, download and install the tunnelling software. You can download ngrok from
https://ngrok.com/download. The free ngrok offering is sufficient for this tutorial.
If you get security warnings, try opening the link in a private window (Firefox) or an incognito window (Chrome).
Navigate into the folder in which you installed ngrok.
Launch ngrok.
Use this command for Windows machines:
ngrok http <port>Use this command for all other operating systems:
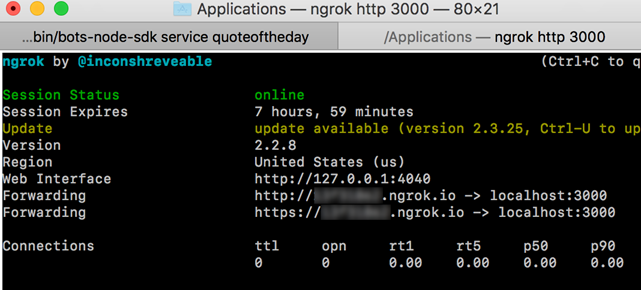
./ngrok http <port>This screenshot shows an ngrok process that was started to listen on port 3000. Notice that the
Session Statusfield showsonline, and that it shows theForwardingURLs for HTTP and HTTPS requests.
Open a browser window, and then go to the following forwarding URL:
https://<https-forwarding-url>/componentsThe request response should display the custom component's description as shown here.

Note:
A new URL is generated each time you stop and start ngrok.
Add the External Custom Component Service
To debug the custom component service that's running on your local machine, you'll add a second component service to the skill. When you add the local service, you'll use the External configuration option.
-
In the skill, click Components
to open the component-services page.
-
Click
 to add a custom
component service.
to add a custom
component service. -
Name the service
QuotesDebugging. -
Provide a brief description.
-
Select the External option.
-
Set the metadata URL to your ngrok fowarding URL with the
/componentsextension. It's the same URL that you used to test your ngrok configuration in a browser.If you forget to add
/componentsto the URL, then you'll get a404error when you create the service. -
The service isn't password protected. So set the User Name and Password fields to
None. The configuration should look similar to the one shown below. Your ngrok URL will be different from the one shown in the screenshot.
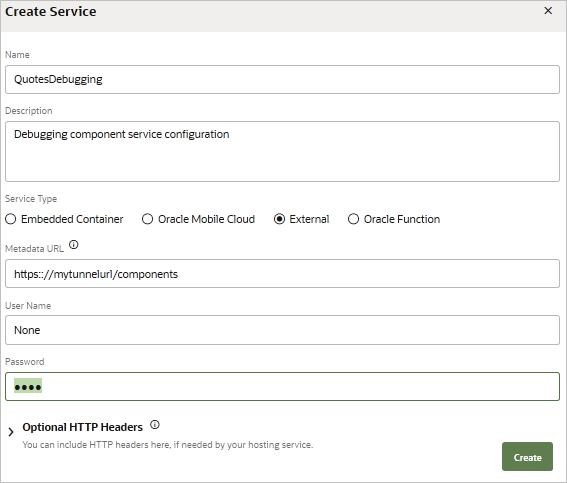
-
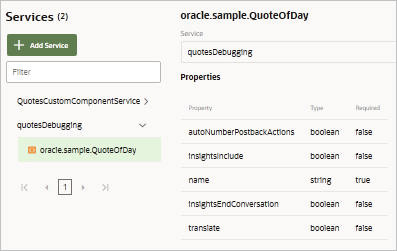
Click Create. The skill now attempts to access your local custom component service to register its components. After the registration completes successfully, the QuotesDebugging custom component service should be similar to this screenshot.
-
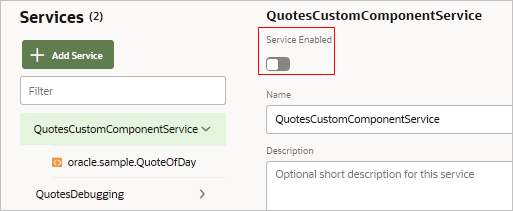
The same custom component service is now configured twice. Before you can debug the custom component service running on your local computer, you must disable the component service that's deployed to the embedded container.
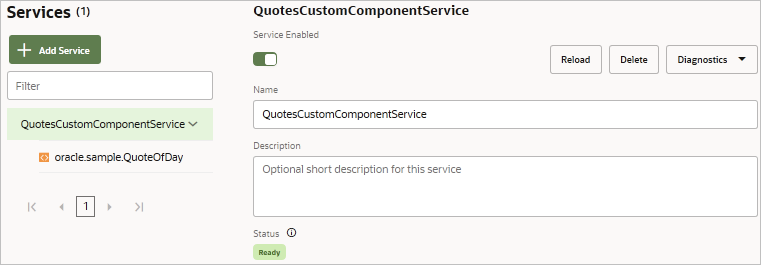
Select QuotesCustomComponentService and switch Service Enabled to Off, as shown here:
-
To test the skill, click Preview
-
Enter
hiin the message field. -
When prompted, enter a name such as
Frank.If your external custom component service works, you should see a quote. Notice the
Hi undefinedmessage, which is the same error that you saw when you tested the custom component service that was deployed to the embedded container.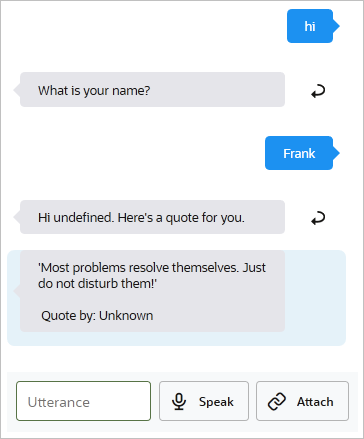
-
Click Reset to clear the conversation and the context variables.
-
In the terminal window in which you started the custom component service's Node Express server, you should see some log messages similar to the ones shown here. One of the log messages will be
User name: undefined$ bots-node-sdk service quoteoftheday --------------------------------------------------------------------- Component Service Ready (no auth): http://localhost:3000/components --------------------------------------------------------------------- quoteoftheday => oracle.sample.QuoteOfDay Invoking component oracle.sample.QuoteOfDay Opening quote generator User name: undefined creating messageModel with payload valid messageModel Quote found: 'It’s Not What We Teach; It’s What They Learn' Quote by: Alfie Kohn creating messageModel with payload valid messageModel In the terminal window, press Ctrl-C to stop the server and release the port.
Debug the Custom Component
If you have successfully completed all of the preceding steps, the following things should all be true:
You stopped the quoteoftheday custom component service from running in the local Node Express server (default port is 3000).
Your local machine is accessible from Oracle Digital Assistant using ngrok or a similar technology.
Your skill has an external custom component service that points to the custom component service running on your local computer.
Debug the Custom Component Code
Now we'll set a breakpoint and step through the code to see what's happening. Here are the steps using Microsoft Visual Studio Code.
Open your JavaScript IDE.
-
Click File, click Open Folder, and then navigate to and open the
quoteofthedayproject folder. Click Explorer
 in the activity bar.
Expand the
componentsfolder and open theQuoteOfDay.jsfile.
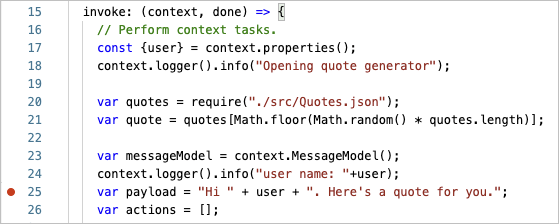
Set a breakpoint in line 25. In Microsoft Visual Studio Code, you click in the margin to the left of the line number column to set a breakpoint.
Click Run and Debug
 in the
activity bar that's on the side, and then click Show all automatic debug configurations.
in the
activity bar that's on the side, and then click Show all automatic debug configurations.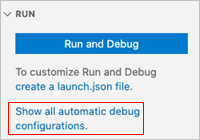
Select Node.js.
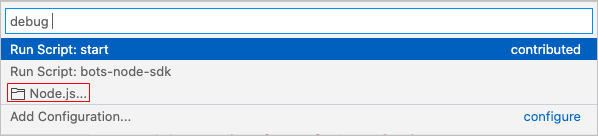
Select Run Script: Start quoteoftheday.
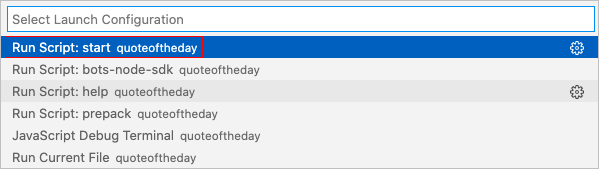
Visual Studio Code starts the server and attaches the debugger.
Go back to the Quote Of The Day Skill, which you should still have open in your browser.
Click Preview
to open the conversation tester.Enter
hiin the message field.When prompted, provide a name.
Switch to your IDE. The breakpoint should be highlighted as shown here for Microsoft Visual Studio Code.

Hover the mouse over the
usrvariable in line 25. A popup should open and displayundefined.In line 25, click the
usrvariable to see all of its uses. The goal is to find the variable definition, which is in line 17 as shown in this screenshot.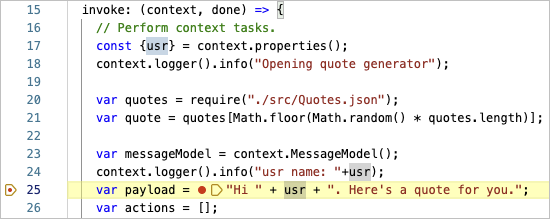
In line 17 you can see that the
usrvariable value is read fromcontext.properties(). Therefore, you can assume that there's a problem with this call.In line 17, hover the mouse cursor over the
contextvariable. Thecontexthandle is a reference to the custom component SDK, and it contains all the information that was passed in the skill's request-message payload.In the popup dialog, expand the
_requestnode, and then expand thepropertiessubnode as shown here.
Notice that there's a
userproperty, which has a value ("Frank"in this screenshot). Apparently, there isn't ausrproperty, but there's auserproperty. This means that you've found the problem in the custom component code.To fix the problem, change the
usrvariable in thepayloaddefinition touser. To do this in Microsoft Visual Studio Code, right-click theusrvariable, click Change All Occurrences, and change the name fromusrtouser.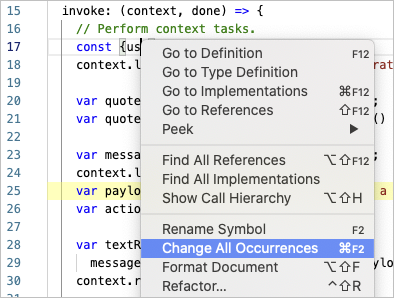
Your code should now look like this:
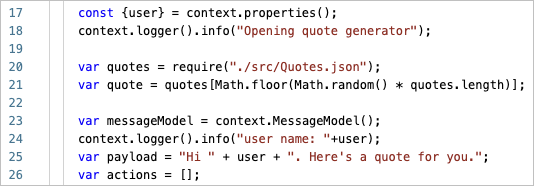
Save your changes.
Retest the Custom Component
Let's restart the server and see if the problem is fixed.
Click Restart to restart the server and reattach the debugger (it's the second to the last icon on the screenshow below).
Switch to the Quote Of The Day Skill in the browser.
If the conversation tester isn't open, click Preview
.The previous debugging session has probably expired. Click Reset in the tester to clear the conversation.
In the message field, enter
hi.When prompted, enter a name.
In your IDE, hover the mouse over the
uservariable in line 25. You should see the name that you provided.
Finish debugging by clicking Continue in the debugger toolbar (it's the first icon on the left in the screenshot below), or by pressing F5.
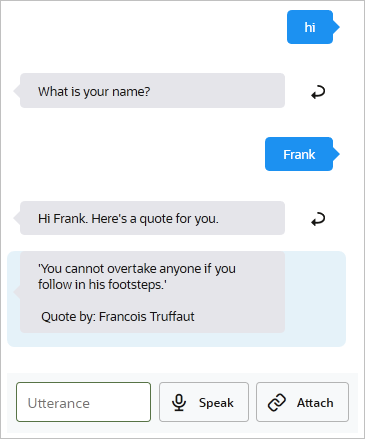
Switch to the conversation tester. You should see a message similar to the one in the image below. Notice that the provided name is included in the skill response.
Click Reset.
Close the tester.
Stop Processes
Now that the problem is solved, you can close the following terminal processes and software:
Press Ctrl+C to close the tunnel, e.g. ngrok. For security reasons, always close the tunnel software immediately after you no longer need it.
Click Stop to stop server and detach the debugger (it's the rightmost icon on the screenshot below).
Close the JavaScript IDE.
Re-Deploy and Test the Custom Component
Now you'll deploy the newer version of the custom component and test it.
Re-Deploy the Custom Component Service to the Embedded Container
Open a terminal window and navigate to
quoteofthedayfolder.To package the modified custom component service project for deployment, enter this command:
npm packBecause of the
prepackscript in thepackage.jsonfile, the command first executes this command to verify the package:npm run bots-node-sdk -- pack --dry-runThe command then packages the Node project into a deployable tarball,
my-custom-component-2.0.0.tgz.Switch to the Quote of the Day Skill in the browser.
Click Components
to open the Components page.Select the QuotesCustomComponentService component service.
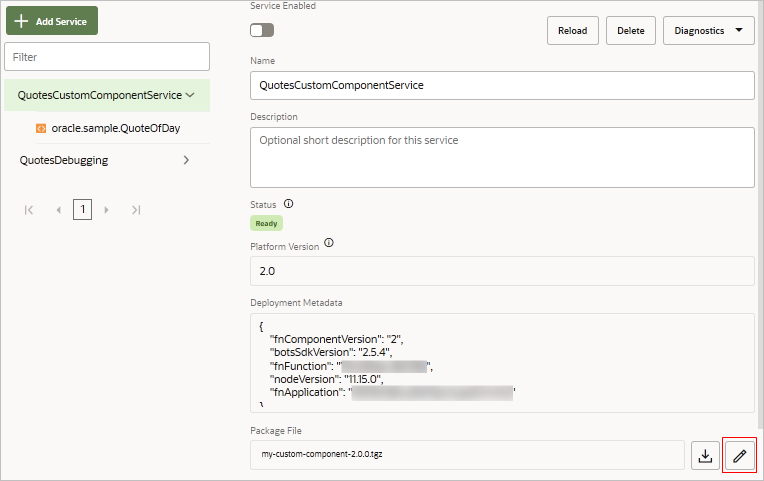
Click Change package file
 .
.In the opened dialog, navigate to the
quoteofthedayfolder, and then select themy-custom-component-2.0.0.tgzfile.Click Open to re-deploy the custom component service.
Note:
Re-deploying the custom component service also switches Service Enabled to On.Select the QuotesDebugging component service that you used for debugging.
Click Delete to remove the external service.
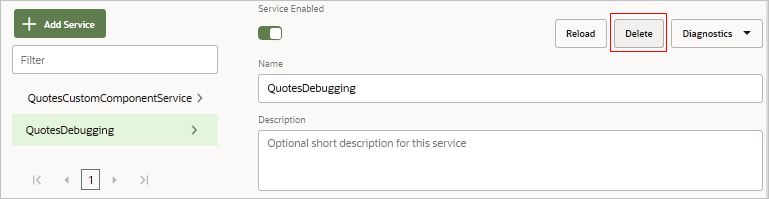
After you delete it, you should have a single component service.
Tip:
If you want to keep the custom component service that you used for debugging, you can switch Service Enabled to Off, so that it is inactive. For this to work, don't stop the tunnelling software and the local Node Express server until after you disable the service.
Test the Re-Deployed Component
Even though you saw that the bug was fixed at the end of your debugging session, you'll want to verify that the embedded service is also fixed.
Click Preview
.Enter
hiin the message field.When prompted, provide a name.
The skill response should contain the provided name in a message that similar to the one shown here, which is
Hi Frank. Here's a quote for you.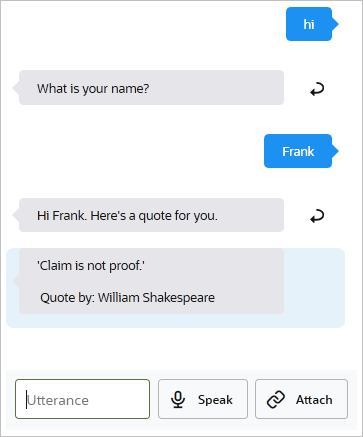
Validate the Dialog Flow
You've debugged and fixed the custom component, and you've verified your fixes by testing it in the conversation tester. There's one more test that you should do — validate the dialog flow.
-
Click Flows
to open the dialog flow editor.
-
Click Validate in the top bar.
You'll see a message like this:
We found some problems with the Quote of the Day Skill skill bot. Open the findings window to see more details.
-
Click View validation findings
 to view the
list
of dialog flow errors.
to view the
list
of dialog flow errors.
You should see error descriptions like the ones in the following screenshot. They indicate that the state is missing the required
nameproperty, and that it's passing theuserproperty, which isn't a valid property for the custom component.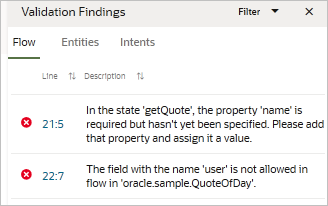
-
In your IDE, look at the
metadatasection, which is shown below, and look at thepropertiesobject.metadata: { name: 'oracle.sample.QuoteOfDay', properties: { name: { required: true, type: 'string' }, }, supportedActions: [] },The
metadata, which is like an API description for the component, says that the component requires anameproperty, yet the actual code parses auserproperty. Because input parameters aren't validated at runtime, you won't catch these types of bugs by using the IDE debugger. Therefore, always remember to validate your dialog as part of your testing.The fix for this bug is to change the property name in the metadata, and then reload the component package.
Learn More
To learn more about building and deploying custom components, see Backend Integration in Using Oracle Digital Assistant.
Debug Custom Components Locally
F43051-01
July 2021
Copyright © 2021, Oracle and/or its affiliates.
Learn how to how to debug a custom component service in the context of a skill's conversation in Oracle Dgital Assistant.
This software and related documentation are provided under a license agreement containing restrictions on use and disclosure and are protected by intellectual property laws. Except as expressly permitted in your license agreement or allowed by law, you may not use, copy, reproduce, translate, broadcast, modify, license, transmit, distribute, exhibit, perform, publish, or display any part, in any form, or by any means. Reverse engineering, disassembly, or decompilation of this software, unless required by law for interoperability, is prohibited.
If this is software or related documentation that is delivered to the U.S. Government or anyone licensing it on behalf of the U.S. Government, then the following notice is applicable:
U.S. GOVERNMENT END USERS: Oracle programs (including any operating system, integrated software, any programs embedded, installed or activated on delivered hardware, and modifications of such programs) and Oracle computer documentation or other Oracle data delivered to or accessed by U.S. Government end users are "commercial computer software" or "commercial computer software documentation" pursuant to the applicable Federal Acquisition Regulation and agency-specific supplemental regulations. As such, the use, reproduction, duplication, release, display, disclosure, modification, preparation of derivative works, and/or adaptation of i) Oracle programs (including any operating system, integrated software, any programs embedded, installed or activated on delivered hardware, and modifications of such programs), ii) Oracle computer documentation and/or iii) other Oracle data, is subject to the rights and limitations specified in the license contained in the applicable contract. The terms governing the U.S. Government's use of Oracle cloud services are defined by the applicable contract for such services. No other rights are granted to the U.S. Government.
This software or hardware is developed for general use in a variety of information management applications. It is not developed or intended for use in any inherently dangerous applications, including applications that may create a risk of personal injury. If you use this software or hardware in dangerous applications, then you shall be responsible to take all appropriate fail-safe, backup, redundancy, and other measures to ensure its safe use. Oracle Corporation and its affiliates disclaim any liability for any damages caused by use of this software or hardware in dangerous applications.
Oracle and Java are registered trademarks of Oracle and/or its affiliates. Other names may be trademarks of their respective owners.
Intel and Intel Inside are trademarks or registered trademarks of Intel Corporation. All SPARC trademarks are used under license and are trademarks or registered trademarks of SPARC International, Inc. AMD, Epyc, and the AMD logo are trademarks or registered trademarks of Advanced Micro Devices. UNIX is a registered trademark of The Open Group.
This software or hardware and documentation may provide access to or information about content, products, and services from third parties. Oracle Corporation and its affiliates are not responsible for and expressly disclaim all warranties of any kind with respect to third-party content, products, and services unless otherwise set forth in an applicable agreement between you and Oracle. Oracle Corporation and its affiliates will not be responsible for any loss, costs, or damages incurred due to your access to or use of third-party content, products, or services, except as set forth in an applicable agreement between you and Oracle.