Before you Begin
This 45-minute tutorial shows how to create a custom component that integrates currency conversion functionality into a skill conversation. You'll learn how to do the following tasks:
- Start a new custom component service project using the Oracle Bots Node.js SDK.
- Define the custom component's name, input parameters, and returned actions.
- Implement logging.
- Invoke a remote REST service.
- Deploy custom component services to a Node container that's embedded in your Oracle Digital Assistant instance.
Background
Custom components are reusable units of custom code that you can call from your skill's dialog flow. From a skill-design perspective, there's no difference between a custom component that you build and the system components provided by Oracle Digital Assistant.
The most common use case for building custom components is to integrate a skill conversation with a remote backend system. You develop custom components using JavaScript and Node.js.
What Do You Need?
This tutorial is for developers who are familiar with JavaScript and Node.js development. To complete this tutorial you need the following:
- Access to an Oracle Digital Assistant instance.
- A JavaScript IDE or text editor. For example, this tutorial uses Microsoft Visual Studio Code in its screenshots. If you feel comfortable using a text editor, then that's fine too.
-
Node.js and Node Package Manager (NPM) installed for global access. If you used a Node installer (Windows, Mac), then both the node and npm executables should be available to you.
To test if you have Node.js and NPM installed, open a terminal window and try the following commands separately:
$ node -v$ npm -v
Install the Oracle Bots Node.js SDK
The Oracle Bots Node.js SDK is a Node module for building and deploying custom component services for Oracle Digital Assistant.
Follow these steps to install the Oracle Node.js Bots SDK to your local machine.
- Open a terminal window.
-
If your Internet access is through a proxy, you might need to do the following to be able to install the Oracle Bots Node.js SDK from the Internet:
- To get the external IP address of your proxy, open a browser
and go to
http://www.whatismyproxy.com/. -
In the terminal window, enter these commands:
npm config set proxy http://<external_ip>:80
npm config set https-proxy http://<external_ip>:80
- To get the external IP address of your proxy, open a browser
and go to
-
To install Oracle Bots Node.js SDK for global access on your laptop, enter this command:
npm install -g @oracle/bots-node-sdk
On a Mac, you use the sudo command:
sudo npm install -g @oracle/bots-node-sdk
-
To verify the success of your installation, enter this command:
bots-node-sdk -v
The command should print the Oracle Bots Node.js SDK version.
$ bots-node-sdk -v
Version: 2.5.4
Request a fixer.io Currency Converter API Key
The Fixer website at fixer.io offers current and historic exchange rates for up to 170 currencies. To complete this tutorial, you need a free subscription that allows you to get current conversion rates.
- Go to https://fixer.io.
-
Click GET FREE API KEY in the upper right corner.

-
In the Pricing section, click GET FREE API KEY.

- Complete the registration form.
-
Copy and save the free API key that's displayed in the confirmation page.
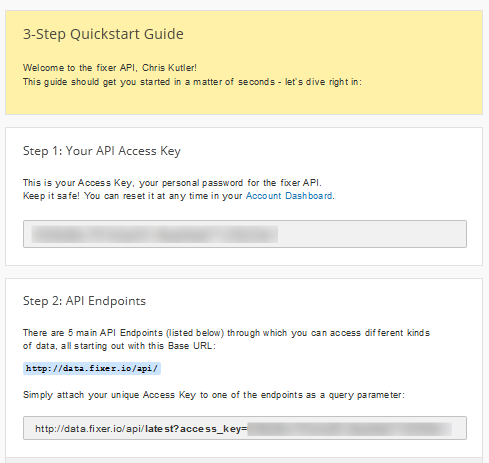
The free API key has restrictions. For example, the conversion rates are updated less frequently and you only can make requests using HTTP (not HTTPS). In addition, the base currency is Euro (EUR). You can handle the base currency restriction in your custom component code and enable users to specify different base currencies.
Create the Custom Component Service
To create a custom component service project, use the Oracle Bots Node.js SDK command line interface (CLI) that was installed when you installed the Oracle Bots Node.js SDK. The Oracle Bots Node.js SDK provides all the infrastructure and tools that you need to test, debug, and deploy custom component services.
Create a Custom Component Package
In this section, you use the bots-node-sdk init command
to create a package structure with
the necessary files, including a custom component JavaScript file for
the the currency converter component.
This command also installs all the dependencies.
-
Open a terminal window and navigate to the folder that will contain
your component package. Ensure that the folder's path doesn't
contain spaces. For example, on Windows, don't navigate to a folder
under
Program Files. -
Enter this command:
bots-node-sdk init converterccs --name converterccs --component-name CurrencyConverter
This command might take several minutes to complete.
As shown in this screenshot, the command creates a subfolder named
converterccs, which contains yourmain.jsandpackage.jsonfiles, along with the installed "dev" dependencies innode_modules. It also creates acomponentsfolder that containsCurrencyConverter.js, which is the file that you'll modify.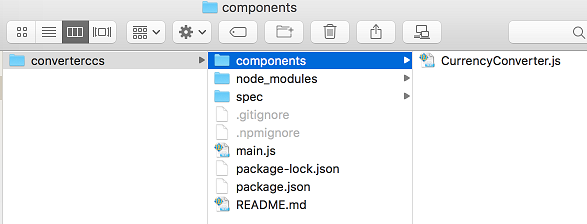
(Optional) Open the
package.jsfile and notice that thenamematches the value that you provided for the--nameargument in yourinitcommand.
Provide the Custom Component Framework
The custom component service that you just created is the equivalent to the hello world example. In the next steps, you'll modify the code to become the starter for the currency-converter custom component.
- Open your JavaScript editor of choice.
-
In the JavaScript editor, open the
converterccs/components/CurrencyConverter.jsfile.Alternatively, if your editor supports projects, you can open the
converterccsfolder as a project, expand thecomponentsnode and openCurrencyConverter.js.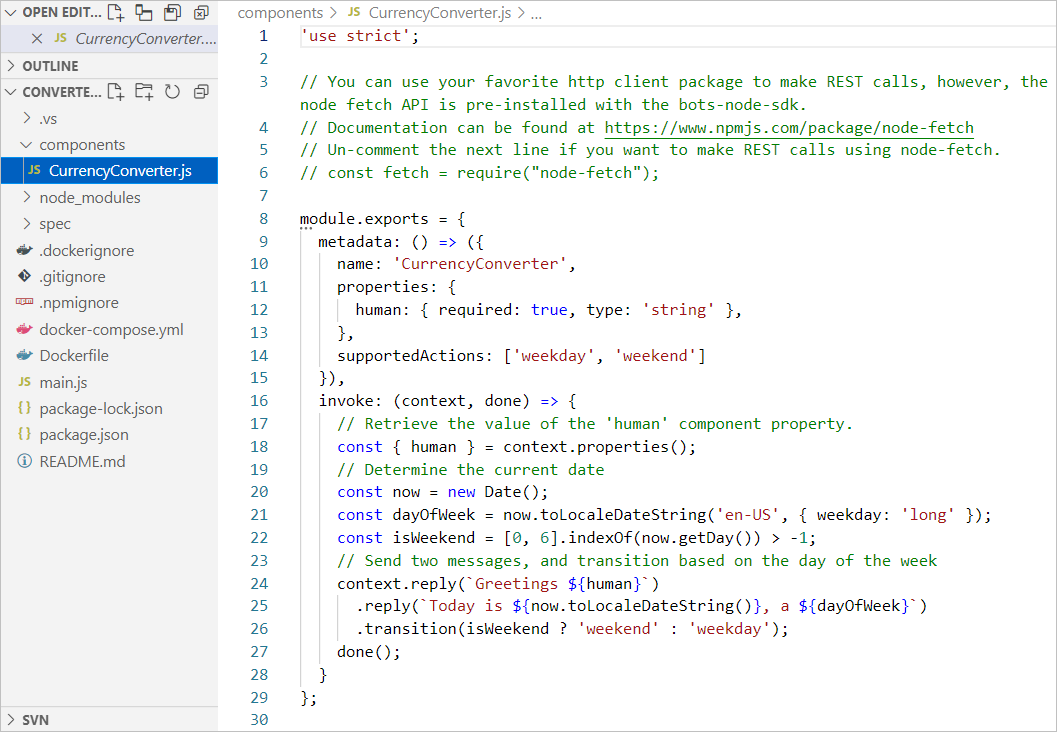
-
Line 10 defines the component's name. To avoid possible naming conflicts when a skill uses more than one component service, add a prefix to the component name.
Change:
name: 'CurrencyConverter',
to:
name: 'complete.training.CurrencyConverter',
-
Now you'll define the input properties that the skill can pass to the custom component. Replace line 12, which defines the
humanproperty, with the following code:variable: {required: true,type: 'string'}, baseCurrency: {required: true,type: 'string'}, targetCurrencies: {required: true,type: 'string'}, amount: {required: true,type: 'int'}The skill can use the properties in these ways:
-
variable: Names the variable that the custom component can use to return the result object. -
baseCurrency: Defines the currency of the amount that's to be converted -
targetCurrencies: Lists the currencies that the amount must be converted to. -
amount: Defines the amount to convert.
-
-
Change this code line:
supportedActions: ['weekday', 'weekend']
to:
supportedActions: ['success', 'failure']
The custom component will use these actions to tell the skill whether the currency conversion succeeded.
With these changes, the
metadata()function should look like this, with the function starting on line 9 and ending on line 18:9 metadata: () => ({ 10 name: 'complete.training.CurrencyConverter', 11 properties: { 12 variable: {required: true,type: 'string'}, 13 baseCurrency: {required: true,type: 'string'}, 14 targetCurrencies: {required: true,type: 'string'}, 15 amount: {required: true,type: 'int'} 16 }, 17 supportedActions: ['success', 'failure'] 18 }), -
Change the
invoke: (context, done)function to the following code:invoke: (context, done) => { const { variable } = context.properties() const { baseCurrency } = context.properties() const { targetCurrencies } = context.properties() const { amount } = context.properties() done(); }Your code should look like this, with the
invoke()function starting on line 19 and ending on line 27:19 invoke: (context, done) => { 20 21 const {variable} = context.properties() 22 const {baseCurrency} = context.properties() 23 const {targetCurrencies} = context.properties() 24 const {amount} = context.properties() 25 26 done(); 27 }Each of the lines that begin with
constreads the value for a required component input property. Because the input parameters are flagged as required in themetadata()definition, the code doesn't have to check for missing values (the skill will invoke a runtime exception if a required property is missing). If a property is optional, then your code should check for null values.The
done()function call invokes a callback that passes the component response back to the Oracle Digital Assistant skill that invoked the custom component.
Add Your First Logging Statement
The Oracle Bots Node SDK exposes a configurable logger. By default, logging is set up to use the console logger. You'll use the logger to track the custom component processing.
- Locate the the blank line above the call to
done(), which should be line 25. -
Replace the blank line with the following code in a single line:
context.logger().info("Input parameter values: variable: "+variable+", baseCurrency: "+baseCurrency+", targetCurrencies: "+targetCurrencies+", amount: "+amount)This log statement prints the names and values of the component's input parameters.
Note:
Because this entry-level tutorial doesn't cover custom component debugging, you are using the logger to track the processing. To learn how to debug custom components, see Debug Custom Components Locally.Build the fixer.io Request URL
- Create a new line under
context.logger(). -
Replace the blank line with the following code, including the blank line before the first
varstatement and the blank line after thecontext.logger()statement.var tmpTargetCurrencies = targetCurrencies+","+baseCurrency var fixerIoAPIKey = "<replace with your api key>" var reqUrl = "http://data.fixer.io/api/latest?access_key="+fixerIoAPIKey + "&base=EUR&symbols=" + tmpTargetCurrencies // hide API key from logs context.logger().info("fixer.io request URL:"+reqUrl.replace(fixerIoAPIKey,"*********"))The custom component's
invokefunction should now look like this, with theinvokefunction starting on line 19 and ending on line 34:19 invoke: (context, done) => { 20 21 const {variable} = context.properties() 22 const {baseCurrency} = context.properties() 23 const {targetCurrencies} = context.properties() 24 const {amount} = context.properties() 25 context.logger().info("Input parameter values: variable: " + variable + ", baseCurrency: " + baseCurrency + ", targetCurrencies: " + targetCurrencies + ", amount: " + amount) 26 27 var tmpTargetCurrencies = targetCurrencies + "," + baseCurrency 28 var fixerIoAPIKey = "<replace with your api key>" 29 var reqUrl = "http://data.fixer.io/api/latest?access_key="+fixerIoAPIKey + "&base=EUR&symbols=" + tmpTargetCurrencies 30 //hide API key from logs 31 context.logger().info("fixer.io request URL:" + reqUrl.replace(fixerIoAPIKey, "*********")) 32 33 done() 34 } In line 28, replace
<replace with your api key>with your fixer.io API key. For example:28 var fixerIoAPIKey = "1234567abcde890123b45678c1"
To keep this tutorial as simple as possible, we are having you put the key in the code. However, in production, you would include the key as a component property. You would also use a custom parameter to set the key value, and then pass the custom parameter value to the component as described in Custom Parameters in Using Oracle Digital Assistant, .
The free fixer.io subscription key only supports EUR as the base currency. To be able to use any currency as the base currency, the fixer.io request URL in line 25 needs to contain the skill-provided base currency as an additional value for the target currency.
The replace(...) function in the logging statement in line 31
ensures that your fixer.io API key does not appear in the log message.
Add the Currency Conversion Code
This tutorial uses the node-fetch module, which is is pre-installed with Bots Node SDK.
-
To create a reference to the request module, un-comment line 6 so that it looks like this:
const fetch = require("node-fetch") -
Near the bottom of the file, add a new line above the
done()function call.You should now have 2 blank lines above the
done()function call. -
Replace the blank line that's just above the
done()function call with the following code, which calls the fixer.io remote REST service:fetch(reqUrl) .then((response) => { // Replace this line with the contents of converterimpl.txt }) .catch((err) => { done(err) } );Your code should look like this:
29 var reqUrl = "http://data.fixer.io/api/latest?access_key="+fixerIoAPIKey + "&base=EUR&symbols=" + tmpTargetCurrencies; 30 // hide API key from logs 31 context.logger().info("fixer.io request URL:"+reqUrl.replace(fixerIoAPIKey,"*********")) 32 33 fetch(reqUrl) 34 .then((response) => { 35 // Replace this line with the contents of converterimpl.txt 36 }) 37 .catch((err) => { 38 done(err) 39 } 40 ); 41 done() 42 } 43 }; -
Remove the second
done()code line (line 41 in the above code snippet). You'll add this function call to other locations in the final currency conversion implementation.Note:
Typically, because thedone()function call is so important, you shouldn't remove thedone()call, but instead wait until you've built the code that you can move it to so that it serves as a reminder. In this case, you'll re-add the funtion in the next section, so it's OK to delete it now. -
Now that you've defined the basic outline for the
complete.training.CurrencyConvertercomponent, you can implement the code to convert the base currency amount into one or more target currencies.Open converterimpl.txt and copy its contents.
-
In line 35, replace this line with the code that you copied to the clipboard.
// Replace this line with the contents of converterimpl.txt
- Save your work.
-
Compare your custom component with the sample code in completecode.txt, which is also shown in the following screenshot.
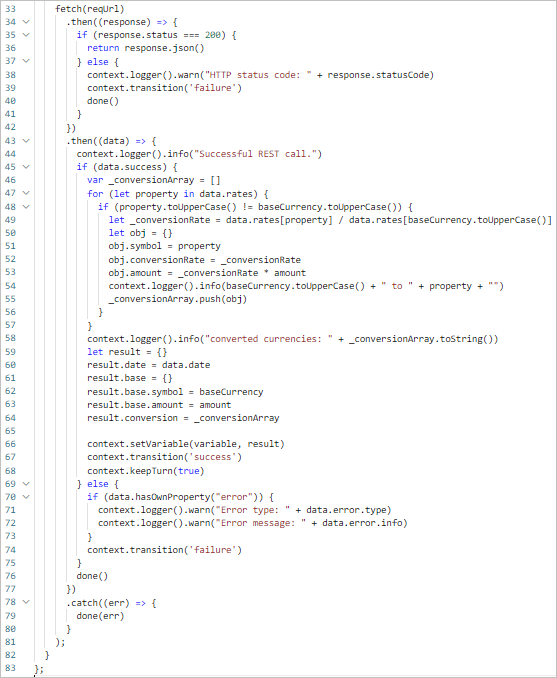
Let's pause for a few minutes to understand the code that you just added.
- Line 33: The
fetch()function performs the REST call to the fixer.io website. It then calls an anonymous function to which it passes the response object and the error object (err) if it exists. - Line 35: A 200 response status code means that the REST service call succeeded.
- Line 45: Even if the REST call succeeded, the response may contain an error, such as an invalid API key. This line checks the response body to see if the conversion was successful.
- Line 47: If the request returned conversion rates, then this code block
saves the rates in an array. The response body is a JSON object, so the
rates are retrieved from
data.rates. - Line 48: To work around the free API key limitation that only EUR can be used as a base currency in the request, the target currency is set to the skill-provided base currency. In this line of code, the base currency is removed from the conversion rates so that only target currencies get reported back to the skill.
- Line 49: This line computes the converted amount for the currently handled target currency. To get the conversion rate of the target currency relative to the skill-provided base currency (and not EUR), it divides the target currency rate by the base currency rate, which is the skill-provided currency rate in relation to EUR. The code then saves the currency symbol (for example, USD), the conversion rate, and the converted amount to an object, and then adds the object to an array.
- Lines 59-64: These lines build the response object that will be returned to the skill. The result object contains a base property, which holds information about the base currency, and a conversion property, which contains all the target currencies and their converted amounts.
- Line 66: This code saves the result object to a dialog-flow context
variable. The name of the context variable was provided by the skill
designer through the custom component's
variableproperty. - Line 67: In this line, the custom component triggers navigation to the success transition action.
- Lines 37 and 69: These code sections handle the cases where 1) the response status code wasn't 200, and 2) the conversion wasn't successful, such as when the API key is missing.
- Line 33: The
Note: We intentionally haven't explained the structure of the returned object. Later, when you wear the skill designer's hat, you'll learn how to get the structure of custom component response data.
Package and Deploy the Custom Component Service
You can deploy custom components to either a skill's embedded container, Oracle Functions, a remote Node server, or Oracle Mobile Hub. In this tutorial, you'll deploy your custom component service to a skill's embedded container. For this, you first need to package the custom component service into a deployable file.
Package the Component Project for Deployment
- Save your work in your JavaScript IDE.
- Open a terminal window and navigate into the
converterccsfolder. -
In the
convertercssfolder, enter this command:bots-node-sdk pack
Because of the
prepackscript in thepackage.jsonfile, the command first executes this command to verify the package. The command then packages the Node project and its dependencies into a deployable tarball,converterccs-1.0.0.tgzas shown here.$ bots-node-sdk pack --------------------------------------------------------------------- Preparing artifact from: converterccs... --------------------------------------------------------------------- > converterccs@1.0.0 prepack /converterccs > npm run bots-node-sdk -- pack --dry-run > converterccs@1.0.0 bots-node-sdk /converterccs > bots-node-sdk "pack" "--dry-run" --------------------------------------------------------------------- Component Package 'converterccs' is valid! --------------------------------------------------------------------- npm notice npm notice package: converterccs@1.0.0 npm notice === Tarball Contents === npm notice 576B package.json npm notice 30B .dockerignore npm notice 197B docker-compose.yml npm notice 86B Dockerfile npm notice 60B main.js npm notice 2.6kB README.md npm notice 3.4kB components/CurrencyConverter.js npm notice === Tarball Details === npm notice name: converterccs npm notice version: 1.0.0 npm notice filename: converterccs-1.0.0.tgz npm notice package size: 8.8 kB npm notice unpacked size: 107.4 kB npm notice shasum: 99c850e2711cbf48e3dcea83cb043f92bc0ad69c npm notice integrity: sha512-urml2rznGTvf7[...]czHsWQB4VXZPg== npm notice total files: 7 npm notice converterccs-1.0.0.tgz converterccs $
Note:
This package doesn't have any dependencies. When you package custom components that have dependencies, your tarball must include all dependencies except fordevDependencies.
Clone the Tester Skill
If you are using a shared Oracle Digital Assistant instance, then the test skill might already exist. If it does, then you can simply clone the skill. If it doesn't exist, then skip to the next section, where you import the skill.
- To open the Oracle Digital Assistant instance, open a browser and go to <your-instance url>/botsui.
-
Click
 on the top-left corner of the page to show the navigation menu.
-
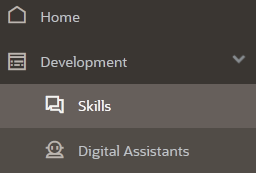
Expand Development and select Skills.
- Click again to hide the navigation menu.
-
In the Skills dashboard, type
currencyin the Filter field to find the CurrencyConverterTester skill.If the CurrencyConverterTester skill isn’t available in your instance, then skip to the next section to import it.
-
On the CurrencyConverterTester card, click Options
 , and then
select Clone.
, and then
select Clone.
-
Name the skill
<your-initials>_CurrencyConverterTester, or use any prefix that creates a name that's unique to the instance. For example,FN_CurrencyConverterTester. - Enter a short description.
- Select Open cloned skill afterwards, and then click Clone.
Import the Tester Skill
If your instance doesn't have the CurrencyConverterTester skill, then you can import the one that we provide.
- Download currency-converter-tester-2-0.zip to your local machine.
- To open the Oracle Digital Assistant instance, open a browser and go to <your-instance url>/botsui.
-
Click
on the top-left corner of the page to show the navigation menu.
-
Expand Development and select Skills.
- Click again to hide the navigation menu.
- Click
 to start the import process.
 -
Browse to the folder where you saved the dowloaded
currency-converter-tester-2-0.zipfile, select it, and then click Open to upload and install the starter skill. -
Locate your CurrencyConverterTester skill and click its tile to open it.
If you don't see the skill, type
currencyin the Filter field to find it.
Deploy Your Custom Component Service to the Skill
- In the CurrencyConverterTester skill, click Components
 to open
the component service page.
to open
the component service page. - Click
 to open the Create Service
dialog.
to open the Create Service
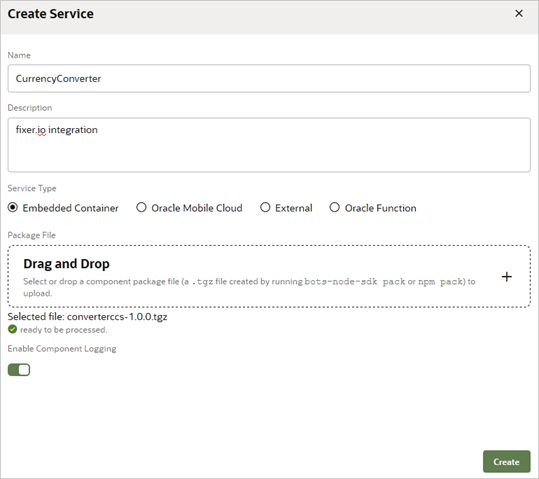
dialog. - In the Name field, enter
CurrencyConverter. - In the Description field, enter
fixer.io integration. - Ensure that Embedded Container is selected.
- Locate the
converterccs-1.0.0.tgzfile in theconverterccsfolder on your file system. - Drag-and-drop the
converterccs-1.0.0.tgzfile into the Create Service dialog's Package File field. - Switch Enable Component Logging to On.
-
Click Create.
-
Wait for the Status field to show Ready, which may take a few seconds.

-
Expand CurrencyConverter if it isn't already expanded, and select complete.training.CurrencyConverter. Notice that the component description is the information that you defined in the custom component's
metadata()function:You'll see some properties that you didn't define in your metadata, such as
insightsEndConversationandtranslate. Digital Assistant automatically adds these properties to all component services.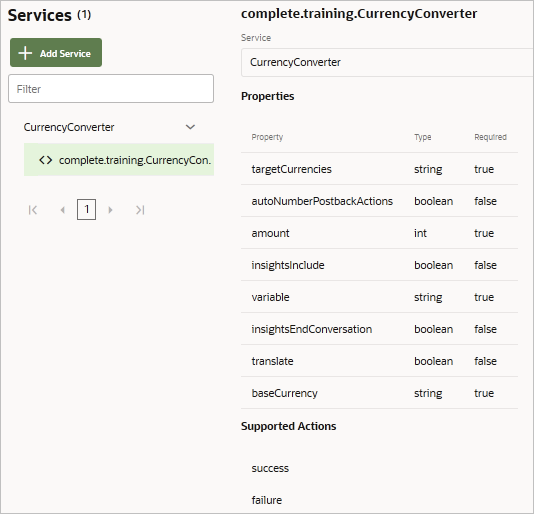
With the custom component service deployed to the skill's embedded container, you are ready to test the component.
Test the Custom Component
The tester skill's dialog flow is aleady set up for testing. If you
closely followed the steps in this tutorial, then the component name,
the input parameter names, and the action transition names match the
names used in the converter: state in the dialog flow. If
you deviated from the tutorial, you must first apply the changes to
the converter: state in the flow.
Note:
The tester flow uses a composite bag entity to guide users through the steps of providing a base currency, a conversion amount, and one or many target currencies. Although the currency converter that you built supports 170 currencies, the skill uses a reduced list.-
Click Flows
 to open the dialog flow editor.
Notice the
getConversion:state in line 11. TheSystem.ResolveEntitiescomponent accesses theCONVERSIONcomposite bag entity through theconversioncontext variable, which is referenced from the component'svariableproperty. TheSystem.ResolveEntitiesresolves the composite bag entity, asking the user to provide a base currency, a currency amount, and one or more target currencies.Note: This tutorial doesn't make use of the composite bag entity's out-of-order extraction functionality. Users will have to provide one-by-one each piece information that's required to perform the currency conversion.
The
converter:state in line 19 references the custom component that you built. The custom component input properties reference theconversionvariable to obtain their values. The custom component saves the conversion results in theconversionResultcontext variable. -
To test the skill, click Preview
 .
.
- Start by entering
hi. - From the displayed currency list, select CAD for the base currency.
- Enter
100for the amount to convert. -
When asked for the target currencies, type 4 5 9, and then press the Enter key.
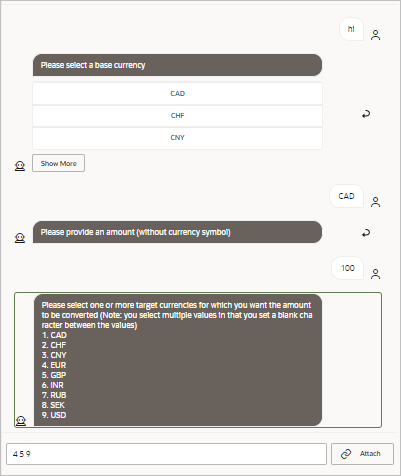
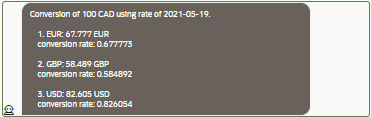
As a result, you should see this skill response, which provides the currency amount and rate for each target currency:
- Click Reset to start a new Preview session.
- Enter
hi. - Select USD as the base currency. You'll have to click Show More twice for the USD symbol to show.
- Enter
100. -
Type
EUR CHF GBP, and then press the Enter key. You should get a conversion quote similar to the one before.Note:
The custom component was designed to not display any target currency that matches the base currency. - Click Reset, and then continue trying different conversions.
- Close Preview, but don't reset it. You'll need the log messages from the current session for the next section of the tutorial.
View The Component's Log Messages
The custom component prints log messages from within its code
(context.logger().info(...).
When logging is enabled for a service, you can view these messages from the component service page.
- Click Components to open the component service
page.
-
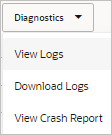
Select CurrencyConverter, click Diagnostics, and then click View Logs.
The dialog displays log messages that are similar to those shown in the following screenshot, such as:
[2021-05-18T17:27:27.889] [INFO] service - Successful conversion
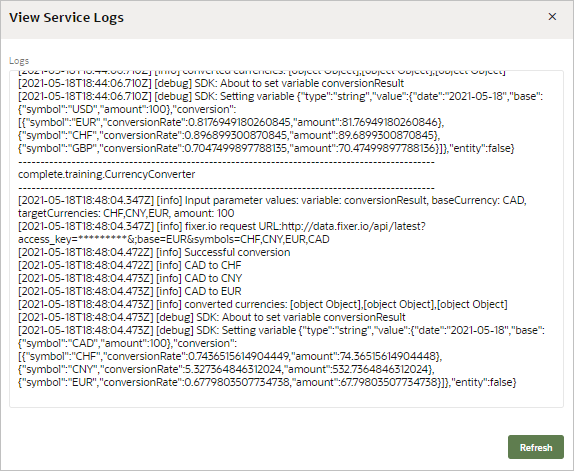
Notice the following log message:
access_key=*********&base=EUR&symbols=CHF,CNY,INR,CAD
Instead of printing the access credential, the custom component code masks the information, so that it's not disclosed. This masking is part of the custom component code that you edited.
Use Preview to Discover the Response Data Structure
When you created the custom component, we didn't explore the custom component response data structure nor did we explore the
content of the dialog flow. How do you know what is in a component
response? For example, how would you know that the
conversionResult variable can be used as shown in the
dialog flow editor lines 37 - 43?
      text: |-
            Conversion of ${conversionResult.value.base.amount} ${conversionResult.value.base.symbol} using rate of ${conversionResult.value.date}.

            <#list conversionResult.value.conversion as item>
                ${item?index+1}. ${item.symbol}: ${item.amount?string["#.000"]} ${item.symbol}
                conversion rate: ${item.conversionRate}

            </#list>
To figure this out, you can use Preview.
To learn about the structure of a data object returned by a custom component, stop after processing the custom component, and then use the Variables section in the Preview's Conversation tab to explore the variable's content, as described in these steps.
- Click Preview.
- Click Reset.
-
Enter
hi. - Select a base currency.
- Enter a value for the amount.
- Select one or more target currencies.
-
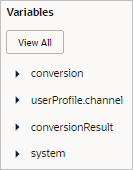
Look at the Variables section that's displayed in the Preview's Conversation tab:
-
Fully expand the conversionResult variable to see the structure of the data object as shown here.
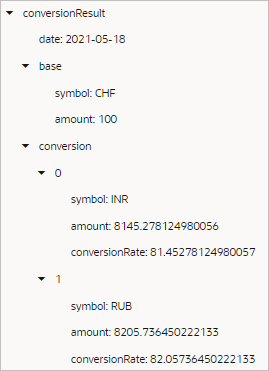
You can see the conversionResult object's properties, array items, and subproperties.
You've now learned how to build, deploy, use, and test a custom component. See the next section to learn more about these tasks.
Learn More
- Debug Custom Components Locally tutorial
- Enable Real-World Entity Extraction with Composite Bag Entities tutorial
- Backend Integration in Using Oracle Digital Assistant
- Enable Real-World Entity Extraction with Composite Bag Entities
- Node.js
- Bots Node SDK Reference
- Bots Node SDK GitHub
- Bots Node SDK Package Manager website
- node-fetch NPM Package website
Create Custom Components to Integrate with Backend Services
F43050-01
May 2021
Copyright © 2020, 2021, Oracle and/or its affiliates.
[Tutorial description]
This software and related documentation are provided under a license agreement containing restrictions on use and disclosure and are protected by intellectual property laws. Except as expressly permitted in your license agreement or allowed by law, you may not use, copy, reproduce, translate, broadcast, modify, license, transmit, distribute, exhibit, perform, publish, or display any part, in any form, or by any means. Reverse engineering, disassembly, or decompilation of this software, unless required by law for interoperability, is prohibited.
If this is software or related documentation that is delivered to the U.S. Government or anyone licensing it on behalf of the U.S. Government, then the following notice is applicable:
U.S. GOVERNMENT END USERS: Oracle programs (including any operating system, integrated software, any programs embedded, installed or activated on delivered hardware, and modifications of such programs) and Oracle computer documentation or other Oracle data delivered to or accessed by U.S. Government end users are "commercial computer software" or "commercial computer software documentation" pursuant to the applicable Federal Acquisition Regulation and agency-specific supplemental regulations. As such, the use, reproduction, duplication, release, display, disclosure, modification, preparation of derivative works, and/or adaptation of i) Oracle programs (including any operating system, integrated software, any programs embedded, installed or activated on delivered hardware, and modifications of such programs), ii) Oracle computer documentation and/or iii) other Oracle data, is subject to the rights and limitations specified in the license contained in the applicable contract. The terms governing the U.S. Government's use of Oracle cloud services are defined by the applicable contract for such services. No other rights are granted to the U.S. Government.
This software or hardware is developed for general use in a variety of information management applications. It is not developed or intended for use in any inherently dangerous applications, including applications that may create a risk of personal injury. If you use this software or hardware in dangerous applications, then you shall be responsible to take all appropriate fail-safe, backup, redundancy, and other measures to ensure its safe use. Oracle Corporation and its affiliates disclaim any liability for any damages caused by use of this software or hardware in dangerous applications.
Oracle and Java are registered trademarks of Oracle and/or its affiliates. Other names may be trademarks of their respective owners.
Intel and Intel Inside are trademarks or registered trademarks of Intel Corporation. All SPARC trademarks are used under license and are trademarks or registered trademarks of SPARC International, Inc. AMD, Epyc, and the AMD logo are trademarks or registered trademarks of Advanced Micro Devices. UNIX is a registered trademark of The Open Group.
This software or hardware and documentation may provide access to or information about content, products, and services from third parties. Oracle Corporation and its affiliates are not responsible for and expressly disclaim all warranties of any kind with respect to third-party content, products, and services unless otherwise set forth in an applicable agreement between you and Oracle. Oracle Corporation and its affiliates will not be responsible for any loss, costs, or damages incurred due to your access to or use of third-party content, products, or services, except as set forth in an applicable agreement between you and Oracle.