JavaScript must be enabled to correctly display this content
Before you Begin
Background
In this two-hour lab, you'll learn how to work with skills and digital assistants in Oracle Digital Assistant.
A skill is an individual chatbot that is focused on a specific set of capabilities (e.g. helping customers order food from a specific restaurant).
A digital assistant is a master chatbot containing multiple specialized skills. When a user engages with the digital assistant, the digital assistant evaluates the user input and routes the conversation to the appropriate skill. You can populate your digital assistant with skills from the Skill Store and with skills you have designed yourself.
Here’s the scenario for this lab:
You’re part of a project team building a digital assistant to allow your customers to better engage with the various businesses in a major shopping centre.
This is the early stage of building the digital assistant and currently it supports use cases for a bank and a major retail store. The next stage of the project is to add a skill to support the new pizzeria that is opening up.
Here is what you need to do:
Complete the pizza skill ensuring it can handle complex requests for personalizing your pizza.
Add this skill to the shopping centre digital assistant.
Expose the digital assistant on the pizzeria's website.
If you have your own instance, you can continue this lab after the event and even build your own digital assistant.
Using a shared instance. This option only applies if you are participating in an Oracle event where such an instance is available for all of the lab's participants.
With this option, you can dig into the lab with less setup time.
If you don't already have an instance of Oracle Digital Assistant, you can set one up through the Oracle Cloud Infrastructure Console.
If you will be the only user of this instance, you can do a simplified setup consisting of these basic steps:
Using your Oracle Cloud Infrastructure admin credentials, sign into the Oracle Cloud Infrastructure Console.
Create a compartment.
Create a Digital Assistant instance in this compartment.
For a detailed walkthrough of this process, see this article.
Note: If you want to invite other users, you need to create user accounts, security roles and grant users permission to access to your instance. For more on this process, see Set Up Digital Assistant as an Individual Service.
Import the Starter Skill and Digital Assistant to Your Instance
Now let's prepare our demo environment by setting up the starter pizza skill and starter shopping centre digital assistant.
Import the Pizza Skill:
With the Oracle Digital Assistant UI open in your browser, click to open the side menu.
Click Development and select Skills.
Click again to collapse the side menu.
Import the skill by clicking the Import Skill button that is highlighted in red in the screenshot below.
Navigate to PizzaSkill_starter.zip on your system and click Open.
In the skills dashboard, select the PizzaSkill tile to open the skill designer.
Import the Starter Digital Assistant
With the ODA UI open in your browser, click to open the side menu.
Click Development and select Digital Assistants.
Click again to collapse the side menu.
Click Import Digital Assistant.
Navigate to ODA_HOL2019.zip on your system and click Open.
In the Digital Assistants dashboard, select the ODA_HOL2019 tile to open the DA designer.
If you cannot spot the ODA_HOL2019 DA, type ODA_HOL2019 into the Filter field located above the New Digital Assistant tile.
By importing the ODA_HOL2019 DA, you have added a digital assistant and two skills to your instance:
ODA_HOL_2019 (digital assistant)
RetailBot (skill)
FinancialBot (skill)
You are now ready for the main part of the lab. Skip ahead to the Design the Pizza Skill section.
This section only applies if you are at an Oracle event with a shared instance of Digital Assistant.
Log In to the Shared Instance
In your browser, enter the URL that has been provided by your lab instructor.
Log in to the instance using the credentials that you have been provided.
After successfully logging in, you will land on the ODA home page.
Clone Copies of the Starter Skill and Digital Assistant
In this lab, a starter skill and a starter digital assistant are provided for you. Before you get to work, you need to create your own copies.
Clone the Starter Skill
With the Oracle Digital Assistant UI open in your browser, click to open the side menu.
Click Development and select Skills.
Click again to collapse the side menu.
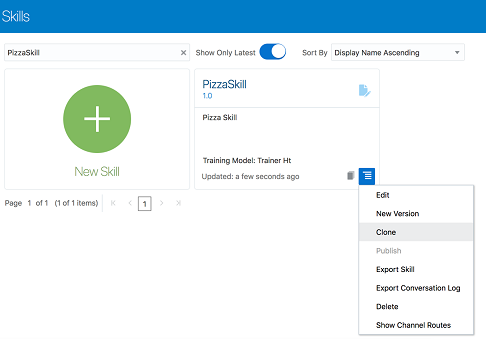
In the skills dashboard, find the tile for PizzaSkill.
Click PizzaSkill's Options menu () and select Clone.
In the Create Clone dialog, enter a value for Display Name using the form <your_initials>_PizzaSkill.
For example, if your initials are AB, you'd name the skill AB_PizzaSkill.
Click Clone.
On the Skills dashboard page, select <your_initials>_PizzaSkill to open it up in the designer.
Clone the Starter Digital Assistant
Click to open the side menu.
Click Development and select Digital Assistants.
Click again to collapse the side menu.
In the skills dashboard, find the tile for ODA_HOL2019, open its Options menu (), and select Clone.
In the Create Clone dialog, enter a value for Display Name using the form <your_initials>_ODA_HOL2019.
For example, if your initials are AB, you'd name the skill AB_ODA_HOL2019.
Click Clone.
On the Digital Assistants dashboard page, select <your_initials>_ODA_HOL2019 to open it up in the designer.
Design the Pizza Skill
In this part of the lab, we'll complete development of the Pizza Skill that has been started for us. After familiarizing ourselves with the starter skill, we'll:
Create a composite bag entity to consolidate existing entities which represent the different variable elements of the pizza (size, topping, delivery time etc) and make it easier to manage entities from the dialog flow.
Add logic to the skill's dialog flow to manage the pizza ordering process.
Train and test the skill.
Publish the skill so that it can be used in a digital assistant.
Explore and Test the Skill
The conversational AI use case you are working with is a skill for ordering pizza. To familiarize yourself with the designer and the skill itself, try it out by following these steps:
In ODA, click to open the side menu.
Click Development and select Skills.
Click again to collapse the side menu.
In the skills dashboard, select your copy of PizzaSkill.
In the left navigation for the designer, select .
Click the OrderPizza intent and quickly scan the utterances.
In the left navigation for the designer, select .
Select the PizzaDough entity and look at the way that it is configured.
Repeat the above step for PizzaSize and PizzaTopping.
Locate the Train button () on the right side of the page, click it, click Submit, and then wait a few seconds for the training to complete.
Find the Bot Tester icon () on the top of the page and click it.
In the tester's Message field, type I want to order pizza, click Send, and note the skill's response.
For now it's just a static response. It will become more dynamic once we add logic to the dialog flow.
Click the Reset button at the top of the tester window and then close the tester.
Add a Composite Bag Entity
When a customer orders a pizza, details such as toppings, size, and crust need to be specified. In PizzaSkill, each of these variables is represented by an entity.
The challenge for any chatbot is that the user can include varying subsets of the required information in their initial input. For example, one person might specify the size and topping, but not the type of crust. And another person might specify only the crust. In each case, the skill should recognize any entities supplied in the original input, and prompt for those that are not.
In this step, we’ll create a composite bag entity, which is a special entity that automatically recognizes and prompts for the appropriate entities for a pizza order. In addition to our custom entities (PizzaSize, PizzaTopping, PizzaDough), we'll include a system entity for DeliveryTime.
Create the Composite Bag Entity:
Select and click to create a new entity.
In the Name field, change the value to PizzaBag.
In the Configuration section, in the Type dropdown, select Composite Bag.
Add Bag Items for the PizzaSize, PizzaTopping, PizzaDough, and DeliveryTime Entities
Click .
On the Add Bag Item page, fill in the following values:
Name:PizzaSize
Type:Entity
Entity Name:PizzaSize (If prompted in a popup, select Overwrite.)
Maximum User Input Attempts:4
Error Message:Sorry, '${system.entityToResolve.value.userInput!'this'}'
is not a valid size of pizza.
Click .
For the value, enter What size of pizza would you like?
Again, click .
For the value, enter Please choose small, medium or large.
Click Close.
Again, click .
On the Add Bag Item page, fill in the following values:
Name:PizzaTopping
Type:Entity
Entity Name:PizzaTopping (If prompted in a popup, select Overwrite.)
Error Message:Sorry, we don't have that topping
Prompt for Disambiguation:switched ON
Disambiguation Prompt:Sorry you can only order one topping type
Click Close.
Again click .
On the Add Bag Item page, fill in the following values:
Name:PizzaDough
Type:Entity
Entity Name:PizzaDough
Prompt for Value:false
Click Close.
For the fourth (and final) time, click .
On the Add Bag Item page, fill in the following values:
Name:DeliveryTime
Type:Entity
Entity Name:TIME
Maximum User Input Attempts:4
Scroll down to the Prompts section, replace the existing prompt with When can we deliver that for you?, and press Enter.
Click .
In the Expression field, enter ${(pizza.value.DeliveryTime.hrs?number < 10)?then('true','false')}
In the Error Message field, enter Sorry, we only deliver up to 9:30pm and press the Enter key.
Click Close.
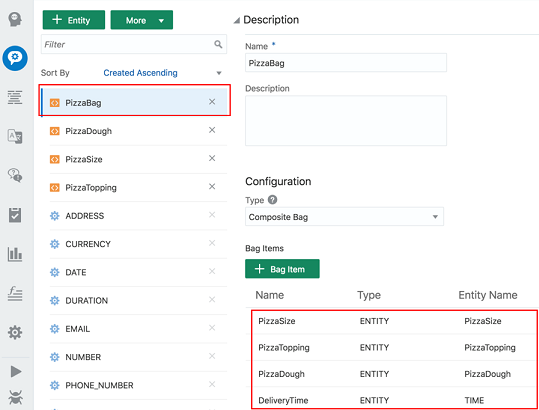
Here is what the PizzaBag composite bag should look like in the designer:
Associate the Entity with the Intent
Now we need to associate the PizzaBag composite entity to the OrderPizza intent so that we can extract the key words and phrases from the user input.
Select .
Select the OrderPizza intent.
Click the button and select PizzaBag from the dropdown. See this screenshot to help locate the button:
Implement the Pizza Ordering Logic
Next we need to write logic for the skill to understand the user query and respond accordingly. We'll do this in the dialog flow where we can choreograph the interaction between the skill and its users.
Click .
Within the context variables section, add this entry: pizza: "PizzaBag"
Important: For all dialog flow examples, make sure that you get the indentation exactly right. Each state starts with two spaces of indentation. With each additional level of indentation, you add two more spaces.
Update the text and transitions properties in the startOrderPizza state:
startOrderPizza:
component: "System.Output"
properties:
text: "ok lets get that order sorted"
keepTurn: true
transitions:next: "resolveEntities"
Click Copy in the following code box and then paste the copied code below the startOrderPizza state:
  resolveEntities:
    component: "System.ResolveEntities"
    properties:
      variable: "pizza"
      nlpResultVariable: "iResult"
      maxPrompts: 3
      cancelPolicy: "immediate"
    transitions:
      next: "setPizzaDough"
      actions:
        cancel: "maxError"

  setPizzaDough:
    component: "System.SetVariable"
    properties:
      variable: "pizza.PizzaDough"
      # value set for the variable.
      value: "${pizza.value.PizzaDough?has_content?then(pizza.value.PizzaDough,'regular')}"
    transitions:
      next: "showPizzaOrder"

  showPizzaOrder:
    component: "System.Output"
    properties:
      text: "Ok so we are getting you a ${pizza.value.PizzaSize} ${pizza.value.PizzaTopping} at ${pizza.value.DeliveryTime.date?long?number_to_time?string('HH:mm')}.  This will be on our ${pizza.value.PizzaDough} base "
    transitions:
      return : "showPizzaOrder"

  maxError:
    component: "System.Output"
    properties:
      text: "OK lets connect you with someone to help"
    transitions:
      return: "maxError"
Notes on What We Just Did
We have added a context variable pizza of type PizzaBag and used it in the resolveEntities state. This state is called when the OrderPizza intent is resolved.
The resolveEntities state calls a system component (System.ResolveEntities), iterates through all the entity fields in the composite bag, converses with the user, and resolves all the fields.
The setPizzaDough state checks if the dough value is null. If yes, then it sets it to regular.
Once all the entities are resolved, we output the pizza details in the showPizzaOrder state.
The maxError state is called if the number of attempts for an entity in the bag has reached the value of maxPrompts.
Validate and Train PizzaSkill
Click the Validate button to validate the skill.
(The Validate button is in the top navigation.)
If validation fails, delete the code in the dialog flow, replace it with the contents of the PizzaSkill_BotML.txt file, and validate the flow again.
Click , click Submit, and then wait a few seconds for the training to complete.
Test PizzaSkill
Find the Bot Tester icon () on the top of the page and click it.
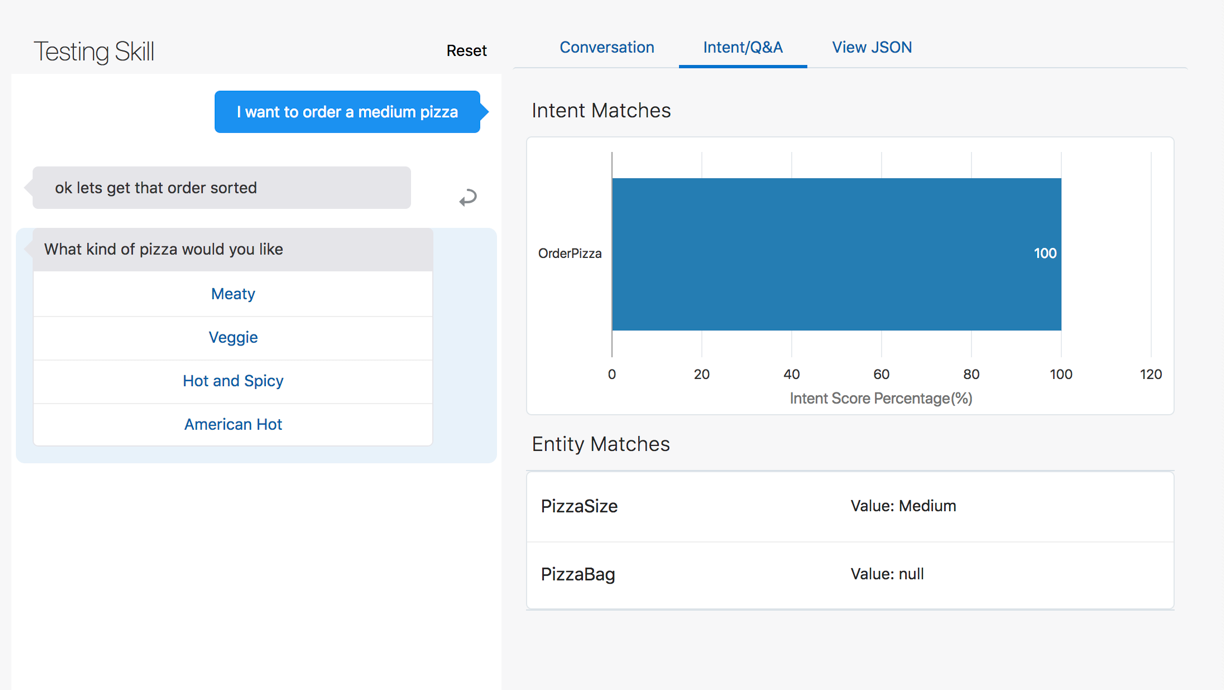
Type I want to order a medium pizza in the Message field and click Send.
Click the Intent/QnA tab and observe the Entity Matches section.
You'll notice that the PizzaSize value is set to Medium:
Click the Reset button.
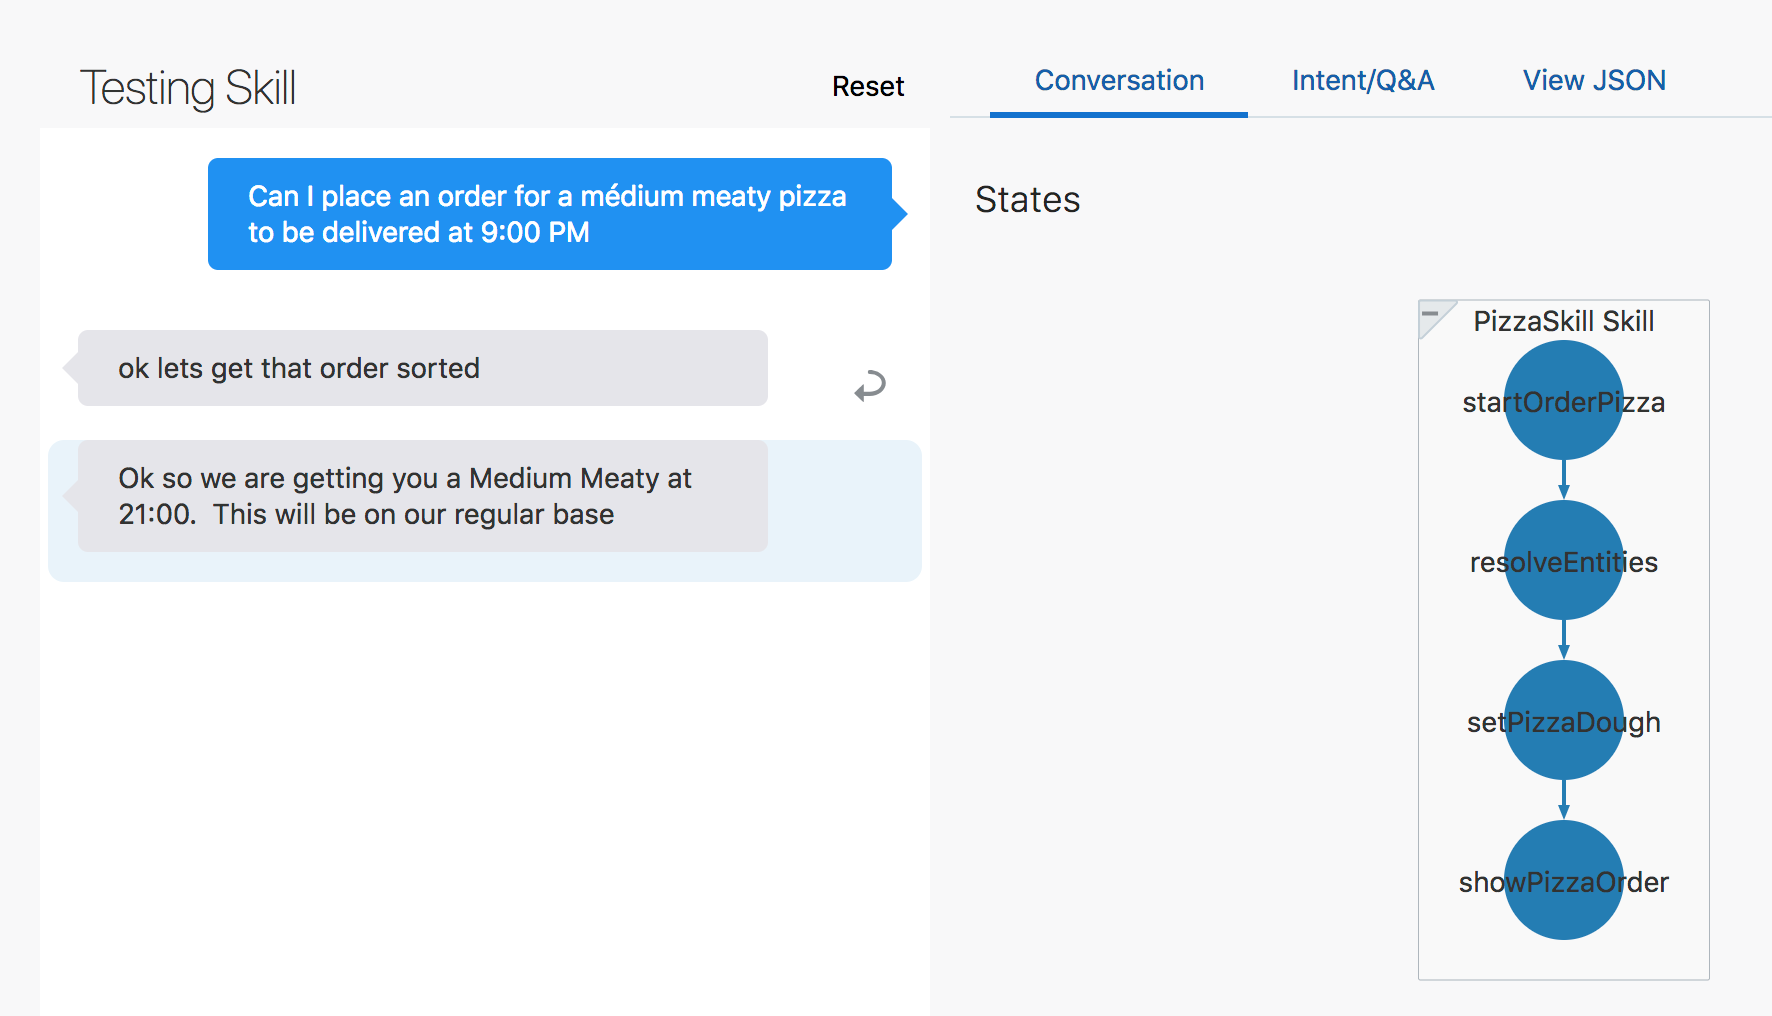
Now try Can I place an order for a medium meaty pizza to be delivered at 9:00 PM and observe the response:
Click Reset.
Now let’s try one with a gluten-free base by typing: A small veggie pizza to be delivered at 8:00pm, also can you please make it gluten-free?
Click Reset.
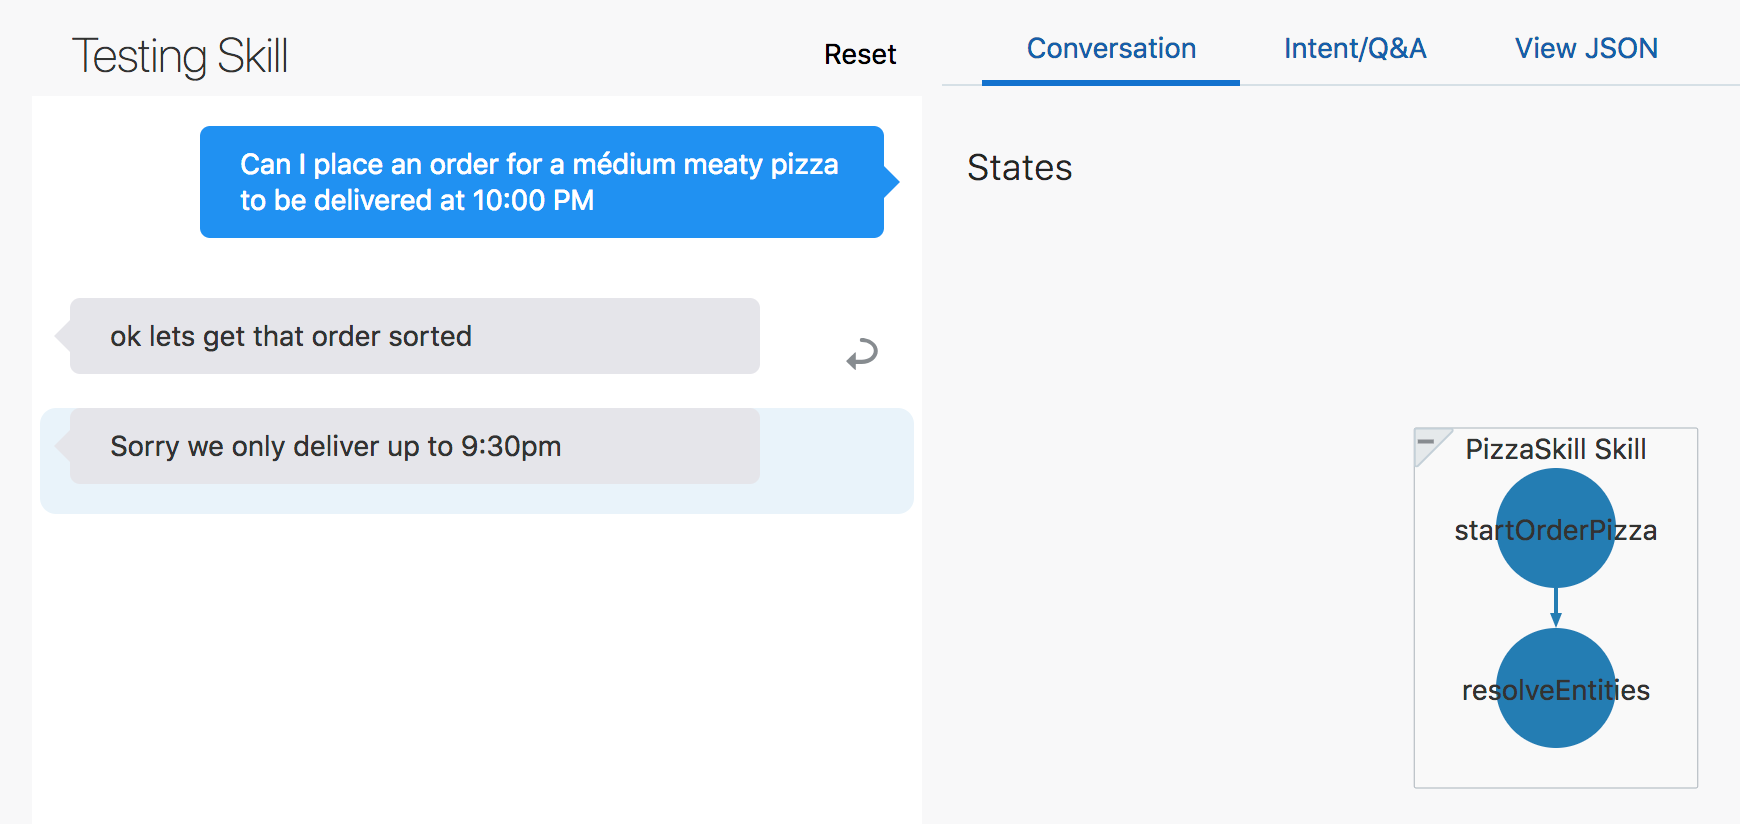
Now try Can I place an order for a medium meaty pizza to be delivered at 10:00 PM.
This should result in the following response:
Click Reset.
Now try Can I place an order for a small medium meaty pizza to be delivered at 9:00 PM and see what you get.
Click Reset.
Now try Can I place an order for a small sausage pizza to be delivered at 9:00 PM and see what you get.
Click Reset.
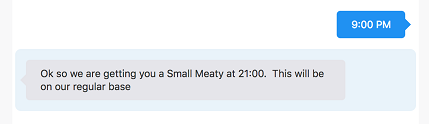
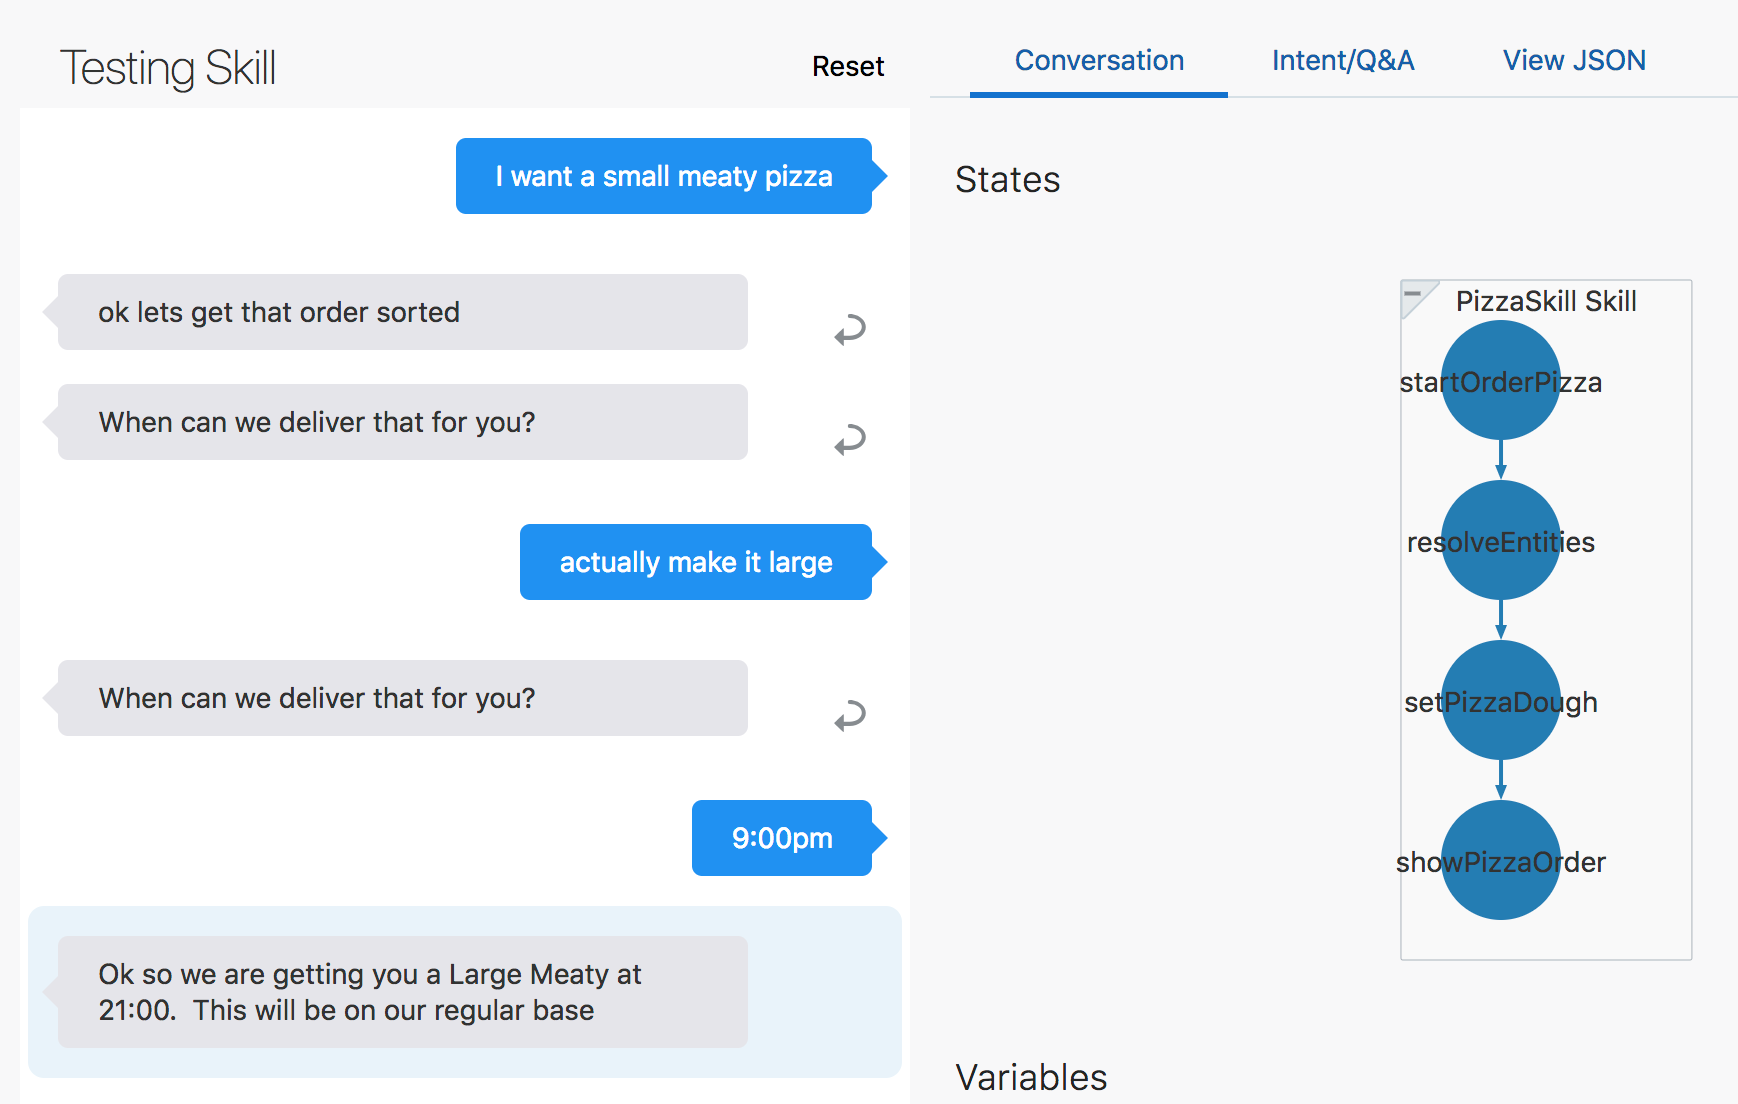
Next try I want a small meaty pizza.
The skill asks at what time to deliver the pizza.
To see how the skill reacts when the user changes his mind mid-stream, type actually make it large and press Enter.
When the skill repeats the question about delivery time, type 9:00 PM.
This is what the conversation should look like:
As you can see, the skill was able to incorporate the change in the order and continue without missing a beat.
Using the composite entity, we are able to resolve all the entities in a single customer query!
Now that we are done building the skill, we'd like to add it to our digital assistant.
However, to make the skill available to be added to a digital assistant, we first need to publish it:
Click to open the side menu.
Click Development and select Skills.
Click again to collapse the side menu.
In the skills dashboard, find the tile for your copy of PizzaSkill.
Click the skill's Options menu () and select Publish.
On the Publish Skills page, click Publish.
Once you have published the skill, the badge should appear on the skill's tile.
This also means that you can no longer make any changes to this version of the skill.
Congrats! Your skill is now ready to be added to a digital assistant!
Set Up the Shopping Centre Digital Assistant
Digital assistants are virtual personal assistants that users can interact with using natural language. When a user engages with the digital assistant, the digital assistant evaluates the user input and routes the conversation to the appropriate skill.
Among other things, the digital assistant:
Greets the user upon access.
Upon user request, lists what it can do and provides entry points into the given skills.
Routes explicit user requests to the appropriate skill.
Handles interruptions to flows.
Handles disambiguation.
Handles requests to exit the bot.
Explore the Digital Assistant
The starter digital assistant (or, DA for short) that you just cloned consists of two skills – FinancialBot and RetailBot. Later, we'll add PizzaSkill to the DA.
To familiarize yourself with the DA, try it out by following these steps:
Click to open the side menu.
Click Development and select Digital Assistants.
Click again to collapse the side menu.
On the Digital Assistants dashboard, find the tile for your copy of ODA_HOL2019 and select it to open it up in the designer.
Ensure the Skills icon is selected ().
Notice that FinancialBot and RetailBot are listed there.
Select the RetailBot skill and browse the attributes of its description and interaction model.
Select the FinancialBot skill and browse the attributes of its description and interaction model.
Select .
Note the three intents.
These are built in to all digital assistants. Here's what they are for:
exit: applies when the user signals the desire to exit the current conversation or context in the digital assistant.
help: applies when the user asks for help or orientation.
unresolvedIntent: applies to user input that doesn't match well with the exit and help intents.
Click and select the Configurations tab.
Notice the Routing Parameters, Conversation Parameters and Other Parameters sections.
Click , click Submit, and then wait a few seconds for the training to complete.
Find the tester icon () on the top of the page and click it.
In the tester's Message field, type help me, press Enter, and note the DA's greeting and initial menu.
Click the Reset button.
Now try entering Do I have enough money in my savings account, pressing Enter, and observing the response.
Close the tester.
Add PizzaSkill to the DA
With a new pizzeria opening in the shopping centre, we want the digital assistant to support this merchant as well. So let's add the PizzaSkill to our digital assistant and then train the digital assistant so that it can work with the new skill:
In your DA, select .
Click .
Find the tile for your copy of PizzaSkill.
Note: The skill won't appear there if you haven't completed the Publish the Skill part of the lab.
In the tile for your skill, click .
Click Close to close the Skill Catalog.
Click , click Submit, and then wait a few seconds for the training to complete.
Personalize Your Digital Assistant
Once you have created a digital assistant and added skills to it, you can customize some of the aspects of the digital assistant, such as the invocation name of the digital assistant’s skills and the language in the digital assistant’s help and exit intents.
Change the Invocation Name
An important part of configuring any skill is coming up with a good invocation name, which is used in explicit invocation of the skill. Here are the steps to change the invocation name of recently added skill:
In your DA, select .
Select Pizza Skill.
Scroll down to the Interaction Model section of the page and change the Invocation Name to Pizza King.
Change the example utterance to Order Pizza.
Test the Invocation Name
Now let’s try various invocation patterns and see whether and how the digital assistant responds:
Click the tester icon ().
In the tester's Message field, type Go to Pizza King to place my pizza order, press Enter, and note the DA's response.
Click the Reset button.
Now try Pizza King.
Click Reset.
Now try Pizza King to check my order.
Click Reset.
Now try I want a large meaty pizza from pizza king.
Click Reset.
Now try Can you use Pizza King to place an order.
Click Reset.
System Intents and Prompts
You can customize the built-in system intents and the prompts that are driven by them.
First, let's add some utterances to the built-in help intent:
In your DA, select .
Select the help intent.
In the Examples section, add the following utterances:
Can someone help me
What can you do
What things do you do
What can I ask you
The digital assistant comes with configurable prompts to respond to various types of user input. These prompts can be modified in the DA's configuration settings.
Let's modify the DA's help prompt:
In the DA, click and select the Configurations tab.
Scroll down to the Conversation Parameters section of the page.
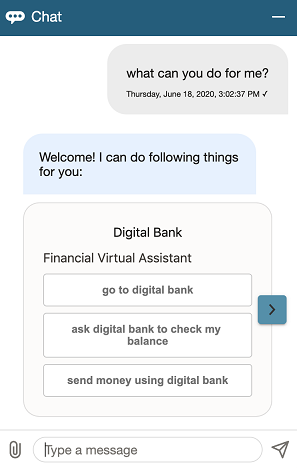
Modify the value of Digital Assistants Help Prompt to Welcome! I can do following things for you:
Click , click Submit, and then wait a few seconds for the training to complete.
Test the Utterances and Modified Prompt
To see the new utterances and prompt in action:
Click the tester icon ().
In the tester's Message field, type Can someone help me, press Enter, and note the DA's response.
Evaluate Routing Behaviors
Before putting the digital assistant into production, let’s use the tester to evaluate various aspects of its routing behavior.
Open the tester by clicking the tester icon ().
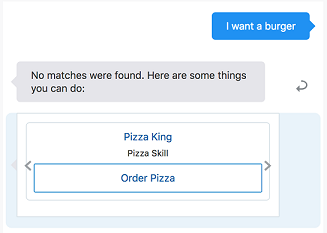
No Match
In the tester's Message field, type I want a burger and press Enter.
Since no match is found in the DA and skill, it generates the DA-level help card:
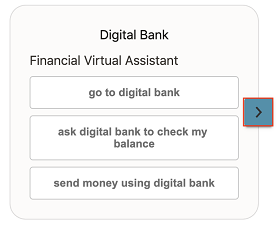
Note: Only the Pizza King shows in the screenshot, but you can use the horizontal scroll arrows to see the cards for the other skills.
Click Reset.
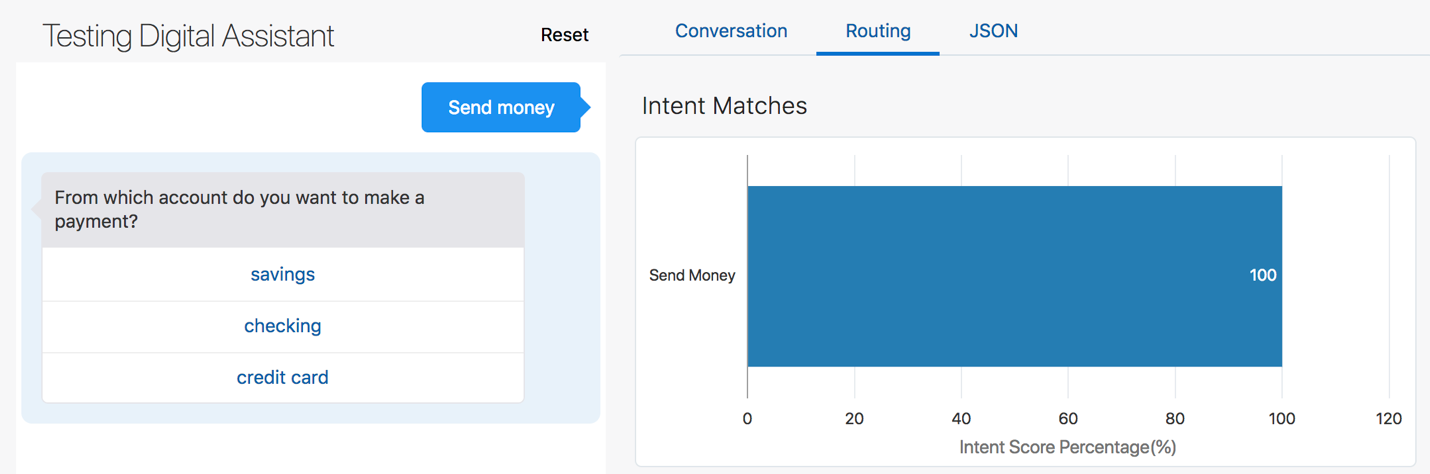
Implicit Invocation
In the tester's Message field, type Send money and press Enter.
Notice that the routing resolves to the Digital Bank candidate skill and its Send Money intent:
Note: "Digital Bank" is the invocation name of FinancialBot.
Click the Routing tab and scroll down.
Notice the intent evaluation that leads to this response:
Click Reset.
Note: In these examples, you might get slightly different results than what are shown here, especially in the confidences scores (given in percentages) when resolving intents. And in some cases, the resolved intents could vary, should the differing confidence scores push those intents above or below the given confidence thresholds. The cause of this variance is the non-deterministic nature of the AI behind the natural language processing and the fact that these bots have a limited number of training utterances (in order to make the lab simpler).
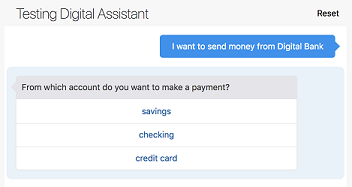
Explicit Invocation
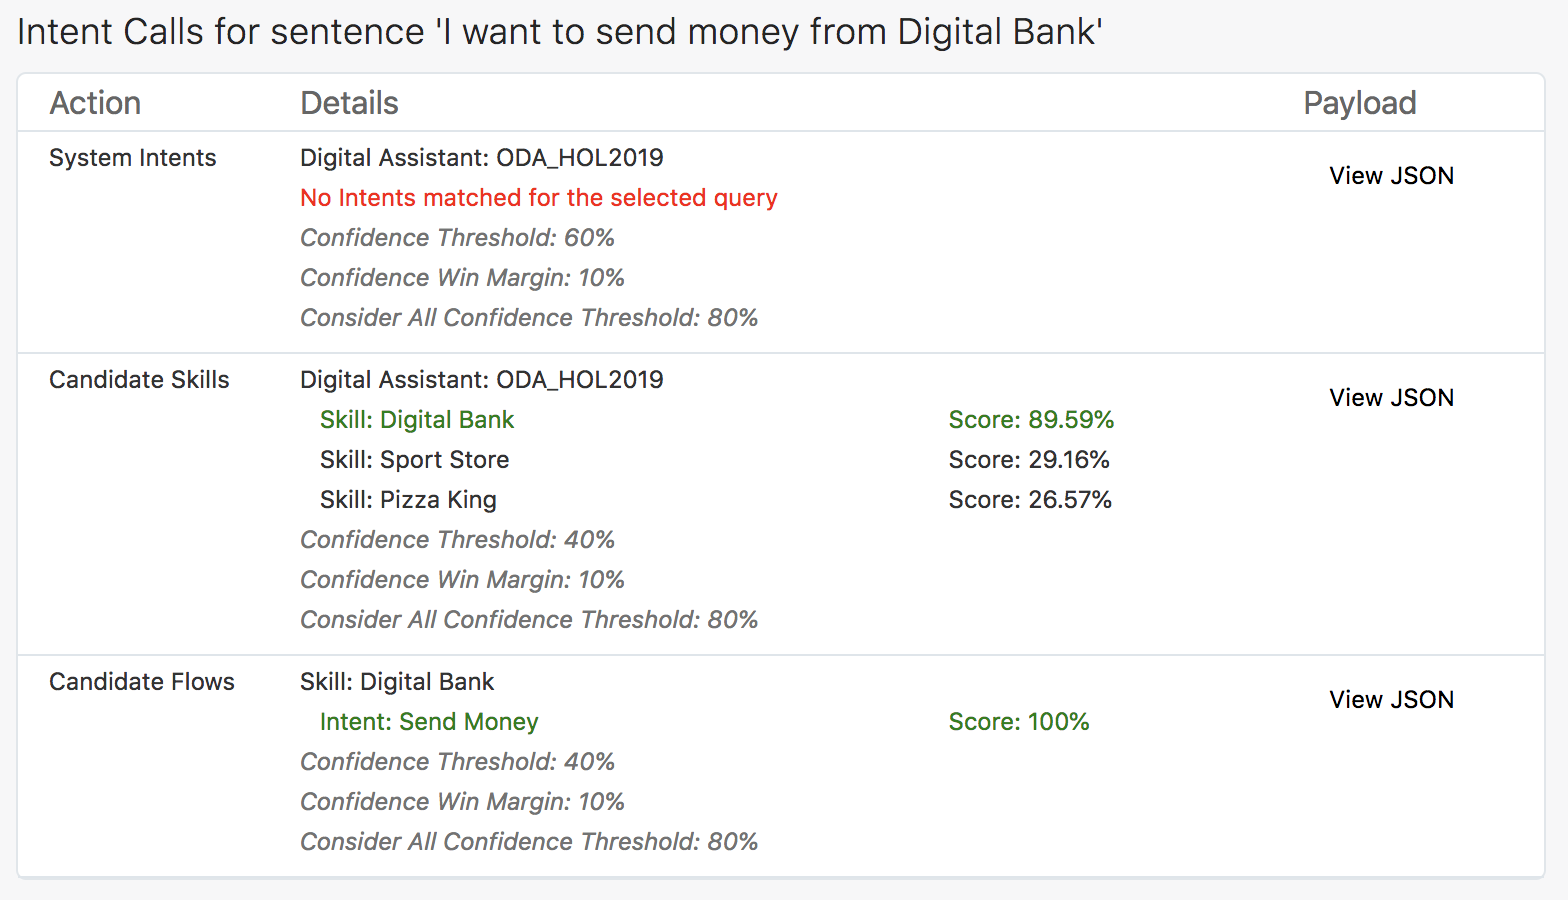
In the tester's Message field, type I want to send money from Digital Bank and press Enter.
Here’s the user’s input and the digital assistant’s initial response:
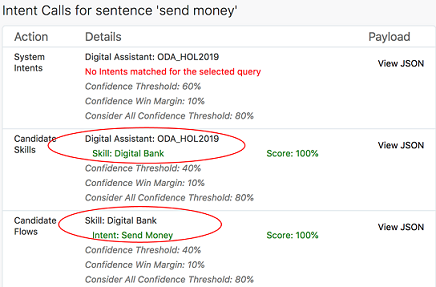
Click the Routing tab and scroll down to the Rules section and notice the rule that is displayed.
In the Intent Calls section, you can see that the Digital Bank skill gets a much higher confidence score than the other skills.
Click Reset.
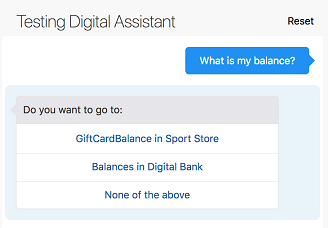
Ambiguous Utterance
In the tester's Message field, type What is my balance? and press Enter.
Here’s the conversation:
As you can see, the digital assistant is unsure of what the user wants to do, so it provides a prompt asking the user to choose among the Sport Store (which is the invocation name for the RetailBot skill) and Digital Bank skill intents.
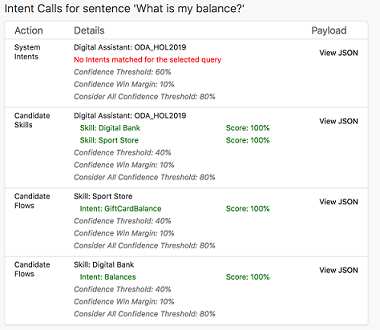
Click the Routing tab and scroll down.
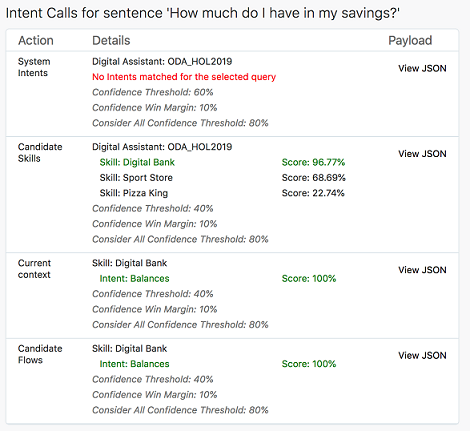
Notice the evaluation in the Intent Calls section that leads to this response:
Both the candidate skills got high scores (100%). And then for each of those skills, the router identified a candidate flow that also scored highly (also 100%).
Since the GiftCardBalance and Balances candidate flows exceed the confidence threshold, and since difference between their scores is less than the Confidence Win Margin value (10%), the digital assistant asks the user to choose between those intents.
Click Reset.
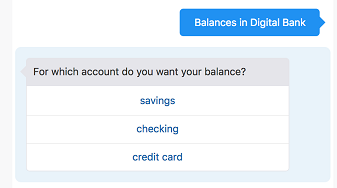
Context Awareness
In the tester, type What is my balance? and press Enter.
Here’s the conversation:
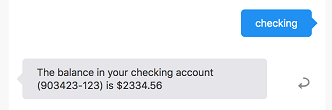
Select Balances in Digital Bank.
Select checking.
.
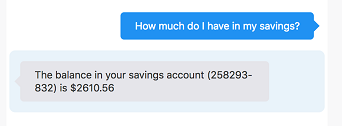
Again, type How much do I have in my savings?
Here is the response:
.
Click Reset.
Notes on What We Just Did
As you can see, the user starts with the question "What is my balance?", goes through a prompt to disambiguate between the Digital Bank skill and the Sport Store skill, and eventually gets her checking account balance. Then the user enters "What is my balance?" again, but this time doesn't have to navigate through any disambiguation prompts. The info in the Routing tab helps to explain why.
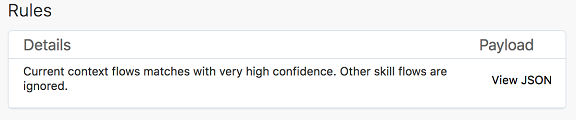
Also note that in the Rules section of the Routing tab, you see the following:
So, even though there are matching intents from the Sport Store skill, they are ignored. The Intent Calls section shows all of the matching intents, but the entry for “Current Context”, which contains only the Digital Bank skill’s Balances intent, is decisive.
Non sequitur
Non sequitur refers to interrupting a conversation flow by changing the subject. Here's an example where such interruptions occur because the user needs info from one skill to complete the flow in another skill.
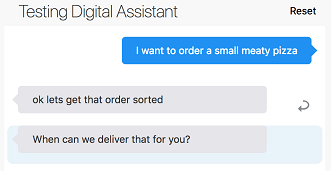
In the tester, type I want to order a small meaty pizza and press Enter.
Pizza Skill is invoked and here is the response:
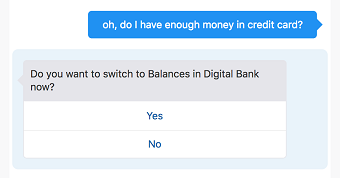
To simulate the user suddenly being unsure if he has enough money, type the following: oh, do I have enough money on my credit card?
At this point the DA detects that the intent corresponds to the Digital Bank skill and asks if user wants to switch to Balances in Digital Bank:
Select Yes.
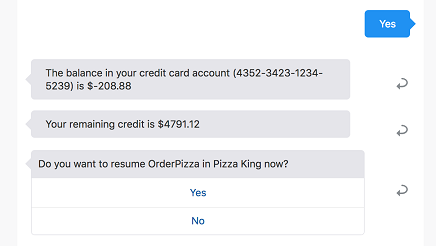
The user is presented with his financial details, thus completing that flow. At that point, the DA asks if it can return back to PizzaSkill.
Again, select Yes.
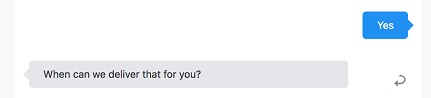
The DA returns to PizzaSkill and resumes the conversation where you left it:
Type 9:00 PM and press Enter.
In this sequence, you started ordering a pizza, confirmed you had enough money in your account, and finished ordering the pizza.
Non sequitur – Complex Conversation
Let’s try a more complex conversation:
In the tester, type I want to order a large pizza at 9:00 PM today and press Enter.
Instead of selecting the kind of pizza, type oh, do I have enough money?
At this point, the DA will ask you to switch to Balance in Digital Bank.
Select Yes.
Now, instead of selecting the account type, type how about my gift card balance?
The DA asks if you want to switch to GiftCardBalance in Sport Store.
Select Yes.
Type GC100 as the gift card number and press Enter.
The DA informs you of your gift card balance.
Then the DA asks if you want to return to Balance in Digital Bank.
Select Yes.
Select savings as your account type.
The DA fetches the savings account details for you and asks if you want to return to OrderPizza in Pizza King.
Select Yes.
Select any of the options for the kind of pizza you want to order.
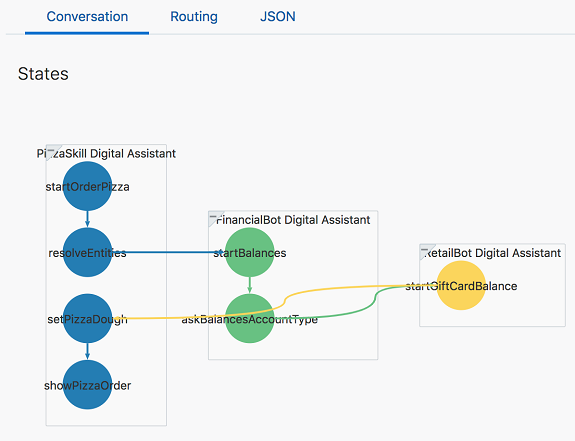
Observe the states flow in the Conversation tab.
You are now done with creating, personalizing, and evaluating the routing behavior of your digital assistant! In the next section, we'll add it to a web channel through which users can access it.
Expose the Digital Assistant to Users through a Web Channel
In this section of the lab, we'll publish our DA through a web channel, create a web application to expose the DA to users, and test the DA from a web page.
Note: If you are using a version of Oracle Digital Assistant that is based on Oracle Cloud Infrastructure Gen 1 (such as releases 19.1.5 and 19.4.1), this section of the tutorial won't work for you. The version of the SDK that this section requires is only available for instances of Digital Assistant that have been provisioned on Oracle Cloud Infrastructure Gen 2 (including versions 19.12 and later). To set a web channel on a Gen 1 instance of Digital Assistant, see Expose Your Digital Assistant through a Web Channel.
Create a New Channel
Click to open the side menu.
Click Development and select Channels.
Click again to collapse the side menu.
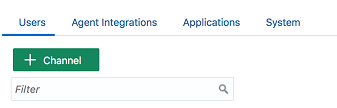
On the Users tab, click + Channel.
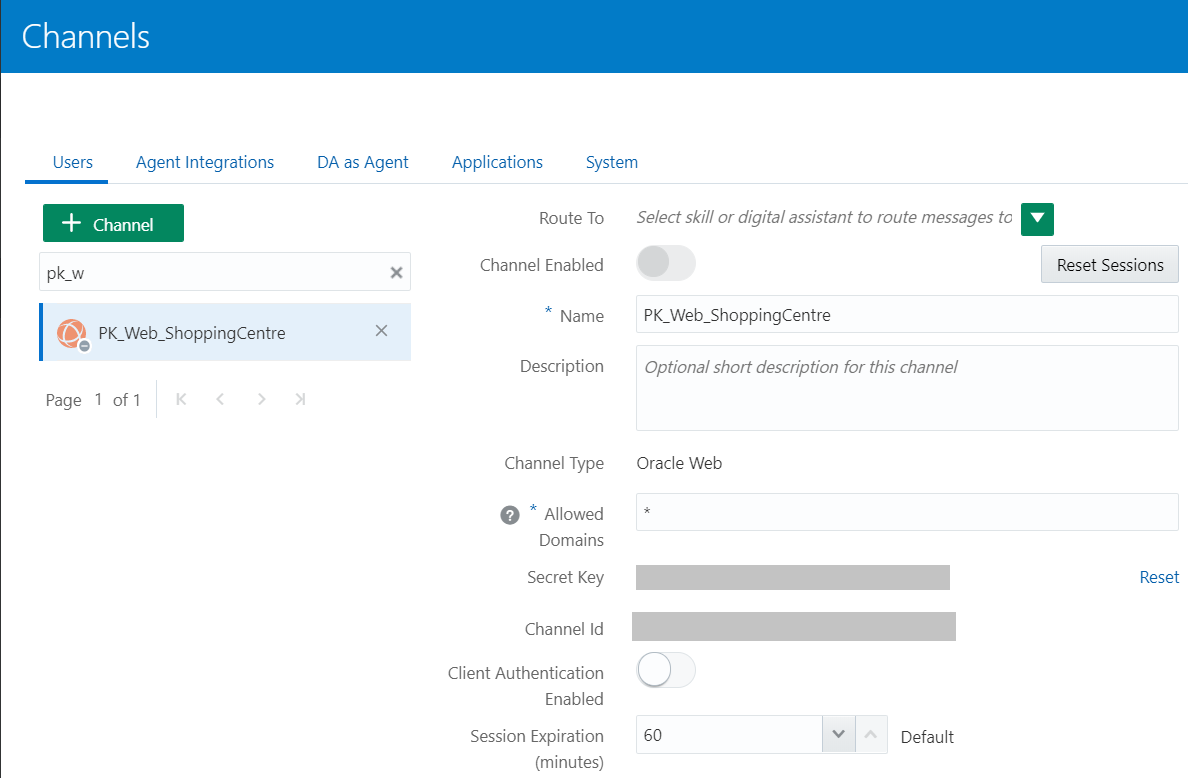
In the Create Channel dialog, fill in the following fields:
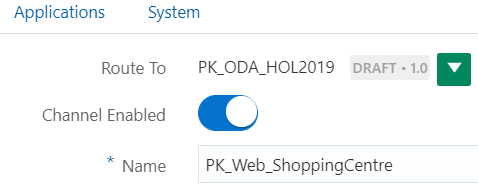
Name: A unique name for the channel, such as PK_Web_ShoppingCentre.
Important: If you are using the shared instance for this lab, be sure to include your initials in this field to distinguish it from the channels of other lab participants.
Channel Type: Oracle Web
Allowed Domains: * (asterisk)
Client Authentication Enabled: Switch to Off
Click Create.
If you are not returned to the page for the newly-created channel, enter part of your channel name in the Filter field, and then select your channel.
Open the Route To dropdown menu, enter your DA name in the Filter box, and select your DA.
Switch Channel Enabled to ON.
Copy the the value of the Channel Id field to a text file.
You will use it later on this lab while running the sample client application.
Set Up a Web Page
To create the web page from which users can access the DA:
Create a folder called chat-page.
Download chat-page.zip into the folder, and then unzip it.
Your folder should now contain index.html and the css, images, and scripts subfolders.
Copy native-client-sdk-js/web-sdk.js from your Oracle Web SDK folder and put it in the scripts subfolder.
Add a Chat Widget to the Web Page
Now we'll add the chat widget to the web page:
In the top folder (chat-page), open index.html in an editor.
Click Copy in the following code box to copy the code,
and then insert the copied code
below the <link rel="stylesheet" href="css/style.css"> tag.
    <script>
        var chatWidgetSettings = {
            URI: '<put-your-URI-here>',
            channelId: '<put-your-channel-ID-here>'
        };
        function initSdk(name) {
            // Default name is Bots
            if (!name) {
                name = 'Bots';
            }
            setTimeout(() => {
                const Bots = new WebSDK(chatWidgetSettings); // Initiate library with configuration
                Bots.connect()                               // Connect to server
                    .then(() => {
                        console.log("Connection Successful");
                    })
                    .catch((reason) => {
                        console.log("Connection failed");
                        console.log(reason);
                    });
                window[name] = Bots;
            });
        }
    </script>
    <script src="scripts/web-sdk.js" onload="initSdk('Bots')">
    </script>
Set these chatWidgetSettings properties:
URI: This is the host and domain name for your Oracle Digital Assistant instance. For example: xxxx.xxx.digitalassistant.xxx.xxx.com.
You can get this URI from the address bar of your browser when it is displaying your Digital Assistant instance.
Note: Don't include https://.
ChannelId: This is the channel ID that you noted when you created
the Oracle Web channel. For example:
12a45b92-2c85-88aa-810d-1dc0d1cfe472.
Save your changes.
Notice that the last <script> element references the web-sdk.js file, which contains functions that enable you to programmatically send messages.
Test the DA on the Web Channel
Let's try out the chat widget.
On your system, navigate to the chat-page folder and double-click index.html to open the page in a web browser.
You should see a web page with the chat widget's icon on the bottom of the page.
Click the widget.
Start communicating with the DA by asking for help and/or making specific requests, such as ordering pizza and checking account balances.
Note: There are menus for all three skills, which you can scroll through by using the arrows on the sides of the menus.
That's it! You have now introduced your DA to its public by hooking it up to a web interface.
Shows how to personalize and tune a digital assistant, add composite bag entities to a skill, and add a digital assistant to a channel
.
This software and related documentation are provided under a license agreement containing restrictions on use and disclosure and are protected by intellectual property laws. Except as expressly permitted in your license agreement or allowed by law, you may not use, copy, reproduce, translate, broadcast, modify, license, transmit, distribute, exhibit, perform, publish, or display any part, in any form, or by any means. Reverse engineering, disassembly, or decompilation of this software, unless required by law for interoperability, is prohibited.
If this is software or related documentation that is delivered to the U.S. Government or anyone licensing it on behalf of the U.S. Government, then the following notice is applicable:
U.S. GOVERNMENT END USERS: Oracle programs (including any operating system, integrated software, any programs embedded, installed or activated on delivered hardware, and modifications of such programs) and Oracle computer documentation or other Oracle data delivered to or accessed by U.S. Government end users are "commercial computer software" or "commercial computer software documentation" pursuant to the applicable Federal Acquisition Regulation and agency-specific supplemental regulations. As such, the use, reproduction, duplication, release, display, disclosure, modification, preparation of derivative works, and/or adaptation of i) Oracle programs (including any operating system, integrated software, any programs embedded, installed or activated on delivered hardware, and modifications of such programs), ii) Oracle computer documentation and/or iii) other Oracle data, is subject to the rights and limitations specified in the license contained in the applicable contract. The terms governing the U.S. Government's use of Oracle cloud services are defined by the applicable contract for such services. No other rights are granted to the U.S. Government.
This software or hardware is developed for general use in a variety of information management applications. It is not developed or intended for use in any inherently dangerous applications, including applications that may create a risk of personal injury. If you use this software or hardware in dangerous applications, then you shall be responsible to take all appropriate fail-safe, backup, redundancy, and other measures to ensure its safe use. Oracle Corporation and its affiliates disclaim any liability for any damages caused by use of this software or hardware in dangerous applications.
Oracle and Java are registered trademarks of Oracle and/or its affiliates. Other names may be trademarks of their respective owners.
Intel and Intel Inside are trademarks or registered trademarks of Intel Corporation. All SPARC trademarks are used under license and are trademarks or registered trademarks of SPARC International, Inc. AMD, Epyc, and the AMD logo are trademarks or registered trademarks of Advanced Micro Devices. UNIX is a registered trademark of The Open Group.
This software or hardware and documentation may provide access to or information about content, products, and services from third parties. Oracle Corporation and its affiliates are not responsible for and expressly disclaim all warranties of any kind with respect to third-party content, products, and services unless otherwise set forth in an applicable agreement between you and Oracle. Oracle Corporation and its affiliates will not be responsible for any loss, costs, or damages incurred due to your access to or use of third-party content, products, or services, except as set forth in an applicable agreement between you and Oracle.
 to open the side menu.
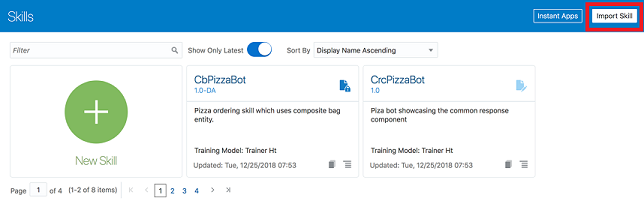
 ) and select Clone.
 .
. .
. ) on the right side of the page, click it, click Submit, and then wait a few seconds for the training to complete.
 ) on the top of the page and click it.
 to create a new entity.
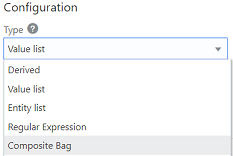
 .
. .
. .
.
 button and select PizzaBag from the dropdown. See this screenshot to help locate the button:

 .
.


 badge should appear on the skill's tile.
 ).
).
 and select the Configurations tab.
 .
. .
.