JavaScript must be enabled to correctly display this content
Before you Begin
This 60-minute hands-on lab is an entry-level exercise for building a skill in Oracle Digital Assistant.
Background
Oracle Digital Assistant is an environment for building digital assistants, which are user interfaces driven by artificial intelligence (AI) that help users accomplish a variety of tasks in natural language conversations. Digital assistants consist of one or more skills, which are individual chatbots that are focused on specific types of tasks.
In this lab, you will create a skill that can be used for interactions with a pizzeria, including ordering pizzas and canceling orders. As part of this process, you will:
Define intents, utterances, entities.
Design a conversation flow.
Validate, debug and test your skill.
What Do You Need?
Access to Oracle Digital Assistant
Create a Skill
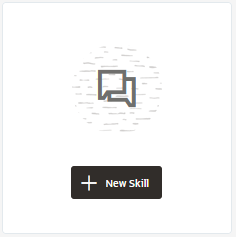
In this lab, we're starting from scratch. So the first thing you'll do is create a new skill.
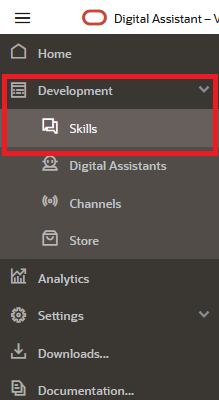
With the Oracle Digital Assistant UI open in your browser, click to open the side menu.
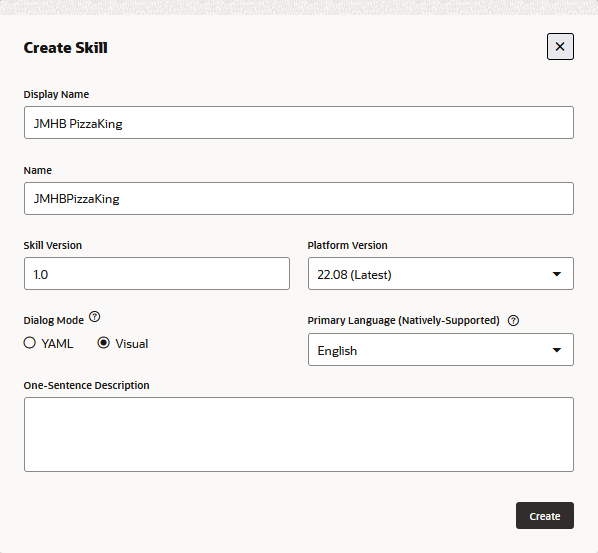
For Display Name enter Pizza King. If you are working in an environment where others may also be creating the same tutorial, prefix Pizza King with your unique initials.
Optionally, fill in a one-sentence description (e.g., Skill for ordering from Pizza King)
For the other fields, leave the default values. Note that the Dialog Mode is Visual. Later on in this tutorial, you're going to create a dialog flow, the definition of the skill-user conversation, using the declarative approach of the Visual Flow Designer.
The designer will then open on the Intents page. Here's where we'll begin to express the Pizza King customer use case in terms of the concepts that support Natural Language Processing (NLP).
Oracle Digital Assistant's underlying natural language processing (NLP) engine doesn't inherently know about the business or task that a skill is supposed to assist with. For the skill to understand what it should react to, you need to define intents and examples (utterances) for how a user would request a specific intent.
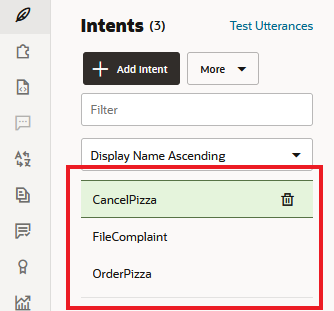
For the Pizza King example, you will create intents for ordering pizza, cancelling an order, and filing a complaint. The order pizza intent is a regular intent, which means that it's mapped to a specific flow that will likely involve one or more exchanges between the user and skill. The cancel pizza and file complaint intents are answer intents, meaning that users who express these intents will get a simple static answer. You are implementing these intents as answer intents in the interest of time. You would not typically implement intents that are related to a process like filing a complaint as answer intents, which are often used for returning answers to FAQs.
Create the Order Pizza Intent
Click the + Intent button.
Next to the Conversation Name field, click , and enter Order Pizza.
In the Name field, type OrderPizza.
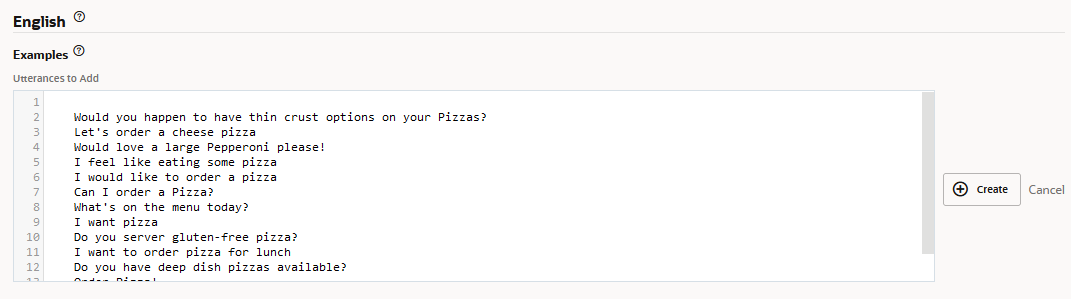
Select and copy all of the example sentences below to your clipboard:
Would you happen to have thin crust options on your Pizzas?
Let's order a cheese pizza
Would love a large Pepperoni please!
I feel like eating some pizza
I would like to order a pizza
Can I order a Pizza?
What's on the menu today?
I want pizza
Do you server gluten-free pizza?
I want to order pizza for lunch
Do you have deep dish pizzas available?
Order Pizza!
(You'll notice that it's fine for utterances to have inconsistent punctuation and capitalization.)
In the Examples section, click Advanced input mode.
The next two intents are not for a transactional intents like OrderPizza. They are instead answer intents: they return a single answer in response to the resolved user input. Though you typically use answer intents for FAQs, here we'll use them for Cancel Pizza and File Complaint so that we can demonstrate a multi-intent skill in action without first having to implement flows for all of the intents.
Click the + Add Intent button (located at the top left of the page).
Next to the Conversation Name field, click , and enter Cancel Pizza.
In the Name field, type CancelPizza.
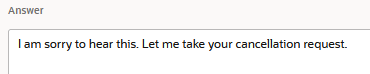
Click in the Answer field. Enter I am sorry to hear this. Let me take your cancellation request.
If you're stuck, you can add the intents and their utterances by importing the PizzaKing-Intents.csv file that's in PizzaKing-Intents_CSV.zip.
Extract this ZIP file to your local system, then click More (located next to +Add Intent), choose Import intents, and browse to, and select, the PizzaKing-Intents.csv file.
Train Your Intents
You've now provided the basic ingredients that allow the skill to recognize user input for ordering a pizza, but right now, the skill has no cognition. It can't understand any user input.
To enable the skill to interpret user input based on the utterances that you just added, you need to train to build the intent model.
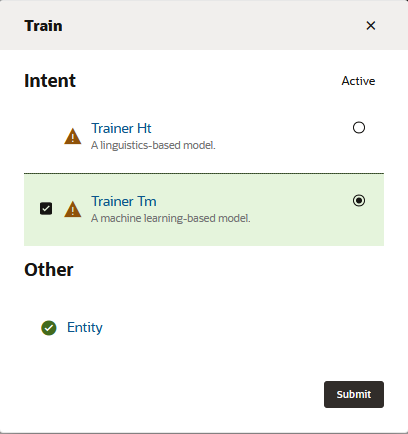
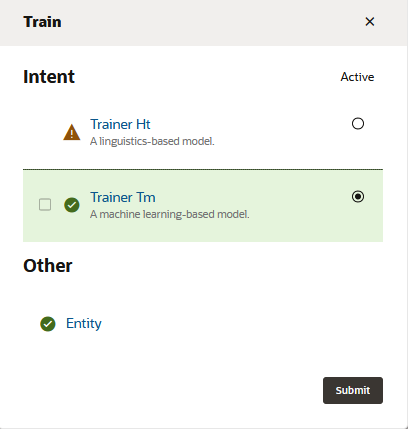
On the right side of the page, locate and click the Train.
Select Trainer Tm and then click Submit. Description of the illustration Wait for the training to complete. It might take a few minutes.
It is not realistic to expect to get the training of your intent model right the first time you do it. Good intent models are created in an iterative cycle of training, testing, retraining, and retesting.
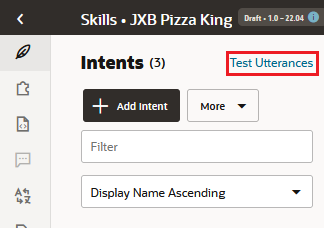
A good intent model is one that has a low ambiguity between the different intents. So let's see how well we’re doing so far.
Click the Test Utterances link that appears near the top of the Intents page.
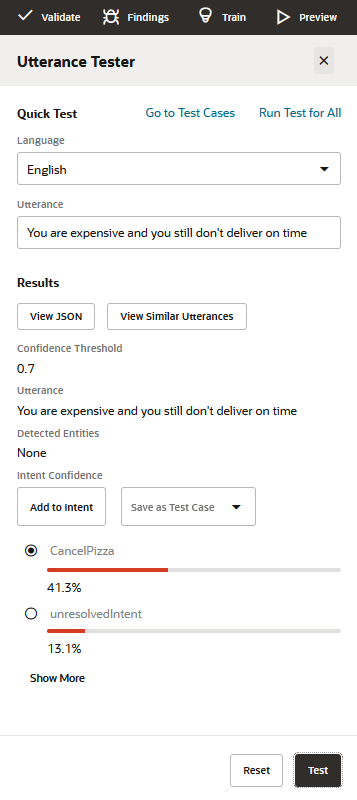
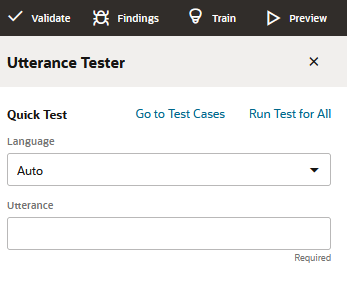
The Utterance Tester slides out from the right side of the page with its Quick Test page open.
In the Language field of the dialog, select English.
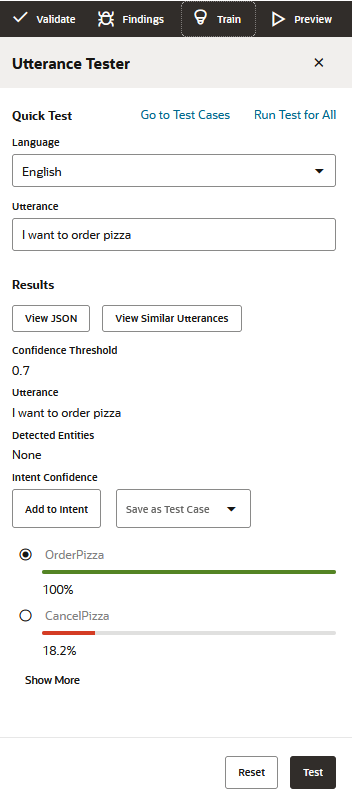
In the Utterance field, type I want to order pizza. Then click the Test button (located at the bottom right of the tester) and look at the test results.
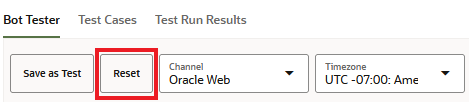
Click Reset (located at the bottom right of the tester).
Now scroll back to the top of the dialog, enter I feel like eating some pizza in the Utterance field, and then click Test.
This should also resolve to the OrderPizza intent. Click Reset.
Now try Cancel my order.
This should resolve to the CancelPizza intent. Click Reset.
And now try Dude, bring me pizza and see what that resolves to.
Type You are expensive and you still don't deliver on time in the Utterance field and click Test. Description of the illustration
In all likelihood, the FileComplaint intent did not receive the highest score. In the above screenshot, CancelPizza "won". For us humans, it is easy to see that "You are expensive and you still don't deliver on time" is not an order but a complaint. However, a skill first needs to be trained with relevant utterances before it is able to gain the same understanding.
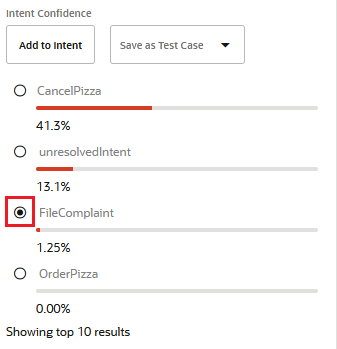
To remedy this, you're going to add this utterance to the FileComplaint intent:
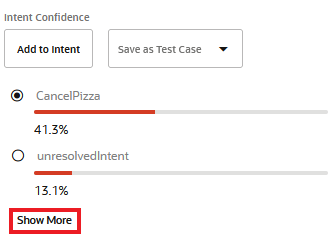
Click Show More to access the FileComplaint result.
In these examples, you might get slightly different confidence scores than the ones shown here. And in some cases, the matching intents themselves could vary if the differing confidence scores push those intents above or below the given confidence thresholds. The cause of this variance is the non-deterministic nature of the AI behind the natural language processing and the fact that, in order to make this tutorial simpler, these skills have a limited number of training utterances.
In real world scenarios, you would be adding a minimum of 80 to 100 utterances per intent.
Retrain the skill with Trainer Tm.
Think of two or three more phrases that the system might have problems matching to an intent with high confidence and try them in the Intent tester.
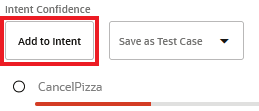
If you find one that doesn’t match well, select the intent that it should be resolved to and click Add to Intent.
Train the model again and then re-test.
Notes on What You Just Did
In this part of the tutorial, you have tested the quality of your intent training with the goal being to ensure a high level of confidence when resolving intents.
In a real skill project, you would always need to go back to the intent testing with the user-provided entries that you find in the conversation logs. In cases where the test input doesn't resolve to intents as well as it should, you'll want to augment the intent's utterances to improve the training model.
Note:
You can save utterances as test cases in the Utterance Tester. You can run these test cases every time you update the training model.
Create Entities
Now it's time to add entities, which detect information in the user input that can help the intent fulfill a user request. For the Pizza King business, such information could be pizza size, pizza toppings, and delivery time. For example, the user input "I'd like to order a small meaty pizza at 9:00 pm" contains all three of these information types.
We'll create custom entities for size and topping and later use a built-in entity for time. While we're at it, we'll add some synonyms (including some common misspellings) that optimize the entity's ability to tag words from sloppy user input.
Create Entities for Pizza Size and Pizza Topping
In the left navigation for the designer, select .
Click + Add Entity to create a new entity.
In the Name field, change the value to PizzaSize.
In the Configuration section, select Value list from the Type menu.
Click + Value.
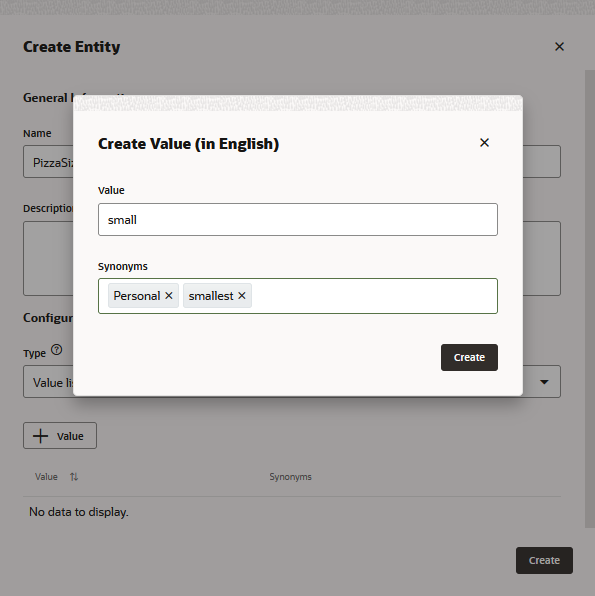
For Value, type small.
For Synonyms, type Personal, then click Enter. Type smallest, and then click Enter again.
Following the procedure described in the previous four steps, you are going to add two more values to the PizzaSize entity: one for medium-sized pizza orders, and one for large-sized pizza orders.
Value
Synonym(s)
medium
Middle
large
Big
grande
biggest
Click Create to complete the entity.
Click + Add Entity to create another entity.
In the Name field, change the value to PizzaTopping.
In the Configuration section, select Value List from the Type menu
Add separate values for Meaty, Veggie, Hot and Spicy, and American Hot.
Click Create.
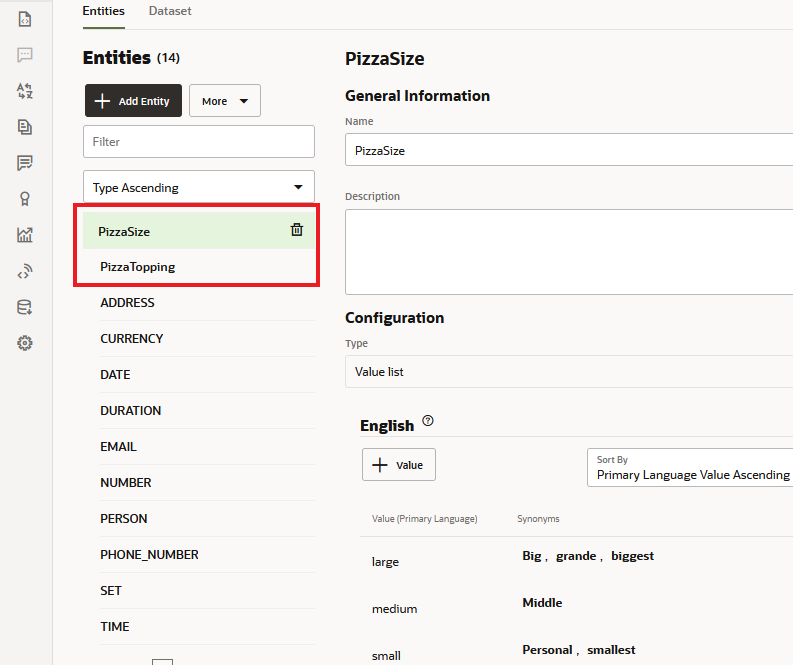
PizzaSize and PizzaToppings should appear in the list of entities, as shown in this image:
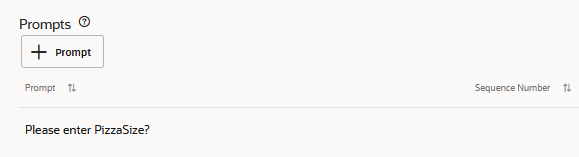
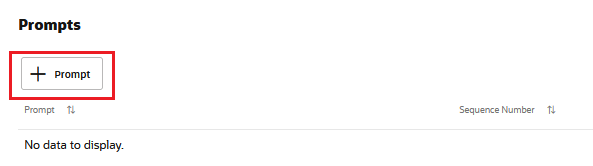
In the row for the default prompt ("Please enter PizzaSize"), click , replace the text with Which size would you like for your pizza? Then click Enter.
In the row for the default prompt ("Please enter PizzaTopping"), click , replace the text with What type of pizza would you like?
Later on in the tutorial, you'll notice that the skill will use these prompts when it needs to ask the user for pizza size and pizza topping.
Create a Composite Bag Entity
In this step, you're going to simplify your development efforts using a composite bag entity, which enables you to manage the three entities that you just created as a consolidated entity. When these entities are controlled by a composite bag, you won't need to create separate references for them when you create the voice of your skill (aka the dialog flow) later on. In addition to unifying your entities, the various composite bag properties enable your skill to match entity values in complex, real-world scenarios that involve erratic user input.
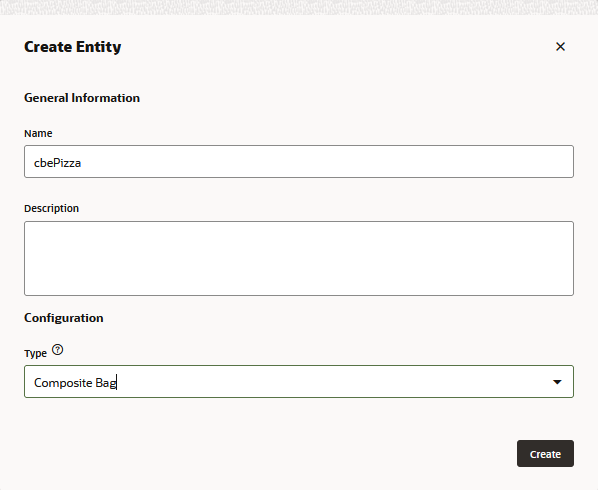
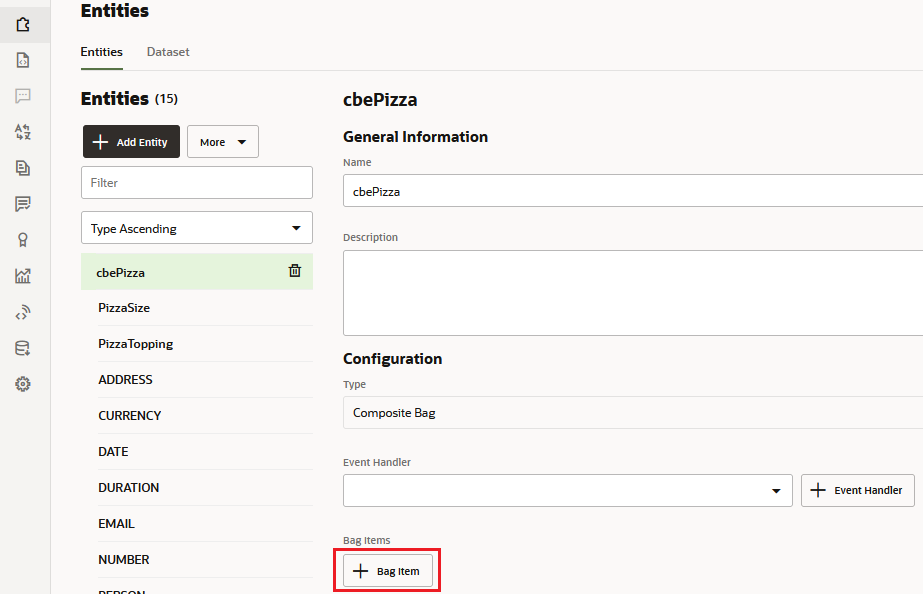
Click + Add Entity.
In the Name field, enter cbePizza.
In the Configuration section, select Composite Bag from the Type menu.
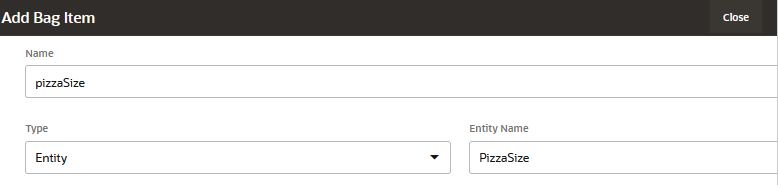
Repeat these steps to create a bag item for the PizzaTopping entity:
Name the item pizzaTopping.
Choose PizzaTopping from the Entity Name list.
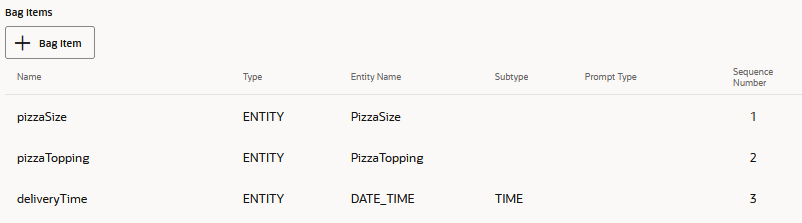
In addition to enabling users to select the pizza type and size, the skill will also enable them to enter a delivery time. For this, you're going add another entity item to the bag. Unlike the PizzaSize and PizzaType entities that you created from scratch, you're instead going to use the built-in TIME entity (or if your skill is Version 22.08 or higher, the DATE_TIME entity), which recognizes various time formats in the user input. To create this item:
Click +Bag Item.
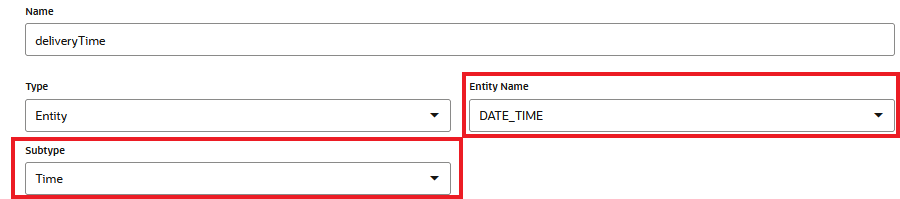
Enter deliveryTime in the Name field.
Select Entity from the Type list.
Choose TIME from the Entity Name List. If your skill is Version 22.08 or higher, choose DATE_TIME from the Entity Name List. Then choose TIME from the Subtype menu.
For an entity to be recognized when parsing the user input message, it needs to be associated with the appropriate intents. In this case, we need to associate the composite bag entity with the OrderPizza intent.
In the left navigation for the designer, select .
Select the OrderPizza intent.
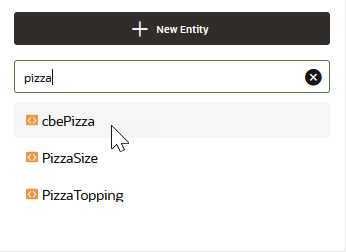
Click the Add Entity dropdown (in the upper right side of the page), type pizza in the Filter Field, and select cbePizza.
The Utterance Tester feature enables you to test whether the skill identifies entity values in user input.
In the left navigation for the designer, select .
Click the Test Utterances link. Click Reset to clear the input field.
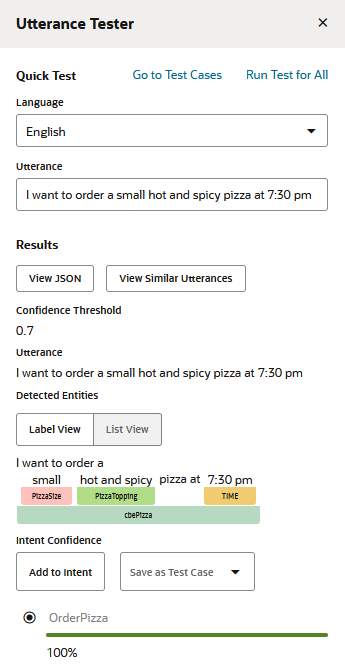
In the Utterance field of the dialog, type I want to order a small hot and spicy pizza at 7:30 pm and then click Test. Description of the illustration
Since the entities are recognized in the user input, the skill doesn’t have to ask the user for that information later in the flow.
The Utterance Tester applies entity labels to the matched terms in the utterance. It also notes that the entities belong to the cbePizza entity.
Description of the illustration
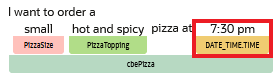
The labelling for the deliveryTime value changes depending on the version you're using. For Version 22.10, the Utterance Tester labels the subtype selected for the DATE_TIME entity (DATE_TIME.TIME, for example).
Description of the illustration
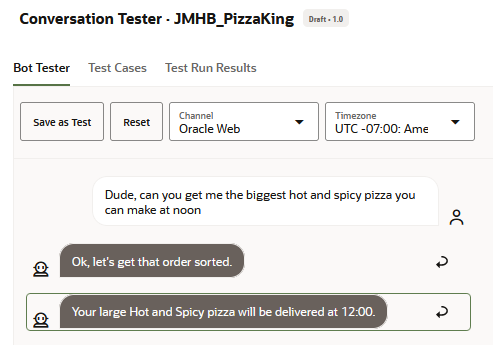
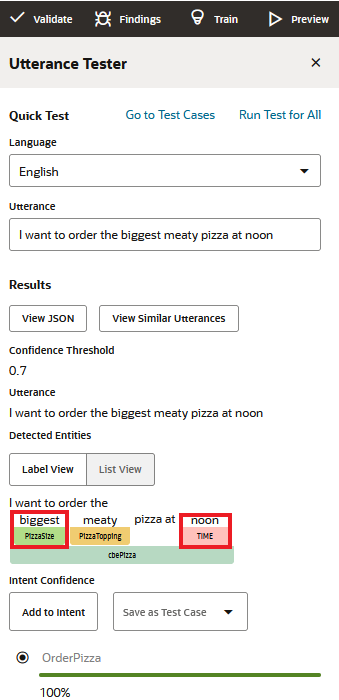
Now let's try another utterance. In the Utterance field, now type I want to order the biggest meaty pizza at noon and click Test.
The result should look like what is shown below. The PizzaSize label notes that the "biggest" synonym is matched for the PizzaSize entity. The Time label notes that "noon" is a recognized value.
In this part of the tutorial, you have created custom entities for the Pizza King OrderPizza intent, associated the entities with the intent, and tested the entity recognition in the embedded skill tester.
Similar to the PizzaOrder intent, you would typically need to create and associate entities for the other intents as well. In the interest of time, this tutorial only focuses on the PizzaOrder intent.
Design the Dialog Flow
With the NLP model created, you are ready to build a dialog flow for the skill. The dialog flow is a blueprint for the interactions that enable the conversation between the skill and the user. Although you're going to create a single flow in this tutorial, a skill can have multiple flows that support different use cases and functions.
Each flow is made up of one or more states, and each state executes a function: rendering a skill response message, authenticating a user, branching the conversation when certain conditions are met, etc. The Visual Flow Designer provides you with templates for each state.
Create the Order Pizza Flow
Now that you have the OrderPizza intent and the pizza variable, you're ready to start building the dialog flow.
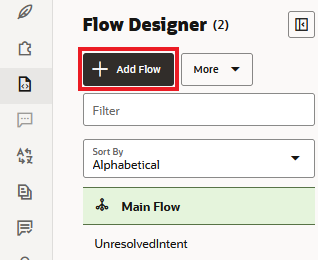
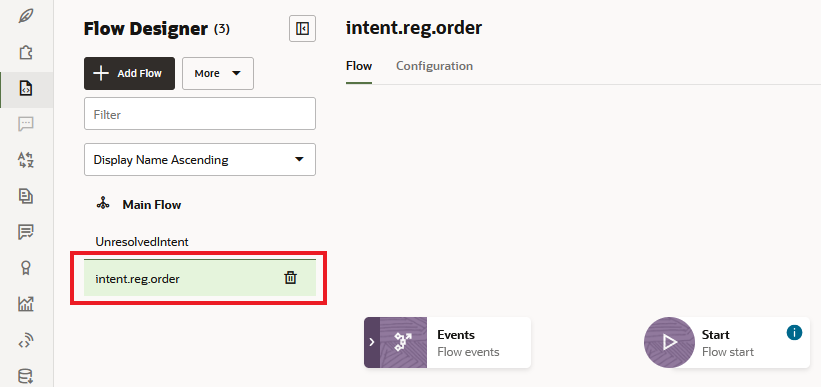
Click Flows in the left navbar.
Click Add Flow.
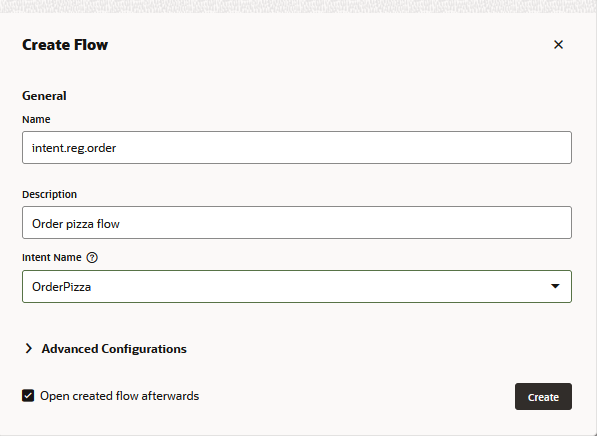
In the Create Flow dialog, enter intent.reg.order as the name.
For the description, enter Order pizza flow.
Select OrderPizza from the Intent Name list to create a mapping between the OrderPizza intent and this flow. This mapping instructs the Main Flow to execute this flow when user input resolves to the OrderPizza intent. You can also set intent event mappings like this one within the Main Flow.
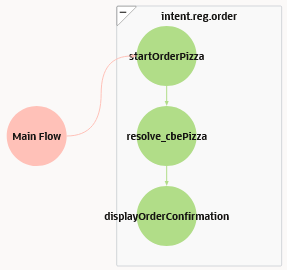
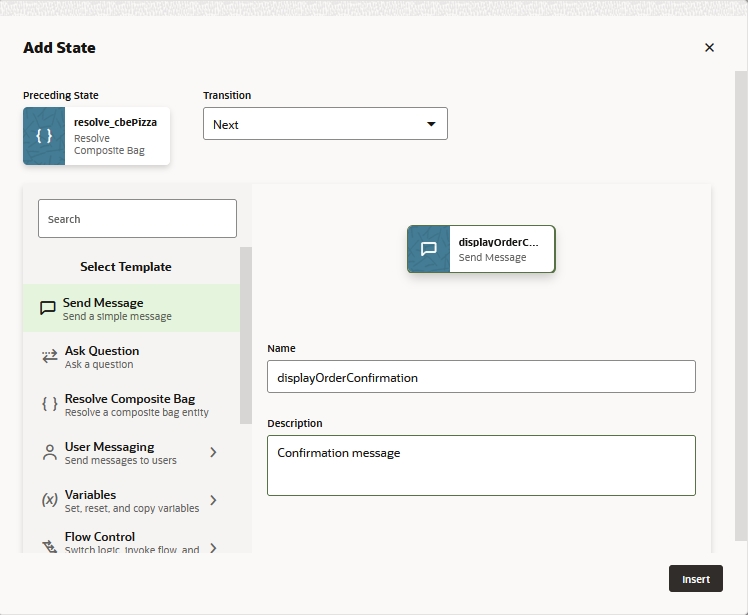
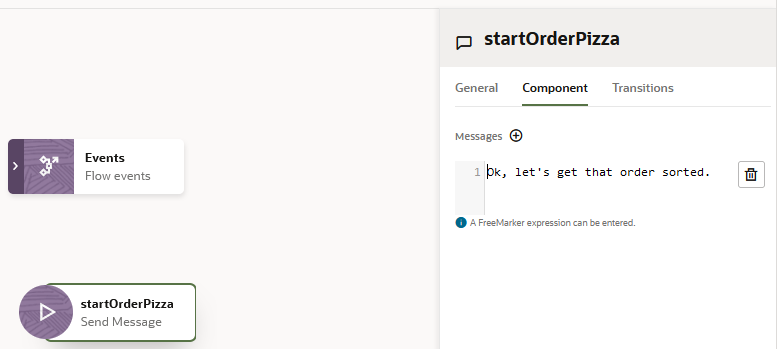
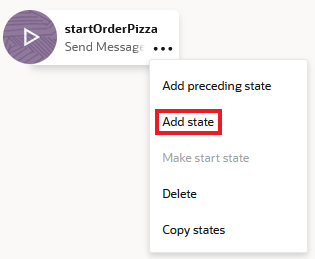
In the Add State dialog, choose Send Message, then enter startOrderPizza as the name and Greeting Message as the description. Then click Insert. Description of the illustration
When you're done, the startOrderPizza state should appear in the canvas with its property editor open to the Component page. (If the property editor isn't open, click the startOrderPizza state.) Note that the editor tags an error for this flow which prevents it from being viable. In this case, it's because this component needs a text message.
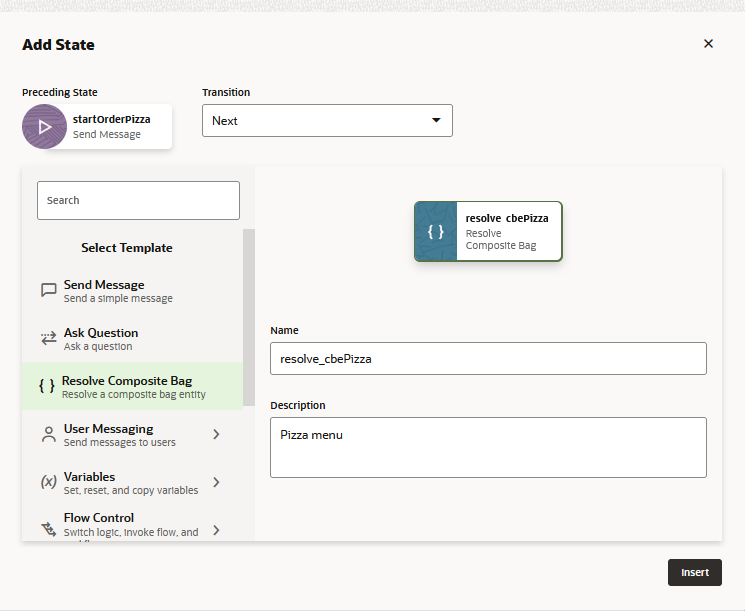
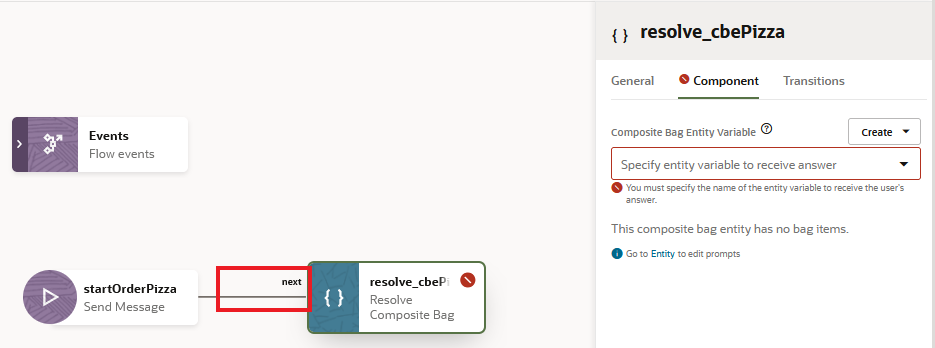
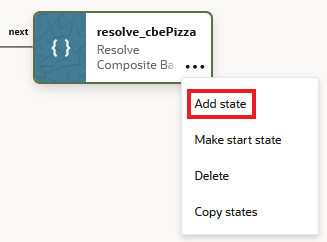
When you're done, the resolve_cbePizza state should appear in the canvas with its property editor open to the Components page. Note the next transition line that connects it to the startOrderPizza state.
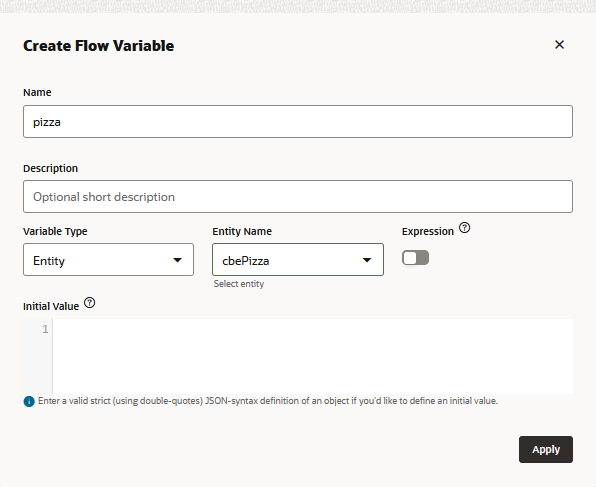
Like the startOrderPizza state, the resove_cbePizza state is flagged with an error because of an undefined property. For this state, the Component page tells you that you can fix this error by adding a variable reference a composite bag entity, which in this case, is the cbePizza entity. To create this variable, click Create.
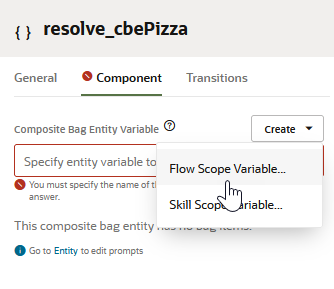
Because only the intent.reg.order flow uses this variable, choose Flow Scope Variable. The value held by this variable will persist only until the flow executes. If the other flows in this skill needed this variable, then you would create a skill scope variable instead.
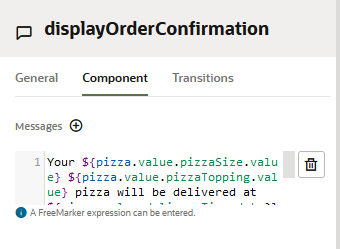
In the Component page of the property inspector, enter the following confirmation message. It uses Apache FreeMarker expressions to access the values set for the pizza variable:
For Versions 22.04 and 22.06:
Your ${pizza.value.pizzaSize.value} ${pizza.value.pizzaTopping.value} pizza will be delivered at ${pizza.value.deliveryTime.date?long?number_to_time?string('HH:mm')}
Your ${pizza.value.pizzaSize.value} ${pizza.value.pizzaTopping.value} pizza will be delivered at ${pizza.value.deliveryTime.value?time.xs?string['hh:mm a']}.
You created a variable that references the composite bag entity and a state for resolving this composite bag entity. If you hadn't created the composite bag entity, you would have needed to create separate variables for pizza size, pizza topping, and delivery time that would, in turn, require separate states in the dialog flow.
When you created the dialog flow, you mapped it to the OrderPizza intent so that it's executed whenever user input gets resolved to the OrderPizza intent at or above the confidence level.
By creating the resolve_cbePizza state, you learned how to leverage a composite bag to create a compact flow. Finally, for the output message in the displayOrderConfirmation state, you added an Apache FreeMarker expression that accessed the values set for the skill-level pizza variable.
Test Your Skill
In this section, you'll test out the intent.reg.order flow, but also test out the conversation flows that are handled automatically: the FileComplaint and CancelPizza answer intents and unresolvedIntent.
Test the Order Pizza Flow
Open the skill tester by clicking at the top of the page.
In the Utterance field, type I want to order pizza and then press Enter.
Continue the conversation by selecting a topping (e.g., Veggie).
A prompt for the delivery time should appear.
Enter a delivery time, such as 7:30 p.m.
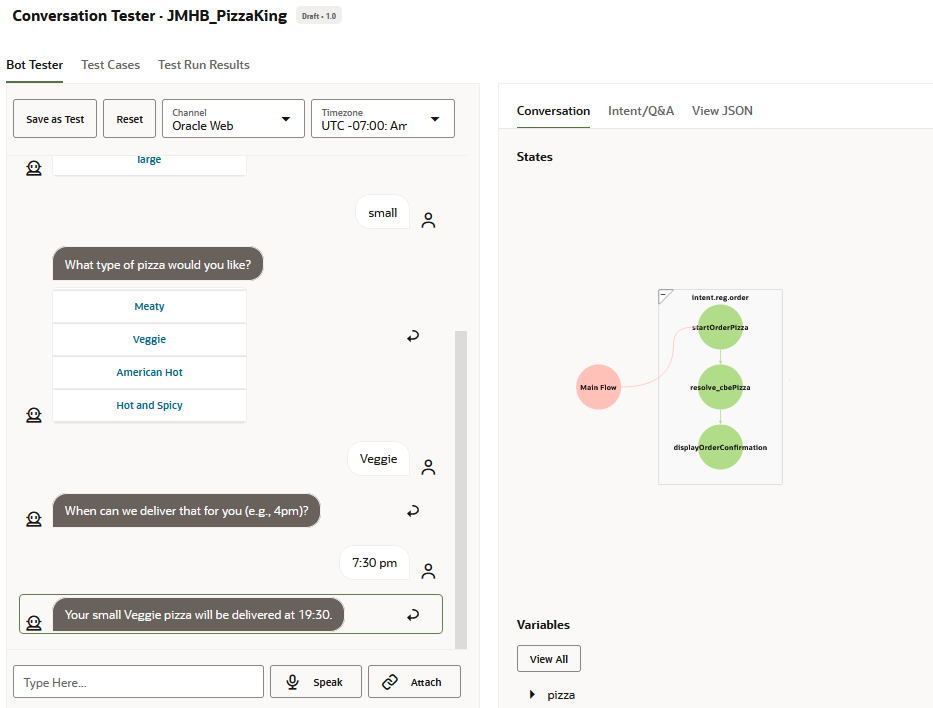
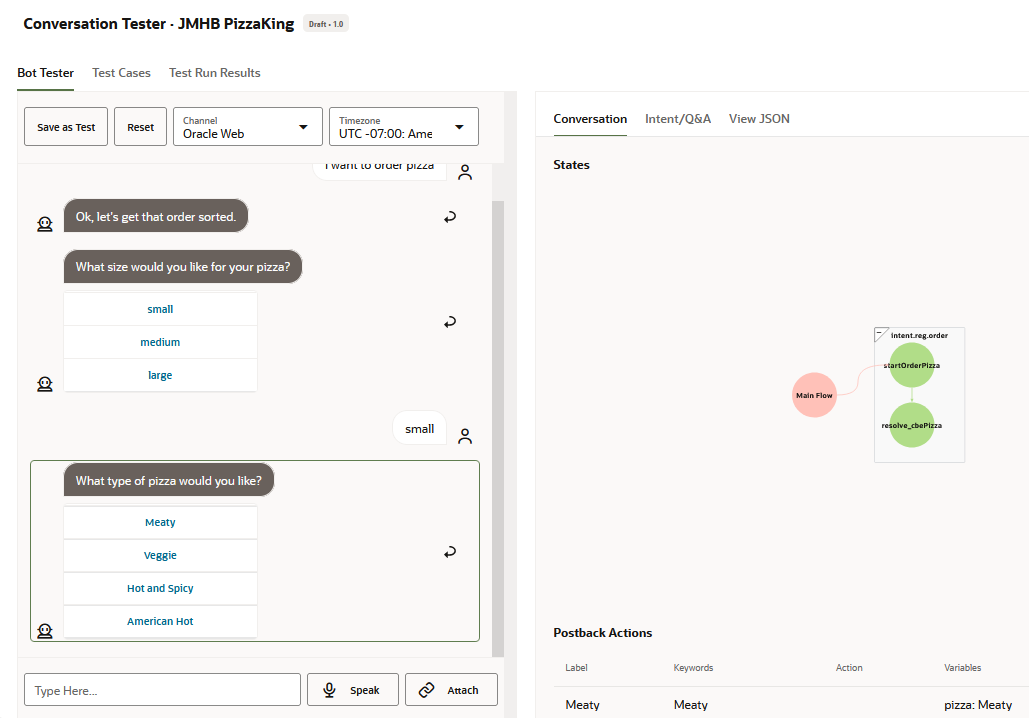
You should receive an order confirmation that summarizes the order. In the Conversation Tester, note the dialog flow traversal that routes the request from the Main Flow to the intent.reg.order flow.
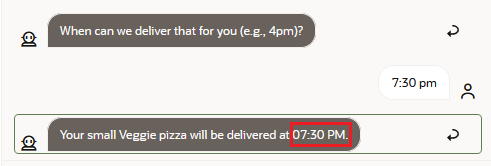
For Version 22.08 and higher, the FreeMarker expression used in the confirmation message will enable the delivery time to be output in a 12-hour format instead of a 24-hour format (07:30 PM instead of 19:30, for example).
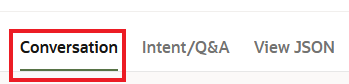
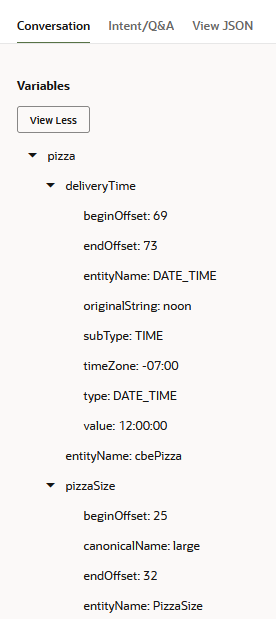
Within the Conversation tab of the tester, scroll down to take a look at the Variables section to see the entity values that were extracted from your input.
You can expand the nodes for each entity to see details of the entity values that were extracted.
Finally, enter I want to order a veggie pizza at 8:00pm.
This time the topping menu and the delivery time should be skipped, but the pizza size list should be displayed.
Select a pizza size.
Your order should then be completed.
Test the Answer Intents
In testing the order pizza intent, you saw how utterance was resolved to the OrderPizza intent, which you mapped to the intent.reg.order flow. Now, you're going to test out the FileComplaint and CancelPizza answer intents which are handled automatically. You'll also test out unresolvedIntent, the flow for handling the user input that can't be resolved to any of the intents that you defined.
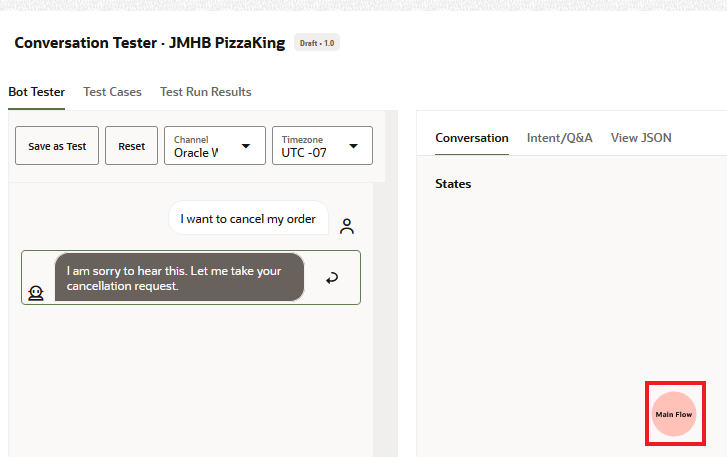
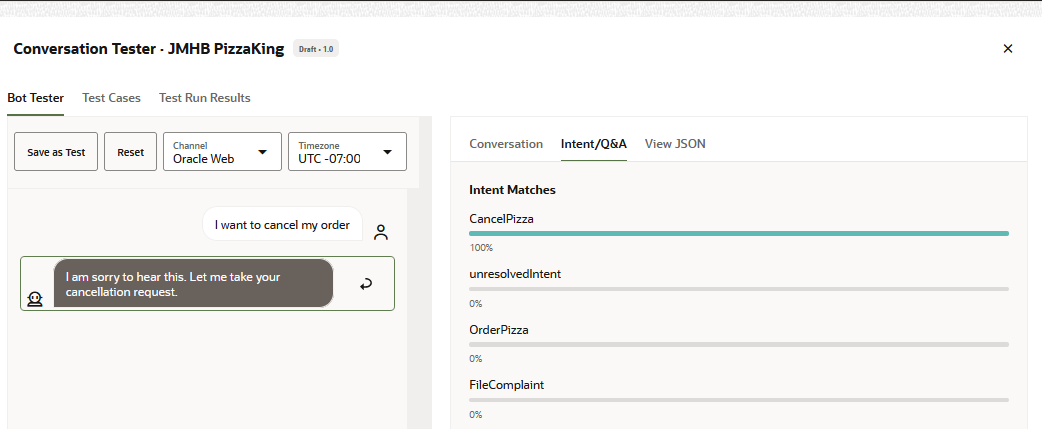
In the Utterance field, enter I want to cancel my order.
The skill should respond with a message regarding pizza cancelation. Because the Main flow alone handles this intent (and the other answer intents that you'll be testing in the section), only the Main flow gets rendered in the Conversation view.
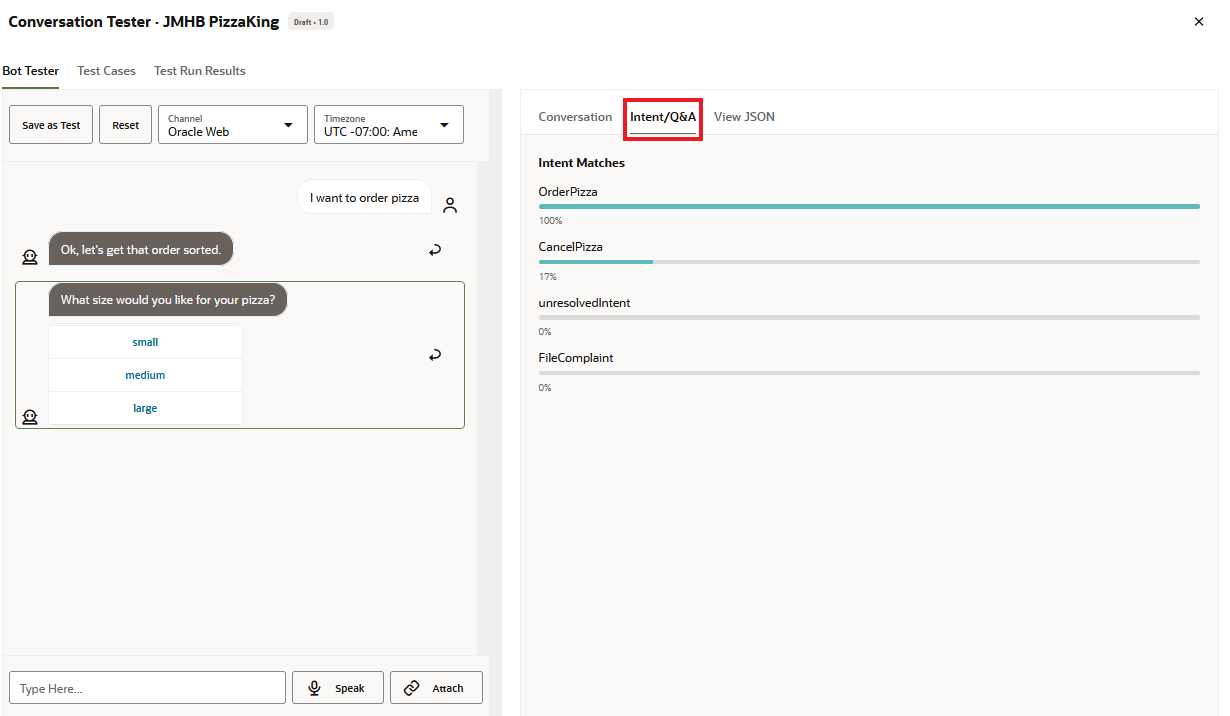
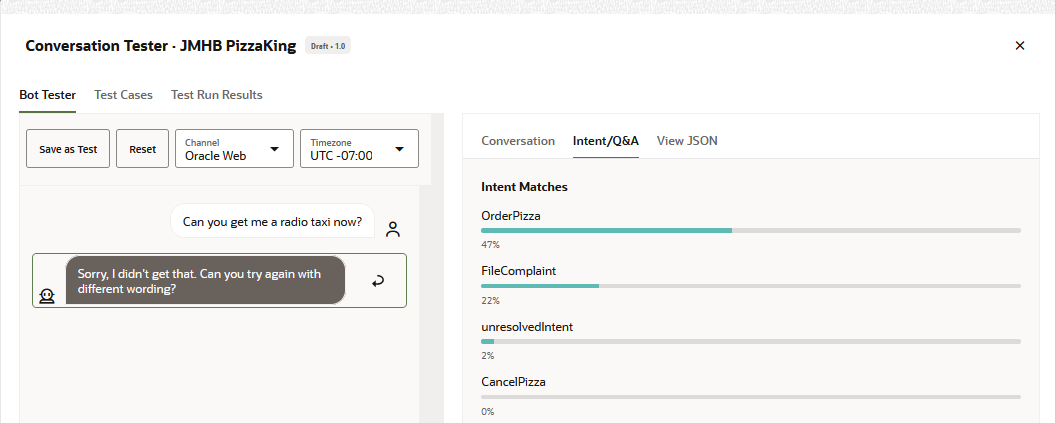
As you can see in the Intent/Q&A view, the confidence threshold level falls below this minimum value of 60% in this case, so the component triggers its unresolvedIntent action.
Congratulations! You have created your first skill and learned key aspects of defining intents, defining entities, designing the conversation flow, and using the Skill Tester to evaluate intent resolution and the conversation flow.
Shows how to create a simple skill in Oracle Digital Assistant.
This software and related documentation are provided under a license agreement containing restrictions on use and disclosure and are protected by intellectual property laws. Except as expressly permitted in your license agreement or allowed by law, you may not use, copy, reproduce, translate, broadcast, modify, license, transmit, distribute, exhibit, perform, publish, or display any part, in any form, or by any means. Reverse engineering, disassembly, or decompilation of this software, unless required by law for interoperability, is prohibited.
If this is software or related documentation that is delivered to the U.S. Government or anyone licensing it on behalf of the U.S. Government, then the following notice is applicable:
U.S. GOVERNMENT END USERS: Oracle programs (including any operating system, integrated software, any programs embedded, installed or activated on delivered hardware, and modifications of such programs) and Oracle computer documentation or other Oracle data delivered to or accessed by U.S. Government end users are "commercial computer software" or "commercial computer software documentation" pursuant to the applicable Federal Acquisition Regulation and agency-specific supplemental regulations. As such, the use, reproduction, duplication, release, display, disclosure, modification, preparation of derivative works, and/or adaptation of i) Oracle programs (including any operating system, integrated software, any programs embedded, installed or activated on delivered hardware, and modifications of such programs), ii) Oracle computer documentation and/or iii) other Oracle data, is subject to the rights and limitations specified in the license contained in the applicable contract. The terms governing the U.S. Government's use of Oracle cloud services are defined by the applicable contract for such services. No other rights are granted to the U.S. Government.
This software or hardware is developed for general use in a variety of information management applications. It is not developed or intended for use in any inherently dangerous applications, including applications that may create a risk of personal injury. If you use this software or hardware in dangerous applications, then you shall be responsible to take all appropriate fail-safe, backup, redundancy, and other measures to ensure its safe use. Oracle Corporation and its affiliates disclaim any liability for any damages caused by use of this software or hardware in dangerous applications.
Oracle and Java are registered trademarks of Oracle and/or its affiliates. Other names may be trademarks of their respective owners.
Intel and Intel Inside are trademarks or registered trademarks of Intel Corporation. All SPARC trademarks are used under license and are trademarks or registered trademarks of SPARC International, Inc. AMD, Epyc, and the AMD logo are trademarks or registered trademarks of Advanced Micro Devices. UNIX is a registered trademark of The Open Group.
This software or hardware and documentation may provide access to or information about content, products, and services from third parties. Oracle Corporation and its affiliates are not responsible for and expressly disclaim all warranties of any kind with respect to third-party content, products, and services unless otherwise set forth in an applicable agreement between you and Oracle. Oracle Corporation and its affiliates will not be responsible for any loss, costs, or damages incurred due to your access to or use of third-party content, products, or services, except as set forth in an applicable agreement between you and Oracle.
 to open the side menu.
 page. Here's where we'll begin to express the Pizza King customer use case in terms of the concepts that support Natural Language Processing (NLP).
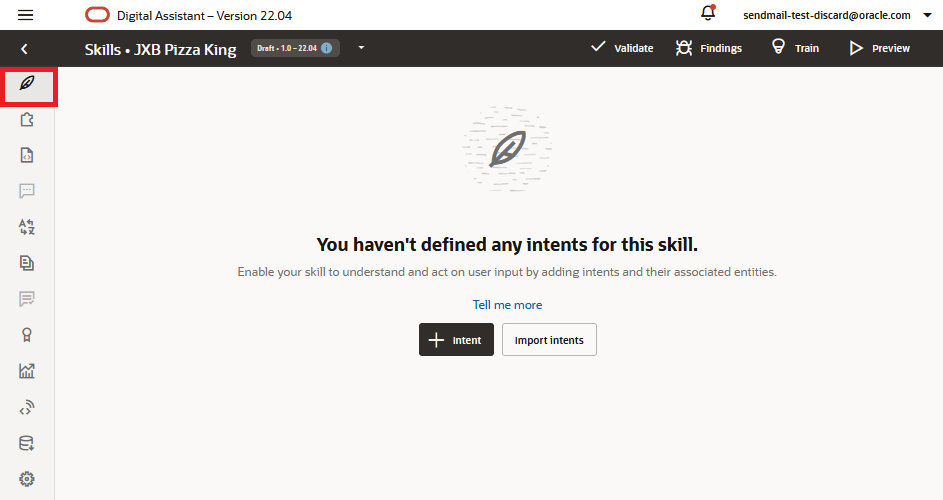
 , and enter
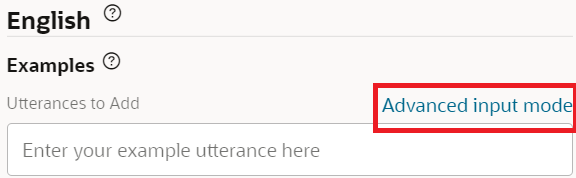
 . It might take a few minutes.

 .
.


 Flows in the left navbar.
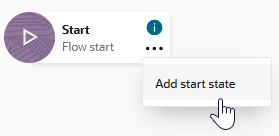
 . Click the menu then click Add start state.
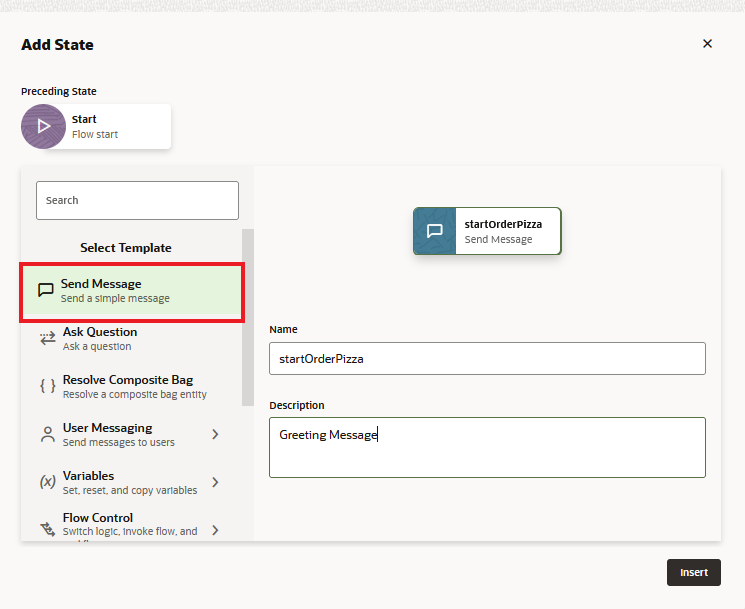
 for this flow which prevents it from being viable. In this case, it's because this component needs a text message.
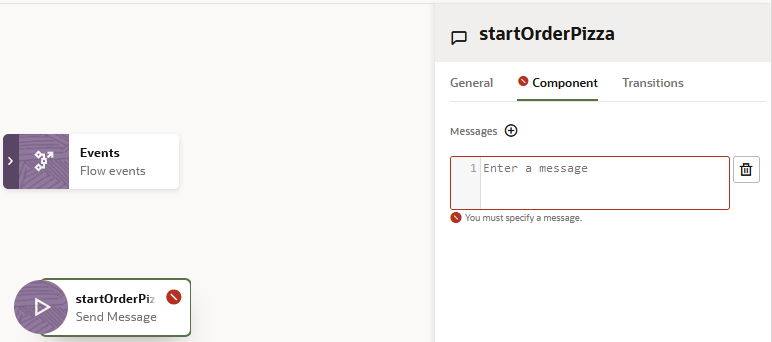

 at the top of the page.