Connect to Oracle Cloud Infrastructure GoldenGate using a public load balancer
Learn to create and configure a public load balancer in your tenancy to access a private OCI GoldenGate deployment.
Overview
When you create an OCI GoldenGate deployment, you can enable or disable the deployment’s public endpoint. Because the OCI GoldenGate Public Endpoint is managed by the OCI GoldenGate service tenancy, it’s not possible for you to create network security group (NSG) rules from your customer tenancy.
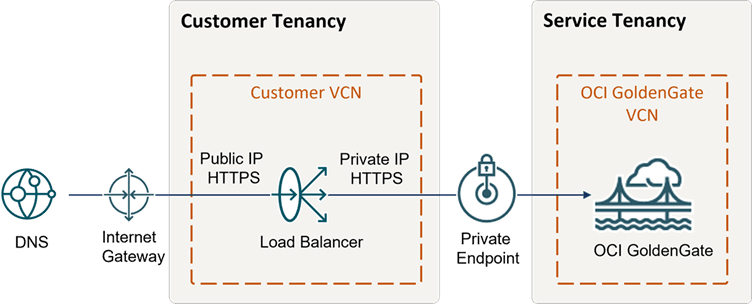
Description of the illustration secure-deployment.png
Before you begin
To successfully complete this quickstart, you must have:
-
A free or paid Oracle Cloud Infrastructure account
-
Access to OCI GoldenGate and Networking services
-
Access to DNS service or third-party DNS management system, such as GoDaddy
Task 1: Create a certificate bundle
Create a certificate bundle that includes the public certificate, the corresponding private key, and any associated Certificate Authority (CA) certificates. For more information, see SSL Certificate for Load Balancers.
Task 2: Create a deployment
Follow the instructions in Create a deployment.
Task 3: Create the load balancer
To create a load balancer with SSL:
-
In the Oracle Cloud navigation menu, select Networking, and then select Load balancer.
-
On the Load balancers page, select Create load balancer.
-
On the Create load balancers page, complete the following fields, and then select Next:
-
For Load balancer name, enter a name, or leave the default.
-
For Choose visibility type, select either Public or Private.
-
For Assign a public IP address, select Reserved IP address.
-
For Shapes, select Dynamic shapes and then select a bandwidth from the dropdown.
-
For Choose networking, select your VCN and subnet from their respective dropdowns.
-
-
On the Choose Backends page, complete the following fields, and then select Next
-
For Specify a load balacing policy, select Weighted round robin.
-
Under Specify health check policy, select TCP from the Protocol dropdown, and then enter
443for Port. -
Leave Use SSL unchecked.
-
-
On the Configure Listener page, completed the following fields, and then select Next:
-
For Specify the type of traffic your listener handles, select HTTPS.
-
For Specify the port your listener monitors for ingress traffic, ensure that 443 is displayed.
-
For SSL Certificate, drag-and-drop or select the SSL Certificate (.cer).
-
Select Specify CA Certificate and then drag-and-drop or select the CA Certificate (.crt).
-
Select Specify Private Key, and then drag-and-drop or select the Private Key File.
-
-
On the Managing logging page, complete the following fields, disable Error Logs, and then select Submit.
-
On the Load balancer details page, select Backend Sets.
-
From the Backend sets list, select the backend set, and then select Edit.
-
In the Edit backend set panel, select Use SSL, ensure that your certificate is selected, and then select Save changes.
-
On the Backend sets details page, select Backends, and then select Add Backends.
-
In the Add backends panel, select IP addresses, enter the OCI GoldenGate deployment's Private IP Address (from Step 2) for IP address, and
443in for Port, and then select Add. -
In the breadcrumb, select Load balancer details, and then copy the IP address.
You can use a web browser to access this IP address, verify the certificate is the digitally signed certificate that you uploaded, and access the OCI GoldenGate Deployment Console. Next, you'll create a DNS record for the Load Balancer's IP.
Task 4: Create a DNS record
Create a DNS record for the Load Balancer’s Public IP in a DNS management system.
You can use Oracle Cloud Infrastructure DNS Management or any public DNS management system.
After a few minutes, verify that you can access the OCI GoldenGate Deployment Console through the domain you created.
Task 5: Create OCI Network Security Rules to allow/deny ingress
-
From the OCI Console navigation menu (hamburger icon), select Networking, then Virtual Cloud Networks.
-
From the Virtual Cloud Networks list, select your VCN.
-
On the VCN Details page, select your subnet.
-
On the Subnet Details page, copy the IPv4 CIDR Block value, and then select Default Security List for <VCN> under Security Lists.
-
On the Default Security Lists Details page, under Ingress Rules, locate the ingress rule for TCP that is currently open for all source and destination port ranges, and then select Edit from its Actions (ellipsis) menu.
-
In the Edit Ingress Rule dialog, replace the Source CIDR value with the IPv4 CIDR Block value copied from Step 4, and then select Save Changes.
Wait a few minutes for the changes to take effect.
-
Select Add Ingress Rule, and then replace the Source CIDR value with an IP address range that includes the Load Balancer's IP address, and then select Add Ingress Rules.
You can also add an ingress rule for the IP address of your local machine to verify that the routing rules are in effect.