Docebo
Before You Begin
Introduction
This document describes how to configure Oracle Identity Cloud Service to provide Single Sign-On (SSO) for Docebo using SAML.
About Docebo
Docebo is a cloud Learning Management System (LMS) that allows you to incorporate formal, informal, social and experiential learning into a single platform. It is extendable and flexible, with a component-based architecture. It also manages, delivers, and tracks Web-based Training (WBT), Instructor-led Training (ILT), and Blended Learning activities.
After integrating Docebo with Oracle Identity Cloud Service:
- Users can access Docebo using their Oracle Identity Cloud Service login credentials.
- Users can start Docebo using the Oracle Identity Cloud Service My Apps console.
- Admins can assign and revoke user access to the Docebo app using the Oracle Identity Cloud Service administration console.
What Do You Need?
- An Oracle Identity Cloud Service account with authorization rights to manage apps and users (Identity Domain Administrator or Application Administrator).
- A Docebo account with authorization rights to configure federated authentication.
Configuring the Docebo App in Oracle Identity Cloud Service
Use this section to register and activate the Docebo app, and then assign users to the app.
Prerequisite Step
A dedicated domain name is required before you can register and activate the Docebo app. You obtain that domain name from Docebo.
The Docebo domain name appears in the Docebo home URL: https://<Domain_Name>.docebosaas.com.
Registering and Activating the Docebo App
Access the Oracle Identity Cloud Service administration console, select Applications, and then click Add.
Click App Catalog.
Search for
Docebo, and then click Add.In the App Details section, enter your Docebo Domain Name, and then click Next.
Note: This is the domain name value that you obtained while performing the steps in the "Prerequisite Step" section.
Click Download Identity Provider Metadata. To learn about other methods you can use to access SAML metadata, see Access SAML Metadata.
Tip: Use this file later during the Docebo configuration in the "Configuring SSO for Docebo" section.
Click Finish. Oracle Identity Cloud Service displays a confirmation message.
Click Activate, and then click Activate Application. Oracle Identity Cloud Service displays a confirmation message.
Assigning Users to the Docebo App
On the Docebo app page in Oracle Identity Cloud Service, select Users, and then click Assign. The Assign Users window appears.
Select users that you want to assign to Docebo, and then click OK. Oracle Identity Cloud Service displays a confirmation message stating that the Docebo app is assigned to the users that you selected.
Configuring SSO for Docebo
Access Docebo as an administrator using the URL:
https://<Domain_Name>.docebosaas.com.In the upper-right corner of the Docebo home page, click the settings icon.
In the Apps & Features section, locate the SAML SETTINGS section, and then click Settings.
In the SAML 2.0 - Settings section, use the following table to update the federated authentication attributes.
This table lists the mandatory federated authentication attributes that you must set to complete the SSO configuration. Attribute Value Identity Provider ID Enter the Identity Provider ID. Use the metadata file that you downloaded earlier to obtain the Identity Provider ID. The Identity Provider ID information is located in the first line of the metadata. See the "Registering and Activating the Docebo App" section. Signature Algorithm Select the SHA-256 option. XML Metadata Paste the metadata that you downloaded while registering Docebo in Oracle Identity Cloud Service. See the "Registering and Activating the Docebo App" section. Username attribute Enter the user name attribute to determine the attribute that is used for enabling SAML. For example, enter email, if you want to use the corresponding information tagged to the 'email' field name for enabling SAML.
Configuring User Provisioning
Select the Enable and If user exists, update information check boxes.
Note: Just in time user provisioning allows you to create a new user if the SAML authentication is valid but the user is not yet available in Docebo. Clear the Enable check box selection to disable Just in time user provisioning.
Enter the name of the attribute that you want to use for user provisioning in the Add fields text box for user provisioning, and then click Add. The attribute appears in the table to include the corresponding details.
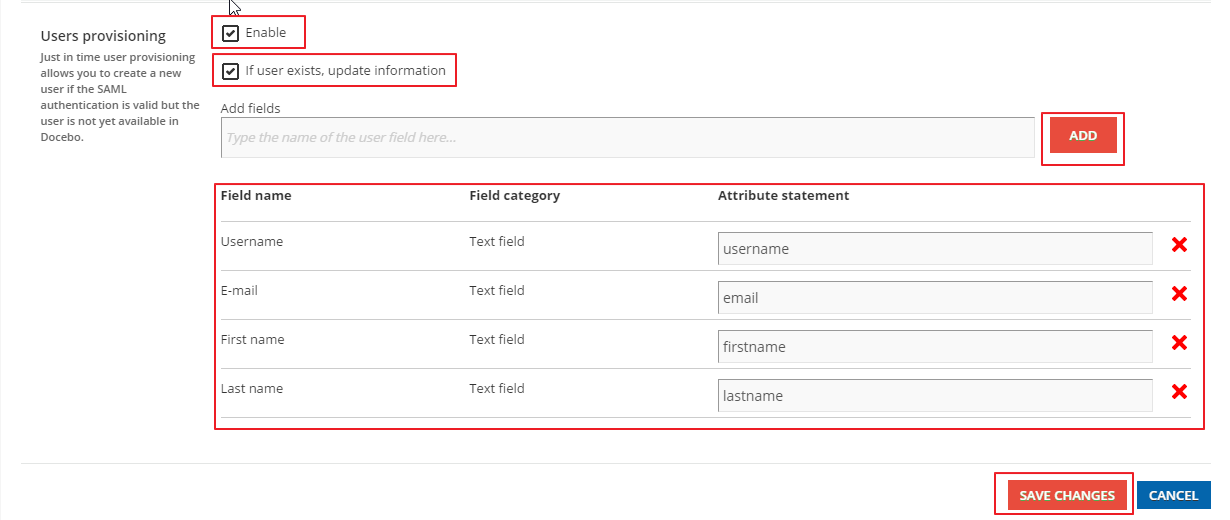
Enter the required information in the corresponding Attribute statement text box.
Note: Docebo can be accessed by a user who is assigned to the Docebo app in Oracle Identity Cloud Service, even if the user does not have a Docebo account.
Click SAVE CHANGES.
Verifying the Integration
Use this section to verify that SSO works when initiated from Oracle Identity Cloud Service (IdP Initiated SSO) and Docebo (SP Initiated SSO).
Verifying Identity Provider Initiated SSO from Oracle Identity Cloud Service
Access the Oracle Identity Cloud Service My Profile console using the URL:
https://<IDCS-Service-Instance>.identity.oraclecloud.com/ui/v1/myconsole.Log in using credentials for a user that is assigned to the Docebo app. Oracle Identity Cloud Service displays a shortcut to Docebo under My Apps.
Click Docebo. The Docebo home page appears.
Click the menu icon in the upper-left corner of the header, and then confirm that the user that is logged in is the same for both Docebo and Oracle Identity Cloud Service.
This confirms that SSO that is initiated from Oracle Identity Cloud Service works.
Verifying Service Provider Initiated SSO from Docebo
Access Docebo using the URL:
https://<Domain_Name>.docebosaas.com, and then click SAML under Sign In. You are redirected to the Oracle Identity Cloud Service login page.Log in using credentials for a user that is assigned to the Docebo app. The Docebo home page appears.
Click the menu icon in the upper-left corner of the header, and then confirm that the user that is logged in is the same for both Docebo and Oracle Identity Cloud Service.
This confirms that SSO that is initiated from Docebo works.
Troubleshooting
Use this section to locate solutions to common integration issues.
Known Issues
Docebo displays the message, "Access Denied".
Cause: The email attribute sent by Oracle Identity Cloud Service during SSO does not match any existing user in Docebo.
Solution: Ensure that either the user that you assign to the Docebo app has an account in both Oracle Identity Cloud Service and Docebo with the same email address or you enable the Users provisioning option while configuring SSO for Docebo.
Unknown Issues
For unknown issues, contact Oracle Support:
Go to https://support.oracle.com.
Select Cloud Support, and then sign in with your support credentials.
In the Cloud Dashboard, confirm that there are no planned outages in Oracle Identity Cloud Service, and then click Create Service Request.
Select Oracle Identity Cloud Service as the service type.
Complete your service request.