Syncplicity
Before You Begin
Introduction
This document describes how to configure Oracle Identity Cloud Service to provide Single Sign-On (SSO) for Syncplicity using SAML.
About Syncplicity
Syncplicity is a flexible, scalable, and a secure way to share and sync files for any size business.
After integrating Syncplicity with Oracle Identity Cloud Service:
- Users can access Syncplicity using their Oracle Identity Cloud Service login credentials.
- Users can start Syncplicity using the Oracle Identity Cloud Service My Apps console.
- Admins can assign and revoke user access to the Syncplicity app using the Oracle Identity Cloud Service administration console.
What Do You Need?
- An Oracle Identity Cloud Service account with authorization rights to manage apps and users (Identity Domain Administrator or Application Administrator).
- A Syncplicity account with authorization rights to configure federated authentication.
- Make sure that the email ID of each user in Syncplicity matches the primary email ID of the Oracle Identity Cloud Service account.
- An Oracle Identity Cloud Service certificate.
- A service provider signing certificate from the service provider support. Tip: Use this signing certificate later during the Syncplicity registration in the "Registering and Activating the Syncplicity App" section.
Obtaining the Certificate and Saving in PEM Format
Use this section to convert the X509 Certificate value into a format that is suitable for Oracle Identity Cloud Service.
Use the following URL to access the metadata:
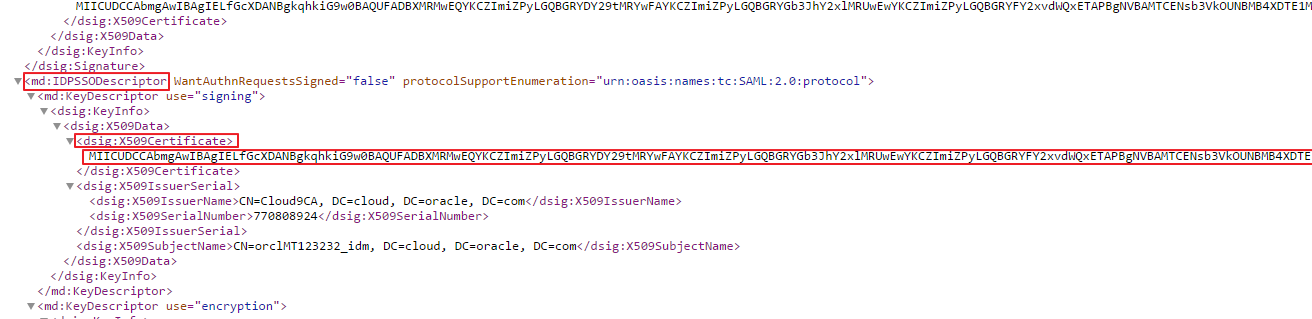
https://<IDCS-Service-Instance>.identity.oraclecloud.com/fed/v1/metadata.In the metadata file, locate the md:IDPSSODescriptor tag.
Copy the content between the dsig:X509Certificate tags into a text file. This content is the Oracle Identity Cloud Service Certificate.
Add
-----BEGIN CERTIFICATE-----at the beginning of the content.Add
-----END CERTIFICATE-----at the end of the content.
Save the file with an extension of .pem.
Tip: Use this content later during the Syncplicity configuration in the "Configuring SSO for Syncplicity" section.
Configuring SSO for Syncplicity
Access Syncplicity as an administrator using the login URL:
https://my.syncplicity.com/Login.aspx. The Syncplicity home page appears.In the header menu, click Admin, and then select Settings from the submenu. The Manage Settings page appears.
In the Account Configuration section, click Custom domain and single sign-on. The Configure Authentication Settings page appears.
Use the table to update the federated authentication attributes, and then click Save changes.
This table lists the mandatory federated authentication attributes that you must set to complete the SSO configuration. Attribute Value Custom Domain Enter your domain name. Tip: Use this domain name later in the "Registering and Activating the Syncplicity App" section. Single Sign-On Status Select Enabled to establish SSO connection. Entity Id Enter https://<Domain_Name>.syncplicity.com. Note: The domain name is the name you have entered as Custom Domain.Sign-in page URL Enter the Sign-in URL/SSO Endpoint: https://<IDCS-Service-Instance>.identity.oraclecloud.com/fed/v1/idp/sso.Identity Provider Certificate Upload the certificate that you previously obtained. See the "Obtaining the Certificate and Saving in PEM Format" section.
Creating Syncplicity Accounts for Users
In the header menu, click Admin, and then select User Accounts from the submenu. The Manage Users page appears.
Click Add a User. The Add and Configure New Users page appears.
Enter the Email Addresses of the users seperated by a comma, select a Role from the drop-down list, and then click Next.
In the Group Memebership step, click Next. The Syncplicity Folders step appears.
Select the folders you like to place under Syncplicity's control on users' computers. A success message stating that the user accounts are created successfully is displayed.
Click View and edit existing users. The Manage Users page appears.
Click the newly created user. The Personal Information page of the user appears.
In the right navigation menu, locate the Tasks section, and then click Activate Account. The User Account Activation dialog box appears.
Enter the First Name, Last Name, Password, Confirm Password fields of the user, and then click Activate Account. A success message stating that the account is activated is displayed.
Note: Enabling SSO deactivates the ability to log in using Syncplicity user name and password directly on the app. Remain logged in to the Syncplicity session until you complete the next section to verify that Identity Provider initiated SSO from Oracle Identity Cloud Service works.
Configuring the Syncplicity App in Oracle Identity Cloud Service
Use this section to register and activate the Syncplicity app, and then assign users to the app.
Registering and Activating the Syncplicity App
Access the Oracle Identity Cloud Service administration console, select Applications, and then click Add.
Click App Catalog.
Search for
Syncplicity, and then click Add.In the App Details section, enter your Syncplicity Domain Name, and then click Next.
Note: This is the Domain Name value that you have entered as Custom Domain in the "Configuring SSO for Syncplicity" section.
Expand the General Settings section, and then upload the signing certificate of the service provider.
Click Finish. Oracle Identity Cloud Service displays a confirmation message.
Click Activate, and then click Activate Application. The Oracle Identity Cloud Service displays a confirmation message.
Assigning Users to the Syncplicity App
On the Syncplicity app page in Oracle Identity Cloud Service, select Users, and then click Assign. The Assign Users window appears.
Select users that you want to assign to Syncplicity, and then click OK. Oracle Identity Cloud Service displays a confirmation message stating that the Syncplicity app is assigned to the users that you selected.
Verifying the Integration
Use this section to verify that SSO works when initiated from Syncplicity (SP Initiated SSO).
Verifying Service Provider Initiated SSO from Syncplicity
Access Syncplicity using the login URL:
https://my.syncplicity.com/Login.aspx. The login page appears.Enter the email address and click Next. You are redirected to the Oracle Identity Cloud Service login page.
Log in using credentials for a user that is assigned to the Syncplicity app. The Syncplicity home page appears.
In the upper-right corner, confirm that the user that is logged in is the same for both Syncplicity and Oracle Identity Cloud Service.
This confirms that SSO that is initiated from Syncplicity works.
Troubleshooting
Use this section to locate solutions to common integration issues.
Known Issues
Syncplicity displays the message, "Login Error"
Cause: The email attribute sent by Oracle Identity Cloud Service during SSO doesn't match any existing user in Syncplicity.
Solution: Ensure that the user that you assign to the Syncplicity app has an account in both Oracle Identity Cloud Service and Syncplicity with the same email address.
Unknown Issues
For unknown issues, contact Oracle Support:
Go to https://support.oracle.com.
Select Cloud Support, and then sign in with your support credentials.
In the Cloud Dashboard, confirm that there are no planned outages in Oracle Identity Cloud Service, and then click Create Service Request.
Select Oracle Identity Cloud Service as the service type.
Complete your service request.