Create Mappings
Oracle E-Business Suite Business Event is defined by the WF_EVENT_T data structure. After adding the required connections to the integration, you need to create the following mappings to pass the required parameter values to the subsequent REST services:
-
Define mappings for
Get_Order -
Define mappings for
Create_Invoice
Create Mappings for Get_Order
In this example, a sales order Header Id is available as one of the business event parameters. In WF_EVENT_T, event parameters are available as Name-Value pair in repeating Parameter element. To obtain the value of the Header Id parameter and pass it to the subsequent Get_Order service call, you need to create mappings for Get_Order.
-
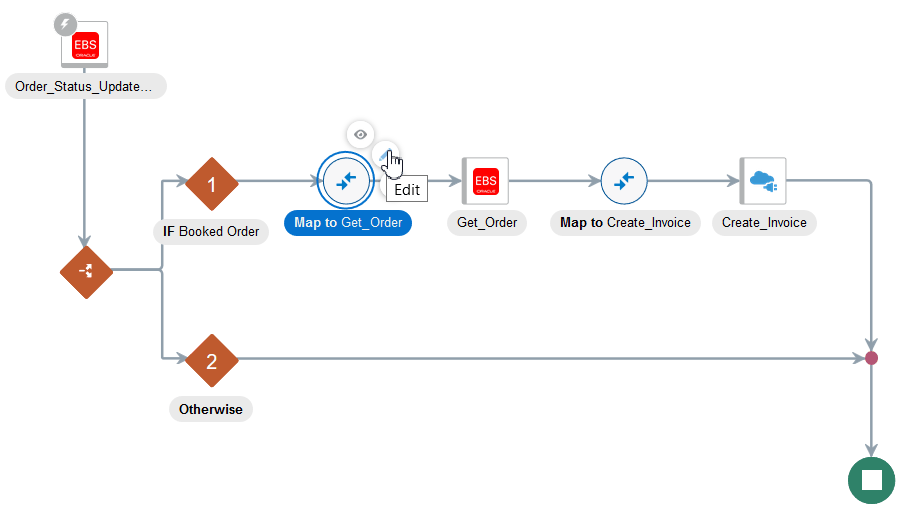
In the Order_Status_Update integration flow, click edit for the
Map to Get_Ordericon.The mapper is displayed.
-
In the mapper, the business event related elements are displayed in the Source section, whereas the
Get_Orderrelated parameters are listed in the Target area. To obtain the value of the sales order Header Id (P_HEADER_ID) included as part of the event parameters and pass it to the subsequent Get_Order REST service, you need to define the XSL expression for the P_HEADER_ID parameter. -
Define the XSL expression for the P_HEADER_ID parameter by performing the following tasks:
-
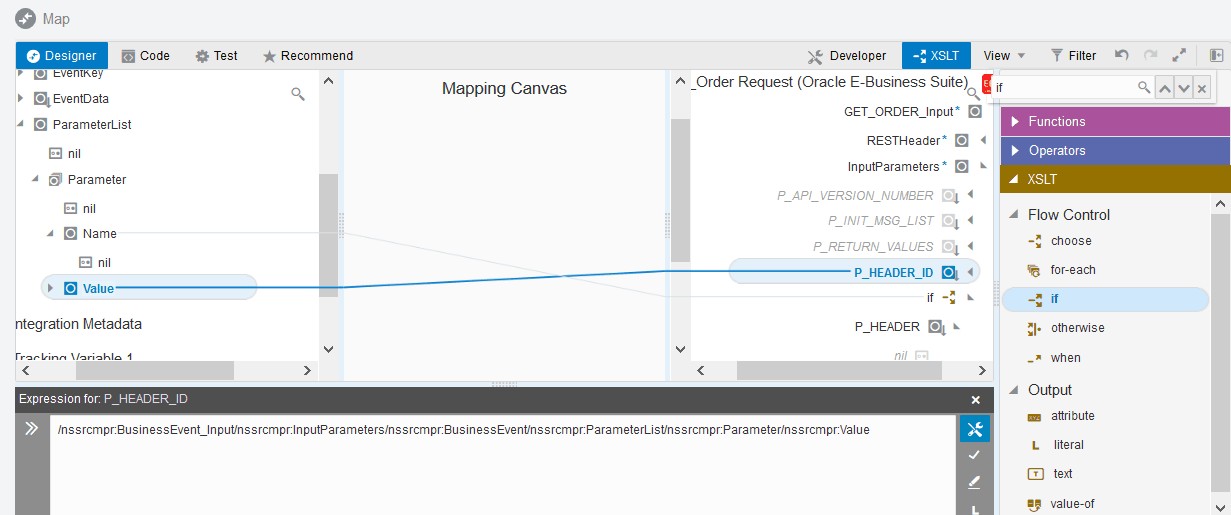
In the Target section, expand the GET_ORDER Request (Oracle E-Business Suite) node, and then the InputParameters node. Click the P_HEADER_ID element to open the Build Mappings page.
-
In the Mapping area of the Build Mappings page, notice that the P_HEADER_ID element is displayed as the Target element.
-
In Source section of the Build Mappings page, expand the BusinessEvent_Input node, then the InputParameters node, then the BusinessEvent node, then the ParameterList node, and then the Parameter node.
-
Drag and drop the Value element from the Source section to the Mapping section as the value for the P_HEADER_ID element.
-
Right-click the P_HEADER_ID element and select Create Target Node from the drop-down menu. Click
 and then
  . Drag and drop the XSL element "
if" to the P_HEADER_ID element. Drag and drop the Name element from the Source section to theifelement to define the XSL expression<xsl:if test="nssrcmpr:Name='HEADER_ID'">. -
Similarly, drag and drop the XSL element "
for-each" from the Source section to the Target section to define the XSL expression<xsl:for-each select="/nssrcmpr:BusinessEvent_Input/nssrcmpr:InputParameters/nssrcmpr:BusinessEvent/nssrcmpr:ParameterList/nssrcmpr:Parameter">. -
Save your work.
Expand the nodes to ensure that the P_HEADER_ID parameter is included as part of the structure.

-
-
Perform the following tasks to assign constant values to the target elements:
-
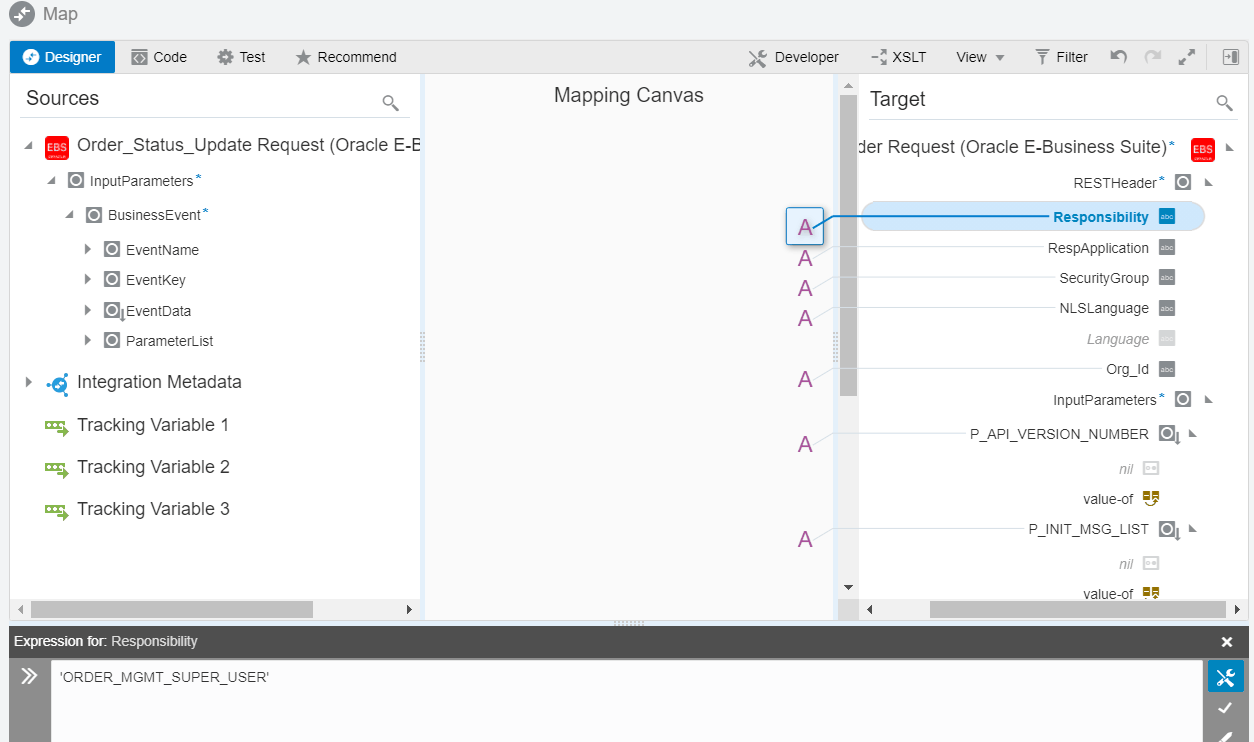
In the Target section, expand the GET_ORDER Request (Oracle E-Business Suite) node, and then the RESTHeader node.
Right-click the Responsibility element and then select Create Target Node from the drop-down menu.
- In the Expression Builder at the bottom of the page, click the "Switch to Developer View" icon and then enter
'ORDER_MGMT_SUPER_USER'for the Responsibility element.A function icon is added to the Mapping Canvas section for the target Responsibility element node.
Similarly, use the same approach to assign appropriate values to the target elements listed in the following table:
Path Element Value GET_ORDER Request (Oracle E-Business Suite)/RESTHeader RespApplication 'ONT' GET_ORDER Request (Oracle E-Business Suite)/RESTHeader SecurityGroup 'STANDARD' GET_ORDER Request (Oracle E-Business Suite)/RESTHeader NLSLanguage 'AMERICAN' GET_ORDER Request (Oracle E-Business Suite)/RESTHeader Org_Id '204' GET_ORDER Request (Oracle E-Business Suite)/InputParameters P_API_VERSION_NUMBER '1.0' GET_ORDER Request (Oracle E-Business Suite)/InputParameters P_INIT_MSG_LIST 'F' GET_ORDER Request (Oracle E-Business Suite)/InputParameters P_ORG_ID '204' After you complete the mappings for
Get_Order, the function icons should appear in the Mapping Canvas section for the corresponding target element nodes. -
-
Click Validate or Close (which also performs validation) to exit the mapper, then click Save to save your changes when prompted.
Create Mappings for Create_Invoice
Perform the following steps to create the mappings:
-
In the Order_Status_Update integration flow, click edit for the
Map to Create_Invoiceicon.The mapper appears.
-
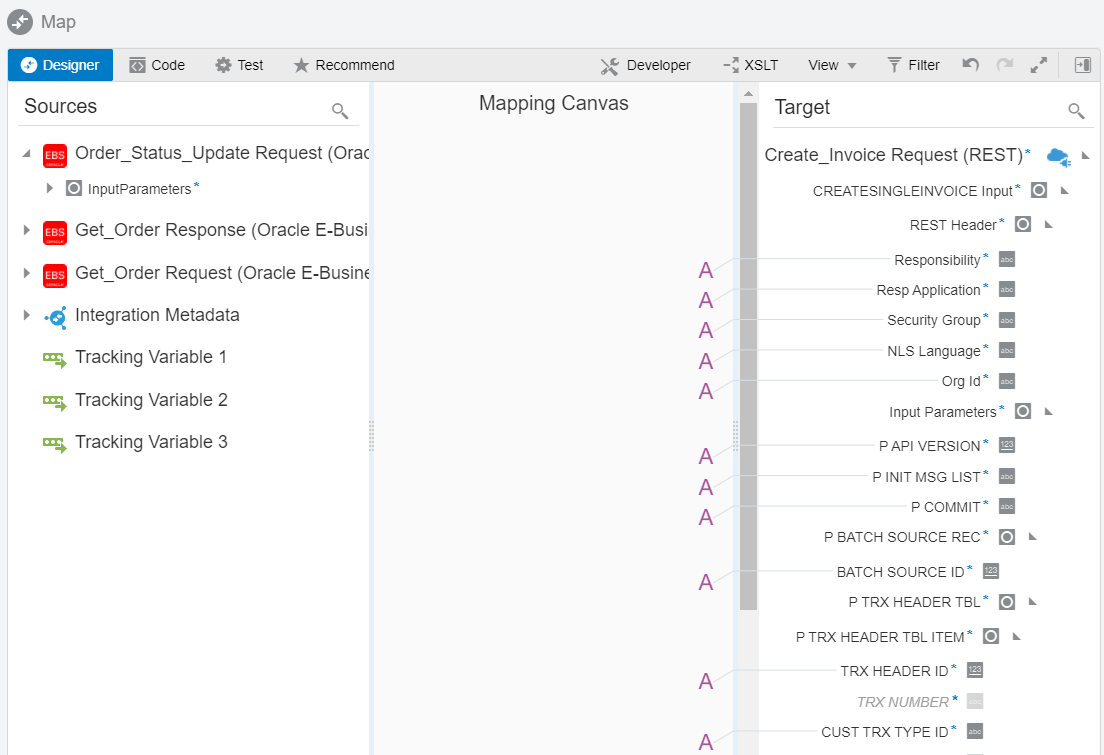
Assign constant values to the target elements.
-
In the Target section, expand the Create_Invoice Request (REST) node, then the CREATESINGLEINVOICE Input node, and then the RESTHeader node.
Right-click the Responsibility element and then select Create Target Node from the drop-down menu.
- In the Expression Builder at the bottom of the page, click the "Switch to Developer View" icon and then enter
'RECEIVABLES_VISION_OPERATIONS'for the Responsibility element.A function icon is added to the Mapping Canvas section for the target Responsibility element node.
Similarly, use the same approach to assign appropriate values to the target elements listed in the following table:
Path Element Value Create_Invoice Request (REST)/CREATESINGLEINVOICE Input/RESTHeader RespApplication 'AR' Create_Invoice Request (REST)/CREATESINGLEINVOICE Input/RESTHeader SecurityGroup 'STANDARD' Create_Invoice Request (REST)/CREATESINGLEINVOICE Input/RESTHeader NLSLanguage 'AMERICAN' Create_Invoice Request (REST)/CREATESINGLEINVOICE Input/RESTHeader Org_Id '204' Create_Invoice Request (REST)/CREATESINGLEINVOICE Input/InputParameters P_API_VERSION '1.0' Create_Invoice Request (REST)/CREATESINGLEINVOICE Input/InputParameters P_INIT_MSG_LIST 'T' Create_Invoice Request (REST)/CREATESINGLEINVOICE Input/InputParameters P_COMMIT 'T' Create_Invoice Request (REST)/CREATESINGLEINVOICE Input/InputParameters/P_BATCH_SOURCE_REC BATCH_SOURCE_ID '1188' Create_Invoice Request (REST)/CREATESINGLEINVOICE Input/InputParameters/P_TRX_HEADER_TBL/P_TRX_HEADER_TBL_ITEM TRX_HEADER_ID '101' Create_Invoice Request (REST)/CREATESINGLEINVOICE Input/InputParameters/P_TRX_HEADER_TBL/P_TRX_HEADER_TBL_ITEM CUST_TRX_TYPE_ID '1684' Create_Invoice Request (REST)/CREATESINGLEINVOICE Input/InputParameters/P_TRX_HEADER_TBL/P_TRX_HEADER_TBL_ITEM BILL_TO_CUSTOMER_ID '1290' Create_Invoice Request (REST)/CREATESINGLEINVOICE Input/InputParameters/P_TRX_HEADER_TBL/P_TRX_HEADER_TBL_ITEM SHIP_TO_CUSTOMER_ID '1290' Create_Invoice Request (REST)/CREATESINGLEINVOICE Input/InputParameters/P_TRX_HEADER_TBL/P_TRX_HEADER_TBL_ITEM COMMENTS 'Invoice created via ICS integration for booked Sales Order in Order Management' After you complete this step, the function icons should appear in the Mapping Canvas section for the corresponding target element nodes.

-
-
Add the following mapping for the header:
-
In the Source section, enter "HEADER_ID" in the Search field to locate this parameter.
Select the HEADER_ID element from the X_HEADER_REC node.
-
In the Target section, expand the Create_Invoice Request (REST) node, then the CREATESINGLEINVOICE Input node, then the InputParameters node, then the P_TRX_HEADER_TBL node, and then the P_TRX_HEADER_TBL_ITEM node.
Select the TRX_NUMBER element.
Drag the HEADER_ID element from the Source section to the TRX_NUMBER element in the Target section to map the data.
The mapped source element HEADER_ID and TRX_NUMBER target element are connected in a blue line.

-
-
Use the same approach, as described in the previous step, to add the following sets of mappings for the line items:
Source Path Source Element Target Path Target Element Get_Order Response (Oracle E-Business Suite) /GET_ORDERResponse/OutputParameters/X_LINE_TBL/X_LINE_TBL_ITEM LINE_NUMBER Create_Invoice Request (REST)/CREATESINGLEINVOICE Input/InputParameters/P_TRX_LINES_TBL/P_TRX_LINES_TBL_ITEM LINE_NUMBER Get_Order Response (Oracle E-Business Suite) /GET_ORDERResponse/OutputParameters/X_LINE_TBL/X_LINE_TBL_ITEM ORDERED_ITEM Create_Invoice Request (REST)/CREATESINGLEINVOICE Input/InputParameters/P_TRX_LINES_TBL/P_TRX_LINES_TBL_ITEM DESCRIPTION Get_Order Response (Oracle E-Business Suite) /GET_ORDERResponse/OutputParameters/X_LINE_TBL/X_LINE_TBL_ITEM ORDERED_QUANTITY Create_Invoice Request (REST)/CREATESINGLEINVOICE Input/InputParameters/P_TRX_LINES_TBL/P_TRX_LINES_TBL_ITEM QUANTITY_ORDERED Get_Order Response (Oracle E-Business Suite) /GET_ORDERResponse/OutputParameters/X_LINE_TBL/X_LINE_TBL_ITEM ORDERED_QUANTITY Create_Invoice Request (REST)/CREATESINGLEINVOICE Input/InputParameters/P_TRX_LINES_TBL/P_TRX_LINES_TBL_ITEM QUANTITY_INVOICED Get_Order Response (Oracle E-Business Suite) /GET_ORDERResponse/OutputParameters/X_LINE_TBL/X_LINE_TBL_ITEM UNIT_SELLING_PRICE Create_Invoice Request (REST)/CREATESINGLEINVOICE Input/InputParameters/P_TRX_LINES_TBL/P_TRX_LINES_TBL_ITEM UNIT_SELLING_PRICE -
Assign the following values:
-
In the Target section, expand the Create_Invoice Request (REST) node, then the CREATESINGLEINVOICE Input node, then the InputParameters node, and then the P_TRX_DIST_TBL node.
Right-click the P_TRX_DIST_TBL_ITEM element and select Create Target Node from the drop-down menu.
In the Expression Builder at the bottom of the page, click the "Switch to Developer View" icon and then enter
'<nsmpr1:P_TRX_DIST_ID/>'for the P_TRX_DIST_TBL_ITEM element.A function icon is added to the Mapping Canvas section for the target P_TRX_DIST_TBL_ITEM element node.
-
In the Target section, expand the Create_Invoice Request (REST) node, then the CREATESINGLEINVOICE Input node, then the InputParameters node, and then the P_TRX_SALESCREDITS_TBL node.
Right-click the P_TRX_SALESCREDITS_TBL_ITEM element and select Create Target Node from the drop-down menu.
In the Expression Builder at the bottom of the page, click the "Switch to Developer View" icon and then enter
'<nsmpr1:P_TRX_SALESCREDITS_ID/>'for the P_TRX_SALESCREDITS_TBL_ITEM element.A function icon is added to the Mapping Canvas section for the target P_TRX_SALESCREDITS_TBL_ITEM element node.
Click Validate or Close (which also performs validation) to exit the mapper, then click Save to save your changes when prompted.
-

