Add the Oracle E-Business Suite Adapter (Trigger) and the REST Adapter (Invoke) to the Integration
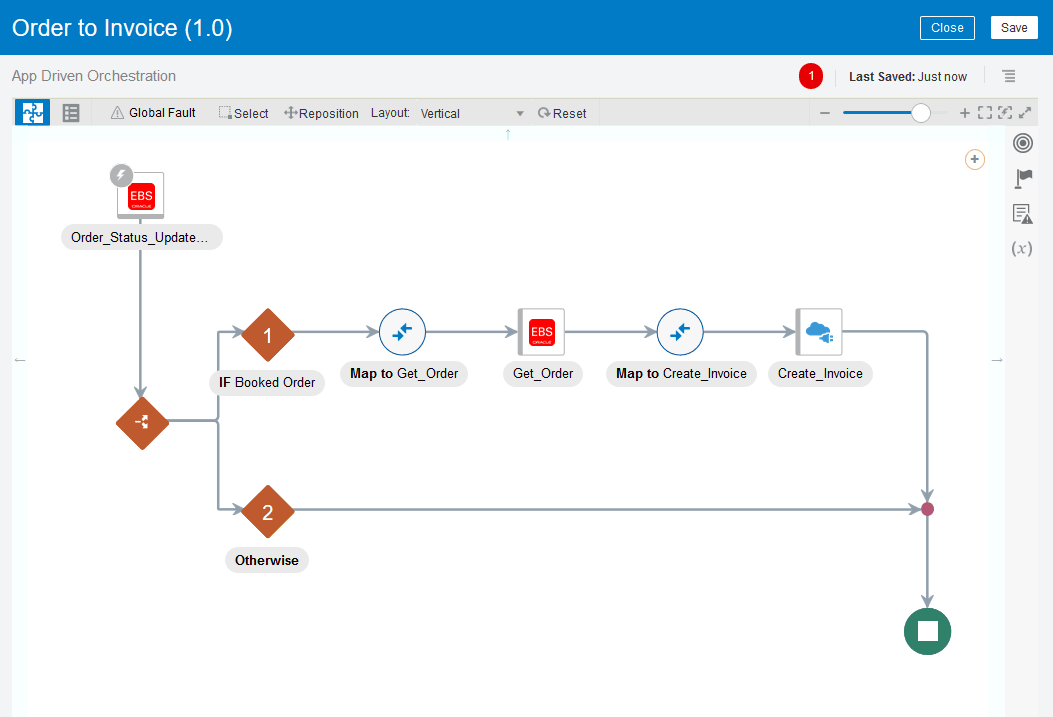
In this example, the orchestration flow diagram created for this integration includes the following activities:
-
The Oracle E-Business Suite Adapter as a trigger activity called "Order_Status_Update" for the Oracle E-Business Suite Order Management instance
This trigger activity uses the business event
oracle.apps.ont.oip.statuschange.updatethrough the Oracle E-Business Suite Adapter. When the status of a sales order is updated, Oracle Order Management raises this event.See: Add the Oracle E-Business Suite Adapter as a Trigger with a Business Event.
-
A switch added with two branches
-
The defined branch called "Booked Order" is the major orchestration flow for the integration.
-
The Otherwise branch is not used in this example.
-
-
Mappings defined for "Get_Order"
It allows you to map and pass the order related parameters to the "Get_Order" activity to invoke the GET_ORDER REST Service.
See: Create Mappings.
-
The Oracle E-Business Suite Adapter as an invoke activity called "Get_Order" for the Oracle E-Business Suite Order Management instance.
This invoke activity uses the GET_ORDER operation of the Process Order (OE_ORDER_PUB) REST service when adding the Oracle E-Business Suite Adapter as an invoke. This service retrieves the sales order information.
See: Add the Oracle E-Business Suite Adapter as an Invoke for the "Get_Order" Activity.
-
Mappings defined for "Create_Invoice"
This activity assigns the sales order related elements from the "Get_Order" activity to the Invoice related elements in the "Create_Invoice" activity.
See: Create Mappings.
-
The REST Adapter as an invoke activity called "Create_Invoice" for the Oracle E-Business Suite Accounts Receivables instance
This activity configures a request payload using the XML schema file type and then creates an invoice in Oracle Accounts Receivables through the invocation of the CREATE_SINGLE_INVOICE REST service.
See: Add the REST Adapter as an Invoke for the "Receivables" Activity.
Add the Oracle E-Business Suite Adapter as a Trigger with a Business Event
Perform the following steps to add the first activity called "Order_Status_Update" for the Oracle E-Business Suite Order Management connection:
-
In the "Order to Invoice" integration canvas, drag and drop the Oracle E-Business Suite connection called "Order Management" from the Triggers section in the upper right corner to the large + section within the circle in the integration canvas.
The Configure Oracle E-Business Suite Adapter Endpoint wizard appears.
-
Enter the following information In the Basic Info page:
-
What do you want to call your endpoint? - Enter "Order_Status_Update" as the endpoint name.
-
What does this endpoint do? - Enter the description of this integration endpoint.
-
What do you want to configure the endpoint for? - Select Business Event.
Click Next to proceed with the rest of the configuration.
-
-
In the Business Events page, specify the following information for your connection:
-
Product Family: Select "Order Management Suite" from the drop-down list.
-
Product: Select "Order Management" from the drop-down list.
-
Business Event: Select "Event for OIP status update notification" from the populated list.
After you select an event name, the corresponding event information, including internal name (
oracle.apps.ont.oip.statuschange.update), event status “Enabled”, and description, is automatically populated in this page.
Click Next.
-
-
The Summary page appears with the selected event information.
The Oracle E-Business Suite Adapter Source Endpoint configuration is successfully created with the selected event.
Click Done.
The "Order_Status_Update" endpoint now appears as a trigger in the integration flow.
Add a Switch with Two Branch Rules
Perform the following steps to add a Switch:
-
Drag and drop the "Switch" action from the Actions section on the right to the integration right after the Order_Status_Update activity.
This action adds two rules allowing you to define routing expression branches for your integration.
-
Click edit on the first rule. The Condition Builder page appears.
-
In the Condition Builder, enter the following information to create the condition:
All of Name = 'STATUS_CODE'andValue = 'BOOKED':-
Enter "Booked Order" as the Expression Name.
-
In Source section, expand the BusinessEvent_Input node, then the InputParameters node, then the BusinessEvent node, then the ParameterList node, and then the Parameter node.
-
Drag and drop the Name element to the right top under the New Condition section.
-
Select
=from the drop-down list. -
Enter
'STATUS_CODE'in the text box as the condition value.
Click the Add Condition (+) icon.
-
-
Drag and drop the Value element to the right top under the New Condition section.
-
Select
=from the drop-down list. -
Enter
'BOOKED'in the text box as the condition value.
Click the Add Condition (+) icon.
-
-
-
In the Match field, select "All of" from the list.
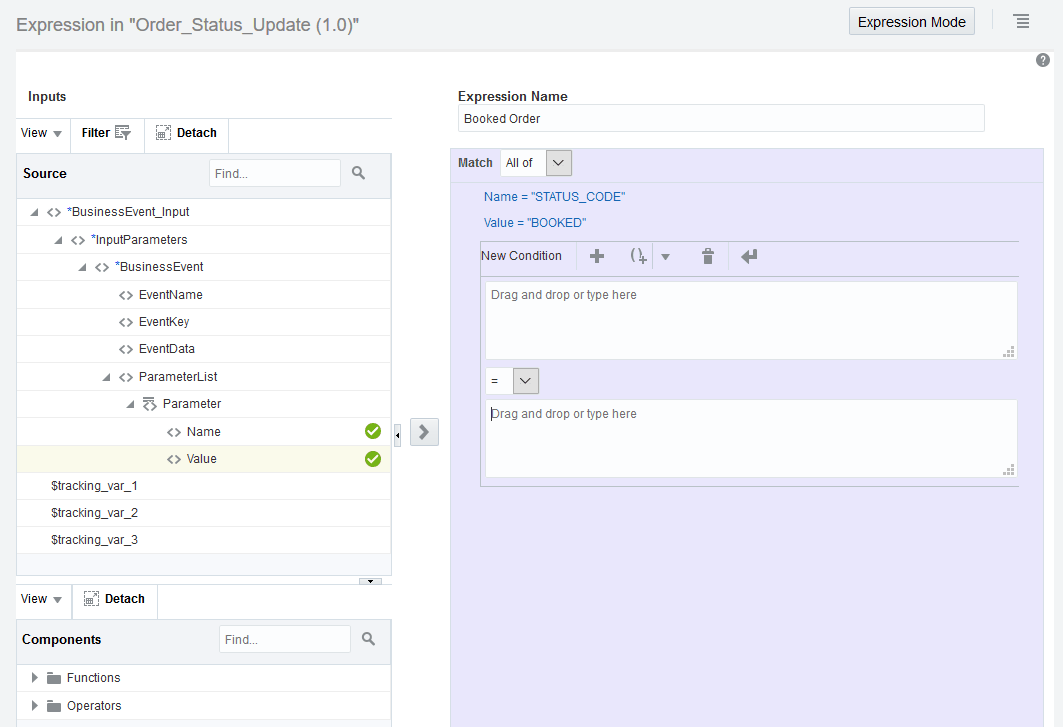
Description of the illustration order_status_expression.gif
Save your work. Click Close to return to the integration.
-
Add the Oracle E-Business Suite Adapter as an Invoke for the "Get_Order" Activity
Perform the following steps to add the Oracle E-Business Suite Adapter as an invoke connection:
-
Drag and drop the Oracle E-Business Suite connection "Order Management" from the Invokes section on the right to the integration right after the Booked Order rule.
The Configure Oracle E-Business Suite Adapter Endpoint wizard appears.
-
In the Basic Info page, enter the following information:
-
What do you want to call your endpoint? - Enter "Get_Order" as the endpoint name.
-
What does this endpoint do? - Enter the description of this integration endpoint, such as "Get an order in Oracle E-Business Suite".
Click Next.
-
-
In the Web Services page, specify the following information for your target connection:
-
Product Family: Select "Order Management Suite" from the drop-down list.
-
Product: Select "Order Management".
-
Interface Type: Select "PL/SQL".
-
API: Select "Process Order API" from the populated list for this example.
The corresponding API internal name (OE_ORDER_PUB) and description are automatically populated.
Click Next.
-
-
In the Operations page, select a desired method name contained in the selected API (OE_ORDER_PUB). For example, select "GET_ORDER". The corresponding service status value "Ready to Use" is displayed in this page, along with the description information.
Note:
The Service Status of the selected method GET_ORDER should be "Ready to Use".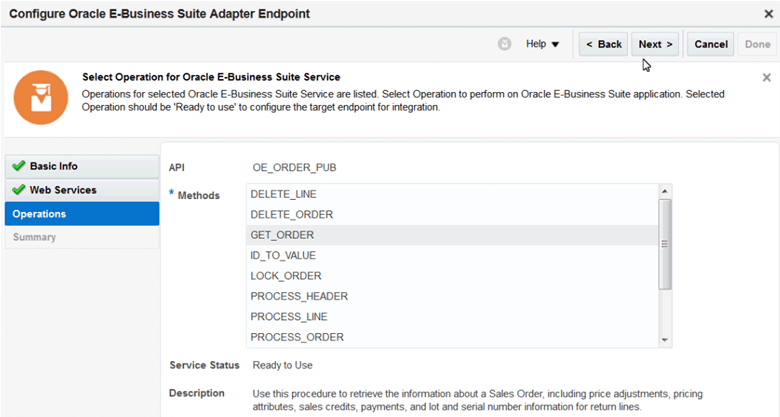
Description of the illustration event_get_order.gifClick Next.
-
The Summary page displays the selected API information. This includes the selected product family name (Order Management Suite), product name (Order Management), web service name (OE_ORDER_PUB), integration pattern (Synchronous), operation name (GET_ORDER), and the operation status (Ready to Use).
Click Done.
The "Get_Order" activity for Order Management now appears as part of the integration flow, along with the "Get_Order" map icon where you can define the mapping later. See: Create Mappings.
Add the REST Adapter as an Invoke for the "Receivables" Activity
Perform the following steps to add the REST Adapter as an invoke connection:
-
Drag and drop the Oracle E-Business Suite connection "Receivables" from the INVOKES toolbar on the left to the integration, after the Get_Order activity in the Booked Order route.
The Configure Oracle REST Endpoint wizard appears. Enter the following information in the Basic Info page:
-
What do you want to call your endpoint? - Enter the name of this endpoint, such as "Create_Invoice".
-
What does this endpoint do? - Enter the usage of this endpoint, such as "Provide REST endpoint with input payload for invoice creation".
-
Select to configure multiple resources or verbs (maximum 11)? - Leave this field unchecked.
Click Next.
-
- In the Resource Configuration page, enter the following information:
-
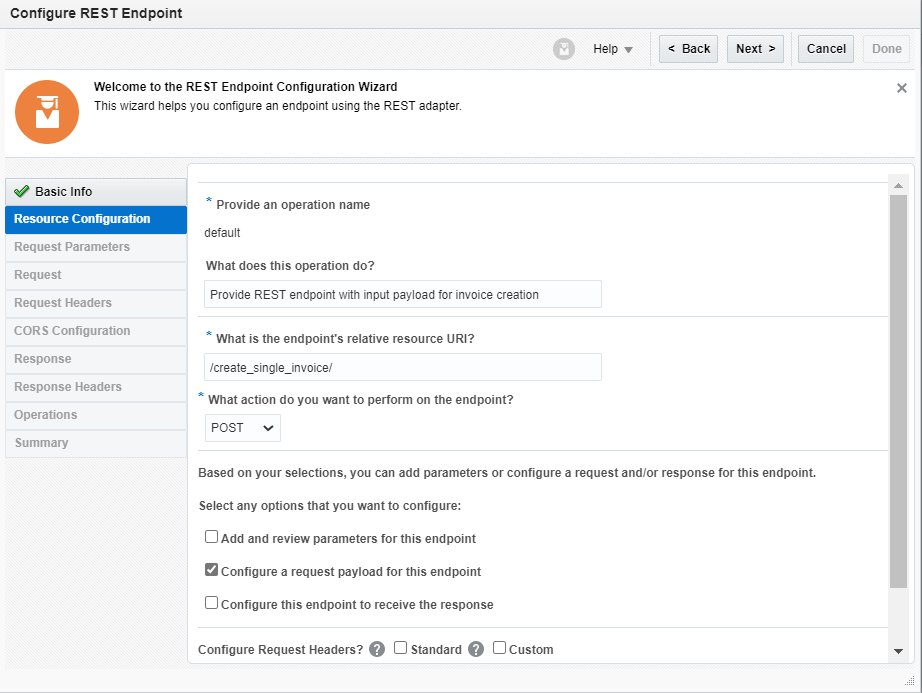
What does this operation do? - Enter the usage of this operation, such as "Provide REST endpoint with input payload for invoice creation".
-
What is the endpoint's relative resource URI? - Enter "
/create_single_invoice/". -
What action do you want to perform on the endpoint? - Select "POST" from the drop-down list.
-
Configure a request payload for this endpoint - Select this check box indicating that a request payload is required in this activity.
-
-
In the Request page, perform the following tasks:
-
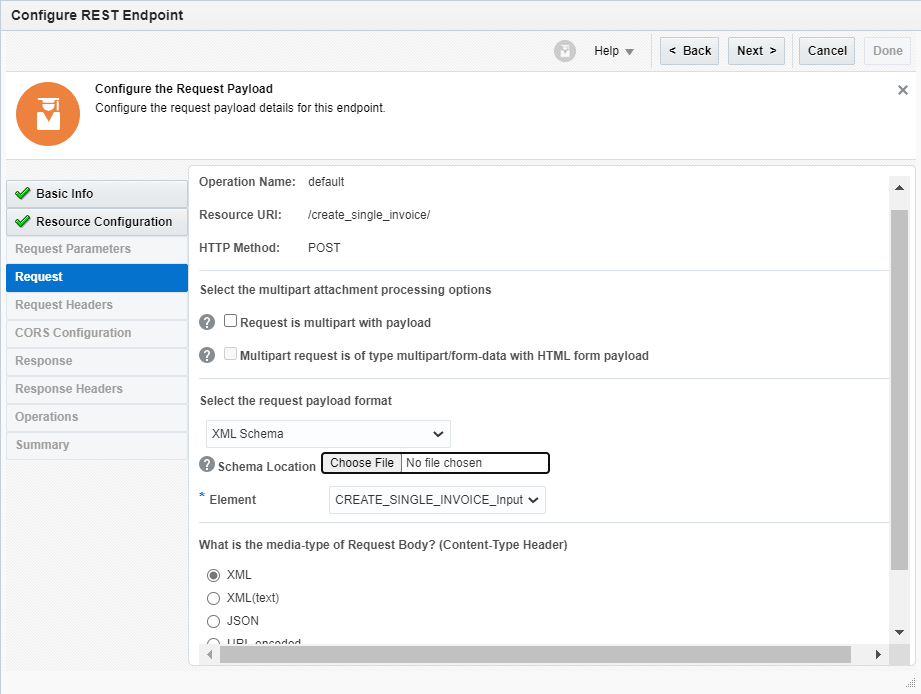
In the "Select the request payload file" section, select the XML schema radio button.
Please note that the request payload file type can be either XML schema or JSON format.
-
Browse and select the sample XSD for the Create Invoice REST service.
For the sample XSD information, see Sample XSD for the Oracle E-Business Suite Adapter as a Trigger with a Business Event Example.
-
In the Element field, select "CREATE_SINGLE_INVOICE_Input" from the drop-down list.
-
In the "Select the type of payload with which you want the endpoint to receive" section, select the XML button as the payload type.
In this example, we do not need to configure this endpoint to receive Response.
-
-
Click Next. This displays the Summary page with the following REST service information that you specified earlier. Click Done.
The
Create_Invoiceactivity appears in the integration flow, listed as the last activity in the Booked Order rule.Similar to the "Get_Order" activity, the "Create_Invoice" map icon also appears (along with the
Create_Invoiceactivity) where you can define the mapping later. See: Create MappingsSave the integration.
At the end of this step, the integration flow contains the activities added in this section.
